Ethernet not working but Wi-Fi is, the first thing you need to do, to get the Ethernet connection working is to disable Wi-Fi. Wondering why we are asking that.
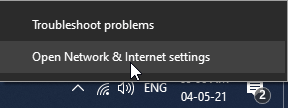
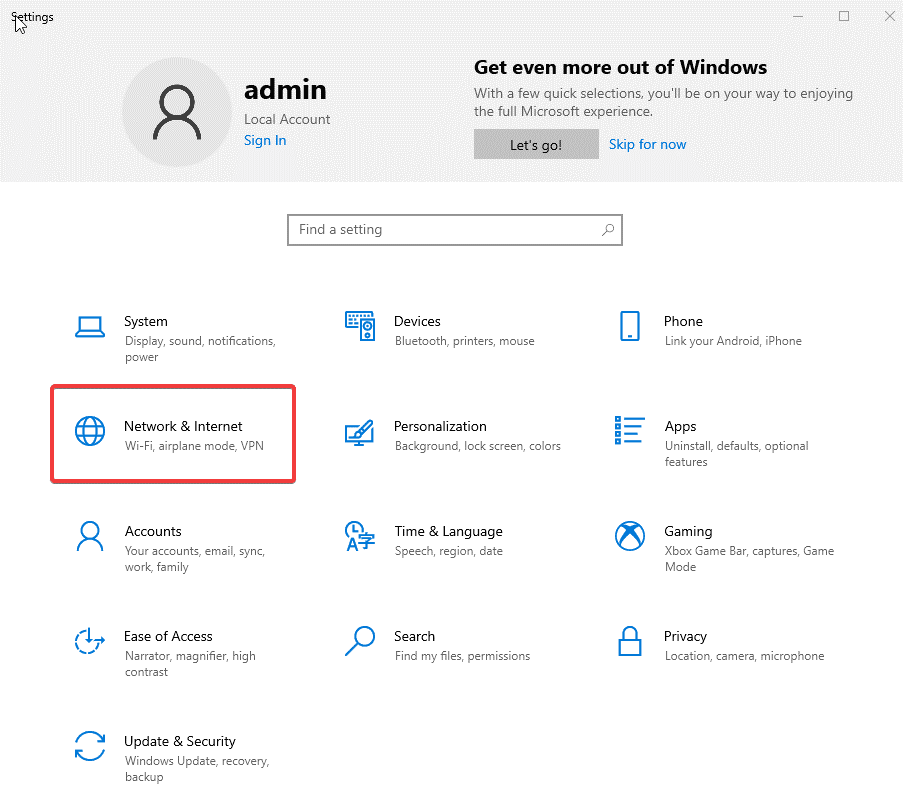
The answer is simple, when Windows has access to both Wi-Fi and Ethernet, the priority is given to Ethernet, still, the Wi-Fi icon is displayed. To troubleshoot this, right-click the Wi-Fi > Network and Internet Settings > Wi-Fi tab > toggle off.
This should help resolve the Ethernet connection not working. However, if this doesn’t help no problem, we have other ways to get it working. To learn all about then and fix Ethernet cable connected but no internet read further.
Also Read: Fix: WiFi Connected But No Internet Issue
14 Best Ways to Solve Ethernet Not Working – Windows
List of Contents
- 1. Enable Ethernet
- 2. Try connecting Ethernet cable into a different port
- 3. Update network driver
- 4. Temporarily disable Antivirus or Firewall
- 5. Restart PC
- 6. Restart system
- 7. Reset Network Settings
- 8. Reconfigure network connection.
- 9. Run Windows Troubleshooter
- 10. Disable Auto Tuning feature
- 11. Turn off Large Send Offload (LSO)
- 12. Modify Power Management Settings for Ethernet
- 13. Check for malware infections
- 14. Use Google DNS
1. Enable Ethernet
The most common reason for Ethernet not working but Wi-Fi is disabled Ethernet. To fix this issue, follow the steps below:
1. Press Windows + X > select Network Connections
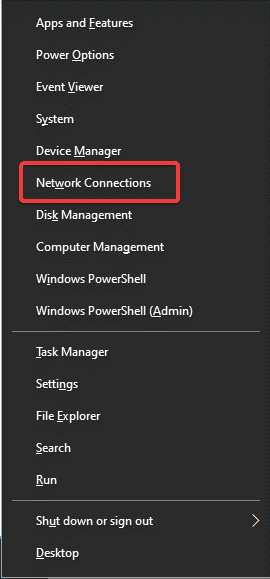
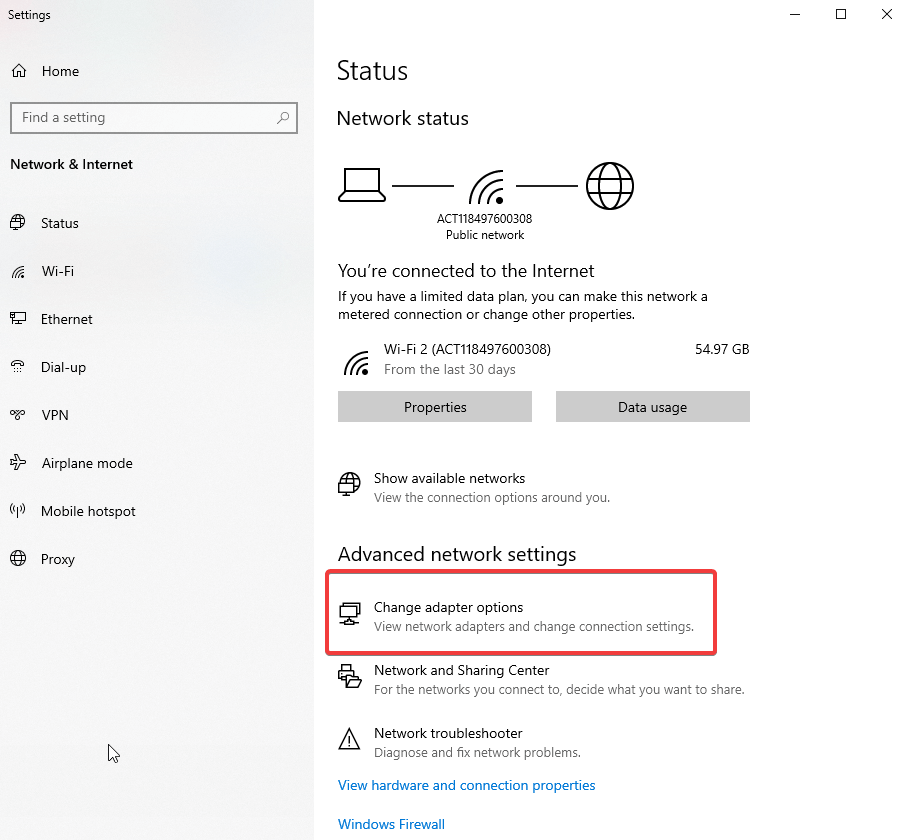
2. Click Change adapter options
3. Look for the Ethernet option in the new window that opens
4. Right-click > Enable
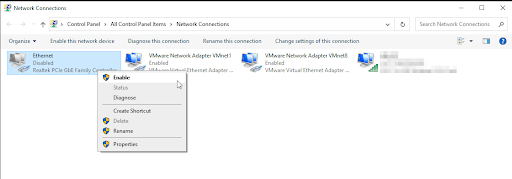
5. Now try to access the internet using Ethernet.
In case this doesn’t help press Windows + R to open the Run window. Type devmgmt.msc > ok. Double click Network adapters > you will now see the name of the Ethernet card (if it has a computer icon next to it, this means it is disabled).
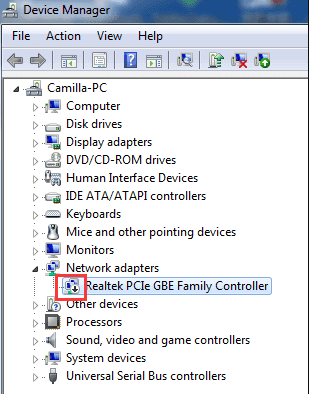
Right-click it > Enable

Now try to connect this should help. In case this doesn’t work move to the next step.
2. Try connecting Ethernet cable into a different port
After enabling Ethernet, if you see a Network cable unplugged message, it means the network card is unable to detect the cable.
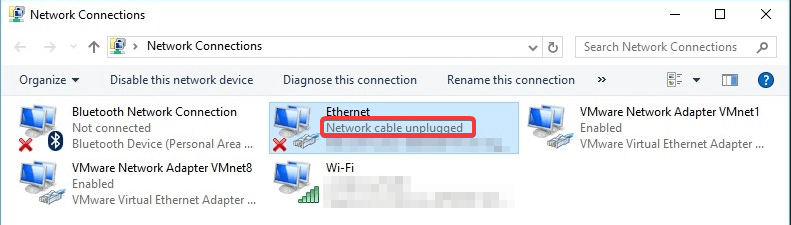
To fix this, detach and reconnect the cable to Ethernet and PC. If this doesn’t help, try connecting the Ethernet cable to a different port. Alternatively, you can also try using a different cable. Doing so will help fix the Ethernet port not working.
3. Update network driver
If your network card driver is outdated or corrupt chances of facing Ethernet cable connected but no internet increase. Therefore, to fix this issue, updating the driver is recommended. You can do it both manually and automatically.
The former process is time-consuming, and it requires patience. Also, the risk of downloading and installing an incorrect driver arises. Hence, we recommend using the best driver updating tool, to update the network card driver. For this, you can try using Smart Driver Care, a trusted and secure way to find outdated drivers and update them. Compatible with Windows this driver updater automatically detects problematic drivers and recommends the right driver updates. Moreover, to use it you don’t need to collect information about the operating system, device model number, motherboard details, etc.
Here’s how to use Smart Driver Care to update Network Driver
Click Here to Download Smart Driver Care

Read Full Review – Smart Driver Care
1. Download and install Smart Driver Care
2. Launch the tool and click Scan Now
3. Wait for the scan to finish
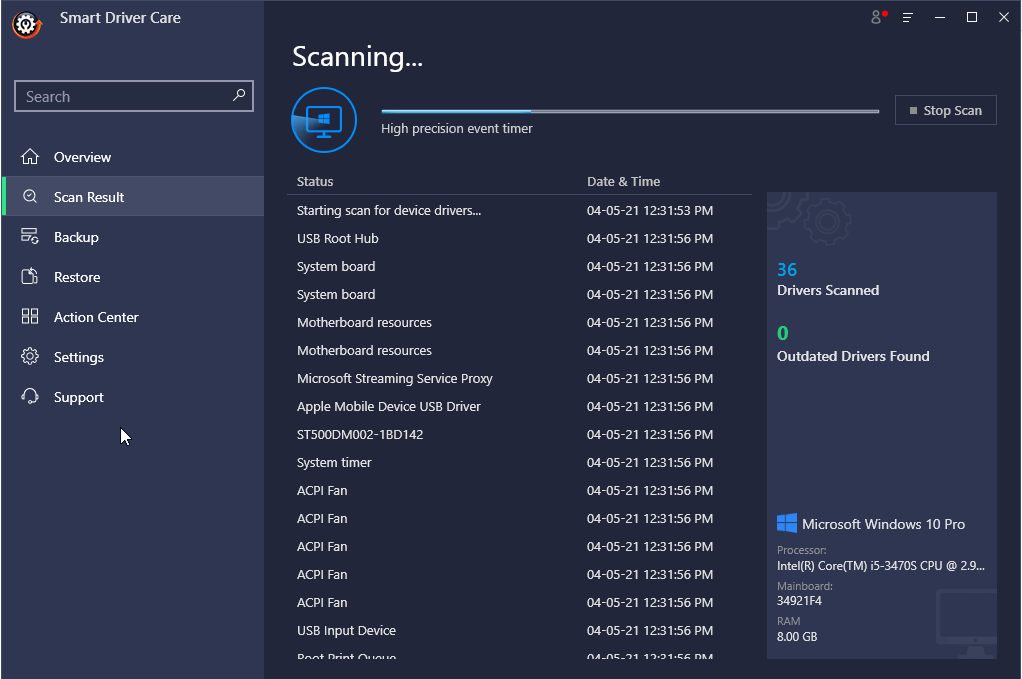
4. Once you have the list of outdated drivers, click Update driver next to Network adapter driver.
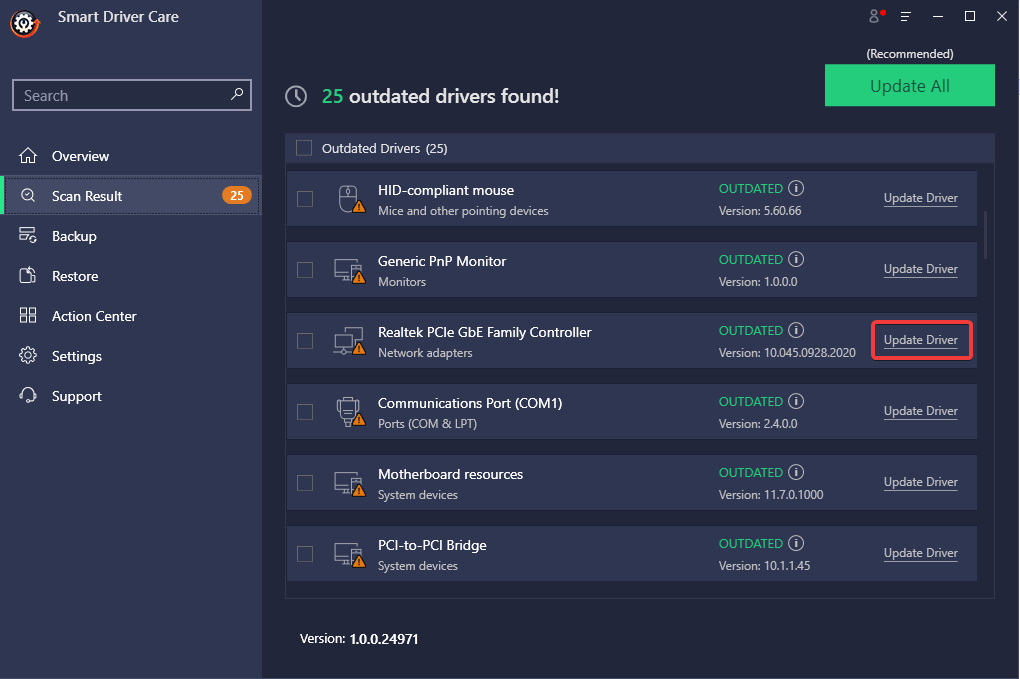
Note: Using the Pro version of Smart Driver Care, you can update all outdated drivers at once by clicking Update All. However, if you are using the trial version, you will have to update each driver individually, one by one.
5. Once the driver is updated, restart the system to apply changes.
6. Now try to access the network using Ethernet, the problem of Ethernet connected but no internet should be resolved.
However, if you want to update drivers manually, read our previous post.
Tip: If the Ethernet controller shows a yellow exclamation or a question mark, you will need to uninstall and reinstall the driver. To do so, right-click uninstall driver > restart the system. Windows will automatically install the network adapter driver.
Also Read: How To Update Keyboard Driver For Windows 10
4. Temporarily disable Antivirus or Firewall
Tip: Once you disable antivirus and firewall your system will no longer be protected. Therefore, be extra cautious about the sites you visit and files you download, when the antivirus and firewall are disabled.
The security tools installed on your machine along with Firewall have been found interfering with network connectivity. To resolve it, we suggest temporarily disabling Antivirus or Firewall.
To disable Firewall, follow the steps below:
1. In the Windows search bar, type Windows Defender Firewall
2. Click Turn Windows Defender Firewall on or off
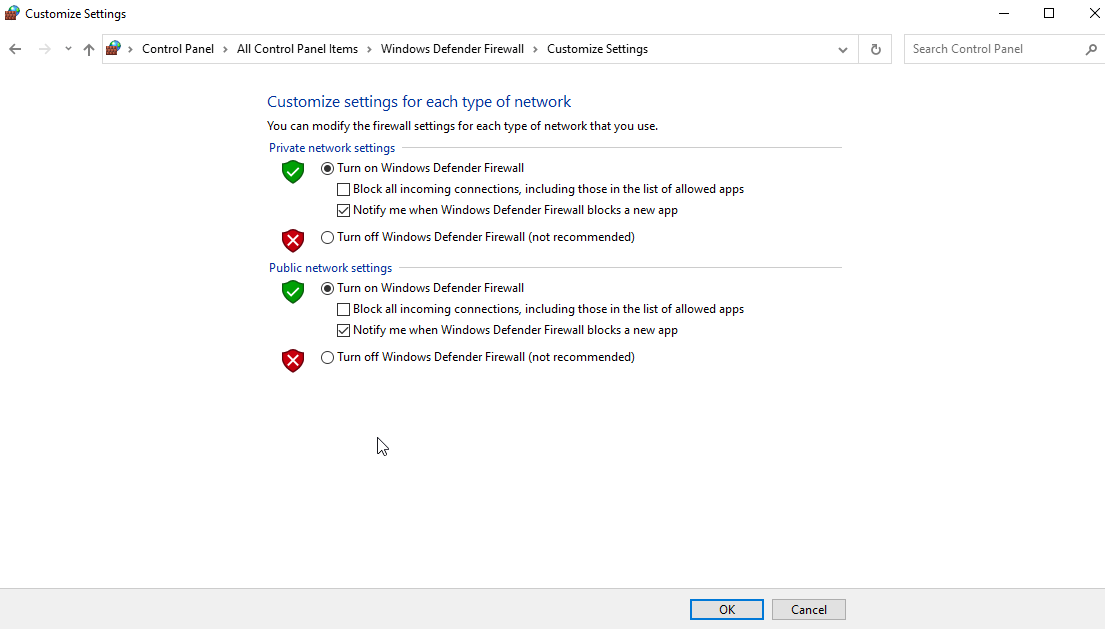
3. Check both the options that read Turn off Windows Defender Firewall.
4. Now check your system Ethernet not working problem should not be fixed.
Read More: How to disable Windows Defender?
5. Restart PC
Though an old trick, it does work. So far, if none of the steps have helped in fixing the Ethernet cable connected but no internet try restarting the PC.
1. Turn off the system
2. Unplug it from the power socket. If it is a laptop, remove the battery
3. Press the power button for 30 seconds > leave it
4. Connect the system back to power. (reattach the battery)
5. Reboot the system.
This should help fix the internet connectivity problem.
6. Flush DNS and Reset TCP/IP
7. In the Windows search bar type Command Prompt
8. Select it > Run as administrator from the right pane
9. Type following command one by one. This means you need to press Enter after entering each command:
ipconfig /release
ipconfig /flushdns
ipconfig /renew
10. Let the command run.
11. Again, open Command Prompt as administrator and type the following commands, one after the other by pressing Enter key:
ipconfig /flushdns
nbtstat –r
netsh int ip reset
netsh winsock reset
netsh winsock reset catalog
netsh int ipv4 reset reset.log
6. Restart system
Restart to apply changes. This should fix Ethernet connected but no internet problem.
7. Reset Network Settings
Sometimes when there’s an issue with the cache, then also you might face Ethernet not working but Wi-Fi is. To fix this problem reset network settings by following the steps below:
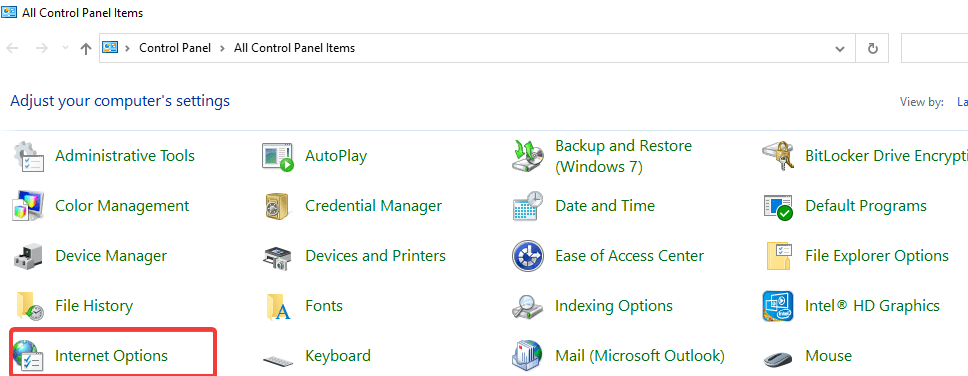
1. Press Windows + R to open the Run window
2. Type control > ok
3. Change the View by to Large icons
4. Select Internet Options
5. Hit Advanced tab > Restore Advanced Settings.
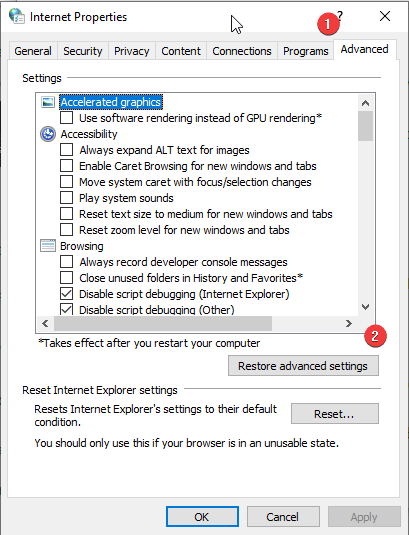
6. Apply > Ok. Exit the Internet Properties window
7. Press Windows + I to open Windows Settings.
8. Click Network & Internet
9. Select Network reset
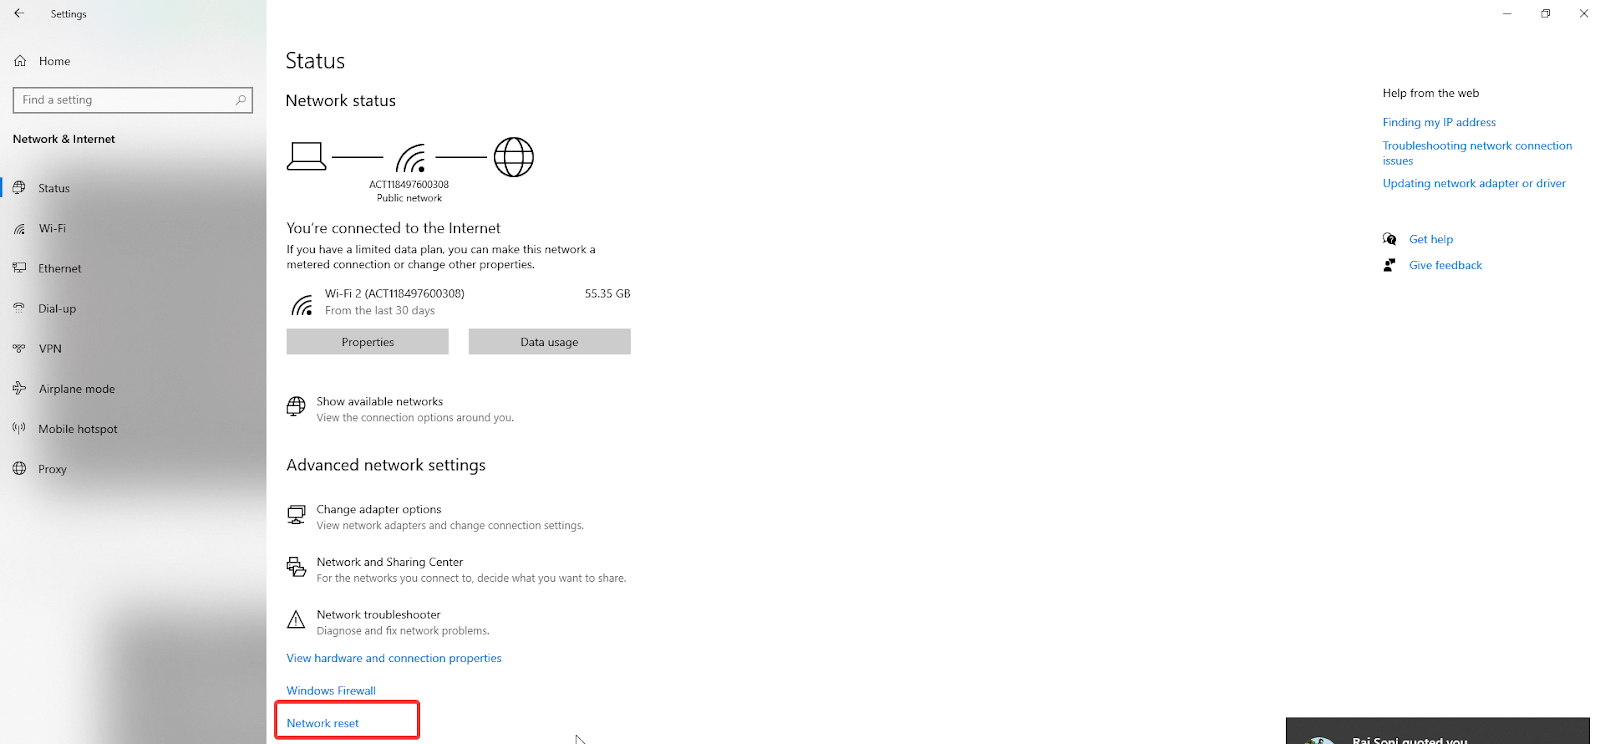
10. Confirm the action and wait for the process to finish.
11. Restart the system, the Ethernet not working problem should be fixed.
8. Reconfigure network connection.
When network settings are misconfigured, Ethernet might not work properly. To fix this reconfiguring network settings is recommended. To do so, follow the steps below:
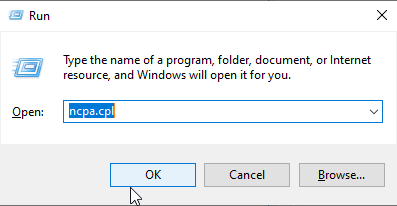
1. Press Windows + R to open the Run window
2. Type ncpa.cpl to open network configuration panel > Ok
3. Right-click the Ethernet adapter that you are using > Properties.
4. Double click Internet Protocol Version 4 (TCP /IPv4)
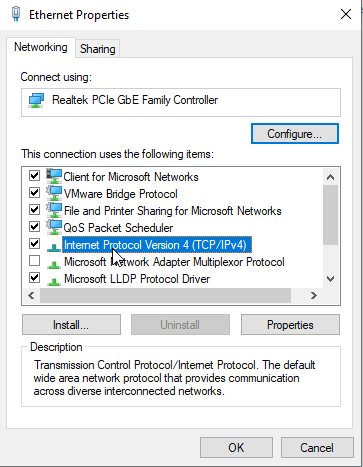
5. In the consecutive window that opens select the radio button next to “Obtain an IP Address Automatically and Obtain DNS Server Automatically.
6. Exit the window. Check the PC to see if the Ethernet connected but no internet issue is resolved or not.
Note: If you are using Internet Protocol Version 6 (TCP/IPv6), you will need to make the above changes to it.
9. Run Windows Troubleshooter
To fix such issues Windows offer an in-built troubleshooter, using it you can fix the issue with Ethernet connectivity.
1. Press Windows + I to open Windows settings
2. Select Update & Security

3. Click Troubleshoot from the left pane > Additional troubleshooters

4. In the consecutive window that opens look for Network Adapter.
5. Click it > Run the troubleshooter
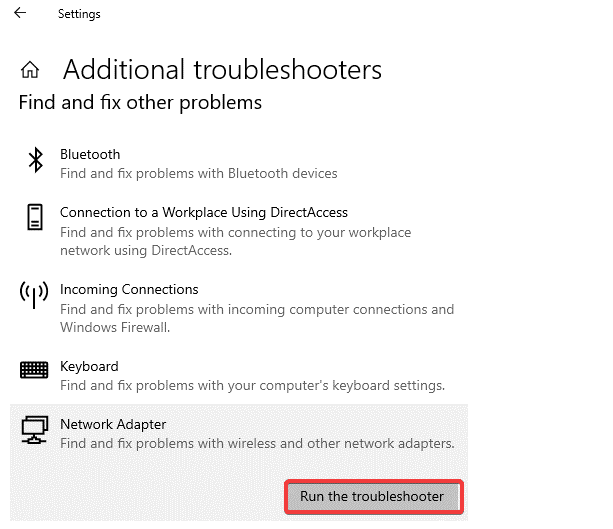
6. Your Ethernet connection should now be working. If not restart the system and then check Ethernet connected but no internet, the problem should now be fixed.
10. Disable Auto Tuning feature
If the Ethernet problem persists, try disabling the auto-tuning feature.
1. In the Windows search bar, type Command Prompt
2. Select the best result > right-click > Run as administrator
3. Type: netsh interface tcp show global
4. If you see Normal written next to Receive Windows Auto-Tuning, disable it.
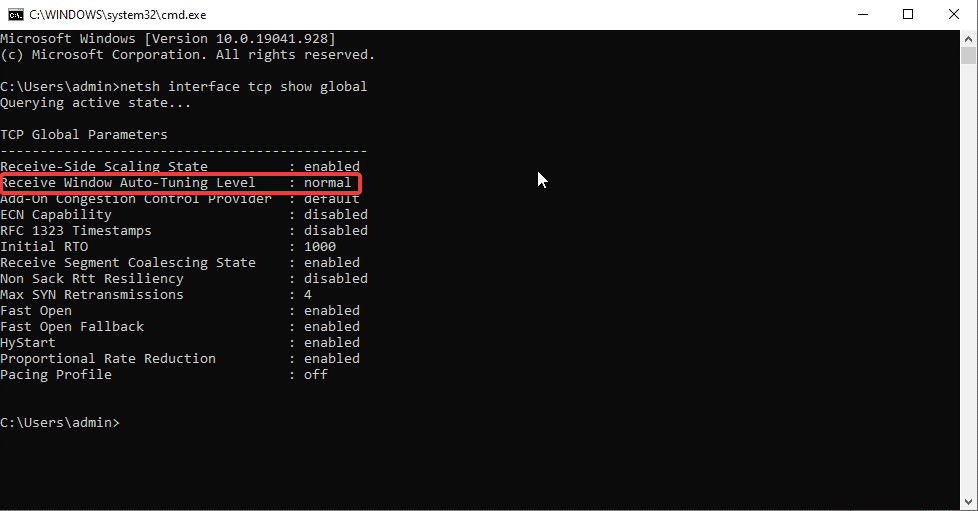
5. To disable type: netsh int tcp set global autotuninglevel=disabled
6. Once done, check whether the Ethernet not working issue should be fixed.
11. Turn off Large Send Offload (LSO)
This is one of the latest features of Windows 10 and is designed to boost network performance. Yet sometimes, it interferes with Ethernet network connectivity. To disable it, follow the steps below:
1. Press Windows + R to open Run window
2. Type msc > ok
3. Double click Network Adapters to unhide the network adapter you are using.
4. Right-click > Properties > Advanced tab > choose Large Send Offload V2 (IPv4) > Disabled
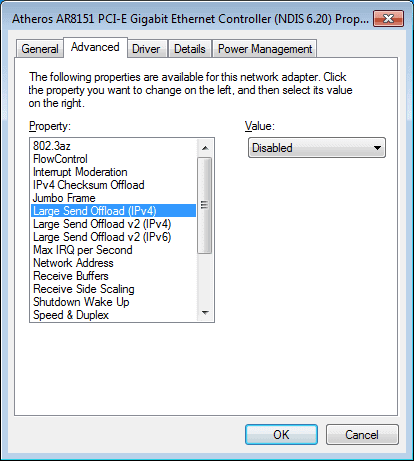
5. Do the same for Large Send Offload V2 (IPv6)
Now check the Ethernet not working problem should be resolved.
12. Modify Power Management Settings for Ethernet
1. Press Windows + R to open the Run window
2. Type devmgmt.msc
3. Double click Network adapters > right-click the Ethernet you are using > Properties > Power Management tab > uncheck Allow the computer to turn off this device to save power.

4. Click Ok and restart the PC. This should help resolve the Ethernet connection not working.
13. Check for malware infections
Viruses, malware, and other nasty threats can block network connections causing Ethernet not working issue. To fix it, we suggest scanning the system using an antivirus tool like Systweak Antivirus.

This security tool is low on system resources and it offers real-time protection, malware protection, exploit protection. Furthermore, it scans startup items for malware infections. To install the tool, click the download button.
Click Here to Download Systweak Antivirus
14. Use Google DNS
If nothing has worked so far, let us try this last fix and use Google DNS.
1. Press Windows + R to open Run window
2. Type control > Ok
3. Network and Sharing > Change adapter settings > right-click your Wi-Fi connection > Properties > Internet Protocol Version 4 (TCP/IPv4).
4. Select Use the following DNS server addresses and enter the following:
Preferred DNS server: 8.8.8.8
Alternate DNS server: 8.8.4.4
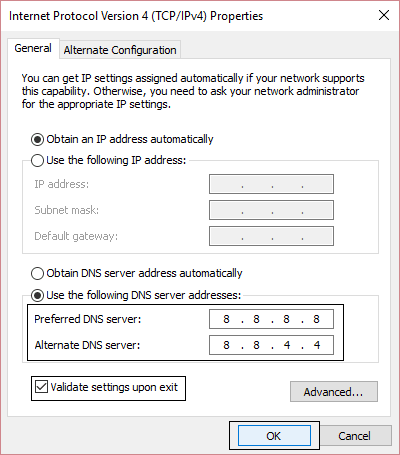
5. Close the window, and the Ethernet not working problem should be fixed.
Fix – Ethernet cable connected but no internet:
We hope after following the fixes as explained above, the Ethernet connection is now restored and you can use it. In case you still face any problem ensure the network you are using is properly set up and check the network cable. Share your feedback and suggestions in the comments section.
Next Readings:
- Does VPN Slow down the Internet? Speed Up VPN Connection
- MacBook Overheating? Try These Tricks
- How to Increase Upload Speed on Windows 10


Penny Hajduk
Thank you for your help. Large Send Offload IPV4 was the culprit. I am very grateful.