Since 2012, we have seen a lot of changes in how to record screens on the iPhone and iPad. The most famous option to record your video on your screen was the usage of the stimulator device on your Mac device.
But, now Apple has made iPhone and iPad screen recording easier. Before starting with the main content, there is a question about why do we need to record and capture screens on the iPhone? The answer is that there are multiple uses of recording a screen like it increases the conversion rate in order to receive more downloads on professional accounts.
Through this blog, I have jot-down steps and methods on how to record your screen on iPhone and iPad. So, let’s get started.
Also Read: How To Screen Record With Sound On Mac & Windows
Best Steps to Record Screen On iPhone or iPad
The below-mentioned steps are the easiest way to record screens directly from iPhone or iPad. The process was introduced in the launch of iOS 11.
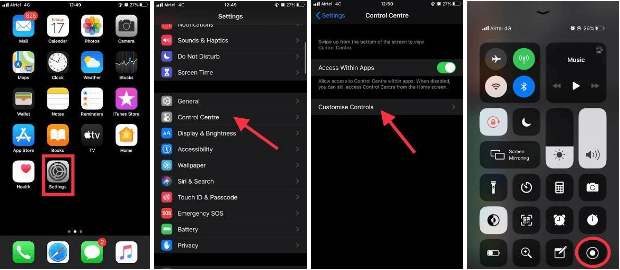
- Go to settings.
- Go to Control Center
- Go to Customize Controls
- Tap on the (+) button available next to Screen Recording.
- Open the control center and tap on the recording button.
- On this step, there will be a countdown of 3 seconds after that recording will be started.
- To stop recording tap on the red status bar on the top of the screen.
Refer to the below screenshots for easy recording.
There are multiple options available which allow to define the video or audio in a format, the frame rate, whether to show taps or not, portrait mode or landscape mode location.
Also Read: How To Screen Record Zoom Meetings With Audio
Best Apps for Record Your iPhone Screen in 2021
1. QuickTime Player

QuickTime player was introduced with OS X Yosemite and iOS 8. In order to record the screen of iPhone or iPad, please ensure you have one of the below-mentioned devices.
- iOS 8 or later device.
- OS X Yosemite Mac or later
- Lightning cable
Below-mentioned is the steps to record the screen through QuickTime Player.
- Through the help of a lightning cable, connect your iPhone or iPad to the Mac device.
- Open QuickTime Player.
- Tap on the file and select “New Movie Recording”
- A new window will appear. Click on the little arrow drop down and select your device.
- Select the mic from the recording device, in case you want sound or music effects.
- Tap on the record button and start recording the screen.
- After finishing the record, tap on the stop button and save the recorded video.
Cmd+T- to trim your video
To check and download the QuickTime player
Also Read:10 Best Screen Recorder for Windows PC [2021]
2. Screenflow
ScreenFlow is similar to QuickTime. The additional feature in ScreenFlow is that you can edit the video with this software after recording.
Accordingly, ScreenFlow is better than QuickTime to screen record iPhone or iPad. If you have to opt between ScreenFlow and QuickTime, our suggestion is to go for ScreenFlow.
Below-mentioned are the steps to screen record your iPhone or iPad.
- Plugin your devices through a lightning cable.
- Open ScreenFlow
- After automatic detection, tap on the record the screen.
Before recording, make sure that the “Record Screen from box” is checked and you have selected the right device. Hit the record button and start recording the screen and edit the video.
Easy and Handy!
To read more about ScreenFlow
3. El Gato

El Gato is the software mostly used by gamers. To set up El Gato refer to the below-mentioned points.
- HDMI Cable
- El Gato game capture device
- iOS device
- HDMI adapter
To record the screen on iPhone, connect all the devices and start recording like QuickTime and ScreenFlow.
To read more about El Gato
To Download El Gato
That’s how we can record and capture screens on iPhone and iPad. You can choose one of the three methods described in this blog. Also, comment down and let us know which method you are going to use to screen record iPhone.
For more such content, follow Tweak Library on all social media platforms.
Thanks for reading.


Leave a Reply