MacBooks are generally durable and stable systems as they are less prone to malware or virus attacks. However, there are several reasons due to which you might want to reset your MacBook. But the big question is how to reset MacBook Air to factory settings?
Most people reset MacBook Air for better overall performance however a few reset their MacBook Air to trade it off or erase data. Whatever the reason may be, here in this article we will explain how to reset MacBook Air to factory settings.
Also Read: Best Mac Cleaner Software For Mac Optimization
Tip: If you do not want to Reset MacBook Air, Follow This!
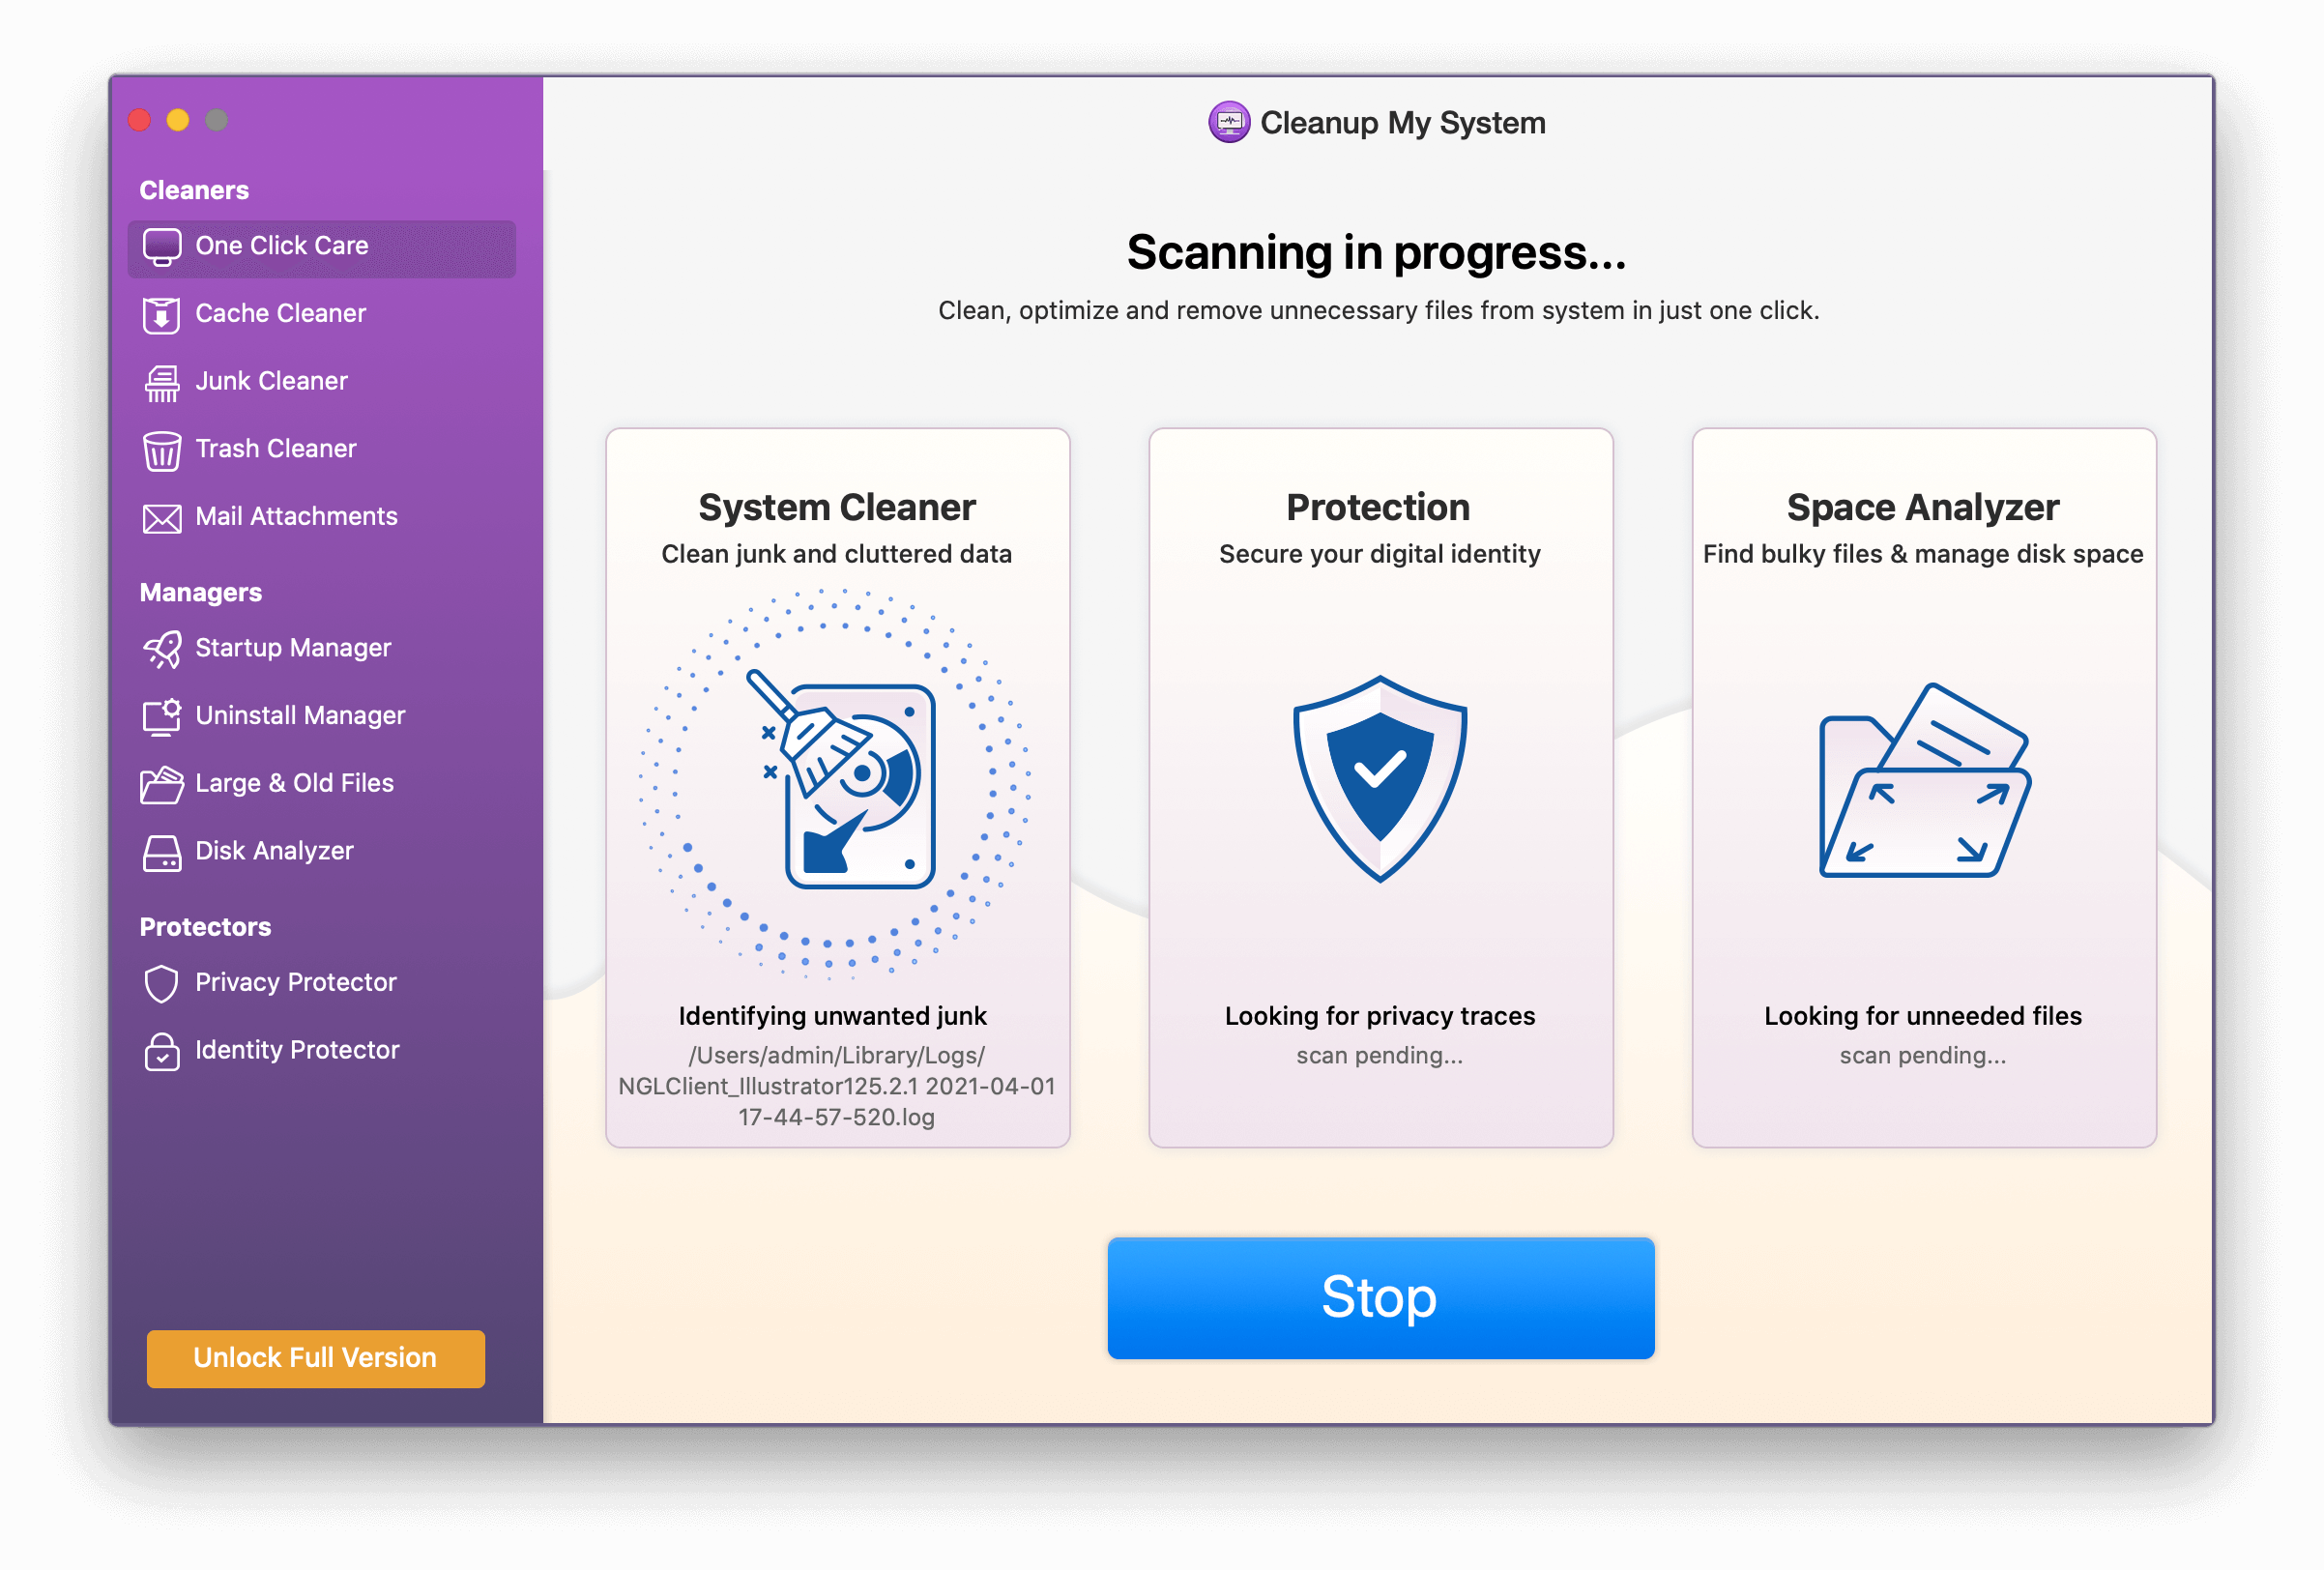
If you are considering resetting MacBook Air due to performance issues, we suggest you take the help of a dedicated tune-up utility to optimize Mac and enjoy top-notch speed. One such tool is Cleanup My System for this purpose. It offers a slew of functionalities like One Click Care, Caches Cleaner, Junk Cleaner, Uninstall Manager, Large & Old Files cleaner, and more to reclaim space and enhance overall speed without putting much effort.
Additionally, you can speed up your Mac by removing useless mail attachments, managing Startup items, and thoroughly cleaning contents moved to Trash, by using advanced features offered by Cleanup My System. This tool will surely optimize your Mac in a way, to make your Mac more stable & smoother than ever before.
Get Cleanup My System

Detailed Review on Cleanup My System
However, if you are here just to learn about how to reset MacBook Air, then here you go.
Also Read: 11 Best CleanMyMac X Alternatives to Clean Mac
How To Reset MacBook Air to Factory Settings
Once you have backed up all the data and logged out of all the accounts you can start resetting MacBook Air to factory settings. To follow reset MacBook Air steps make sure it is connected to power adapter as the battery shouldn’t run out.
Deauthorising iTunes
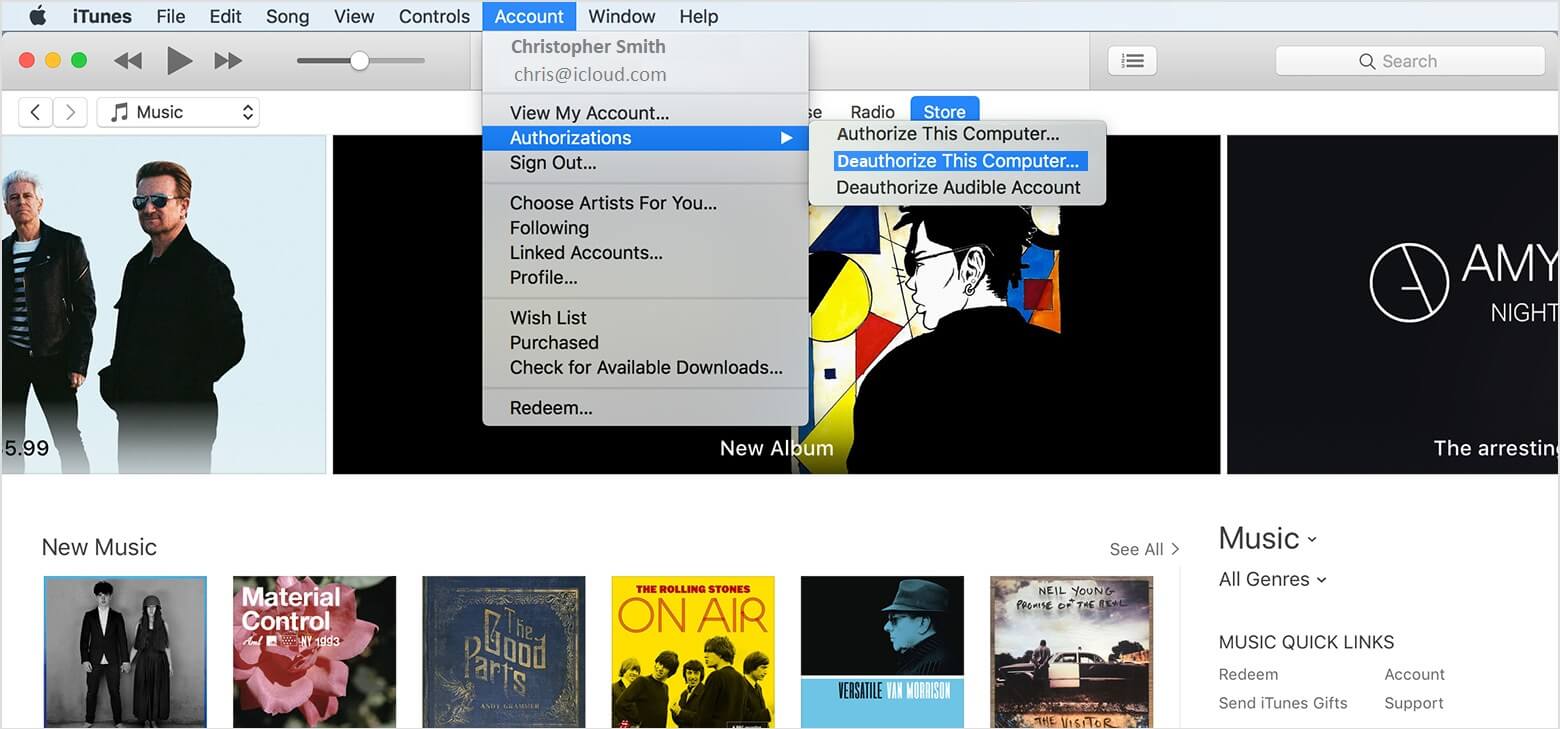
Deauthorizing your computer from iTunes means it will no longer be linked to your iTunes account.
Recent Versions: Open iTunes and click on ‘Account’ ? ‘Authorisations’ ? ‘De-authorise This Computer’. It will ask you to enter your Apple ID and Password once done click ‘De-authorise’.
Older Versions: Open iTunes and click on ‘Store’ ? ‘Deauthorise This Computer’. And you are done.
Turn off FileVault
Since you are planning to reset MacBook Air we suggest disabling FileVault.
FileVault encrypts all the files on your MacBook’s hard drive hence it is better to turn it off before moving ahead.
You may follow the below-mentioned steps to turn off FileVault.
Step 1. Open System Preferences and click on ‘Security & Privacy’.
Step 2. Click on the FileVault tab and click on the ‘Turn Off FileVault’ button. It’ll show you a message stating ‘FileVault is turned off for the disc [name of main hard drive]’. If you fail to see that message, click on the Golden lock icon in the bottom left and verify your account credentials with your user name and password and click on Unlock.
Step 3. Now you may click ‘Turn Off FileVault’. You may need to enter your user name and password again for authentication. Wait for decryption to take place. You are all set.
Disable iCloud
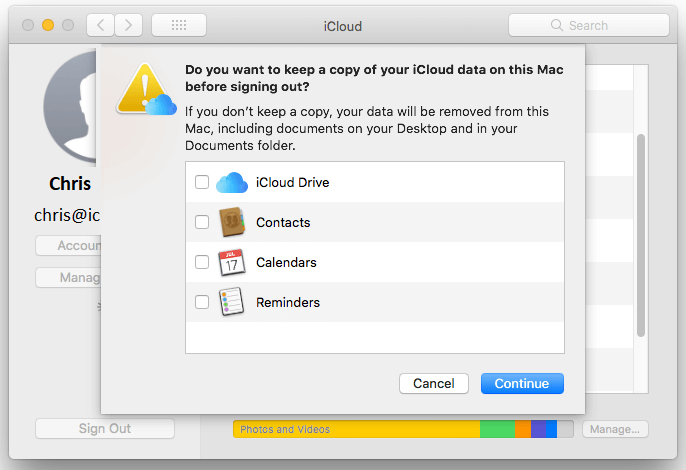
Before proceeding ahead, you’ll need to turn off iCloud. If you have any iCloud files created, copy them on to your backup.
Step 1. Go to ‘System Preferences’ > ‘iCloud’ > ‘Sign Out’.
Step 2. To remove personal data, uncheck each checkbox beside iCloud Drive, Contacts, Calendars, and Reminders and click ‘Continue’.
Step 3. You might get a warning ‘iCloud Drive needs to finish updating before continuing with the sign out’.
“Please Note: If you are using MacBook Air or MacBook Pro with Touch ID, you’ll need to ensure that your payment details are removed from the Mac. Signing out will erase Apple Pay information.”
Step 4. It will ask you to enter your Apple ID and password and let the process complete.
Restart in Recovery Mode
To erase the startup disk, restart your system in recovery mode.
Step 1. Click on the Apple logo at the top left of the screen and click on ‘Restart’ to enter Recovery Mode.
Step 2. Immediately hold down the ‘Command + R’ keys until you see the Apple logo or a spinning globe. Just make sure that the fresh installation isn’t associated with your Apple ID.
Step 3. It will ask you to choose a language. To come to the next screen it might take a while.
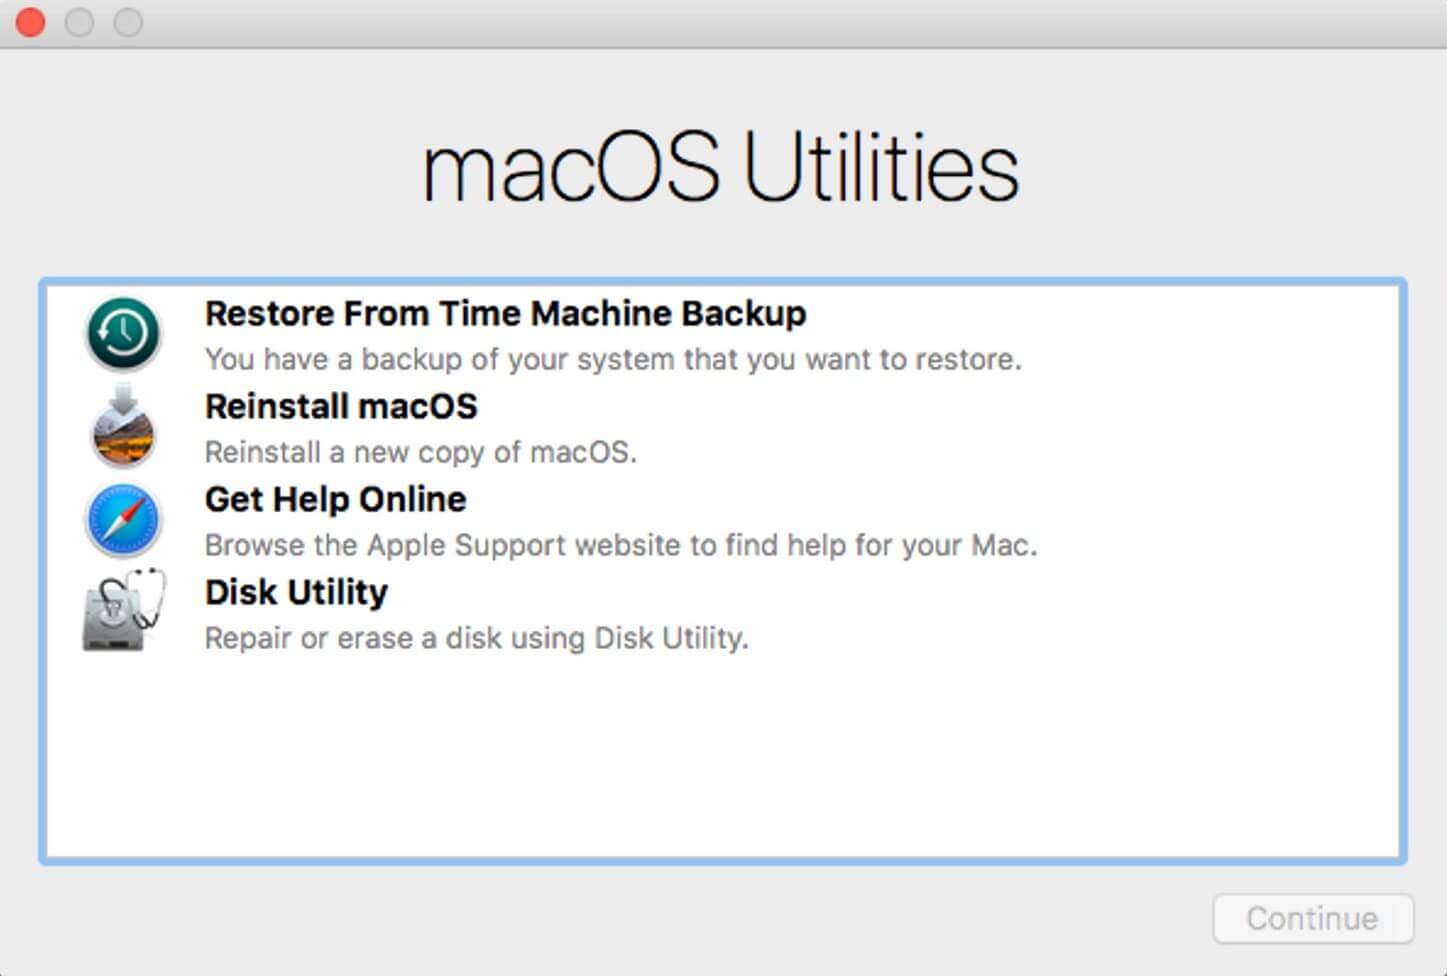
Step 4. You will now be at the ‘Recovery Mode Utilities’ window. This looks similar in Sierra, High Sierra, and Mojave.
Erase MacBook Hard Drive
Now, we are all set to erase the Hard Drive.
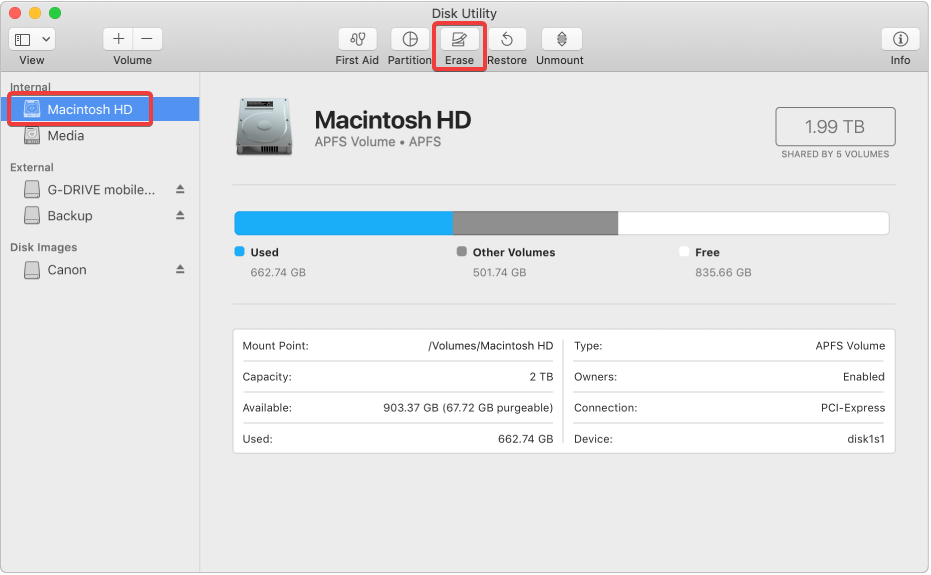
Step 1. Go to ‘Disk Utility’ from the options displayed on macOS Utilities, and click on ‘Continue’.
Step 2. Select your main Hard Drive which is generally called the ‘Macintosh HD’ on the left-hand side panel of your screen.
Step 3. Click on the ‘Erase’ button to initiate the wipeout process on your Hard Drive, click ‘Erase’ again once prompted.
Please Note: This will permanently erase all the data on the Hard Drive. Always ensure that you have taken proper backup of MacBook Air and all set to never access anything on that particular Hard Drive again.
Step 4. When the process is completed, exit out of that program by going to the top menu and selecting ‘Disk Utility’ ? and clicking on ‘Quit Disk Utility’.
How To Reinstall macOS
A machine without an OS is like a body without a soul. You can’t just give away your MacBook without an Operating System installed on the machine until the next person agrees to take it up further. To reinstall macOS, you’ll need to follow these steps. Once you quit ‘Disk Utility’, You should still be in the macOS Utilities.
Step 1. To initiate the installation, Select ‘Reinstall macOS’ or ‘Reinstall OS X’ from the available options in macOS Utilities and click on ‘Continue’.
Step 2. It will show you a prompt message stating “Your Mac will install the version of macOS your Mac was shipped with”. Click ‘Continue’ to initiate the process.
Step 3. Agree to the terms and conditions before the software installation can be initiated. Click on ‘Agree’.
Step 4. You’ll now need to choose where you want to install. Choose ‘Macintosh HD’ shown in the list and click on Install.
Step 5. Your Mac will take some time to download and install a fresh copy of macOS on your MacBook.
Step 6. macOS will attempt a restart when the installation is complete. It will ask you to enter your Apple ID and password to proceed further.
Please Note: If you are selling off your MacBook, This is the stage you can handover it to the next party. It’s sensible to abandon the setup assistant at this point and let the buying person enter his own information to complete the setup process with his credentials.”
Update The Software On Your Mac
Once you have the macOS installed on the system, installing and running the latest updates for your MacBook is recommended. Updates help improve MacBook performance, offers stability, and security of your MacBook. Regular updates include updates for your applications and software installed on your MacBook like Safari, iTunes, and other apps that are part of macOS.
Also Read: Common MacBook problems and how to fix them
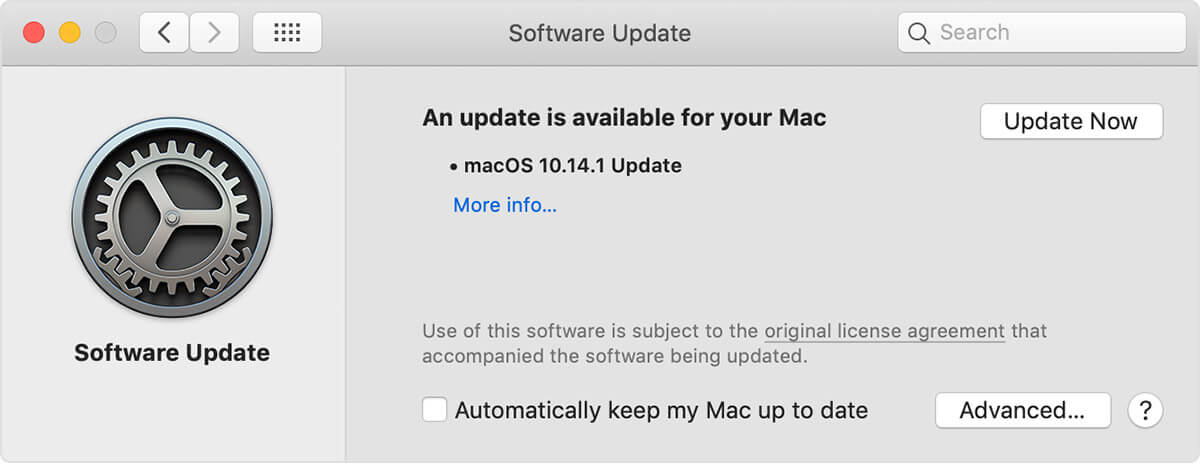
Step 1. Go to ‘System Preferences’ from the Apple menu and click on ‘Software Update’ to look for recent updates.
Step 2. If updated are available you will see them. To install click on the ‘Update Now’ button. To get more information click on ‘More info,’ select specific updates to get installed on your MacBook.
Step 3. You will now see a message “Your Mac is up to date.” This confirms that macOS and all the apps are updated to the latest available version. The software update includes iTunes, Safari, Messages, Books, Calendar, Mail, Photos, and FaceTime.
If you are looking to get updates related to iMovie, Pages, Garageband, Keynote, Numbers, and other apps that you have downloaded separately from the App Store, open the App Store on your MacBook and then click on the Updates tab.
Summing Up
With these steps, you can reset MacBook Air to get a fresh start or wipe al data before trading it off. If you have any questions or face any problem in this process do leave us a comment. Also, share the article with those who need help resetting MacBook Air.


Leave a Reply