


Summary
This blog explains how to disable or pause automatic Windows 11 updates using methods such as Settings, Services, Registry Editor, and Group Policy Editor. It also discusses why users may want to stop updates, such as avoiding workflow interruptions, compatibility issues, or buggy updates, while noting that updates are important for security and system stability.
You are working on a project when Windows notifies you that an update needs to be installed. Maybe Windows scheduled a restart, and when you came back, all tabs were closed, or maybe you were asked to restart in the middle of your work. Whatever the case, there are several ways to prevent Windows Update from interrupting you. Whether you simply want to delay updating Windows for a couple of weeks or turn off Windows Update from restarting automatically altogether.
This tutorial will cover step-by-step instructions for all those methods and includes an actual UI change that Microsoft has been rolling out since mid-June 2026, which most older tutorials have yet to cover.
Windows Update Method Comparison
The table below explains which Windows versions the methods will work on, the required rights, whether the fix is permanent or temporary, and what it is best for. Go through it to find the best method that works for you.
| Method | Works on | Permanent | Best for |
| Pause from Settings | Home + Pro | No setting resets after 35 days | Quick and reversible |
| Disable Update service | Home + Pro | Yes (but can reset after a major update) | Temporarily disabling updates |
| Group Policy Editor | Pro/Enterprise/Education only | Yes | Business and IT management |
| Registry Editor | Home + Pro | Yes | Permanently disabling Windows Update |
| Metered connection | Home + Pro | No | Not all updates are blocked. They are slightly delayed |
Once you have decided which method to use, follow the detailed guide given below.
List of Contents
5 Different Ways to Disable Windows Update in Windows 11
Method 1 – Pause Updates from Settings
The fastest way to turn off your Windows 11 updates is to use the built-in “pause” feature, which temporarily disables them. When it expires, Windows automatically starts updating unless the 35-day period is extended.
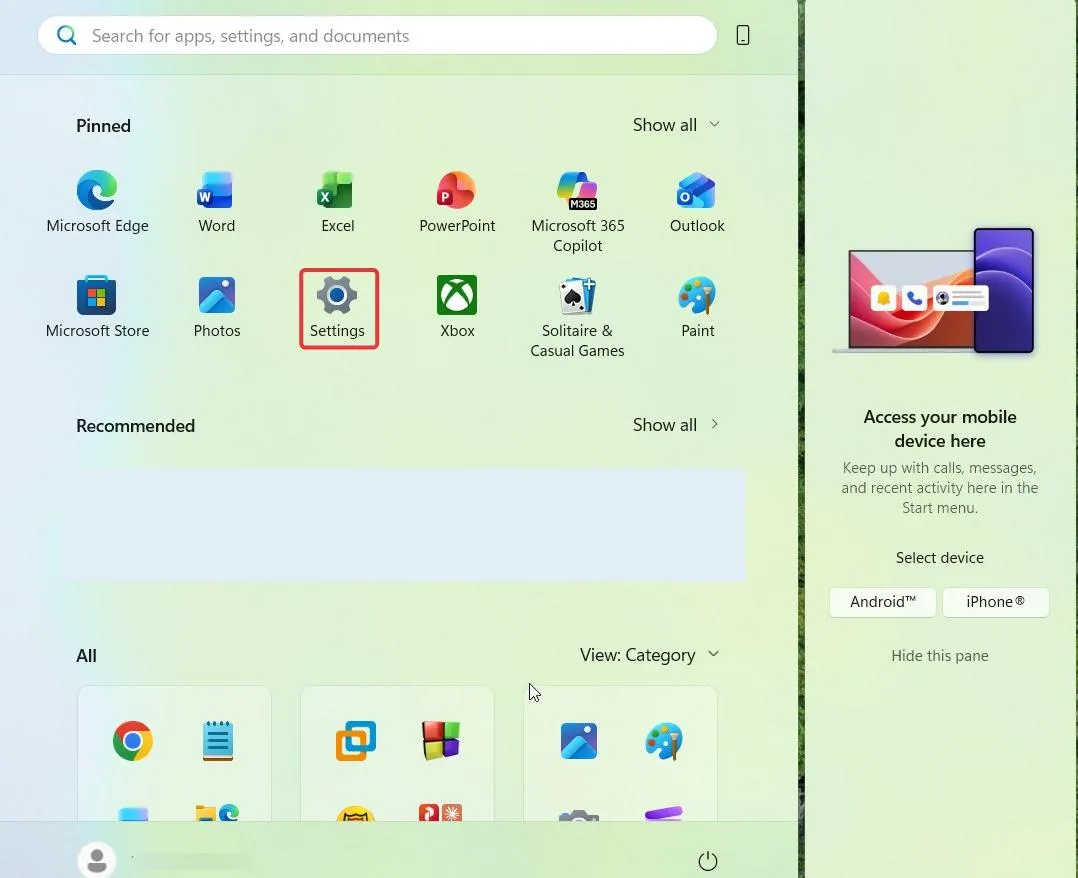
- Click Start, then select Settings, or press Windows key + I to open Settings directly.
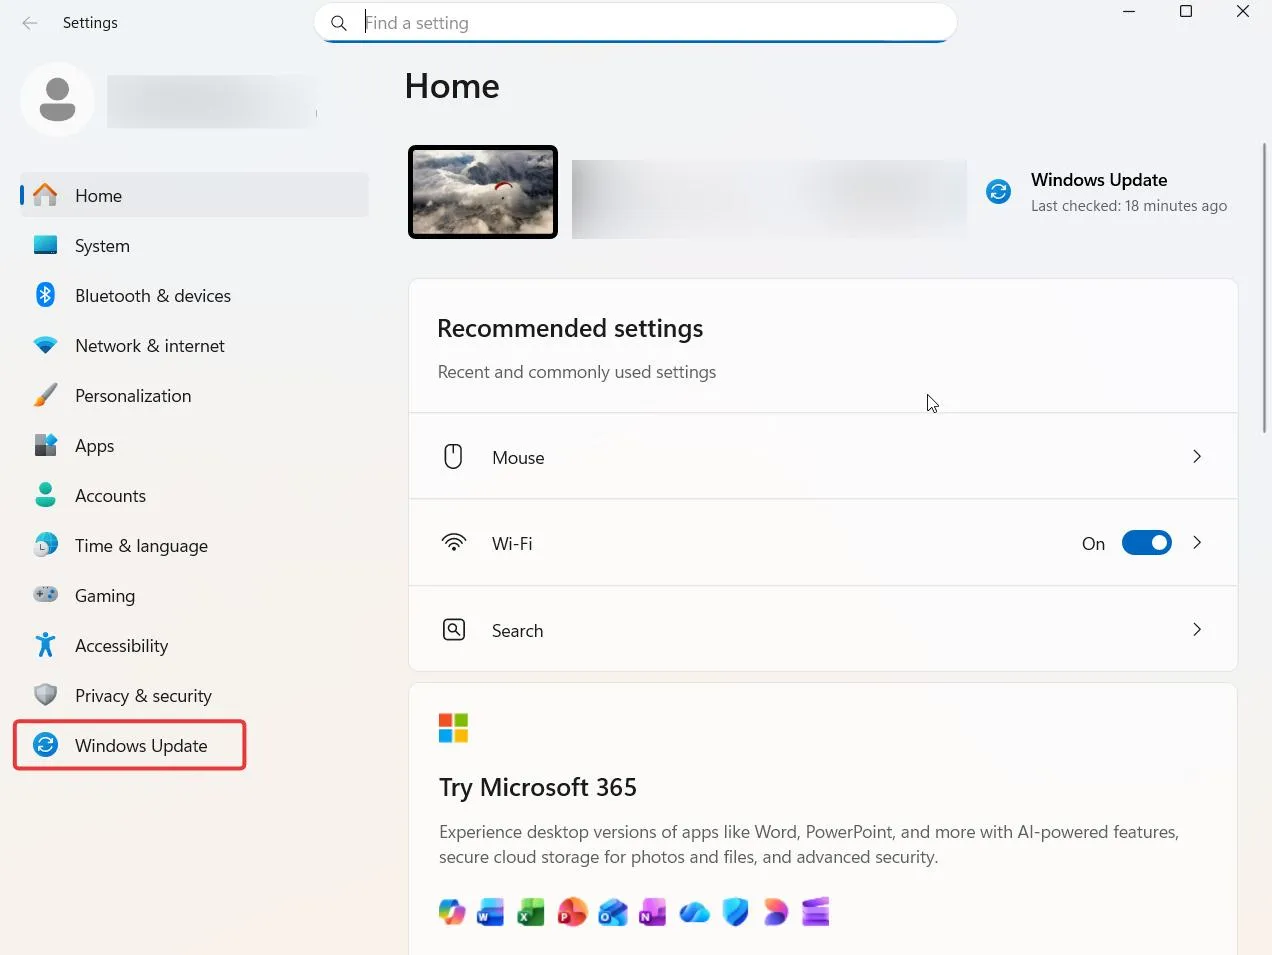
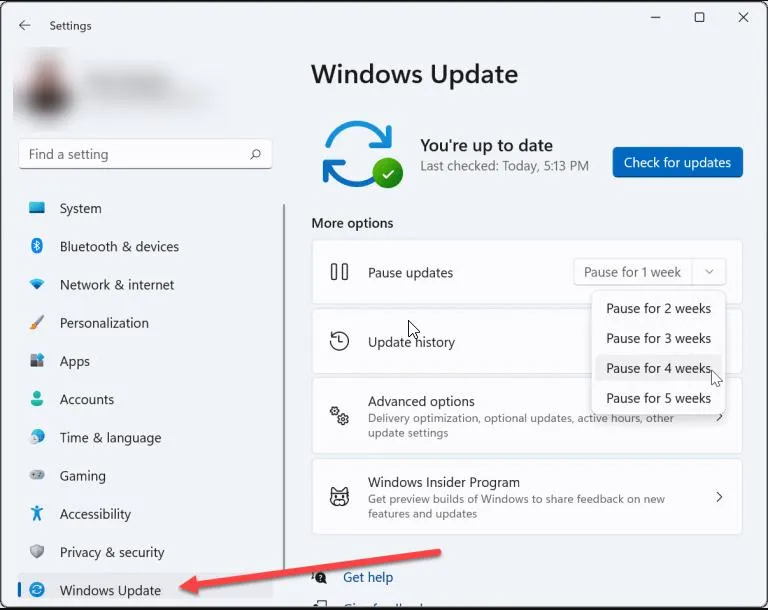
- In the left sidebar, click “Windows Update”.
- Near the top of the Windows Update page, locate the “Pause updates” control and enable it.
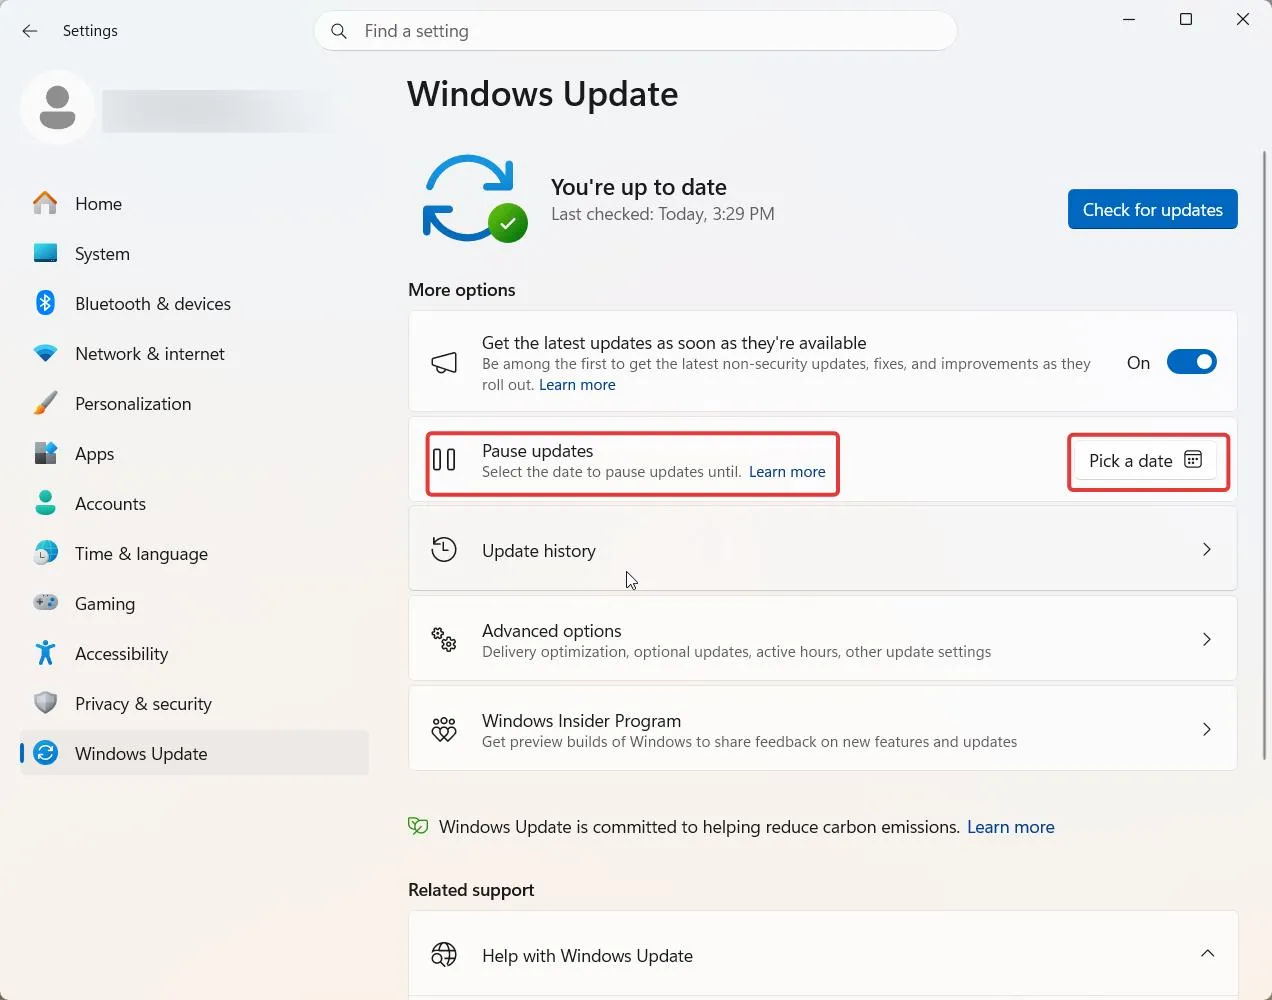
| Note: If the latest 2026 update, i.e., KB5095093, is installed, you will see a calendar that lets you ‘Pick a date,’ and select the duration you want to pause, which is up to 35 days, instead of the drop-down from which you select the weeks you want to disable automatic Windows Update.
Either way, a banner confirms updates have been paused and when they resume. Until then, Windows won’t download, install, or restart your PC for a pending update.
|
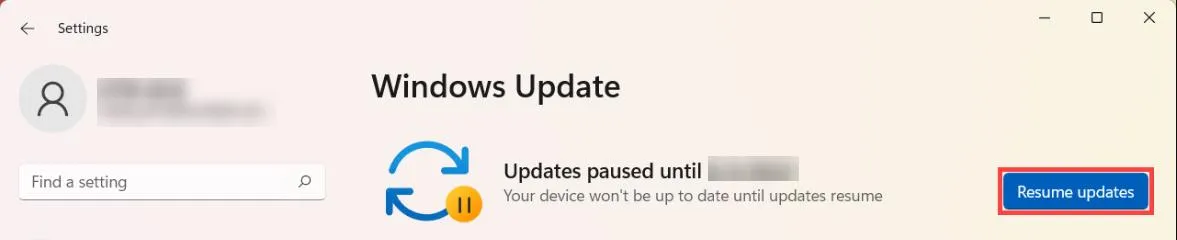
Once the time period ends, the pause is revoked, and anything that was mid-download or had already finished downloading gets canceled, so you’ll download it again once updates resume.
There is no limit to how many times you can pause updates. Once the countdown timer nears the end of its cycle, choose a new date or number of weeks, depending on Windows updated version.
Method 2 – Disable the Windows Update Service
If you are searching for how to permanently disable automatic updates on Windows 11, this is how you do it.
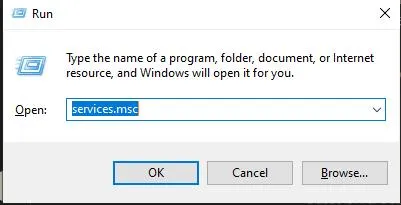
- Press Windows Key + R on your keyboard to open RUN.

- Type services.msc and press Enter.
- Scroll to find Windows Update.
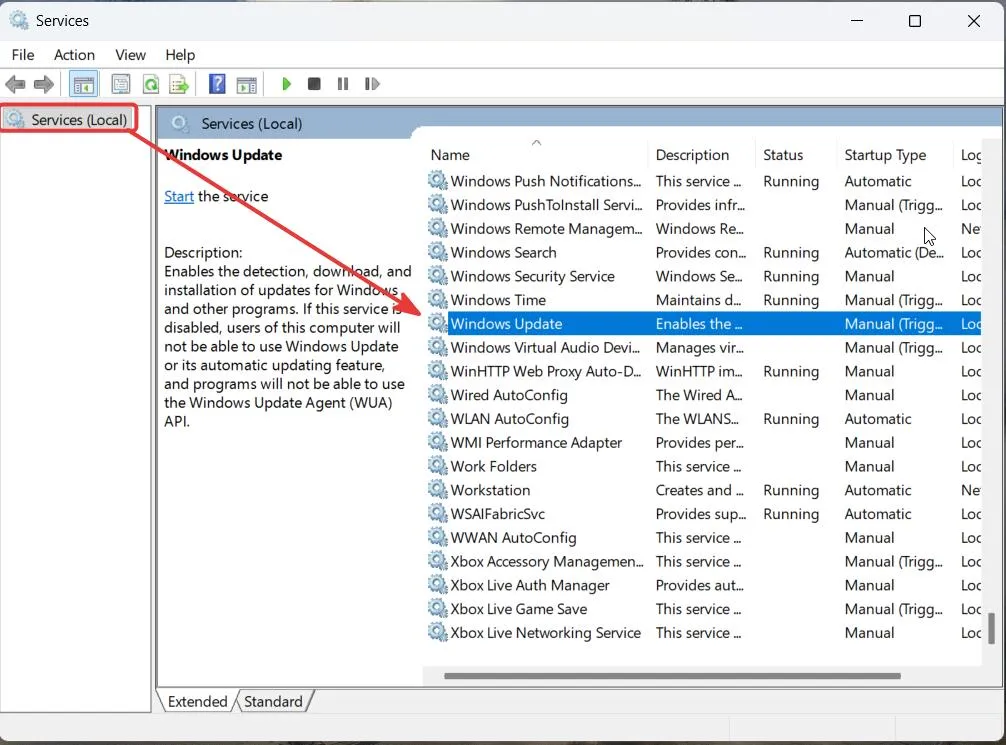
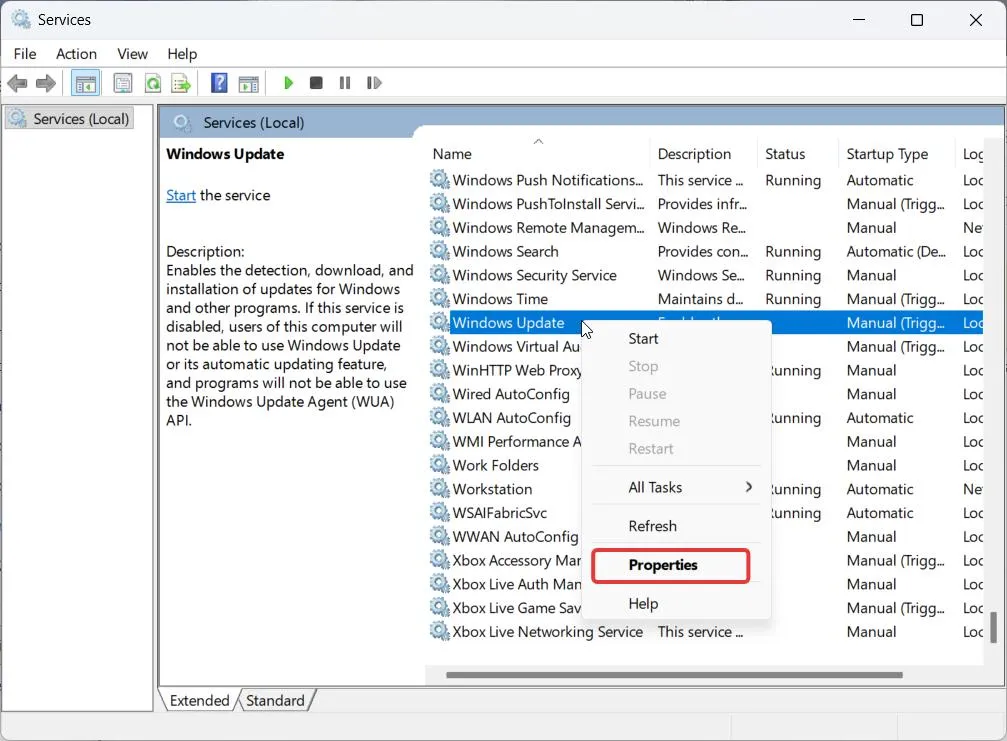
- Right-click “Windows Update” and select Properties.
- Click the “Startup type” dropdown and select “Disabled”.
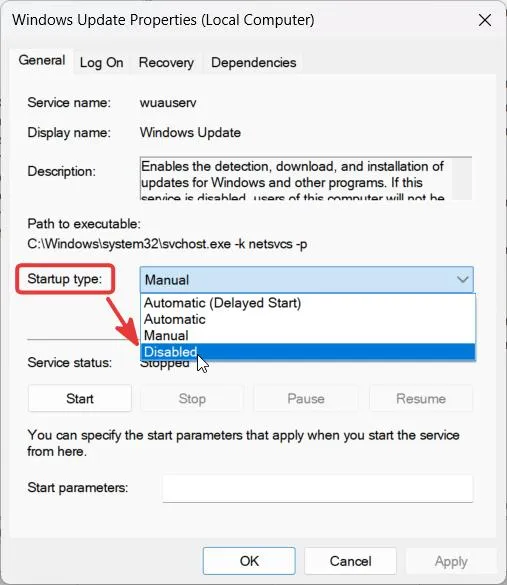
- If Service status shows Running, click Stop, then click Apply and OK.
Windows will stop searching for or installing new updates instantly, and the Windows Update Service will also not restart automatically after a system restart.
| Note: Some users report that Windows 11 resets the setting to manual after a Major Feature Update. Therefore, keep checking the service and read this page for an update on the fix. |
Method 3 – Disable it through the Group Policy Editor
If you got to this post while searching for “turn off automatic updates Windows 11,” go to Group Policy if you are using Windows 11 Pro, Enterprise, or Education editions. If you are running the Windows 11 Home edition, skip this method and move to the registry method below.
| Note: Microsoft does not include gpedit.msc in Home versions. |
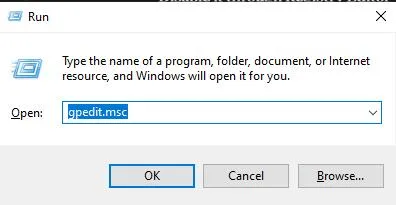
- Press Windows key + R, type gpedit.msc, and press Enter.
- Go to Computer Configuration > Administrative Templates > Windows Components > Windows Update.
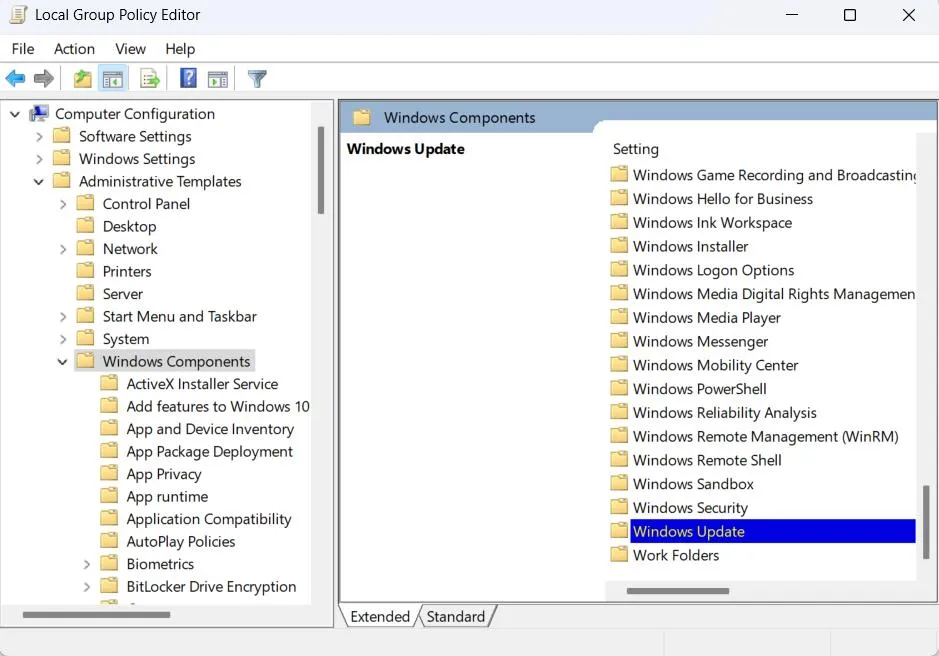
- Double-click the “Windows Update” folder. Click “Manage End User Experience,” > “Configure Automatic Updates”
- Select Disabled, then click Apply and OK.
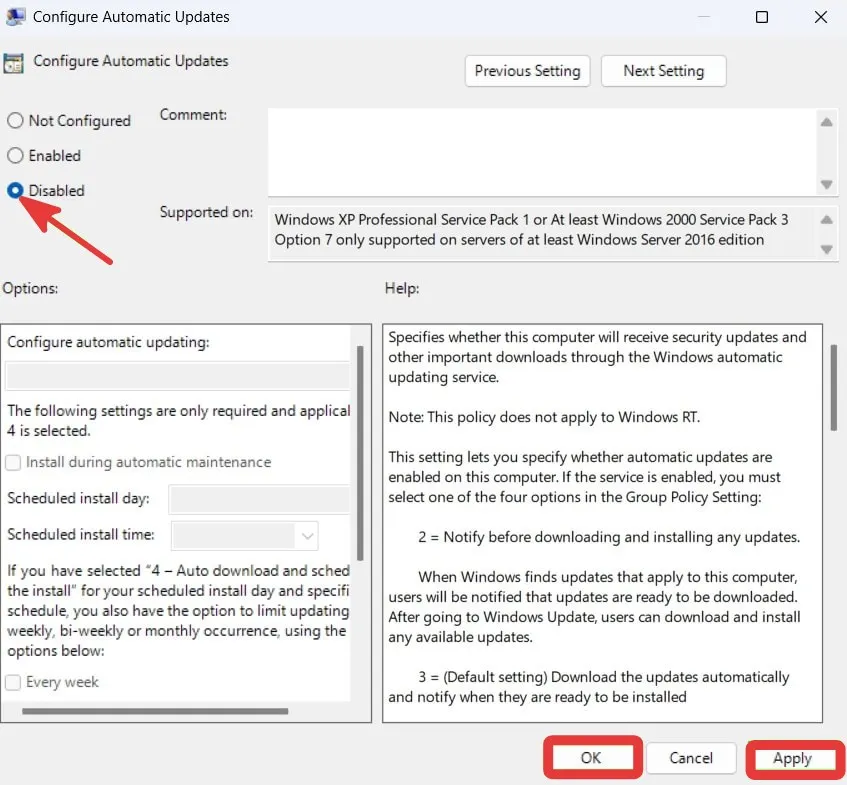
- Restart your PC.
Windows Update will stop checking for updates after the above steps.
Method 4 – Disable through Registry Editor
This method works across all Windows versions (including Home). However, before you make any changes to the registry for safety reasons, take a backup of the registry.
- Press the Windows key + R, type “regedit”, then go to “File” > Export.
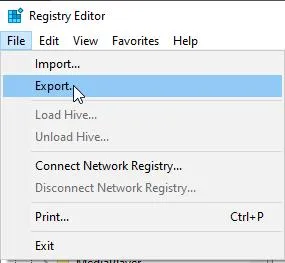
- Choose a location to save the file.
If something goes wrong, simply double-click the saved file, and the registry will be restored.
Steps to Disable Windows Update
- Press Windows key + R, enter “regedit”, and hit the Enter button.
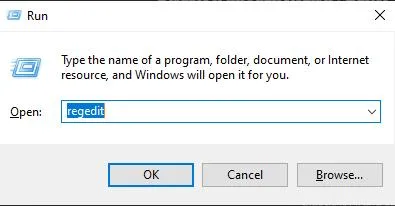
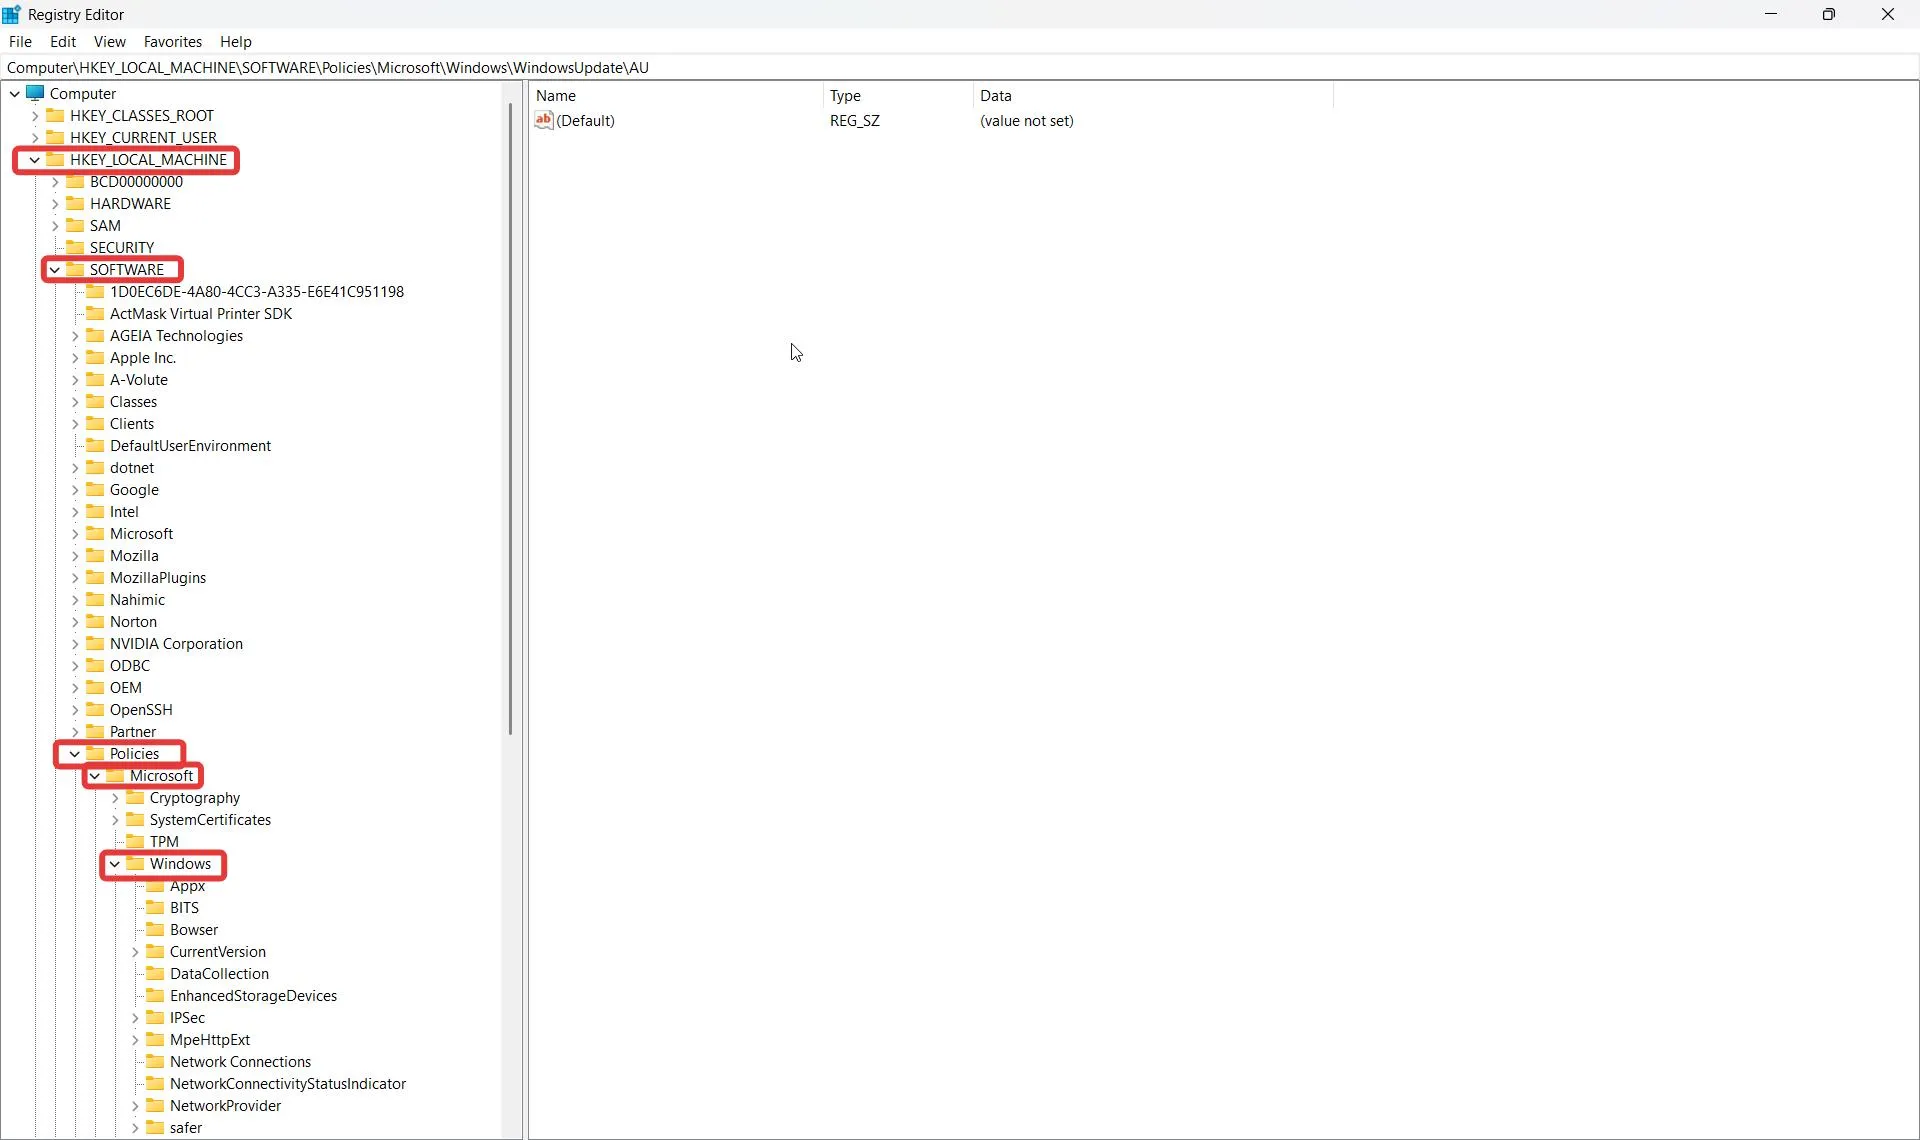
- Navigate through the registry to
HKEY_LOCAL_MACHINE\SOFTWARE\Policies\Microsoft\Windows.
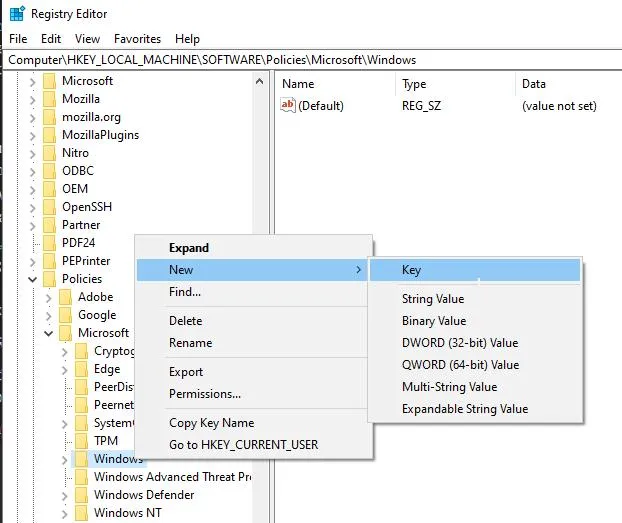
- Right-click on Windows and select “New.” Choose “Key,” name it “WindowsUpdate”. If a “WindowsUpdate” key is already there, do not create another one.
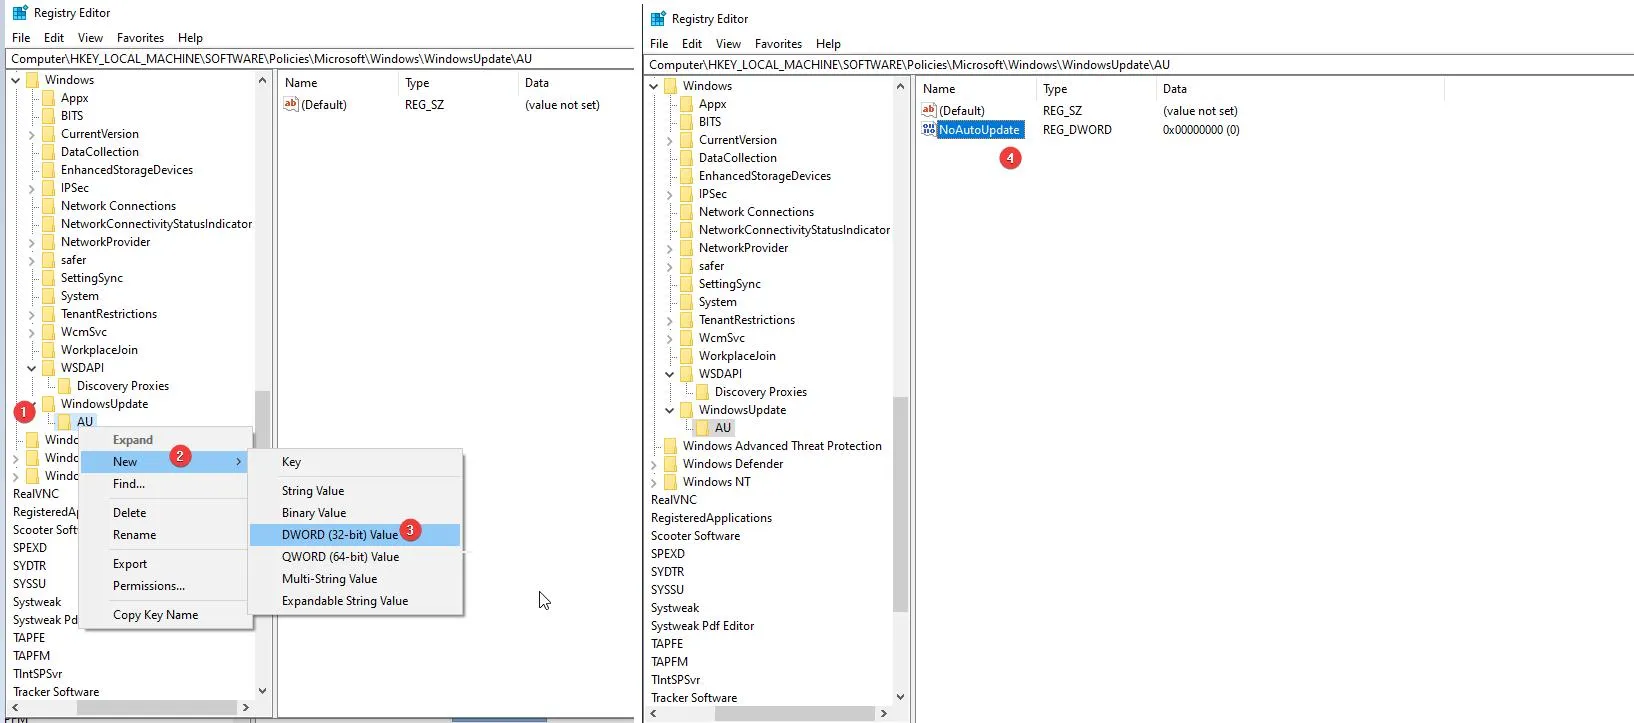
- Right-Click WindowsUpdate, select “New,” > “Key,” and name it “AU.”
- Right-Click AU > select “New,” > “DWORD (32-bit) Value,” and name it as “NoAutoUpdate.”
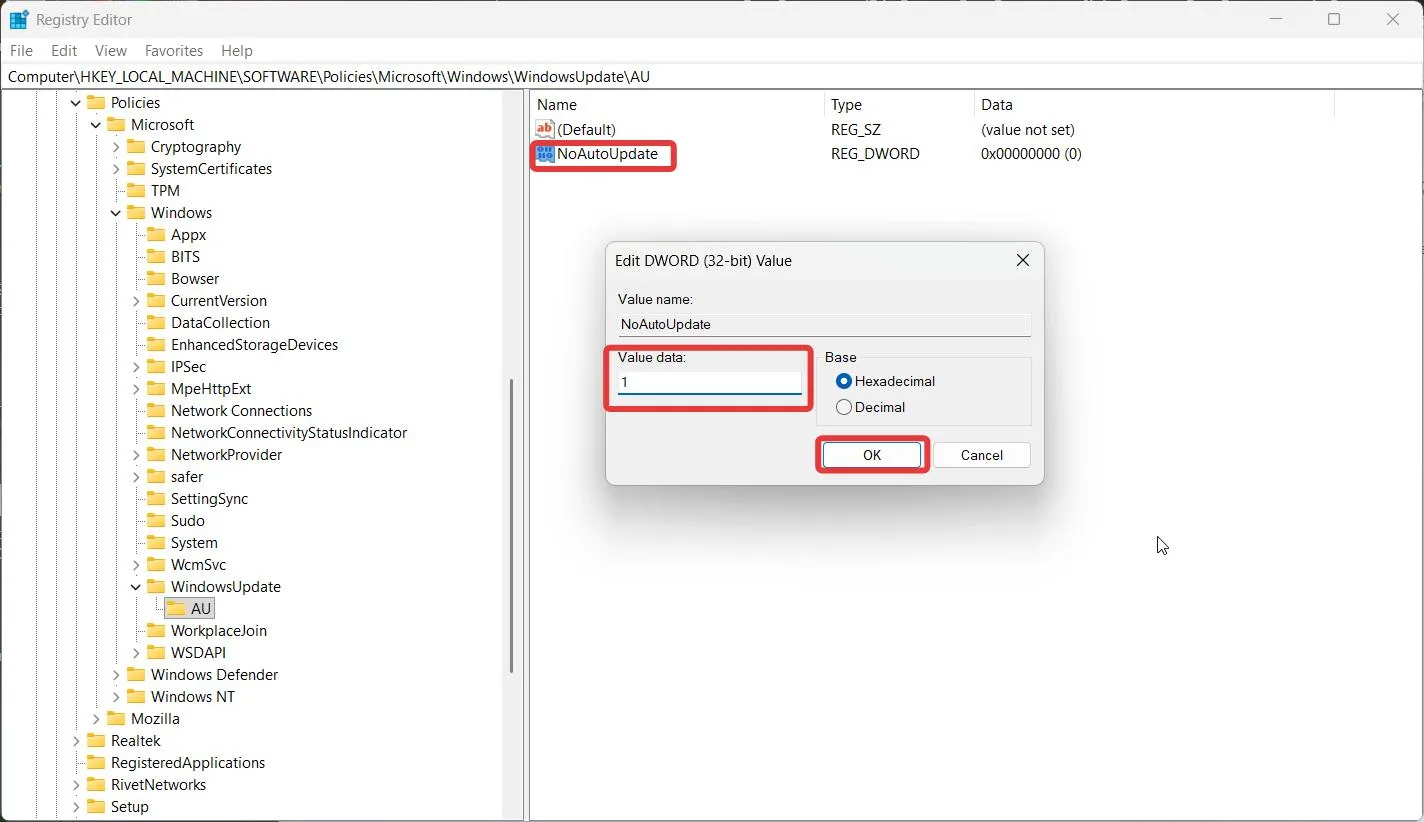
- Double-Click NoAutoUpdate, and under “Value data:” place a 1 in the field provided and click OK.
- Restart your computer.
Automatic Updates will be turned off if the value is set to 1 (double-check the value before exiting Registry Editor; it should be 1). If set to 0, automatic updates will be enabled. A simple typo would cancel out the entire fix.
Method 5- Set your connection to metered
If disabling permanent updates for good seems too extreme, switch to a “metered” connection. It is an intermediate approach.
- Go into Settings > Network & Internet.
- Select either Wi-Fi or Ethernet (the method in which you are currently connected) followed by selecting your current active network.
- Turn on Metered connection.
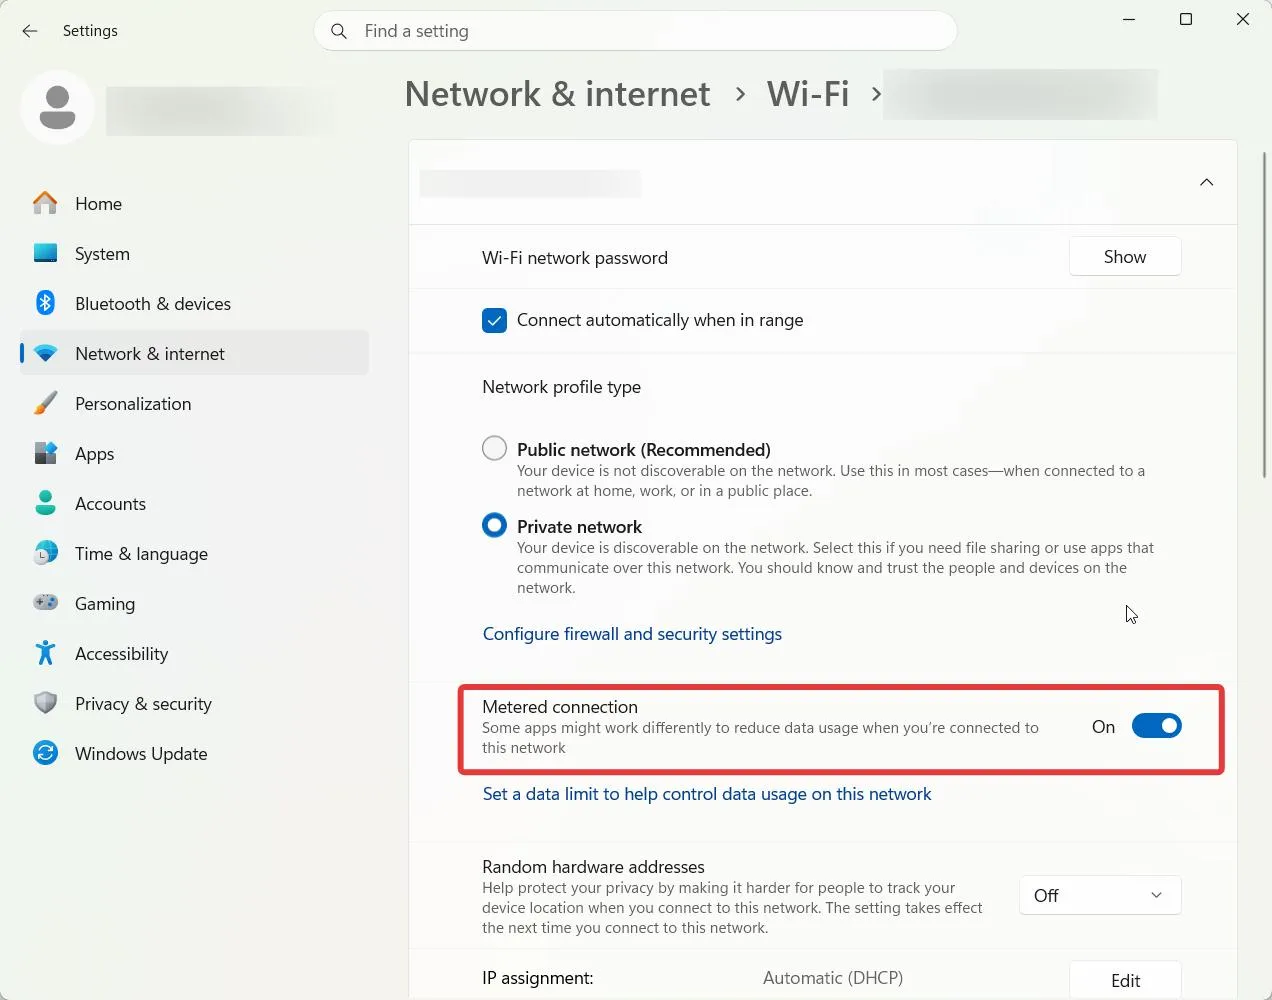
Windows will treat this as a “limited” internet connection and delay all background downloads (including many updates). This is not a total block; there are instances where an update or a security patch may get through. It works best when combined with a temporary pause of updates in settings.
How to disable Delivery Optimization and Stop Windows from using your bandwidth?
By default, Windows 11 shares the updates you download with others and vice versa. via your active Internet connection. This is known as Delivery Optimization, which speeds the distribution of updates to all users across Microsoft’s delivery system but also uses your upload bandwidth.
If this concerns you and you are experiencing a slow connection, or have observed excessive bandwidth usage and want to stop this behavior, disable Delivery Optimization.
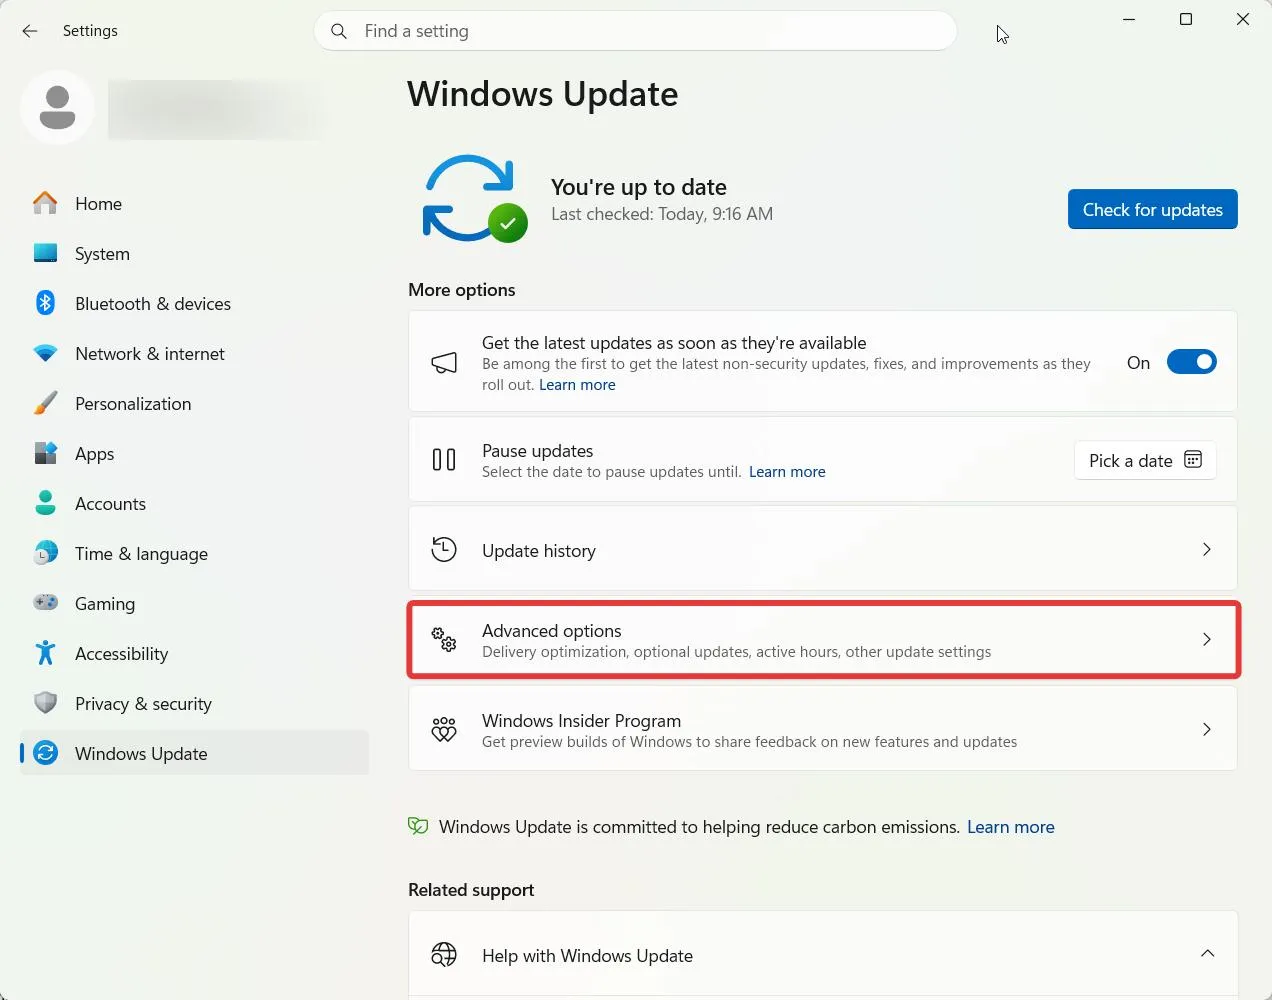
- Open Settings, then go to Windows Update.
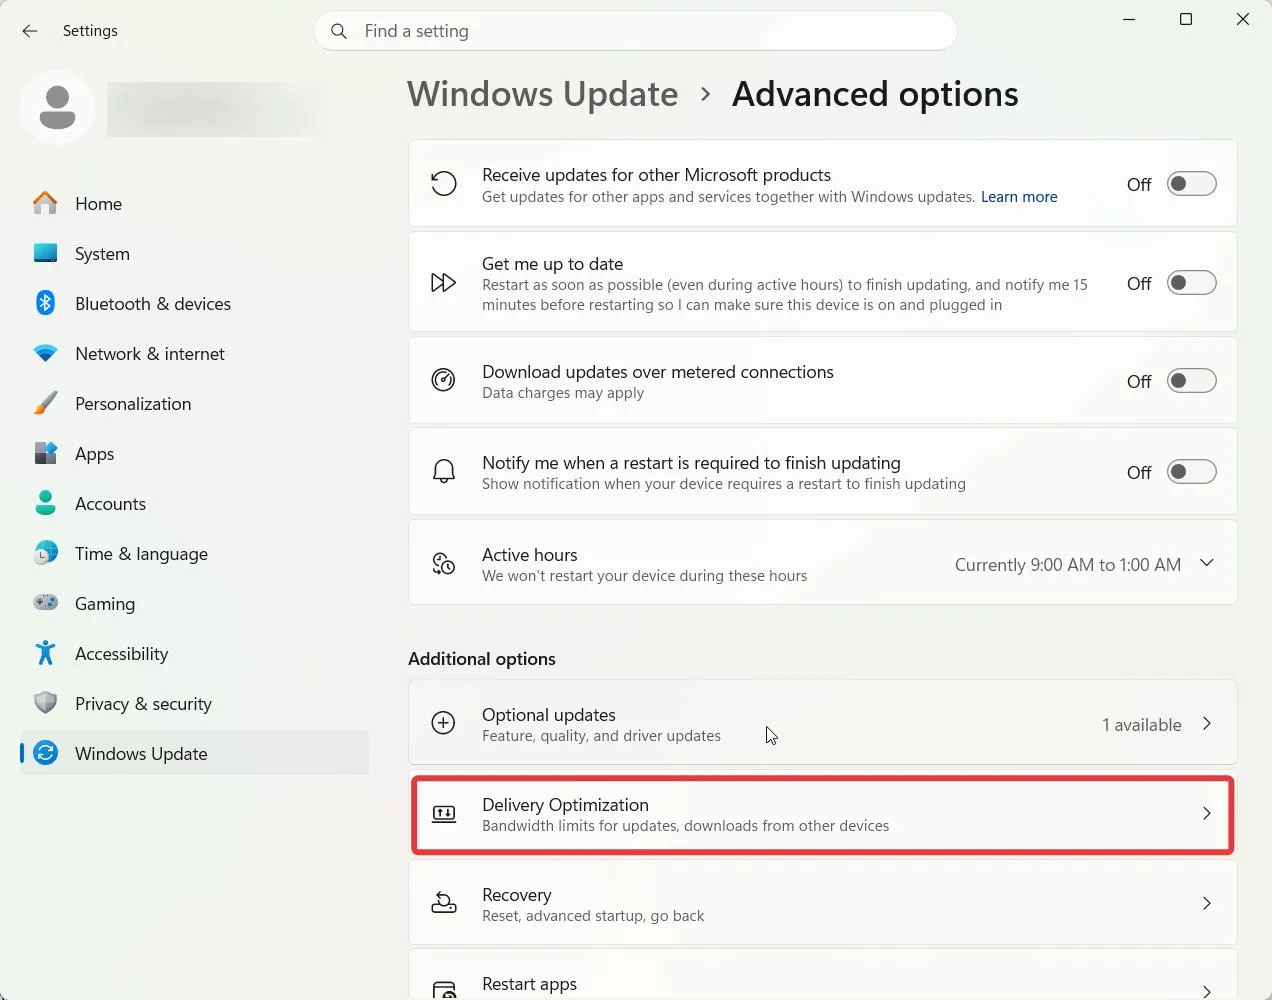
- Select Advanced options, then Delivery Optimization.
- Turn off the toggle labeled “Allow downloads from other devices”.
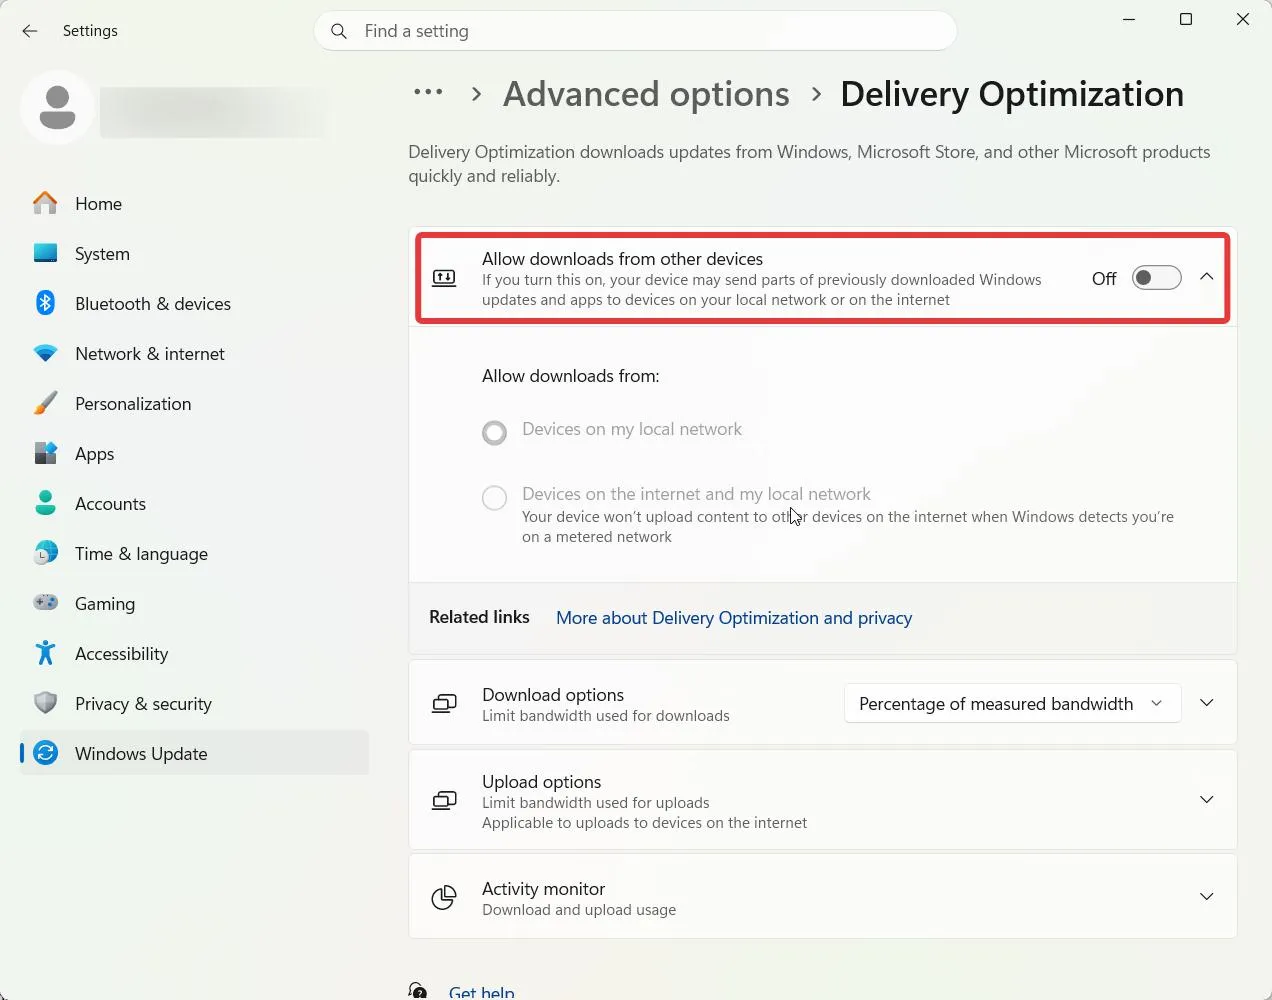
Now, your computer will only receive updates from Microsoft, rather than sending updates to others.
| Note – If multiple Windows computers are connected via LAN using the same router, choose devices connected to my local network only. This way, only the computers within the network will get updates from others. |
Should you disable Windows Update permanently?
Pausing Windows updates for a couple of months does not hurt. However, if you permanently disable Windows Update, you will miss security patches, making your PC vulnerable to attacks. Also, Windows 11 does not send alerts about significant vulnerabilities (which can be patched) on systems that have stopped updates.
If you want to disable Windows updates to avoid system restarts while you are working, pause updates. This will resolve the issue and prevent security patches from going unapplied for an extended period.
To avoid potential risks, turn updates back on and bring yourself current at some point, rather than keeping Windows updates turned off forever.
Common Troubleshooting
What to do if Resume Updates is unresponsive?
If Resume Updates is unresponsive or the Pause button does not reset, open Windows Terminal (or PowerShell) as Administrator, type in “Set-Service –Name wuauserv –StartupType Automatic” and reboot your computer.
How to fix Windows can’t find gpedit.msc?
Check your Windows version. If it is Windows 11 Home, remember that there is no policy editor on it, and there is no official way to add the Group Policy Editor to this version. Go to the Windows Registry Editor to disable Windows Update.
I disabled automatic Windows Update, but it has started downloading again. What do I do?
If Windows Update has resumed running, check Services. Windows Update should be set to manual and disabled. However, if it is set to automatic, this can be the reason, as a Feature Update can change settings.
Frequently Asked Questions
The bottom line
For most individuals annoyed by unexpected reboots, pausing updates in settings provides adequate control. It is reversible, and it does not leave your machine vulnerable to patching issues for months at a time. Use the services or registry method only when you have a valid reason to block updates for a longer duration than a pause can reasonably cover. If you do use this option, set a reminder in your calendar to periodically review Windows Update instead of turning it off indefinitely.



Leave a Reply