There are several reasons why you would want to upgrade Windows 10 to Windows 11, one of which is the support for Android apps, a sleeker interface, and tons of other things at your disposal.
Windows 11 launched on October 5 and it would be safe to say that it is indeed a decent update. Whether or not it is the best? Or, if there is something more that you expected? Do let us know in the comments. What’s even better is the fact that every user who has Windows 10 can upgrade to Windows 11 free of cost. In this post, we’ll take you through some easy ways on how you can update Windows 10 to Windows 11.
We’ll also take you through the process of how you can check if your Windows 10 device has the sufficient configuration necessary for the upgrade. Let’s quickly run through the system requirements your computer needs to have to sustain Windows 11 –
| Processor | 1GHz or faster, a compatible 64-bit processor with 2 or more cores or SoC | |
| RAM | 4 GB | |
| Storage | 64 GB or more | |
| System firmware | UEFI or Secure Boot Capable (If you want to know how to make your system UEFI or secure boot capable, you can visit the hyperlinked Microsoft page) | |
| TPM | TPM 2.0 (If you want to know how to enable TPM on your PC, you can visit the hyperlinked Microsoft page) | |
| Graphics card | WDDM 2.0 driver and DirectX 12 compatibility | |
| Display | 720p HD display, diagonal length of the display should be greater than 9” and it should have 8 bits per color channel | |
| And, last but not the least, you will need an active internet connection and a Microsoft account. For in-depth information on these requirements, you can visit Microsoft Page | ||
Also Read: Windows 11 – Free Update for Licensed Windows 10 Users
How To Upgrade Windows 10 To Windows 11
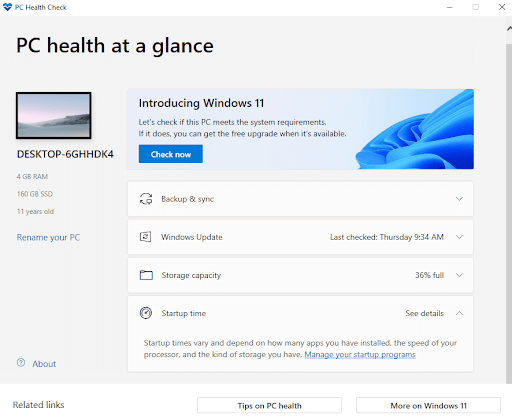
To begin with, before you upgrade your computer from Windows 10 to Windows 11, it is highly advisable that you download and run the PC Health Check app. To download it, scroll down on the hyperlinked page, and then you will see the installation file under Check for compatibility. This app will help you ascertain if your device is cut for the upgrade.
Check If The Upgrade Is Available To You As An Update
You may not have to go through the grind if your PC or laptop has everything that it takes to upgrade to Windows 11. The upgrade will be available as any other update. And, here is how you can fetch it –
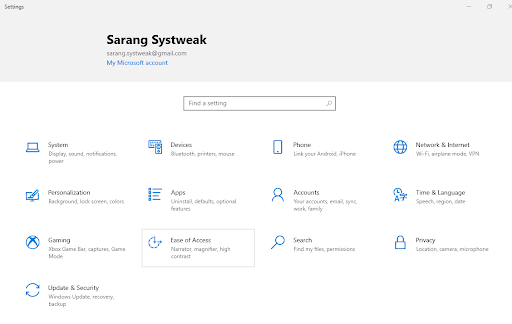
- Press Windows + I to open the Settings

- Click on Update & Security
- Click on Windows Update
- Click on Check for Updates. More specifically, you should be able to see the update titled as Feature update to Windows 11
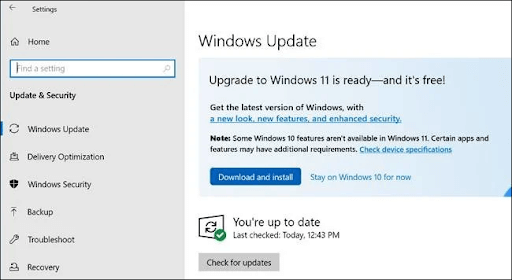
- If you see this, click on Download and install
Download Windows 11 Installation Assistant
Microsoft itself recommends downloading the Windows 11 Installation Assistant for those who want to upgrade Windows 10 to Windows 11. However, some conditions have to be met before you upgrade Windows 11 from Windows 10.
After you have downloaded the installation assistant, follow the steps listed below –
- Select Run. Make sure that you are the administrator to run the installation assistant
- If your computer or laptop is compatible and meets all the requirements, you will then see license terms. Click on Accept and Install when license terms are presented
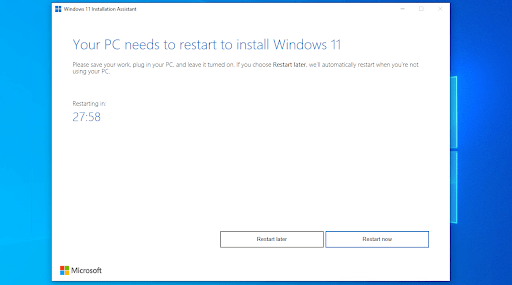
- Click on Restart Now when the tool’s ready. This step will further complete the installation on your computer
- Wait for the installation to complete. It is quite possible that your device will restart a few times during the process. Ensure that you don’t switch it off.
Also Read: Windows 10 Vs Windows 11 – What We Can Anticipate
How You Can Upgrade To Windows 11 From Windows 10 On Unsupported CPUs
If your computer’s CPU is not cut for Windows 11, needn’t get disheartened. There are a few ways you will still be able to install Windows 11 on a PC with an older CPU. And, the best part is you will neither have to format your drive nor erase files nor do any of that jazz. First and foremost Download Windows 11 Disk Image (ISO). Now we shall be editing the registry to bypass CPU check. Listed below are the steps for the same.
This is a crucial step before you make any changes in the registry, it is highly advisable that you backup your registry first. Now that you have backed up your registry, follow these steps –
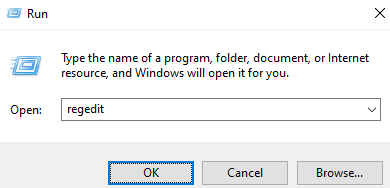
- Press Windows + R and open the Run dialog box
- Type Regedit and press Enter
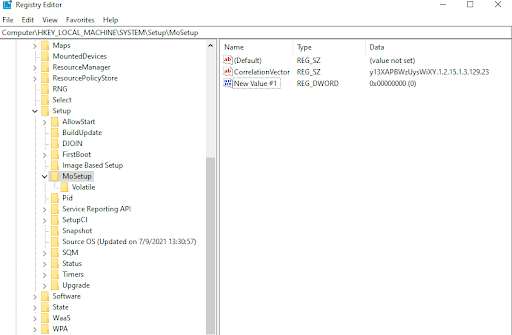
- Navigate to the below-mentioned path –
Computer\HKEY_LOCAL_MACHINE\SYSTEM\Setup\MoSetup
- In the pane on the right-hand side click on New > DWORD (32-bit) Value and name the value as
AllowUpgradesWithUnsupportedTPMOrCPU
- Double-click on this value and enter 1 into the value data field
- Press OK
- Mount the downloaded ISO by right-clicking on it and then clicking on Open with > Windows Explorer
- Click on the setup file and let the installation begin
Disclaimer: The hack may likely work and you may soon be able to install Windows 11. However, you might not get security updates and some features from Microsoft if you opt for this method.
Wrapping Up:
Windows 11 is not just for users who have invested a considerable amount of money in a new PC, it is for all Windows 10 users as well. So, if you have been successful in upgrading Windows 10 to Windows 11, do share your experience in the comments section below. And, for more such updates, keep reading Tweak Library.


Leave a Reply