
Truthfully, many of us have no idea how many or what kind of photos are stored on our laptop or desktop computer. Be it the Web WhatsApp auto-downloading feature, image downloading from the internet, or simply transferring media from cell phone to the computer. We have got so many photos in our system that we have no control over when it comes to organizing them.
And don’t get me started on the duplicate ones, not required, wish messages, and others that take up too much space unnecessarily (even on the computer). From Downloads folder to Pictures & different drives, photos are spread all over the system and there isn’t an easy way to sort them out. Questions like how to organize digital photos or how to organize photos, is there any effective photo management software, keep you distracted from your work constantly.
How to Sort Out or Organize Digital Photos on Windows PC
Since there are thousands of pictures on your system, it’s nearly impossible to sit & sort each & every one of them. It’s hell of a job to just go through them individually and take decisions of either keeping them or flushing them out. Apart from the manual ways, there are various ways one can sort out digital photos such as photo organizing software or third party photos apps. Switching over to these alternatives can help sort out & organize digital photos in different categories.
With the solution of sorting out the pictures on your computer, the first step would be to get them in one place. We all have this annoying habit of clicking too many pictures to get a perfect one & in the process, forget to delete others that weren’t selected. This is also one of the reasons that lead to the pile of pictures in your system that are lying around everywhere.
Post the collection, you can only decide if those are worth keeping or need to be deleted from the system. Obviously the next step would be to look for the best, reliable, & effective Photo Management software that can gather all the images & let you navigate easily. After thorough & intense research, we narrowed down our results on Photo Organizer from Systweak.
Systweak Photo Organizer to Organize Digital Photos
Considered as one of the best photo management software, Photo Organizer has been designed to ease out the photo sorting process. Starting from scanning the entire system to look for the scattered digital images to making them available for users in an organized manner, Photo Organizer exceeds your expectations.

Few of the rich & powerful features the Photo Organizer brings to the table are maintaining photos in one location, removing duplicates to save storage space, & make the photos easier to find & access.
How to Sort Out Digital Photos With Photo Organizer
Download Photo Organizer Here

Let’s start with visiting the official website & downloading the Photo Organizer on your Windows PC to sort out the digital photos. Post the downloading completion, let the tool install on your system & after the successful installation, Photo Organizer will auto launch.
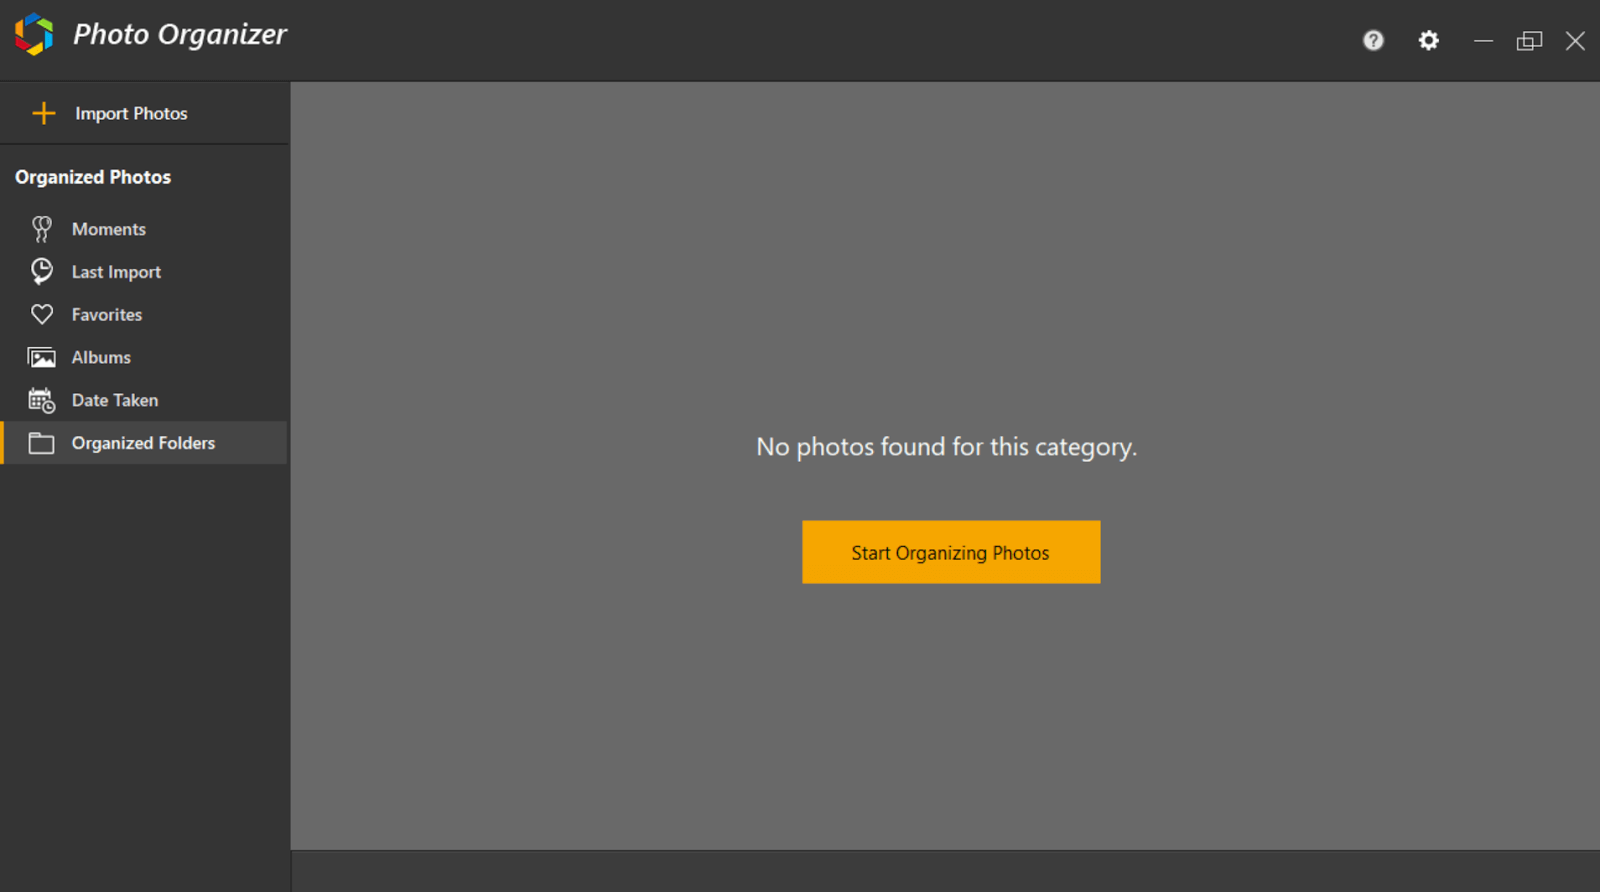
Above is the homepage you will experience once the Photo management software launches on your system & you need to start with tapping on Start Organizing Photos. So without further ado, let’s start exploring the best in the business Photo Organizer to start organizing your photos:
1. Start Organizing Photos / Import Photos
Once the Photo Organizer has been launched, tap on any of the options (Start Organizing Photos / Import Photos) on the homepage. Both the commands will lead you to the same path where you will be choosing either to scan the whole system or Folder wise. All you need to do is, click on either of the options & the below screen will appear in front of you.
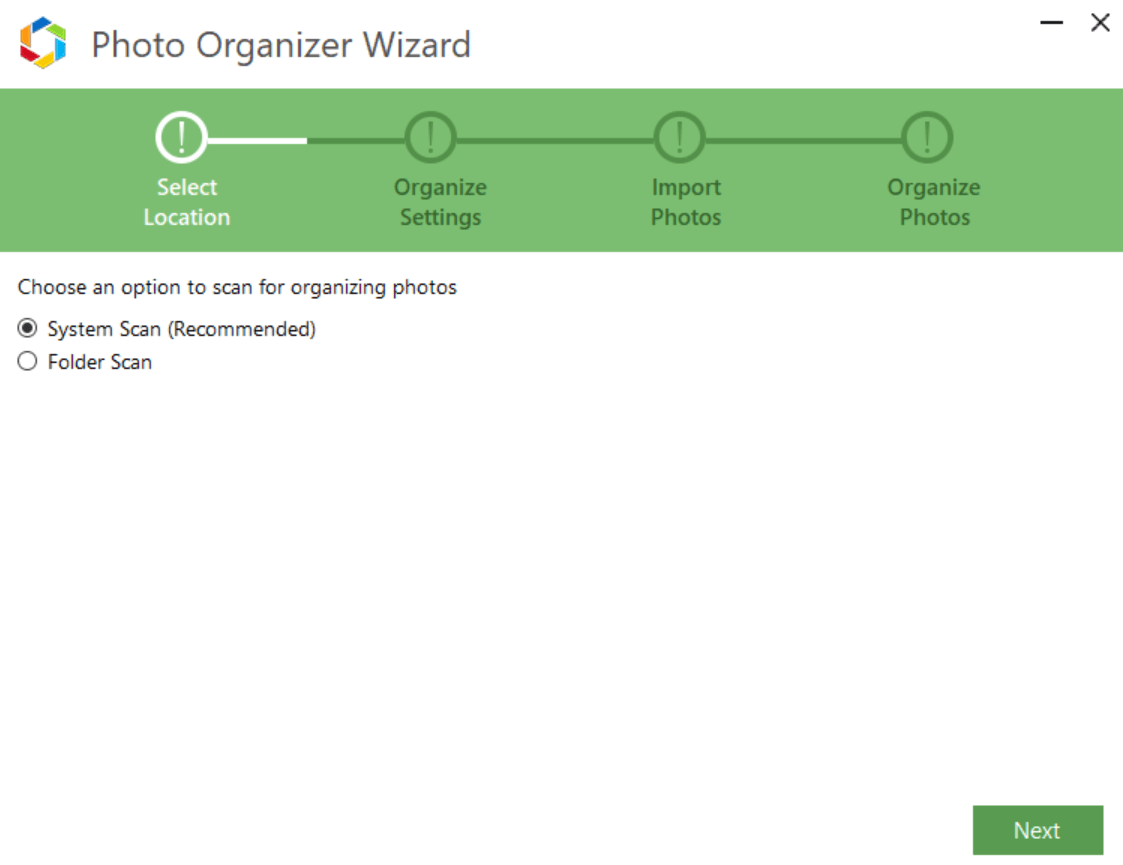
The default set option will always be the System Scan, however, you can switch to the other one as & when you like. Recommended one will always be the System Scan because it automatically starts scanning the entire system for scattered images & brings them together in one place. Having said that, if you are one of those users who keep all the photos in one folder only but not-at-all-managed, go with the Folder Scan as it will be time saving as well.
If you choose to go ahead with System Scan, the next page will have all the information from the Destination folder to the subfolder (including time/date/year).
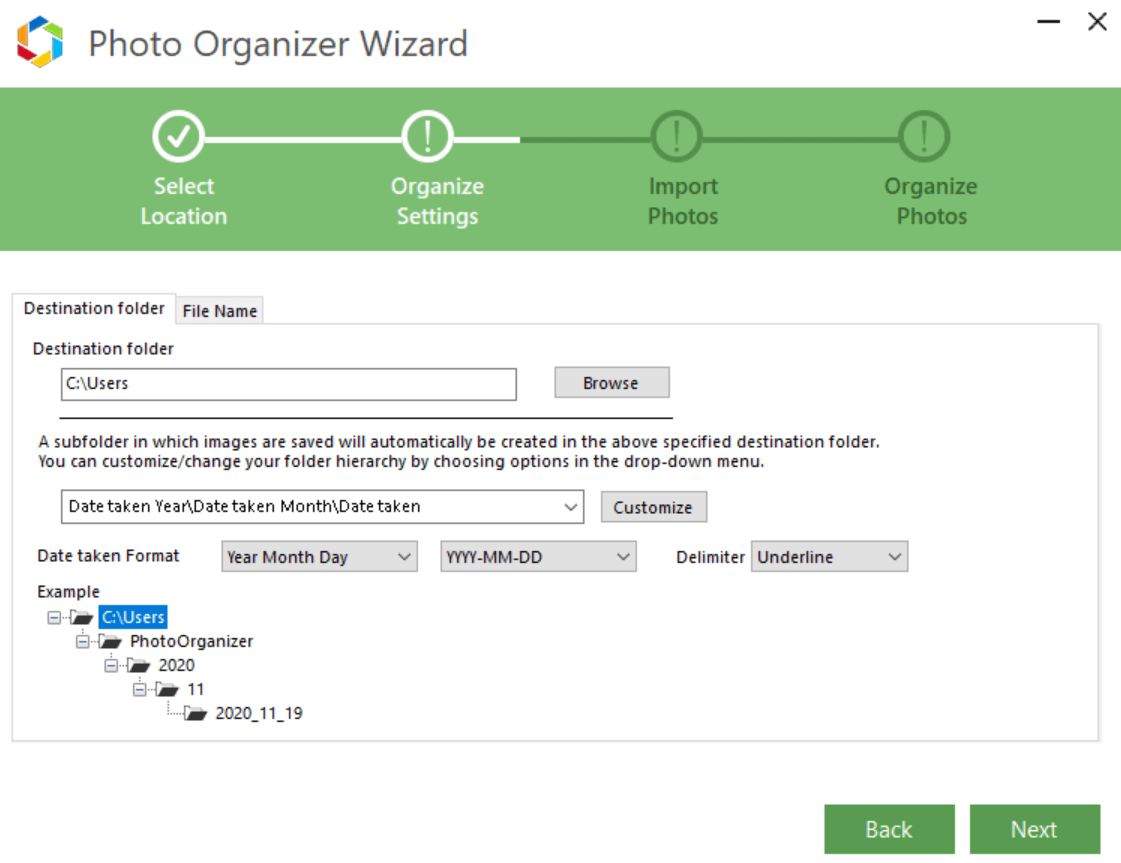
In case you want to make any changes according to your convenience, feel free to do so with full control. The page has been dedicated to organize the settings related to where the new results need to be stored. Additionally, you have the liberty to make necessary changes to the File Name as well and to use the function, tap on the File Name tab next to the Destination folder tab.
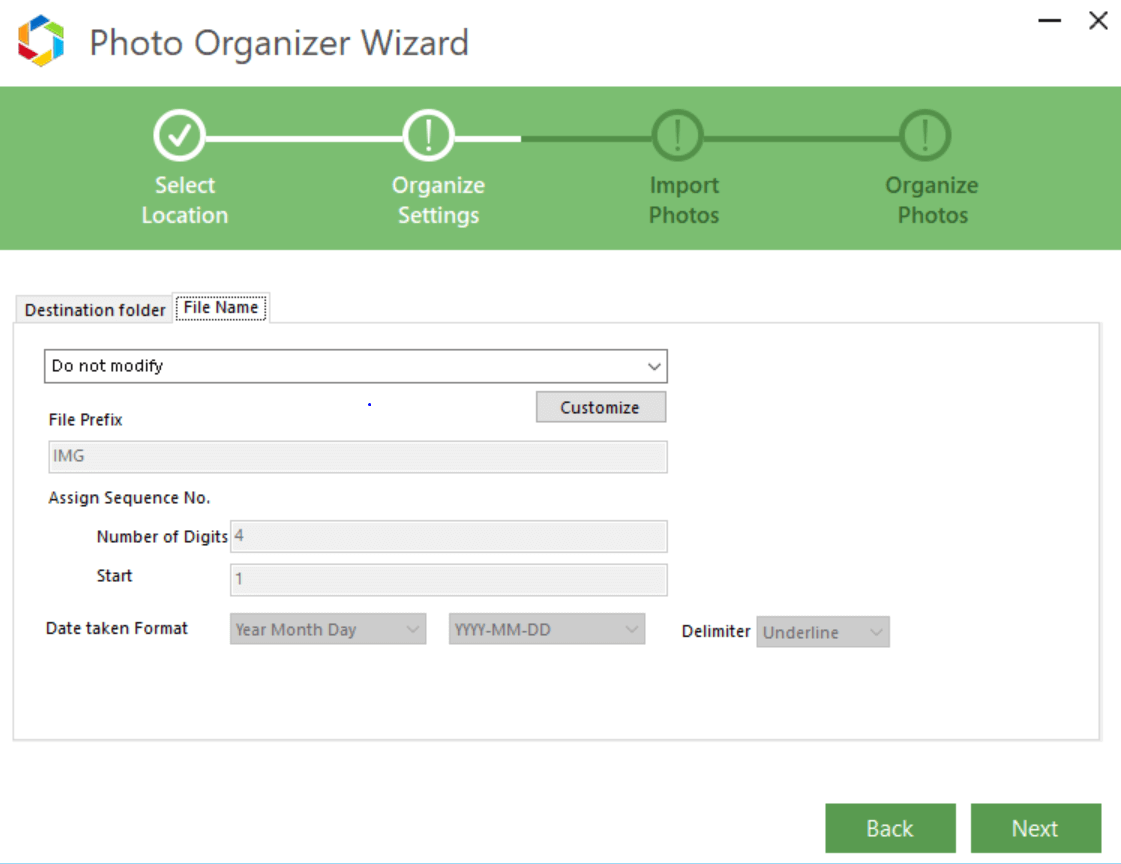
On the above page, as soon as you change the Do not modify to anything else, the whole disabled section below will get enabled to fill in appropriate information accordingly.
Tapping on another NEXT will bring you to the page where you need to make a decision of moving, copying or deleting the photos you are trying to organize. One of the most important steps on the process & decision from the user’s end where any action will affect your results directly.
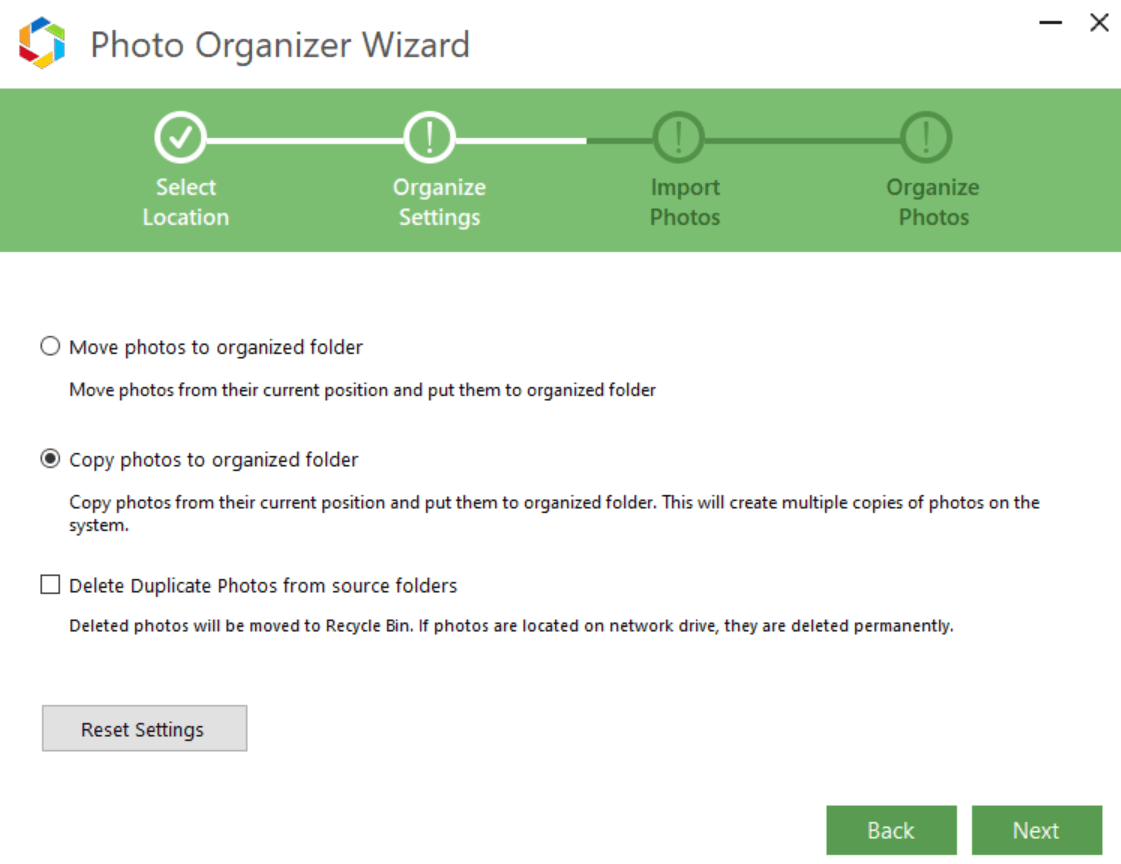
For example, the above screenshot shows the user has three options to choose from (Move/Copy/Delete). All these options are related to the image files that you are supposed to organize on your system so be careful while choosing any of the options.
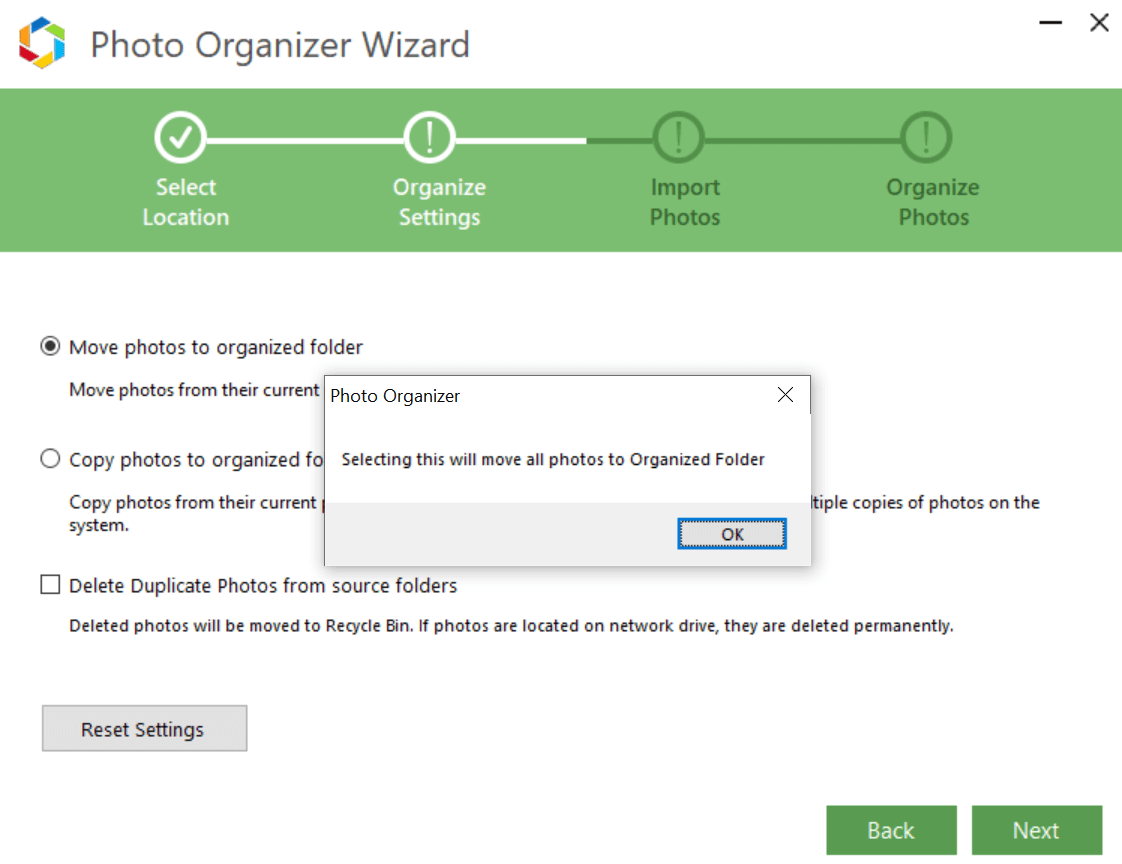
For example, in this case I chose the option to “Move photos to organized folder” and a prompt will pop up with the confirmation of my command.
After choosing the option to either move/copy or delete the photos, tapping on Next will lead to the page where you will get some more details. Such as Execute Folder, Files name to exclude (if any) & the minimum file size for scanning photos.
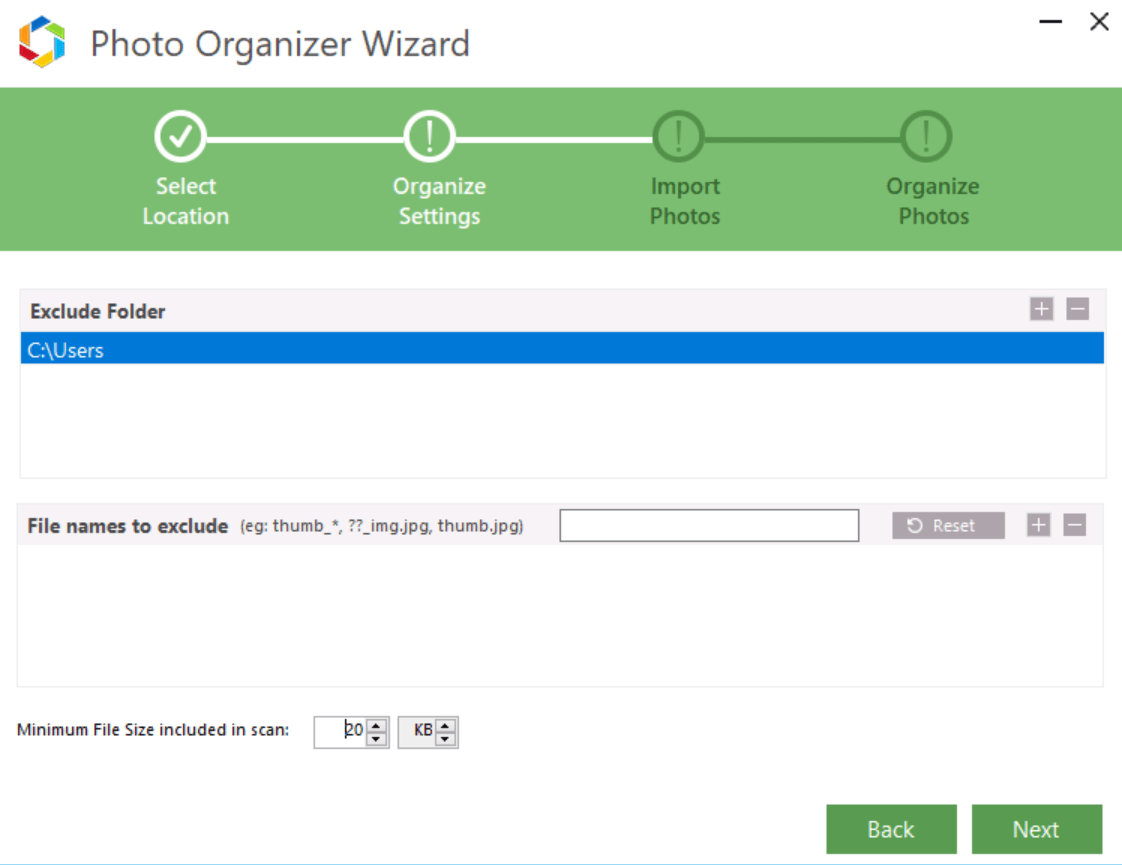
Put in the details as you feel like, from narrowing down a folder for outcome to any file name you don’t want in the process. Also, don’t forget to decide the image size as well that you wish to consider as the criteria to start organizing the digital photos process.
After everything has been put according to your convenience, tap on NEXT & you will see the Photo Organizer Wizard has started scanning the system for organizing the photos.
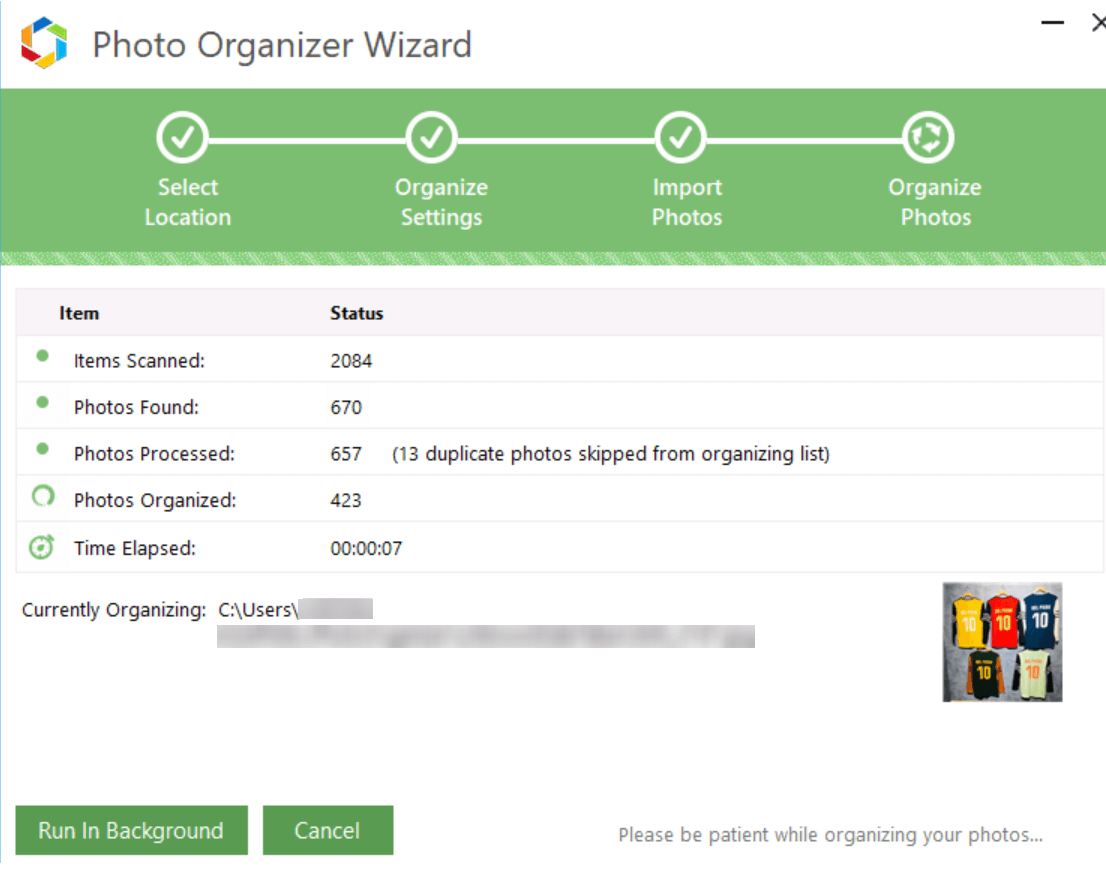
On the above page, you will know how many photos are there in your system right now & that will literally surprise you. As well as the duplicate pictures those are covering up the space unnecessarily on the drive. This data will give you a glimpse of how often you need to start organizing the photos on the system so that the duplicates as well as scattered pictures will be as few as possible.
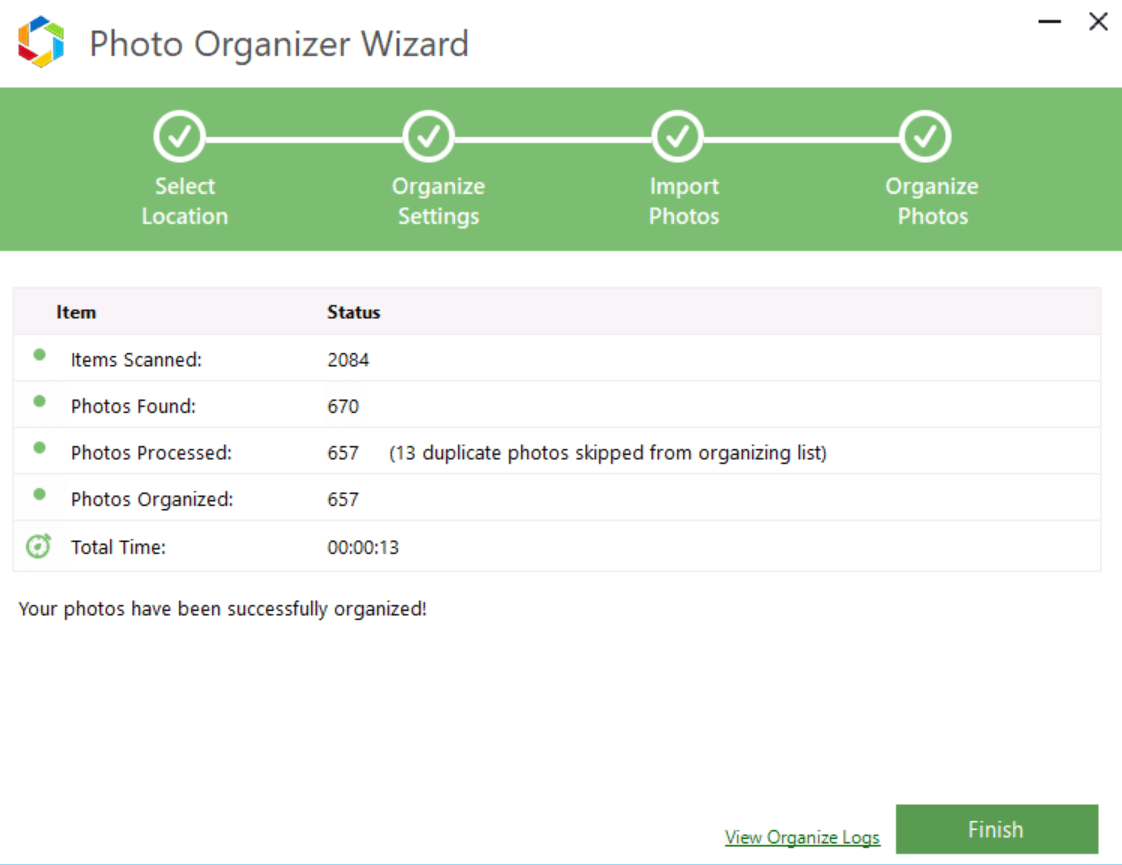
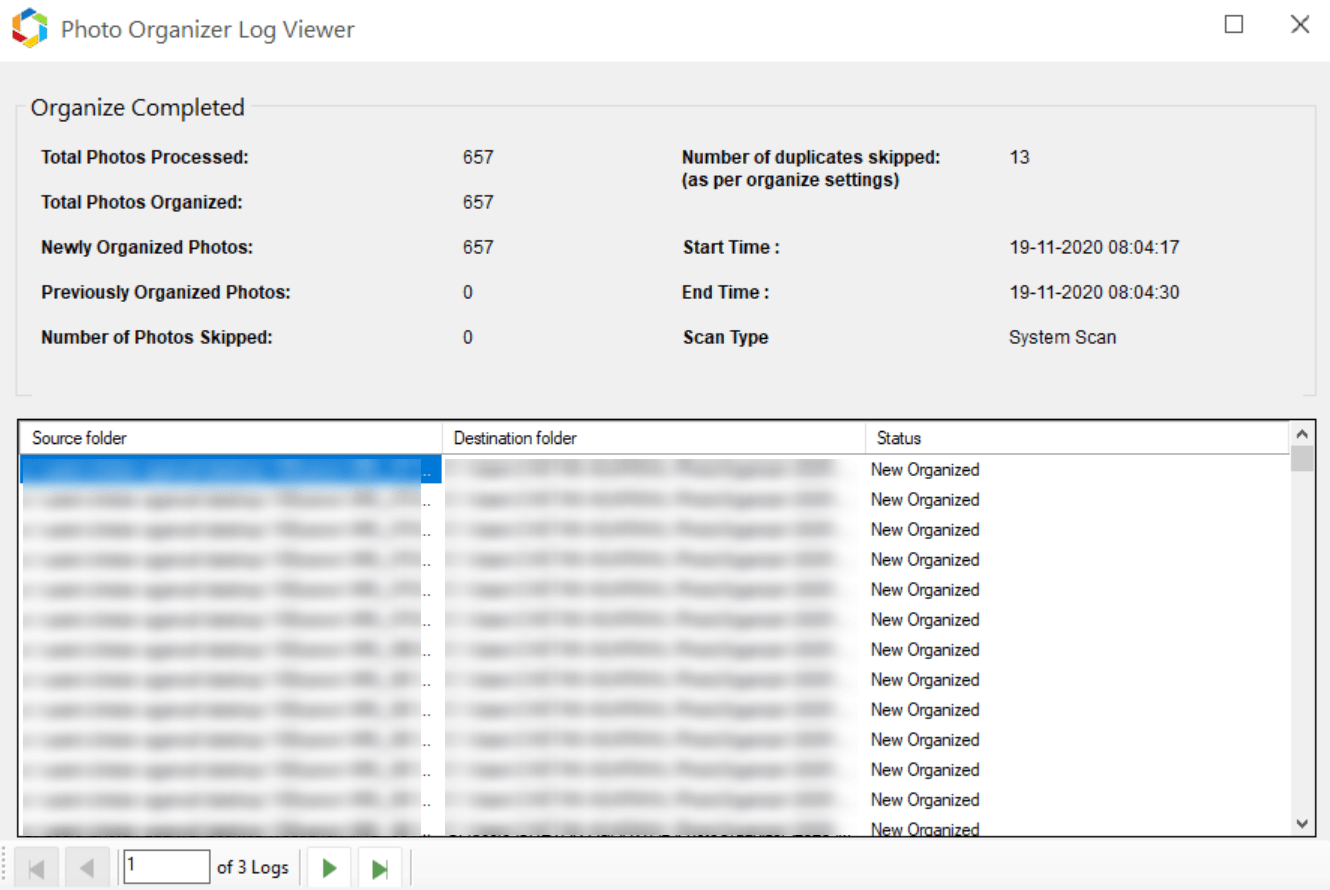
As soon as the organizing photos process ends, the message will read, “Your photos have been successfully organized”. You can see the statistics in front of you along with the Organized log that can be accessed by tapping on “View Organize Logs” nearby Finish function.
This is where all your scattered photos come into one place where you can keep them organized. Plus, with the selection of right options, you can delete the to-be-organized photos after they have organized through Photo Organizer. Simple as that!!
Also Read: How to Recover Photos from a Formatted Hard Drive?
2. Organized Photos
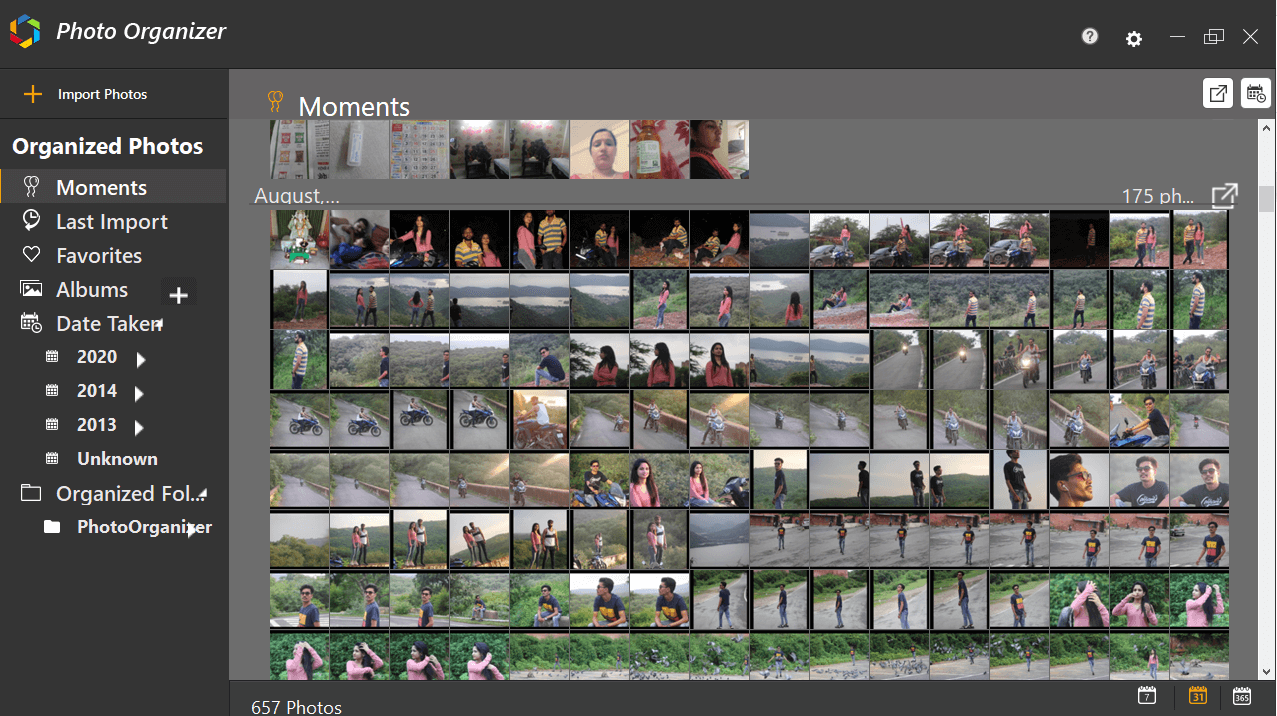
Following section of this magnificent photo management software comes into the picture after your photos have been successfully organized in a pre-defined folder. Post that, all of the pictures will be categorized into different sections from Moments to Date Taken. For every category, the display of photos will be different that you can also control.
For example, the Moments category under Photo Organizer tool looks like the below screenshot that gives you a glimpse of the moments you have captured.
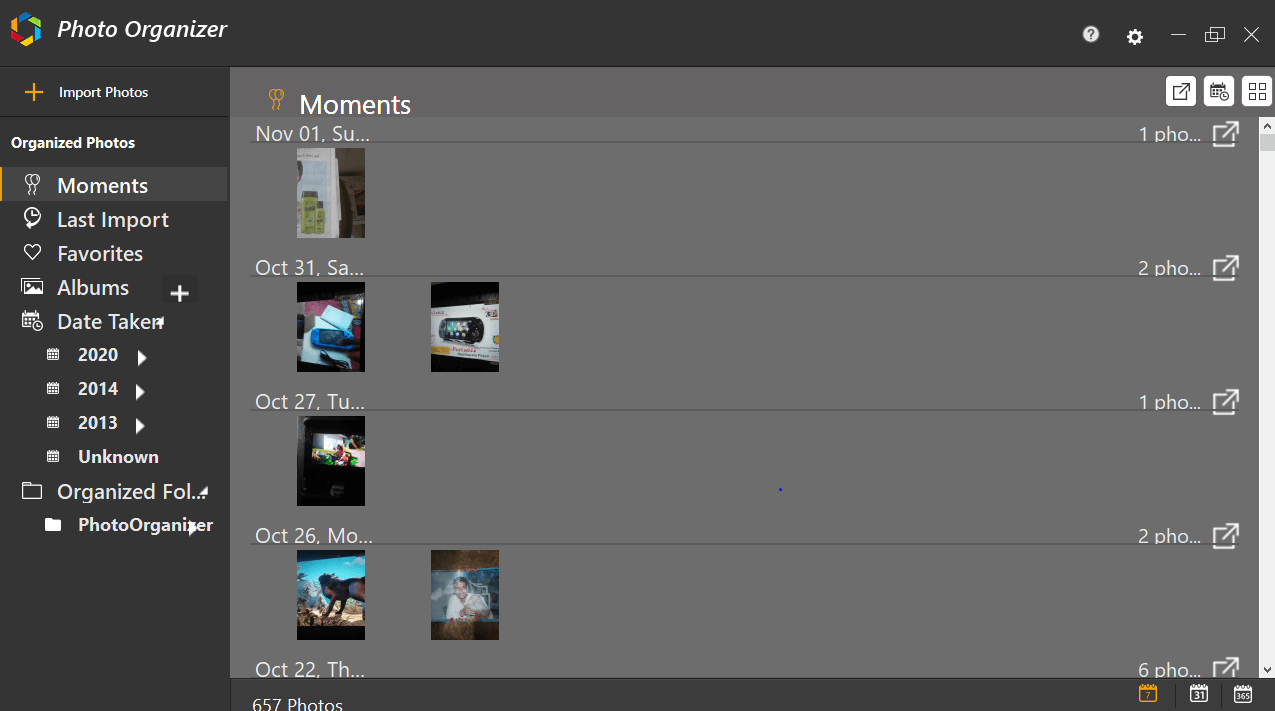
If you look at the bottom right side of the screen, you can see three options that help you change the display of the page. All you need to do is, tap on all the three image display formats to see which one is matching your interests and whichever one you like, stick with that only.
Same way, you can tap on other categories (left side of the screen) including Last Import, Favorites, Albums, Date Taken, & others. Going through these categories, you will know all the differences and accordingly you can select your favorites.
Additionally, even after you have got these many photos, you wish to export more from the system or external drives, tap on the first option (from left to right) just below the (minimize/maximize/close) function.
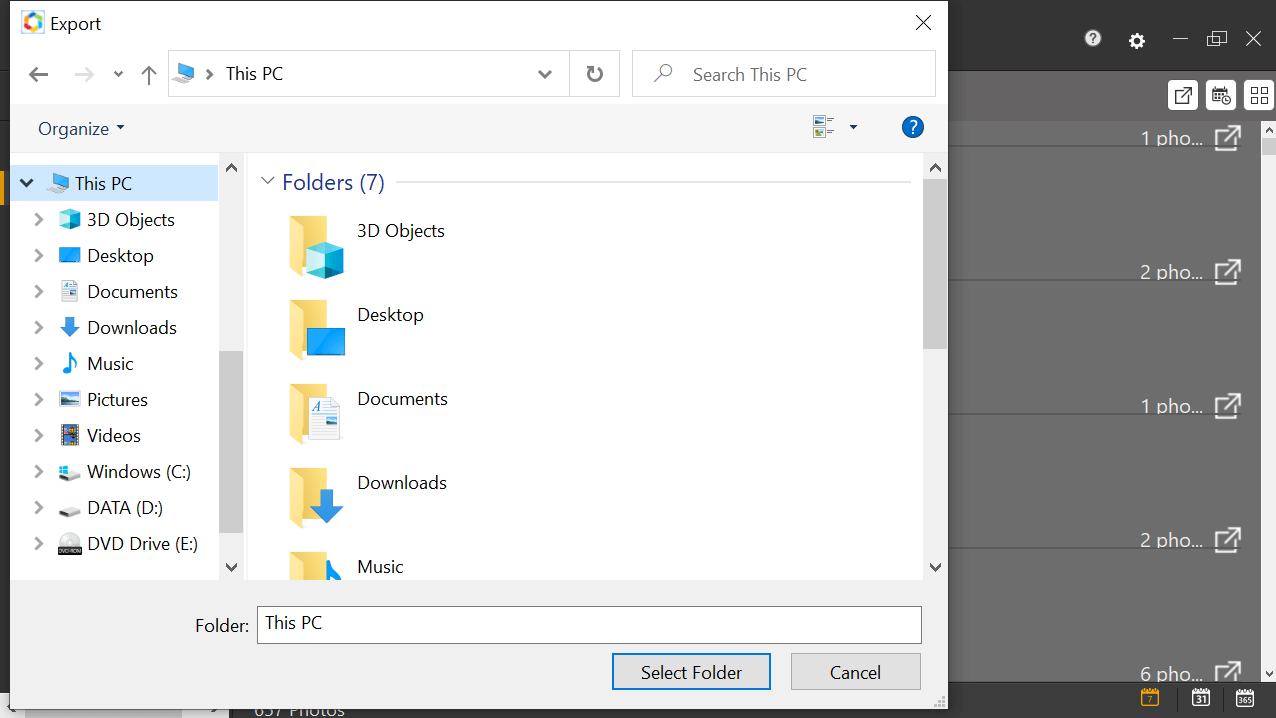
Doing this will let you export pictures from the system if you think you aren’t able to find one that you needed. Tap on the Export button and it will open up the window for you where you can choose the file and add the same. Simple as that!!
This way, Photo Organizer will help you sort out the cluttered pictures from your system & let you take action from one place.
Wrapping Up
We all have been in situations where we cannot manage the pictures that are spread throughout our system. From Downloads folder to different drives, anywhere you can see pictures & just the thought of organizing them makes you feel tired.
This is why we have brought you the ultimate Photo Organizer tool that’s been designed to make your life easier. From streamlining your photos collection to deleting the identical photos, Photo Organizer is the best tool you can get your hands on.
Without further delay, let’s explore the photo management software on your Windows PC and make the most of it.
Next Read
Use Photos Recovery Tool & Never Lose Your Precious Photos
How To Recover Photos From An SD Card Not Readable?


mariya jonsan
I will definitely try photos organizer to sort out my digital photos as this is much required for me, thanks for sharing.