


Summary
Google Chrome can use a significant amount of RAM, particularly when you have multiple tabs, extensions and resource-heavy websites open. While some memory usage is normal, excessive Chrome RAM usage can make your browser slow, cause tabs to freeze and affect overall Windows performance. The good news is that Chrome includes several built-in tools, including Task Manager and Memory Saver, that can help identify and reduce unnecessary memory consumption. Here are 15 easy fixes to try.
If Google Chrome is using too much memory, you may notice your computer becoming sluggish, tabs taking longer to respond or Windows Task Manager showing Chrome consuming several gigabytes of RAM. This can happen even when you aren’t actively doing anything demanding.
Chrome’s multi-process architecture is partly responsible. Instead of putting everything into one process, Chrome separates tabs, extensions and other browser components into different processes. This improves stability and security, but it can also increase Chrome RAM usage. Resource-intensive websites, extensions, background activity and long browsing sessions can push memory consumption even higher.
Before assuming something is wrong, however, remember that high memory usage doesn’t always mean Chrome has a problem. The important question is whether Chrome using too much memory is causing noticeable slowdowns or exhausting your computer’s available RAM.
How to Check Chrome RAM Usage
Before changing settings, find out what’s actually consuming memory.
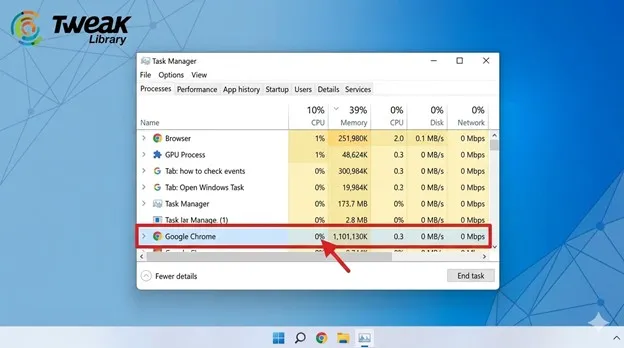
Open Windows Task Manager with Ctrl + Shift + Esc and look for Google Chrome under the Processes tab. This shows Chrome’s overall memory consumption.
For more detail, open a new Chrome window and press Shift + Esc to launch Chrome’s built-in Task Manager. It shows individual tabs, extensions and browser processes and includes a Memory footprint column. Sort the column to identify the biggest memory consumers.
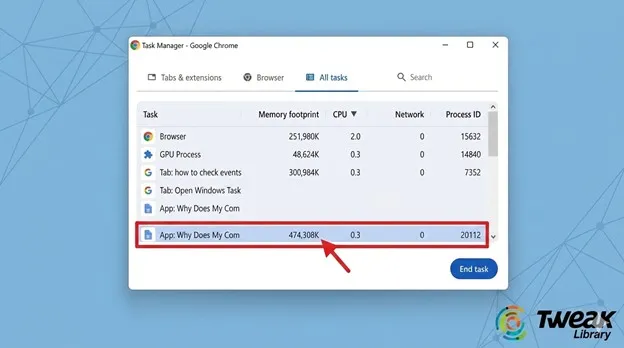
Once you know what’s consuming the memory, try these fixes.
Why Is Chrome Memory-Hungry?
The primary function of Google Chrome is to provide search results in the blink of an eye. For this, it prioritizes speed and stability over resource conservation. It treats every tab and extension as an isolated process so that if one crashes, your entire browser does not go down. While this multi-process architecture keeps your browsing smooth, it naturally multiplies memory consumption.
To understand the factors that can impact performance and contribute to high memory usage, check out the list:
- Multiple open tabs:
Every active tab needs system resources, and complex websites can require considerably more.
- Heavy content websites:
Video streaming, online games, web editors and applications demand massive memory.
- Browser Extensions:
Some extensions run processes in the background that constantly eat up RAM.
- Process isolation:
Splitting tabs into independent processes increases overall stability but duplicates data.
- Background tasks:
Chrome keeps certain processes active even when you are not using them.
- Memory leaks:
A poorly coded website or extension may fail to release memory after you close them.
15 Easy Fixes for Chrome Using Too Much RAM
1. Close Unnecessary Tabs
The simplest solution is to close tabs you no longer need. Keep only frequently used pages open and bookmark anything you want to revisit later.
2. Find and Close Memory-Hungry Tabs
Press Shift + Esc in Chrome to open Task Manager. Sort processes by Memory footprint, select an unusually large process and click End process. This is particularly useful when one website is responsible for the slowdown.
3. Turn On Memory Saver
Go to Settings > Performance and turn on Memory Saver. Chrome can deactivate inactive tabs to free memory for the tabs you’re currently using. When you return to a deactivated tab, Chrome reloads it.
4. Choose the Right Memory Saver Level
Chrome now provides three Memory Saver levels:
- Moderate: Deactivates tabs less aggressively.
- Balanced: The recommended middle ground.
- Maximum: Deactivates inactive tabs more aggressively to maximize memory savings.
Still, if Chrome consuming too much memory, try Maximum. Keep in mind that frequently revisiting inactive tabs may cause more reloads.
5. Remove Unnecessary Extensions
Type chrome://extensions in the address bar. Review your installed extensions and disable or remove those you don’t need. Extensions that run continuously can contribute to Chrome high memory usage.
6. Test Chrome Without Extensions
If you are unsure whether an extension is causing the problem, temporarily disable your extensions and browse normally. If Chrome becomes noticeably faster, re-enable extensions one at a time until you identify the culprit.
7. Restart Chrome
A simple restart can clear temporary processes and resolve slowdowns that have accumulated during a long browsing session. Close Chrome completely and reopen it.
8. Update Chrome
An outdated browser can contain performance problems that may have already been fixed in a newer release. Open Settings > About Chrome and allow Chrome to check for updates. Relaunch the browser if an update is available.
9. Stop Chrome From Running Background Apps
Open Settings > System and look for the option that allows Chrome to continue running background apps when it is closed. Turn it off if you don’t need Chrome processes running after closing the browser.
10. Disable Page Preloading
Chrome can preload pages to make browsing feel faster, but preloading can use additional resources. Open Settings > Performance and review the page preloading option. If you’re dealing with high Chrome RAM usage, try disabling it and see whether performance improves.
11. Clear Cached Browsing Data
Open Settings > Privacy and security > Delete browsing data and clear cached images and files. Cache clearing is more useful for certain browser performance or loading problems than as a permanent RAM fix, so don’t expect it to solve every memory issue.
12. Use Chrome’s Performance Issue Alerts
Chrome can notify you when a tab is negatively affecting browsing performance and recommend deactivating it. If you see a performance alert, follow the suggested Fix now action rather than ignoring it.
13. Test Hardware Acceleration
Hardware acceleration normally helps Chrome use the GPU for graphics-intensive tasks, but compatibility problems with certain graphics drivers can sometimes cause performance issues.
Go to Settings > System and toggle Use graphics acceleration when available, then relaunch Chrome. If the problem disappears after changing the setting, investigate your graphics driver or leave the setting at the configuration that works best for your PC.
14. Reset Chrome Settings
If Chrome remains slow after trying the other fixes, consider resetting its settings. This can undo problematic configuration changes without requiring a complete browser reinstall.
Open Settings > Reset settings > Restore settings to their original defaults and follow the prompts.
15. Check Other Apps Using RAM
Sometimes Chrome isn’t the real culprit. Open Windows Task Manager and check what else is consuming memory. Video editors, games, Microsoft Office applications, cloud-sync utilities and other browsers can all compete for RAM.
If your computer has limited memory, closing unnecessary applications may make Chrome considerably faster even without changing Chrome itself. Google also recommends closing other tabs, applications and unnecessary extensions when a computer is running low on memory.
What If Chrome Is Still Consuming More RAM?
If Chrome is still consuming more RAM after troubleshooting, look for patterns to pinpoint the cause. Check if specific websites, extensions, or long browsing sessions trigger the spike.
Memory usage also depends on your system; a 16 GB RAM computer handles heavy web apps differently than a 4 GB or 8 GB system. Focus on whether the memory load slows down your actual performance rather than the raw numbers.
On Mac and Chromebook
The same core fixes apply on Mac: Memory Saver, extension cleanup, and cache clearing all work the same way.
On a Chromebook, check memory through the built-in Task Manager (Search + Esc), since Chromebooks have less RAM to begin with and fewer tabs can push them into slowdown territory.
Conclusion
Google Chrome is designed to show results in a flash. Its multi-process design approach and modern web application demand a lot of memory to keep your browsing experience fast and stable. Everything is fine, until higher memory consumption affects computer performance. Slow down in performance can lead to delayed response time, intermittent screen freezing, or sluggish mouse movements.
To fix this, open Chrome’s Task Manager to see what is using the most memory. Then, turn on Memory Saver, close unused tabs, and remove extensions you do not need. If Chrome is still slow, check heavy websites, close background apps, or consider upgrading your computer’s RAM.





Leave a Reply