


Summary
When using multiple apps simultaneously on MacBook Air, it can become irritating very quickly since there is a continuous process of switching from one window to another. But here comes a relief, thanks to the Split View feature in macOS. In this article, you will be introduced to the concept of using split screen on MacBook Airs, regardless of the generation.
It is very common when working on a MacBook Air to multitask; you may have to look for data online while creating a report, compare two spreadsheet documents, participate in a video call while taking notes, or code while referring to some documentation. Multitasking on the same screen will disrupt your work.
However, there is a feature available on macOS known as Split View or sometimes referred to as Split Screen, which enables the user to work on two applications simultaneously. No matter whether you have an M1, M2, M3, or M4 MacBook Air or even an Intel model that supports the latest macOS, you will learn all the aspects related to the use of split screen here.
What Is Split Screen on a MacBook Air?
Split Screen, which is also known as Split View, is a feature on macOS that allows users to run two applications side-by-side on their device. Unlike the manual way of splitting the screen for two applications, Split View automatically organizes the applications to provide each with ample space to use. Below are some activities that can be done using split-screen.
- Browsing Safari and typing in Microsoft Word
- Participating in a Zoom call while making notes
- Comparing two files
- Editing photos while watching a tutorial
- Listening to a lecture and working on assignments
- Email management together with calendar management
Benefits of Using Split Screen
Benefits of using Split View:
- Decreases the need for constantly switching apps
- Increases the efficiency of multitasking
- Facilitates easy comparison between documents
- Organizes your workspace
- Assists students and professionals to be more productive
- Utilizes the limited screen space on MacBook Air
For those working with many apps simultaneously, Split Screen would save a lot of time during the day.
Expert Recommended Methods To Use Split Screen on MacBook.
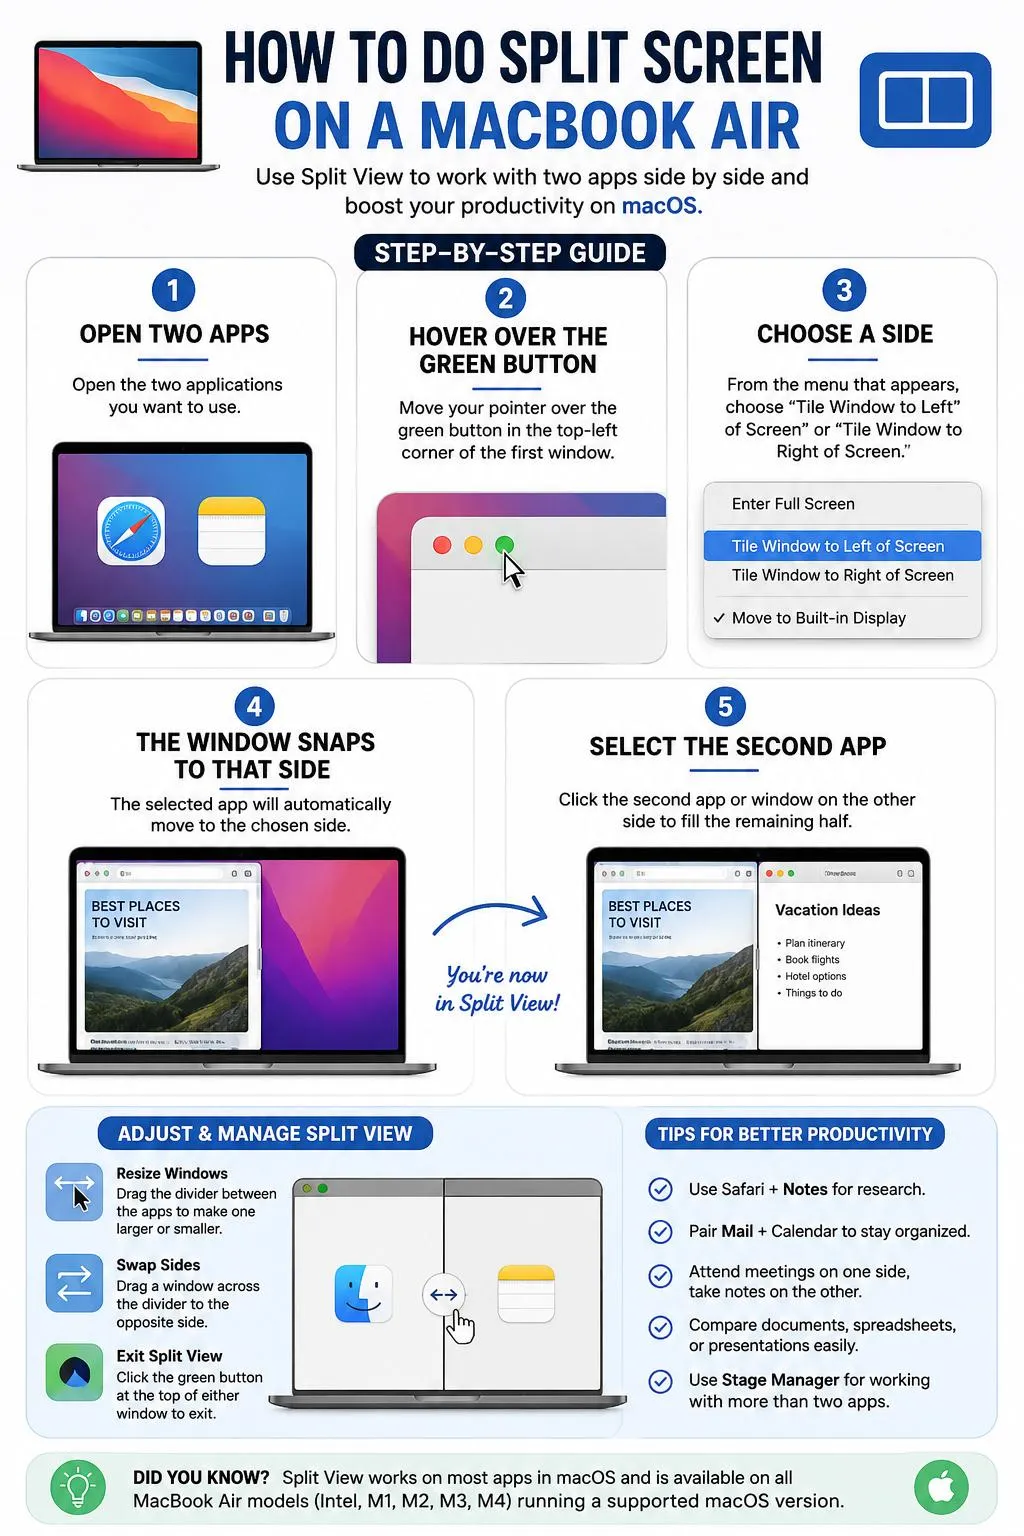
Method 1: Use Split View from the Green Window Button
This is the easiest and most common method.
- Launch the two applications you want to use.
- Look at the upper-left corner of the first app window.
- You’ll see three buttons: Red (Close), Yellow (Minimize), and Green (Full Screen)
- Move your mouse pointer over the green button.
- On newer versions of macOS, a small menu appears automatically.
- You’ll see options such as “Tile Window to Left of Screen” or “Tile Window to Right of Screen”.
- Click your preferred side.
- The selected app moves to that side of the display.
- The opposite side now displays your remaining open windows.
- Click the second application.
- macOS automatically fills the remaining half of the screen.
- You’re now using Split Screen.
Method 2: Use Window Tiling in Newer Versions of macOS
The latest versions of the macOS operating system have more options for tiling. The screen no longer needs to be split in half but instead offers different positions for the windows, which depend on the version of macOS. All you need to do is simply hover over the green window icon and pick the arrangement that works for you.
Method 3: Resize Windows Manually
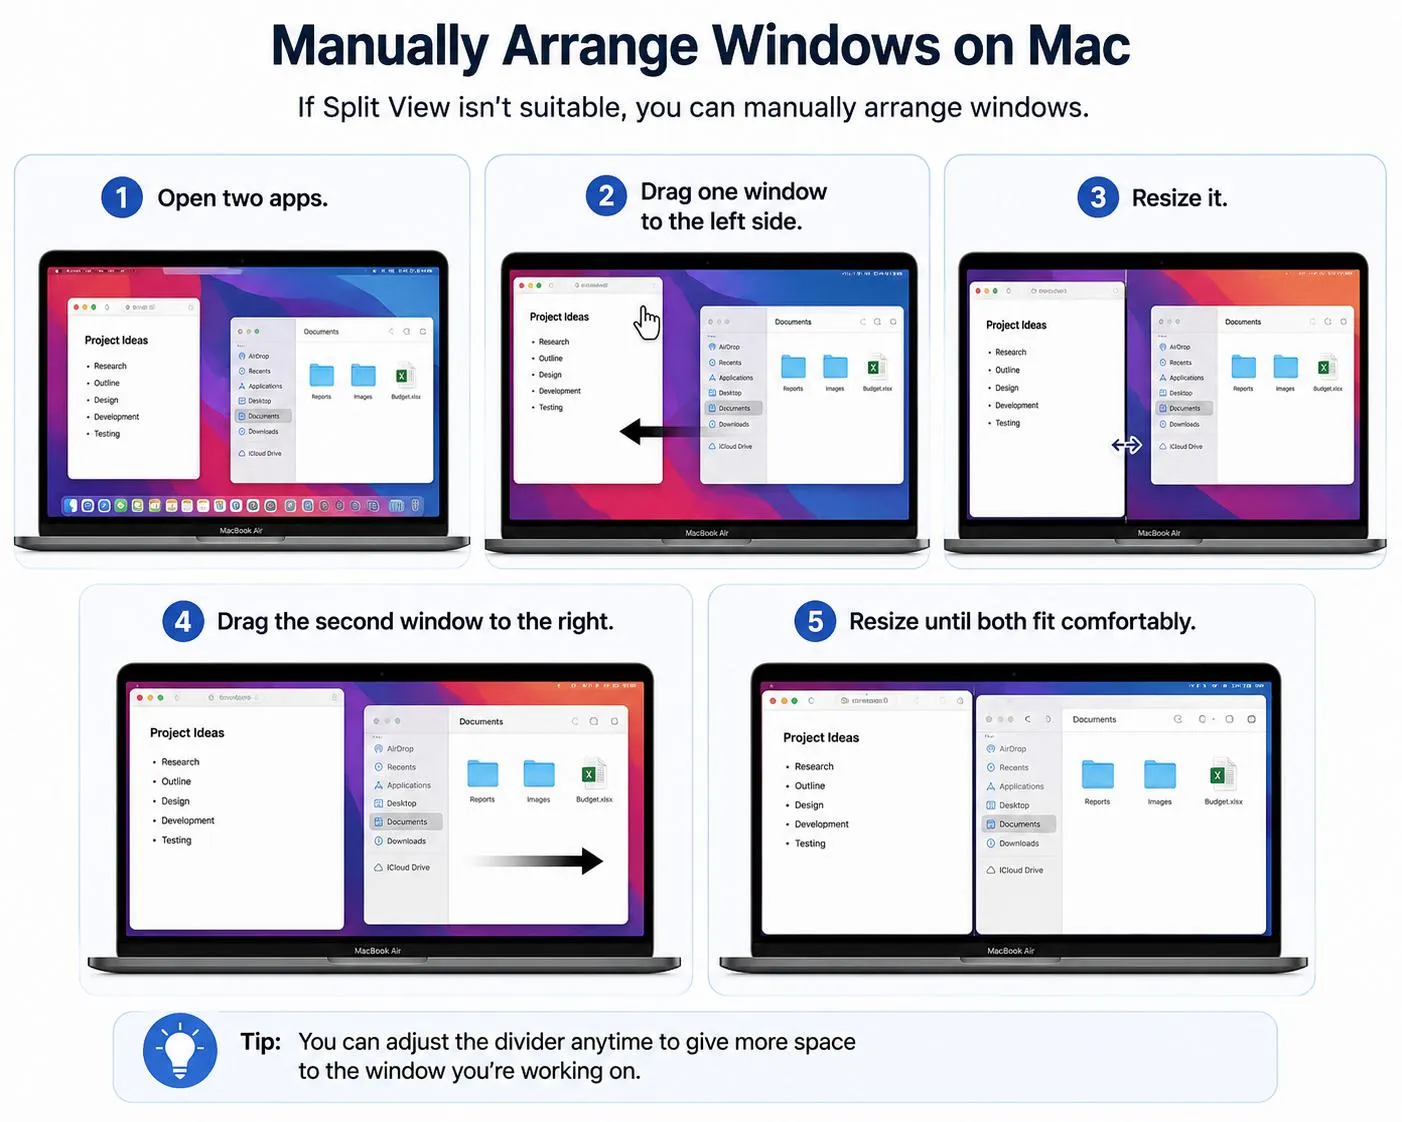
If Split View isn’t suitable, you can manually arrange windows. Here is what you need to do.
- Open two apps.
- Drag one window to the left side.
- Resize it.
- Drag the second window to the right.
- Resize until both fit comfortably.
This method allows more flexibility than Split View because you can leave space for additional windows.
How to Resize Split Screen
Once Split View is active:
- Move your cursor to the divider between both apps.
- When the resize cursor appears, drag left or right.
- Release when satisfied.
This lets one app occupy more space than the other.
How to Swap App Positions
Want the apps to switch sides?
Simply drag the toolbar of one app across the divider to the opposite side. The two applications instantly exchange positions.
How to Exit Split Screen
Leaving Split View is simple.
Method 1
- Move your cursor to the top of the screen.
- Click the green button on either window.
- That app exits Split View.
Method 2
Press the Escape (Esc) key if supported.
Method 3
Use Mission Control to return windows to the desktop.
Bonus Feature: Why Split Screen May Not Work
Sometimes Split View refuses to activate.
Here are common reasons.
- App Doesn’t Support Split View. Some older applications don’t support Apple’s Split View feature. Try using another app to verify.
- macOS Is Outdated. Older macOS versions may have bugs affecting window management. Updating macOS often resolves these issues.
- Full Screen Disabled. Certain apps prevent Split View if they’re already in a custom window mode. Try exiting full screen first.
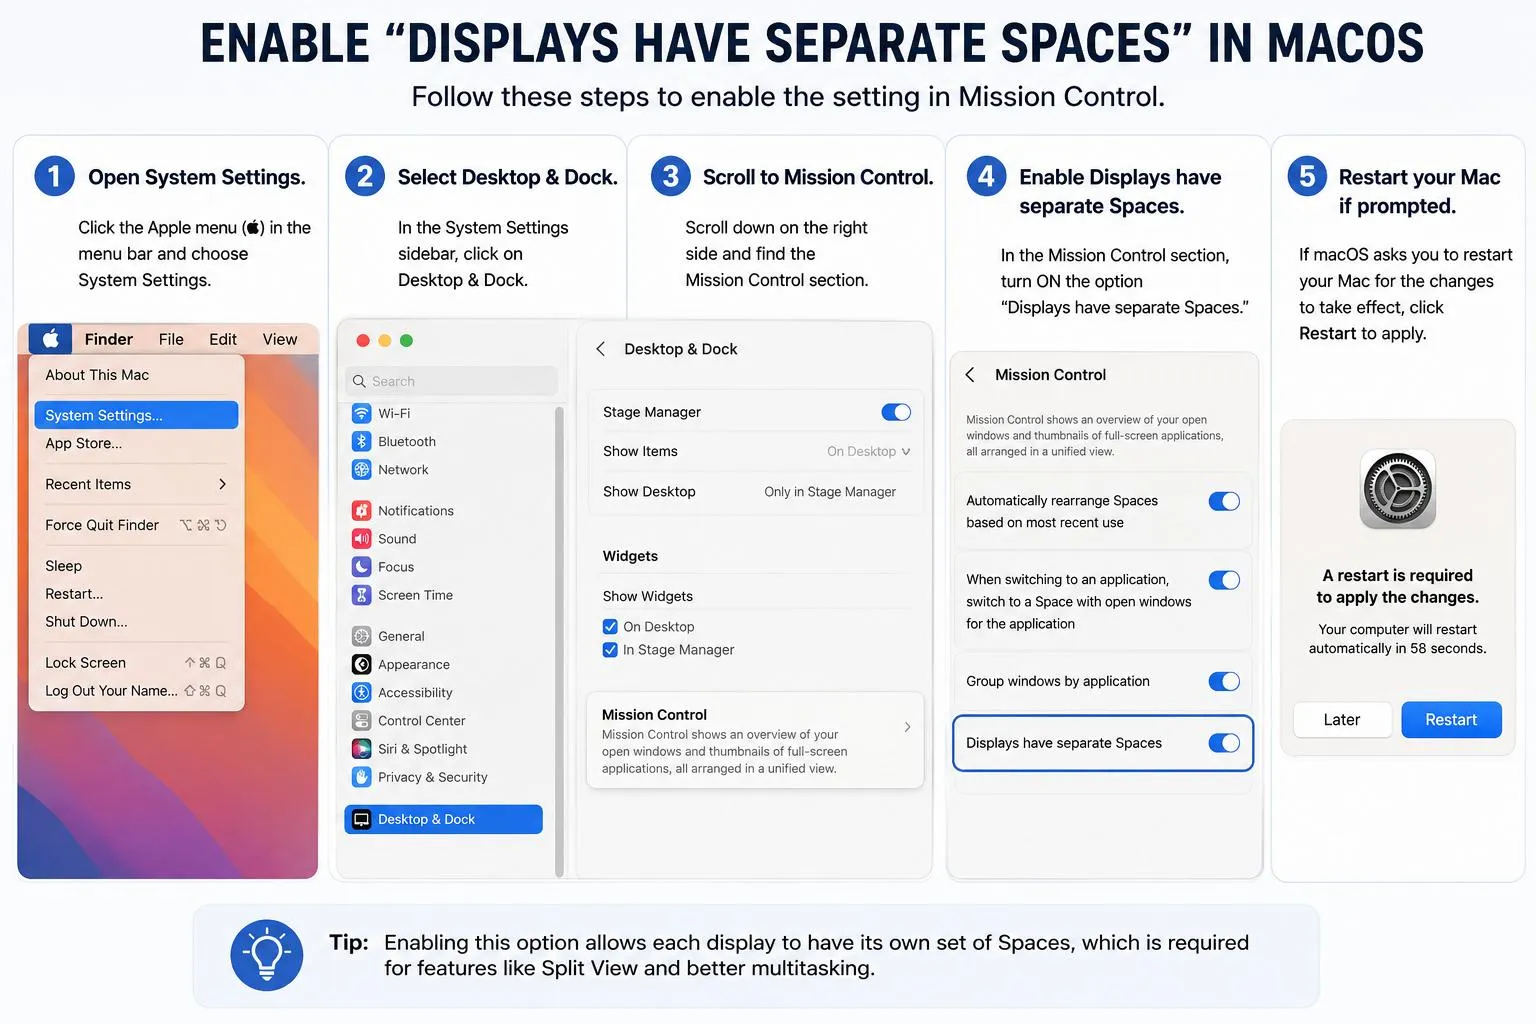
- Displays Have Separate Spaces Is Disabled. Split View depends on Mission Control. To enable it, follow these steps.
- Open System Settings.
- Select Desktop & Dock.
- Scroll to Mission Control.
- Enable Displays have separate Spaces.
- Restart your Mac if prompted.
- Temporary System Glitch. Sometimes macOS simply needs a restart.
Choose Apple menu → Restart. Then try Split View again.
Tips for Using Split Screen Effectively
There are some useful methods to effectively use Split View:
- Place communication applications such as Mail or Messages on one side while doing work with documents.
- Compare two different versions of any file without closing and opening windows.
- Do research work using Notes and Safari side by side.
- Have your calendar open while planning a meeting.
- Use Finder together with a document editor for dragging and dropping files.
- Use Zoom or FaceTime along with Notes in meetings.
Frequently Asked Questions
Conclusion
Among many built-in tools of the MacBook Air, Split Screen is perhaps the most efficient one to increase productivity and concentration. Whether you need to write a report, participate in an online meeting, compare several documents, or conduct some research, Split View allows you to see two applications at once without switching windows back and forth.
It takes only a few clicks on the green window button to arrange your workspace properly. If Split Screen does not work on your MacBook Air, it’s most likely due to the outdated macOS version or some problems with the application itself or the Mission Control settings. The skillful use of Split Screen together with other functions, such as Stage Manager or Mission Control, will help you to turn the MacBook Air into a productive workplace.






Leave a Reply