
Do you often use Skype for communications or you use it quite less? Depending on the usage, Skype turns out to be the best or a random app for the users. In the earlier Windows versions, Skype has to be installed and it was entirely your choice if you want it or not. But, Skype is now owned by Microsoft and it comes built-in with the latest Windows PCs. When you buy Windows 10, Skype comes integrated. You might be wondering what is the problem then?
Well, the problem here is that Skype starts automatically. This is either it is manually or automatically set to appear in the list of Startup items. This is why it keeps on opening and appearing everytime you turn on your PC. again, you might be questioning, what is the issue then. Well, the issue again is that it gets frustrating with time if you do not use Skype or rarely use it.
Since Skype is an integrated part of Windows, you can prevent it from showing up all the time you open Windows 10. There are two popular ways to do this either through Windows Settings or using a startup manager tool for Windows like Advanced System Optimizer.
How To Stop Skype From Starting Automatically
Part 1: Use Windows Settings To Disable Skype on Startup
While you chose to take help of Windows settings, here are some steps to follow to stop skype from starting automatically every time you log on.
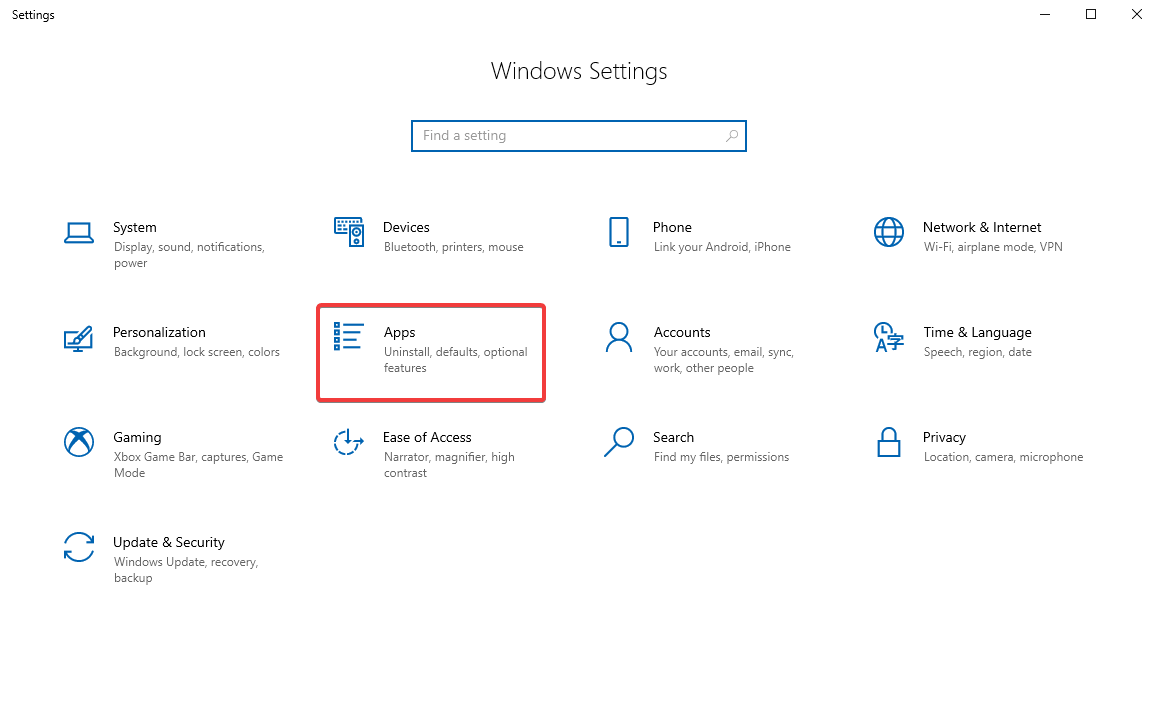
Step 1: Head to Windows Settings either from the Start menu or by pressing Win+I.
Step 2: Navigate to the Apps tab under Settings menu.
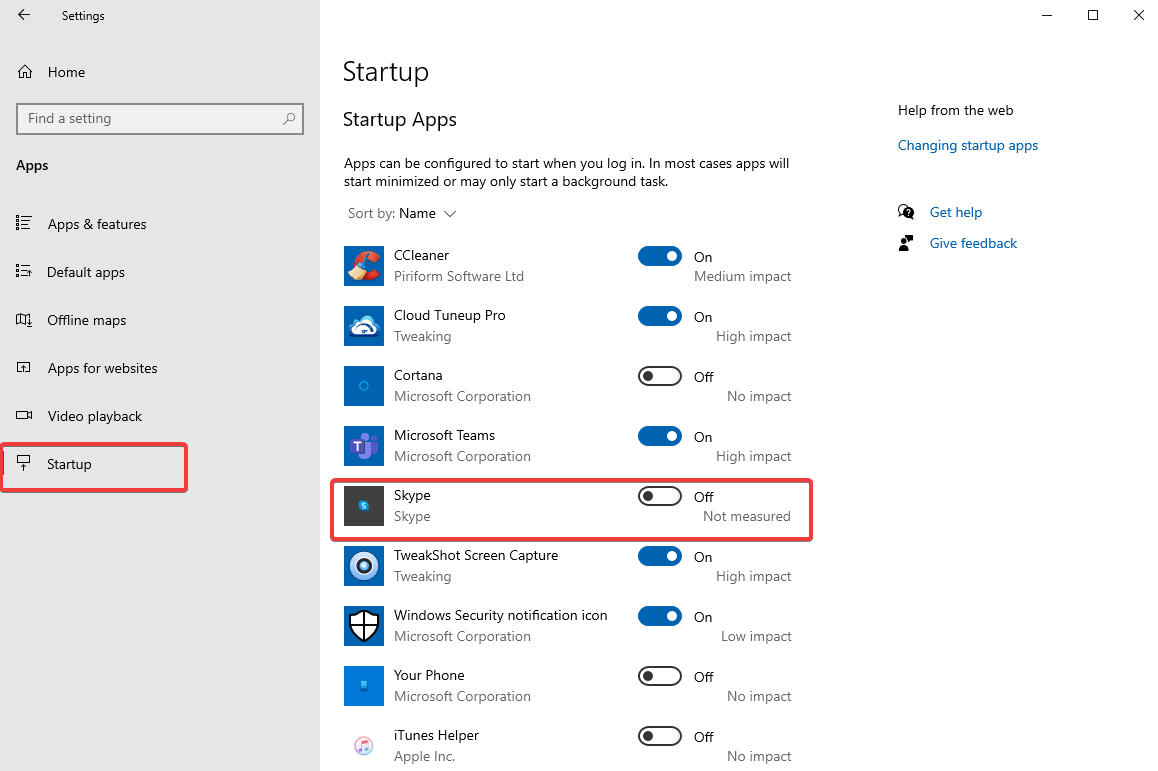
Step 3: Next, you will see a list of tabs, choose Startup from the list. And on the right-side, locate Skype and turn the toggle OFF.
Step 4: That’s all! Now you will not see Skype appearing automatically every time you log on your Windows PC.
What If I Don’t See Skype In The List
Not able to see Skype in the list and still it is appearing during startup? Well, as we always say there is a solution to everything. If Skype is not visible, it might be manually enabled. To fix this, you can press Windows Key+R to open the Run window. Type in shell:startup.
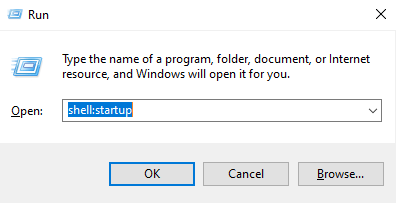
This will open the Startup Folder on your PC. If you see Skype here, you can right click on it and from the list of options choose DELETE. This way you can stop Skype from starting automatically on Windows.
Part 2: Use Advanced System Optimizer- The Best Startup Manager App For Windows
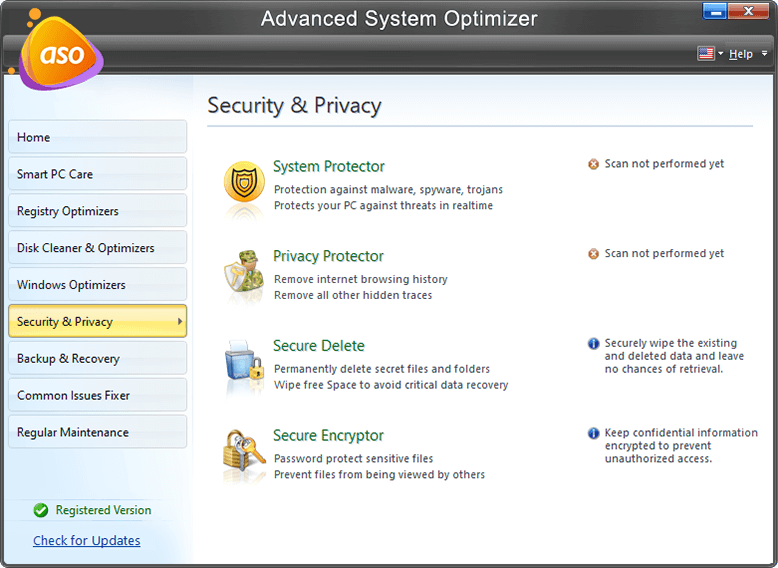
Besides manual ways and Windows Settings app, you can also choose a startup manager app to do the work done. We recommend using an amazing PC optimization tool- Advanced System Optimizer. This is a robust Windows utility that helps you optimize your PC for extraordinary performance. You can use this software for multiple cleaning, optimization and overall maintenance of your computer. Here’s how to use this tool to disable Skype on Startup or clean other startup apps.
Step 1: Download and Install Advanced System Optimizer.

Read Full Review of Advanced System Optimizer
Step 2: Once the app is launched, navigate to the Regular Maintenance > Startup Manager.
Step 3: Click on Manage Startup tab.
Step 4: On the Manage Startup window, you can simply choose which startup item to add/remove/enable/disable by using the buttons (Add, Disable, Enable, Remove) for improving startup speed.
Step 5: Choose Skype from the list and click on Remove.
This makes managing startup apps easier and convenient to optimize your PC using its different modules inclusive of Registry Optimizers, Disk Cleaners, Driver Updater, Uninstall Manager, Regular PC Cleaning & Optimization Scheduler, Duplicate Files Remover, Privacy Protector and a lot more.
Wrapping Up Disable Skype From Startup!
So, these were some of the best ways to stop Skype from appearing automatically on your Windows every time you log on. You can choose to disable Skype either from the Windows settings or by using a startup manager program for Windows. Furthermore, you can head to Windows Settings > Privacy > Background apps and toggle OFF Skype. Once you disable Skype, reboot your system to apply changes and see if Skype appears back again or not. Hopefully, it won’t.
Hope we were able to help you stop skype from starting automatically.
Do let us know your feedback or suggestions in the comments section below.
Keep reading Tweak Library for more troubleshooting guides.
Recommended Readings:
How To Share Screen On Skype From Android, Windows, and iOS
Fix: Unable To Send Messages On Skype In Windows 10
How To Block Or Unblock Someone On Skype


Jackie
Very easy steps to follow! Thanks for the help.