It’s pretty normal for us to transfer files between our devices in our daily lives. Among these data transfer requirements, the necessity to understand how to transfer files from a Mac to an iPhone or an iPhone to a Mac appears to take precedence. This is most likely because it is less known and, thus, more challenging. As a result, we’ve compiled a list of SEVEN methods for transferring data between an iPhone and a Mac. These methods will assist you in transferring files from your Mac to your iPhone or sending files from your iPhone to your Mac.
How to Transfer Files Between iPhone and Mac
Transfer by Syncing Files from Your Mac to Your iPhone
If you wish to transfer material such as images, movies, or music from your Mac to your iPhone or from your iPhone to your Mac, you may utilize EaseUS MobiMover. It allows you to exchange files between a Mac and an iOS device (iPhone/iPad running iOS 8 or later) as well as transfer data between iPhones. You may, for example, transfer a single file, many files, or all of these files of various sorts all at once between your iPhone and Mac.
Aside from exchanging files between your Mac and your iPhone/iPad, EaseUS MobiMover may also assist you when:
- Files may be transferred between a PC and an iPhone.
- Data may be copied from one iPhone to another.
- Videos from YouTube and a variety of other websites can be downloaded to a PC or an iPhone/iPad.
- On a computer, you may see iPhone material.
Steps to Transfer Files from Mac to iPhone Using EaseUS MobiMover
- Download and install EaseUS MobiMover
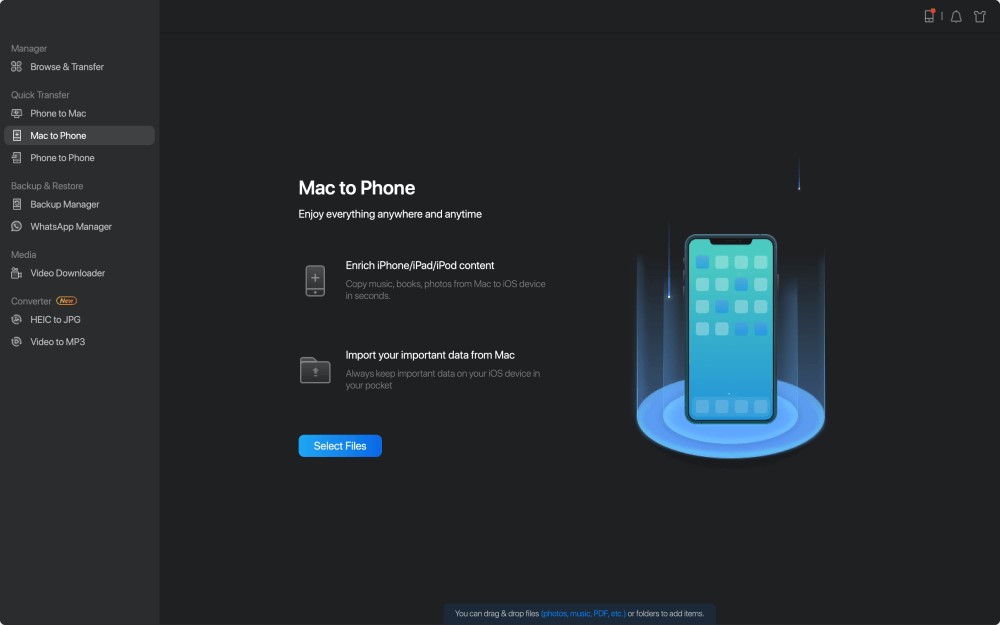
- Connect your new iPhone to your Mac via USB connection and hit “Trust This Computer” on your device. Launch EaseUS MobiMover and select “Mac to Phone” from the main menu, as seen in the screenshot below. To begin transferring files from your Mac to your iOS device, click “Select Files.”
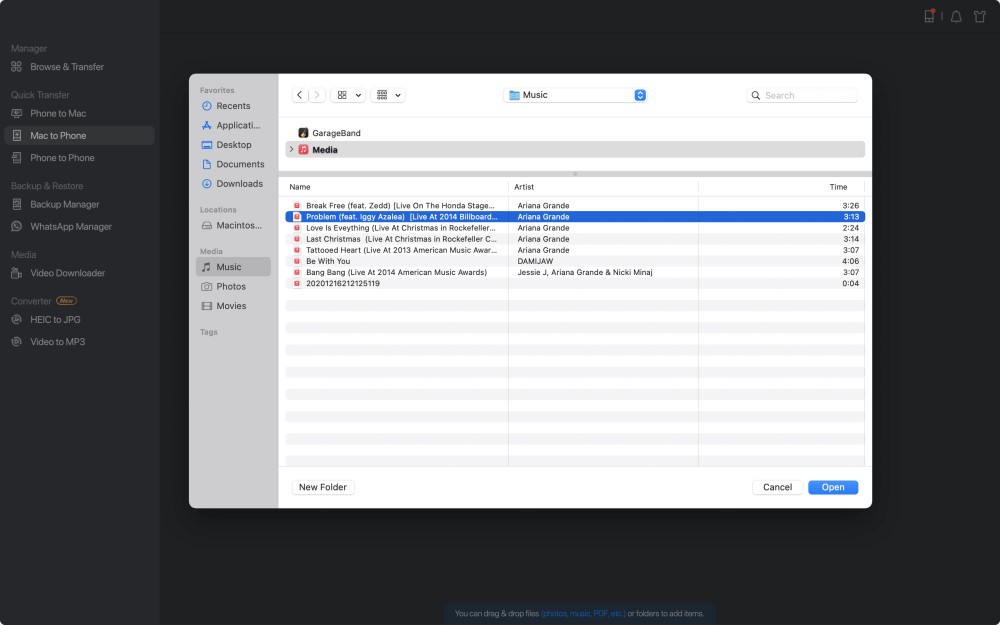
- You may explore your Mac’s files and select the files you want to transfer. Click “Open” after that.
- On the right panel, you may get a preview of the files you’ve chosen. Click “Add File” or just drag and drop files to the designated area if you wish to add new items to transfer at this stage. Finally, choose “Transfer” to begin simultaneously transferring data from your Mac to your iPhone. While transferring, keep your iPhone connected. When the procedure is complete, go to the appropriate place on your iPhone and launch the appropriate app to view the synchronized data.

Note:- Photos, Videos, Audio Files (Music, Ringtones, Voice Memos, Audiobooks), Books, Contacts (in HTML), and Messages are all supported files (from iPhone to Mac)
AirDrop Allows You to Transfer Files From Your Mac to Your iPhone or Vice Versa
On iOS devices and Macs, AirDrop is the built-in file-sharing software. With AirDrop turned on, you can share files over Bluetooth or Wi-Fi between two iOS devices or between an iOS device and a Mac. Contacts can be transferred from iPhone to iPhone using AirDrop, photographs can be sent from Mac to iPhone via AirDrop, and so on. As a result, utilizing AirDrop to transfer files between your iPhone and Mac is convenient.
To use AirDrop to transmit files between an iPhone and a Mac, follow these steps:
- On your iPhone or iPad, enable AirDrop.
On your iOS device, go to “Control Center.”
- Make sure both “Bluetooth” and “Wi-Fi” are turned on, then touch “AirDrop” and choose whether “Contacts Only” or “Everyone” should be able to find your iPhone.
- On your Mac, enable AirDrop.
- To enable AirDrop on your Mac, go to “Finder” > “Go” > “AirDrop” and turn on “Bluetooth” and “WiFi.”
- “Allow being discovered by” should be set to “Everyone” or “Contacts Only.”
To exchange files between your Mac and your iPhone/iPad, use AirDrop.
You may now easily share files from your Mac to your iPhone or iPad using AirDrop. With AirDrop, you can send files from your Mac to your iPhone in two ways.
- Drag and drop the photographs, you wish to transmit from Mac to iPhone onto the recipient’s image, then click “Send.”
- Alternatively, you may use an App’s “Share” button, choose “AirDrop,” select the recipient, and then click “Done.”
iCloud Drive Allows you to Sync Files Between Your iPhone and Mac
Users may utilize iCloud Drive to save files in the cloud and access them from here, Macs, PCs, and iOS devices. You have complete control over which folders and files are saved in iCloud Drive. You may access the files on all of your devices with the same Apple ID if you enable iCloud Drive.
To use iCloud Drive to sync files between your iPhone and Mac, follow these steps:-
- On your iPhone and Mac, enable iCloud Drive.
- On an iPhone, go to “Settings” > [your name] > “iCloud” and switch on “iCloud Drive” at the bottom.
- On a Mac, go to the Apple menu > “System Preferences” > “iCloud” > “iCloud Drive,” and then pick it.
- From the source device, upload the files you want to transfer to iCloud Drive.
- On the target device, download the files to iCloud Drive.
Using iTunes File Sharing, You May Transfer Files From Your Mac to Your iPhone.
The file-sharing program allows you to transfer files between your Mac and iPhone. Check the documentation of an app to see if it supports this feature.
- Connect your iPhone to your computer in the first step.
- On your Mac, click the “Device” button above the sidebar of the iTunes window in the iTunes software.
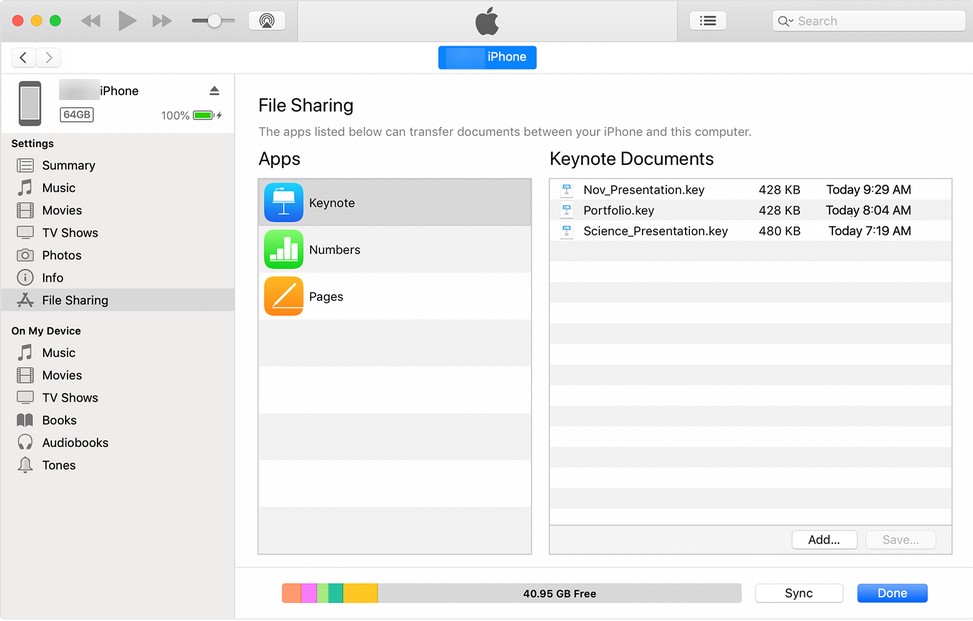
- Select “File Sharing” from the drop-down menu.
- From the list on the left, choose the app to which you wish to transfer a file.
- Begin transferring files from your iPhone to your Mac.
To transfer files from your Mac to your iPhone, go to “Add,” choose the file you wish to transfer, and then click “Add.”
To transmit files from your iPhone to your Mac, go to the right-hand list and choose the file you want to send, then click “Store to” and choose where you want to save it. After that, click “Save To” one again.
Email Files from a Mac to an iPhone or an iPhone to a Mac
Any file that can be attached to an email may be moved from your Mac to your iPhone.
If you wish to transfer files from your Mac to your iPhone, start a new email on your computer, attach the files you want to send, then send the email to your account. Check your email on your iPhone after that, and then download the contents to your iOS device. Create an email and send it to the Mac through the Email app if you wish to send files from an iPhone to a Mac.
Depending on the size of the files and the strength of the network connection, methods like AirDrop or email may take a long time to transmit data. If you only need to transmit a few files of modest size, these solutions are advised. If not, look into alternative options that can save you a lot of time.
Dropbox Allows You to Transfer Files From Your Mac to Your iPhone or Vice Versa
Other cloud storage services, including Dropbox and Google Drive, allow you to transfer data between an iPhone and a Mac in addition to iCloud. As an example, consider Dropbox.
To exchange files between an iPhone and a Mac using Dropbox, follow these steps:
- Dropbox can be downloaded and installed on both your Mac and iPhone. And use the same Dropbox account to log in to the app.
- Upload the files to Dropbox from your Mac to transfer them to your iPhone. Upload the data from your iPhone to Dropbox to transferfiles from your iPhone to your Mac.
- To inspect and download the files, use the Dropbox app on the destination device. (Make sure the devices are steadily connected to the network.)
Transfer Files from Mac to iPhone via Syncing
If you have the newest version of macOS Catalina installed on your Mac, you may sync data directly between the Mac and iPhone via USB cable or over the same Wi-Fi connection.
To transfer files from your iPhone to your Mac using a USB cord, follow these steps:
- Connect the devices with a USB cord.
- Select your iDevice in “Finder.”
- Choose the categories of content you wish to share, such as music, movies, files, and more, and a list of applications will appear.
- To begin transferring files from Mac to iPhone, drag a file or files from a Finder window into the app.
To exchange files between a Mac and an iPhone via a Wi-Fi connection, follow these steps:
- Set Wi-Fi syncing
- Using a USB cord, connect the iPhone to the Mac.
- Select your iDevice in the sidebar of Finder.
- Check the option “Show this [device] while on Wi-Fi” under the “General” page.
- Set the syncing options to meet your needs, then click “Apply.”
- Select the iPhone in the sidebar and sync it once your iPhone and Mac are linked through Wi-Fi.
Conclusion:-
There must be one option among the seven that properly meets your desire to transfer a file between a Mac and an iPhone. It’s important to note that if you choose to sync files, the synced data may overwrite existing files on the destination device. Furthermore, if you share data using cloud storage services, any files you remove from one device will be destroyed from all of your other devices. If you don’t want to do that, there are alternative options.
When deciding how to send files from a Mac to an iPhone or an iPhone to a Mac, keep in mind the precise file type(s) you wish to transfer, as each of the techniques below supports different file kinds. With this in mind, choose the most appropriate method for transferring documents, images, and other data between your Mac and iPhone in a matter of minutes.


Leave a Reply