I remember the day I forgot my iCloud password and I was so upset and angry that I couldn’t work for that entire day. I know it hurts and how it feels to get locked out on your account. It was like 8 years ago when I was not aware how to reset iCloud password. As they say, “History repeats itself!” I again forgot my iCloud password and this time I was aware of how to reset iCloud password. I got rid of the situation by following iCloud password reset steps and thought of writing it down for others to make use of it.
If you forgot iCloud password and are locked out on your iCloud, iTunes, or the App Store, Don’t panic as you are going to unlock all in the next 5 minutes.
Now never forget a password of any of your accounts on your browser as this amazing Password Manager Tool will take care of all password related issues. It saves all your passwords in one vault with military-grade encryption and accessible with one Master Password.


Reset ICloud Password With Your Email Address
You can reset iCloud password using your email ID. If two-factor authentication is not turned ON for your Apple ID, you’ll need to use your email address associated with your account. Just follow these simple steps to recover iCloud password.
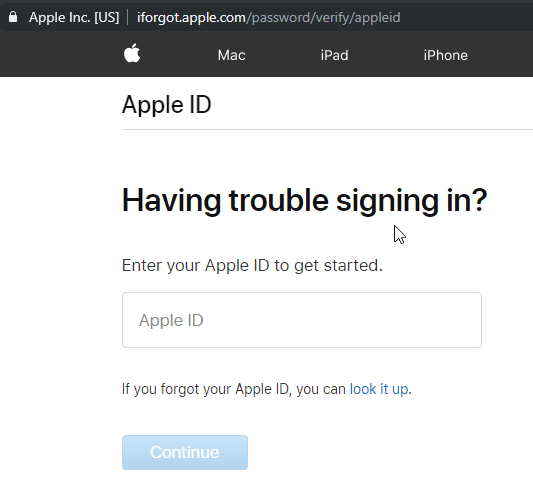
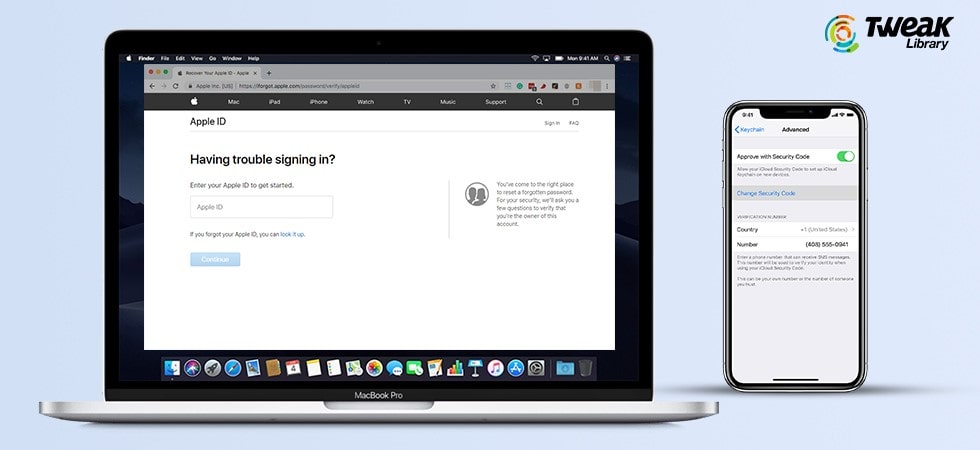
Step 1. Open a browser on your PC and go to iforgot.apple.com to recover iCloud password.
Step 2. Enter your Apple ID email address and click on ‘Continue’.
Step 3. Select ‘I need to reset my password’ and click on ‘Continue’.
Step 4. Select ‘Get an email’ and click ‘Continue’ and click on ‘Done’.
Step 5. Open the email you received from Apple with a subject line “How to reset your Apple ID password” and click on ‘Reset Now’.
Step 6. Enter the new password you want to set, Enter it again to confirm and click on ‘Reset Password’. You are all done, you can try to login using the new password to your Apple device.
Reset ICloud Password By Answering Security Questions
Another way to reset iCloud password is to answer security questions that you set up while creating your account. You can follow these simple steps to recover iCloud password.
Step 1. Open a browser on your PC and go to iforgot.apple.com to recover iCloud password.
Step 2. Enter your Apple ID email address and click on ‘Continue’.
Step 3. Select ‘I need to reset my password’ and click on ‘Continue’.
Step 4. Select ‘Answer security questions’, click ‘Continue’ and click on ‘Done’.
Step 5. Verify your date of birth and click on ‘Continue’.
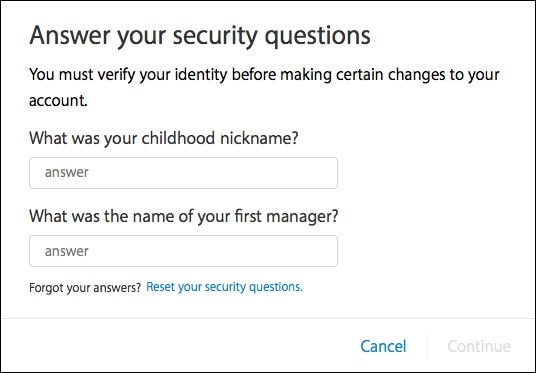
Step 6. Answer the two security questions you’re setup while creating your account and click on ‘Continue’.
Step 7. Enter your new password, enter it again to confirm and click on ‘Reset Password’.
These were the easiest way to change iCloud password and gain access to your iCloud, iTunes, or the App Store.
Reset iCloud Password With Two-Factor Authentication

Step 1. Open a browser on your PC and go to iforgot.apple.com to recover iCloud password.
Step 2. Enter your Apple ID email address and click on ‘Continue’.
Step 3. Confirm your phone number that is linked with your Apple ID and click on ‘Continue’.
Step 4. It will ask you to pick up one of the devices connected to this account. As we’ll use an iPhone to continue.
Step 5. Tap on ‘Allow’, Enter the passcode of your device and tap on ‘Done’.
Step 6. Enter your new Apple ID password and confirm it again. Tap ‘Next’ and ‘Done’.
You are all set!
Also Read: How To Reset Windows 10 Password
Change Apple ID Password
If you are already aware of your Apple ID Password and you feel that it is not private anymore and you should change it, you can follow the below steps to change Apple ID password.
On Your iPhone, iPad, or iPod Touch With iOS 10.3 or Later:
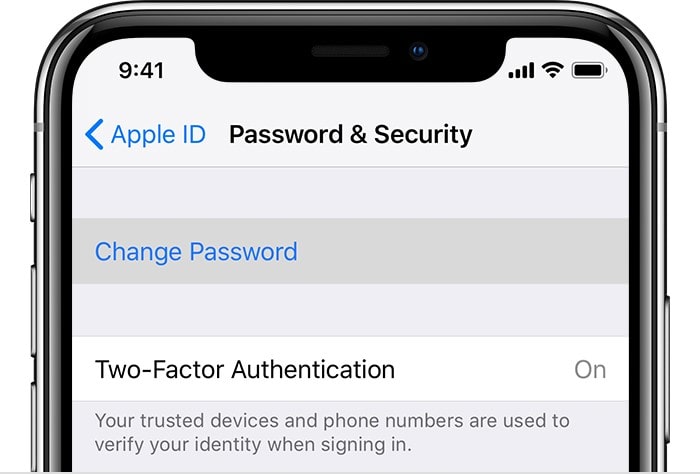
Step 1. Go to Settings à ‘Your Name’ à Password & Security.
Step 2. Tap on ‘Change Password’.
Step 3. Enter your device passcode or current password as asked, enter a new password you want to set up and confirm the same again.
Step 4. Tap ‘Change’ or ‘Change Password’.
“You are good to sign in with your new Apple ID password to access Apple features and services.”
On your Mac Computer:
Step 1. Sign in to your Apple ID Account Page.
Step 2. Go to the Security section and click ‘Change Password’.
Step 3. Enter your current password followed by a new password and confirm it again.
Step 4. Click on ‘Change Password’ and you are all set.
“Sign in with your new Apple ID password to access Apple features and services.”

Never Forget Any Password:
Now you don’t need to remember various passwords or keep the date of birth or marriage anniversary date as your password. TweakPass is an amazing password vault that remembers all your Passwords, card details, form filling details for you. Whenever you wish to login to any account on the browser, it will fil the details on your behalf. Check out more on the Official Site of TweakPass.
Download TweakPass
Product Features
- Lowest Price:
- Autofill Web Forms
- Import from Browsers
- Two Way Authentication
- Actionable Password Strength Report
- Multiple Form Filling Identities
- Application Password
- Detailed Dashboard
- User-Friendly
Also Read: How To Use Password Reset Disk in Windows 10
Summing Up:
We have covered how to reset iCloud password using your email address and how to reset iCloud password by answering security questions. Now you also know how you can change iCloud password using two-factor authentication. If you feel that your password is compromised, you can change Apple ID Password anytime in a few seconds.
If this article turned out to be helpful to you, please like and share this with your colleagues. For more such tips, tricks and tech-related updates visit Tweak Library and if you are more into tech-related videos do watch and subscribe to our YouTube channel. You can also reach us on Facebook and Pinterest.


Leave a Reply