Google Assistant is quite a familiar term for all Android users out there. All we need to do is say ‘OK Google’ and we can get all our work done through this anywhere and anytime available personal assistant. Your one Google Assistant is all ready to extend its helping hand to you when in need across devices. You can ask Google to find you a contact, or you can ask it to send some SMS to anyone from your contacts, play music and much more.
Since we have heard a lot about Google Assistant and its awesome features on an Android device, we have something quite exciting for you. You can now get Google Assistant for PC and can use it anytime on your Windows PC to get your work done.
Just like Microsoft and Amazon’s Cortana and Alexa, you can also use Google Assistant for PC. However, there is no simple way to start accessing Google Assistant for PC, you can always use it in a way that is bit indirect but applicable for Windows 10 PC and Chromebook.
Read further to learn how to get started with Google Assistant on a PC. To install Google Assistant on your computer, first enable Voice & Audio Activity for your Google Account. As we already stated, there is no straightforward way, here’s how to get Google Assistant for your Windows 10 PC.
Get Google Assistant For PC
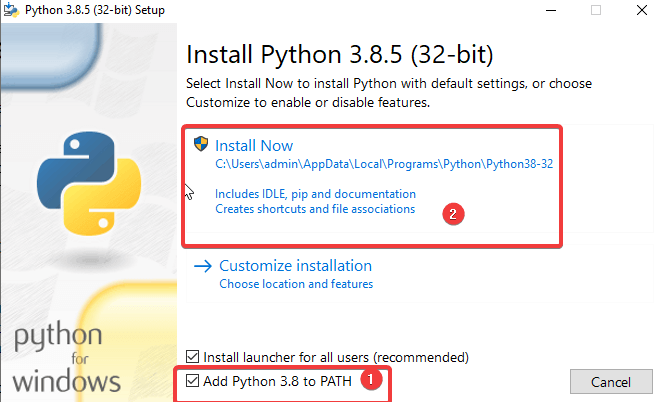
To install Google Assistant for Windows 10, you need to install Python on your Windows PC. To prevent yourself from facing any issues, ensure that you checkmark the box next to Add Python 3.8 to PATH and then click Install Now.
Further to this, follow these steps:
- Open Windows Explorer, create a New Folder in C: Drive, and name it GoogleAssistant.
- Now in your web browser, open Google Cloud Platform and select Create Project. If it asks you to Sign in, use your Google account credentials and login.
- Use WinGoogleAssistant to name your project. You’ll see a Project ID under your project name, note it down somewhere and keep it safe as it will be required later on while using Google Assistant on your Windows PC.
- Select Create and follow the instructions further.
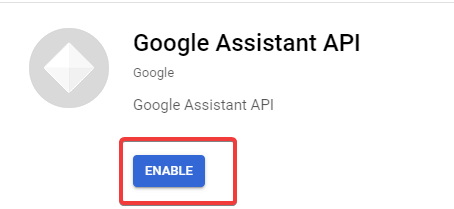
- Next, open Google Assistant APIs in your browser and select Enable to turn on Google Assistant API for your project. Later select Create Credentials.
6. Next, will be the Add credentials to your project screen, choose the below listed responses.
- Which API are you using?
- Where will you be calling the API from?
- What data will you be accessing?
The responses to be submitted for these questions will be Google Assistant API, Other UI (e.g., Windows, CLI tool), and User data respectively for the three questions above.
Click on What credentials do I need? After submitting your responses.
-
- Then click on Setup consent screen and change the Application Type to Internal. Enter WinGoogleAssistant in the Application name and click Save at the bottom of the screen.
- Then, Create credentials > Help me choose. Follow the instructions like the Point no 6. And then proceed towards the next step.
- Type WGAcredentials in the name box and select Create OAuth client ID.
- Download the credentials and tap Done.
- Now, select the down arrow to download JSON file. Save the file in the Google Assistant folder you created in Step 1.
- Now, it’s the time to open Windows Command Prompt. For this type ‘cmd’ in the Run window. To open Run, press Win+R and type in:
py -m pip install google-assistant-sdk[samples] - Wait for the installation, type again:
py -m pip install --upgrade google-auth-oauthlib[tool] - Open Google Assistant folder from C: Drive and locate the JSON file you recently saved in Step 11. Right click on the file and open its
- From properties, select the file name and copy it. Later, switch back to Command Prompt and type:
google-oauthlib-tool --client-secrets C:\GoogleAssistant\
and Paste the file name you just copied in the step above followed by a Space bar and then type:
--scope https://www.googleapis.com/auth/assistant-sdk-prototype --save --headlessand press Enter. - You’ll see command prompt running and later on you will see a URL displayed just before a prompt where it asks you to Enter the authorization code. Select the entire URL starting with https:// and copy it.
- Now, open a new browser and paste the URL in the address bar. Use the same Google account credentials to sign in. You’ll see a dialog asking you to Allow access to Win Google Assistant. Tap Allow.
- In the next window, you’ll see a long string of letters and numbers. Copy those characters using the copy icon at the side.
- Again go back to the Command Prompt window and paste the characters you just copied. It is the Authorization code you were asked to enter in Step 16. As soon as you press Enter, you’ll see a ‘credentials saved’
- That’s it, you have Google Assistant on your Windows 10 PC
- To test, on your cmd window, type:
py -m googlesamples.assistant.grpc.audio_helpers.
Your computer will record an audio of 5 seconds and play it back. If you hear the audio, the Google Assistant set up is done. - Now, locate the Project ID you copied and noted in Step 3 and enter it in cmd window. Then, press Enter.
- Next, type in:
googlesamples-assistant-devicetool --project-idfollowed by space bar type the Project ID and again press space bar and type in the following command:register-model --manufacturer “Assistant SDK developer” --product-name “Assistant SDK light” --type LIGHT --model “GA4W”.Press Enter to finish the Google Assistant setup on Windows 10. - If you want Google Assistant with push to talk abilities, enter the following command in the cmd window:
py -m googlesamples.assistant.grpc.pushtotalk --device-model-id “GA4W” --project-idand press - You can now press Enter key while the program is active and speak out what you want your Google Assistant to do.
Note: Windows 10 does not offer much capabilities to Google Assistant like Cortana but it can help you by answering your questions while connected to the internet.
Wrap Up:
That’s it folks! The process is lengthy and complex but you can set up Google Assistant on Windows as and when required for any assistant help. Do let me know if you found us helpful in the comments section below. Google Assistant or Cortana? Which one is your favorite?
Keep reading Tweak Library for more updates.
Next Read:
Shape-up Your Life With These Google Assistant Settings
Tips To Protect Your Home Assistant


David
Might want to mention you need to be a G Suite user to choose Internal as your User Type.