


Summary
This guide shows you how to identify and eliminate duplicates in Google Sheets using built-in features such as Conditional Formatting, formulas such as COUNTIF(), COUNTIFS(), and UNIQUE(), and Pivot Tables.
Duplication is one of the most popular data problems in Google Sheets. It doesn’t matter whether you are working with customer lists, sales, inventories, survey results, employee data, or any other type of information – duplicates may create mistakes in the results of your calculations, reports, etc.
There are many ways to find and delete duplicates in Google Sheets that do not require special knowledge of spreadsheets. In this article, you will find some quick and easy techniques for detecting duplication and removing it.
Why Should You Remove Duplicate Data?
If you remove duplicate data, it will help you to keep your worksheet in order. The problems that arise from duplicate data include the following:
- Calculation errors
- Unnecessary increase in the size of your file
- Difficulty in analyzing the data
- Duplicate customer or employee files
- Impact on charts and Pivot tables
- Incorrect inventory or sales tracking
Best Ways To Highlight & Remove Duplicates In Google Sheets
Method 1: Highlight Duplicates Using Conditional Formatting
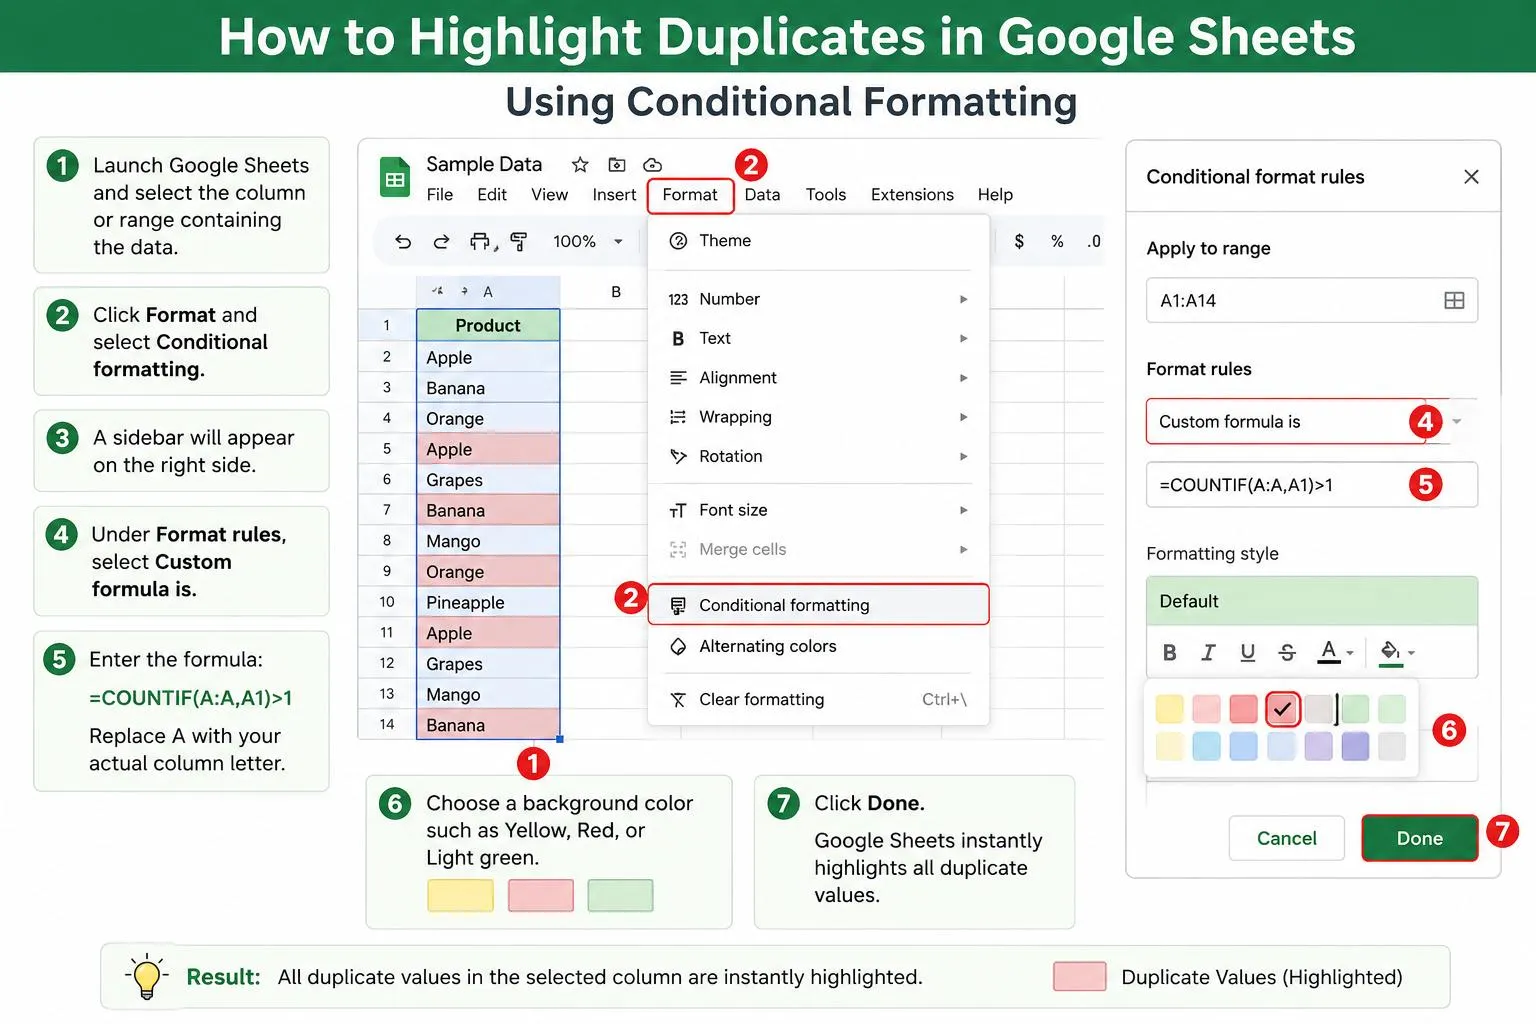
This is the easiest way to visually identify duplicate values without deleting any data.
- Launch your spreadsheet and select the column or range containing the data.
- Click Format and select Conditional formatting.
- A sidebar will appear on the right side.
- Under Format rules, select Custom formula that you have to enter is
=COUNTIF(A:A,A1)>1
- Replace A with your actual column letter.
- Choose a background color such as Yellow, Red, or Light green
- Click Done.
- Google Sheets instantly highlights all duplicate values.
Method 2: Remove Duplicates Using Built-in Tool
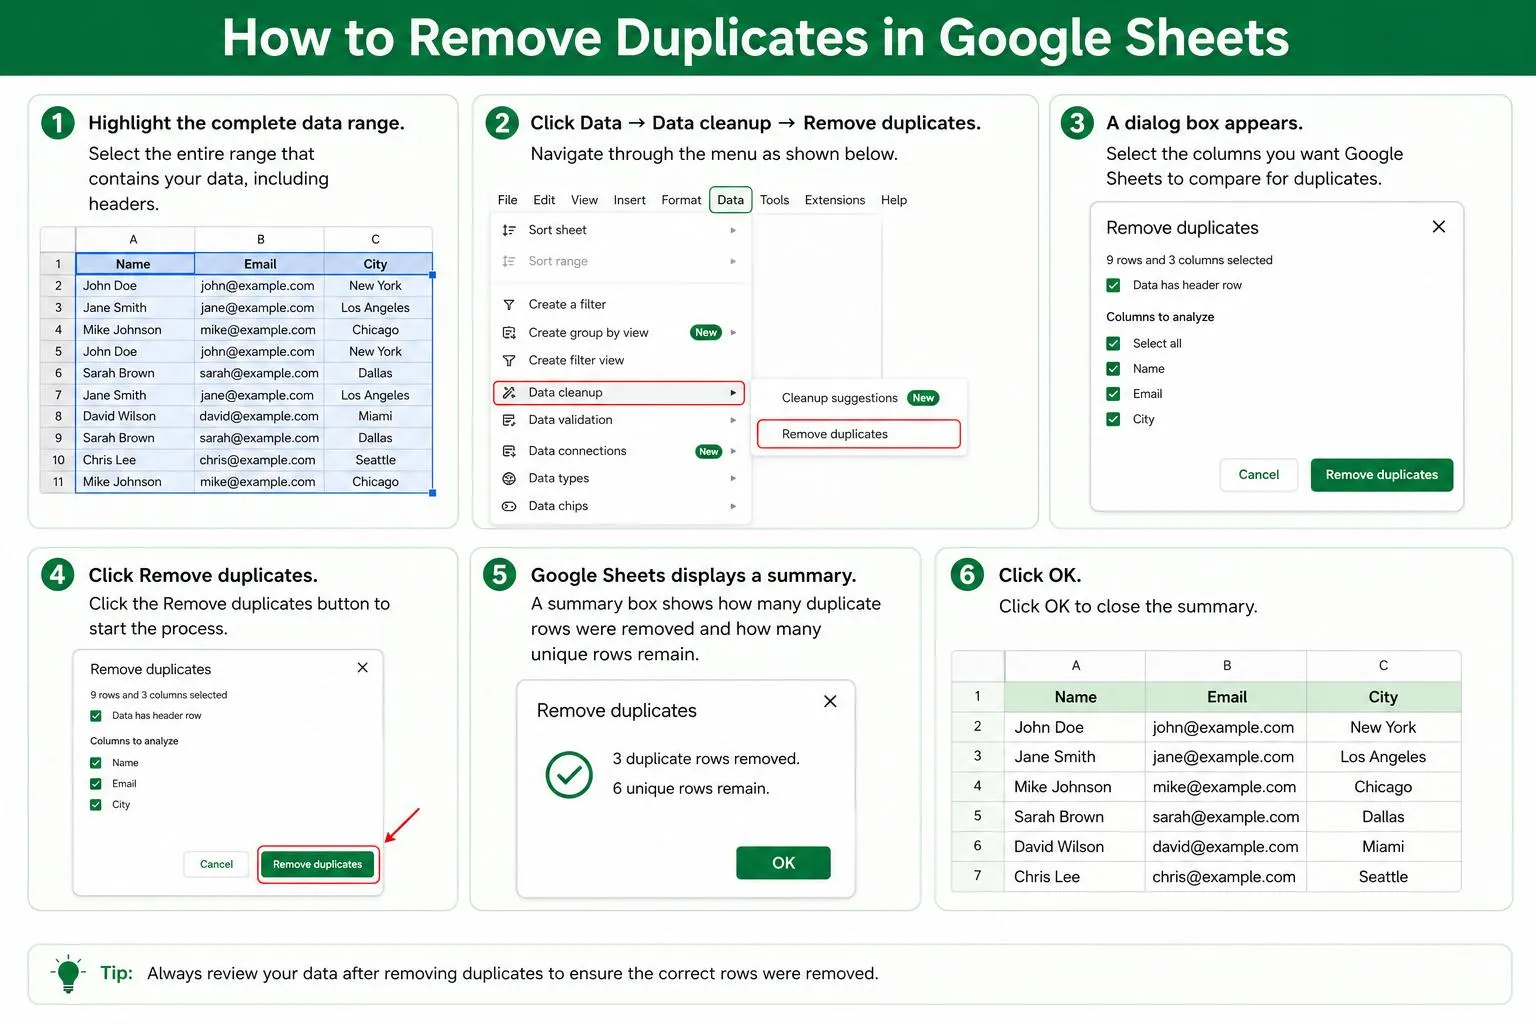
Google Sheets includes a dedicated feature for removing duplicate rows.
- Highlight the complete data range.
- Click Data → Data cleanup → Remove duplicates.s
- A dialog box appears.
- Select the columns you want Google Sheets to compare
- Click Remove duplicates.
- Google Sheets displays a summary like Duplicate rows removed or Unique rows remaining.
- Click OK.
Method 3: Highlight Duplicates Across Multiple Columns
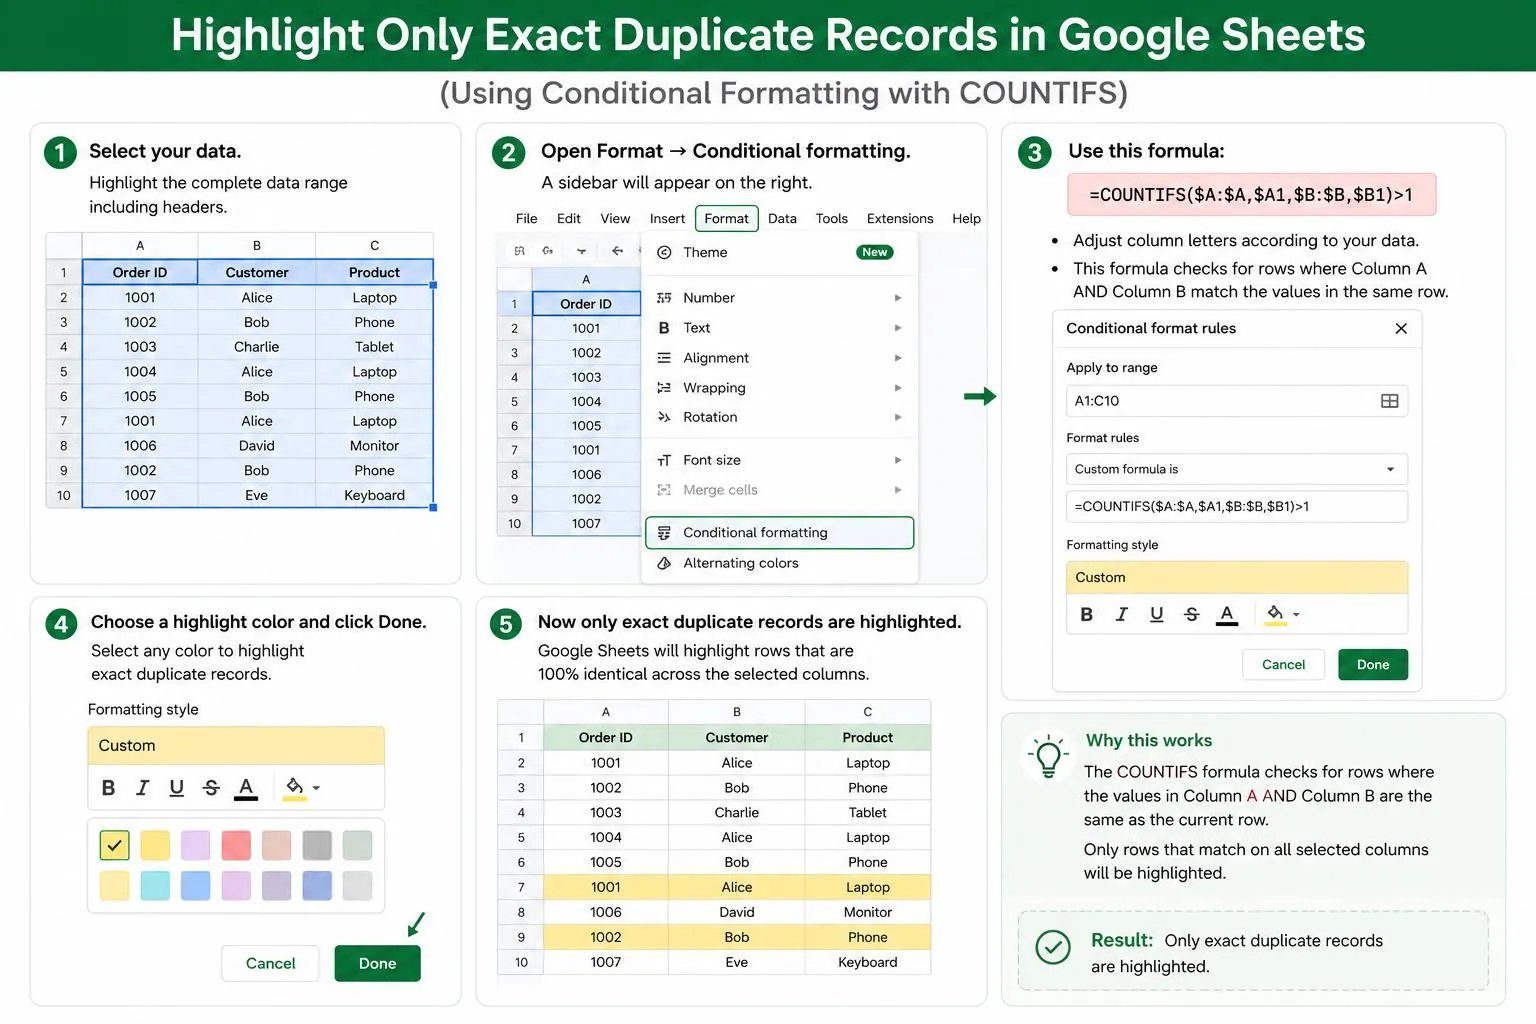
Sometimes duplicate records are based on multiple columns instead of just one.
- Select your data.
- Open Format → Conditional formatting
- Use this formula:
=COUNTIFS($A:$A,$A1,$B:$B,$B1)>1
- Adjust column letters according to your data.
- Choose a highlight color and click Done.
- Now only exact duplicate records are highlighted.
Method 4: Remove Duplicates Using UNIQUE Function
Instead of deleting duplicates, you can create a clean copy of your data.
Use UNIQUE(A2:A100)
Google Sheets automatically returns unique values.
Method 5: Highlight Entire Duplicate Rows
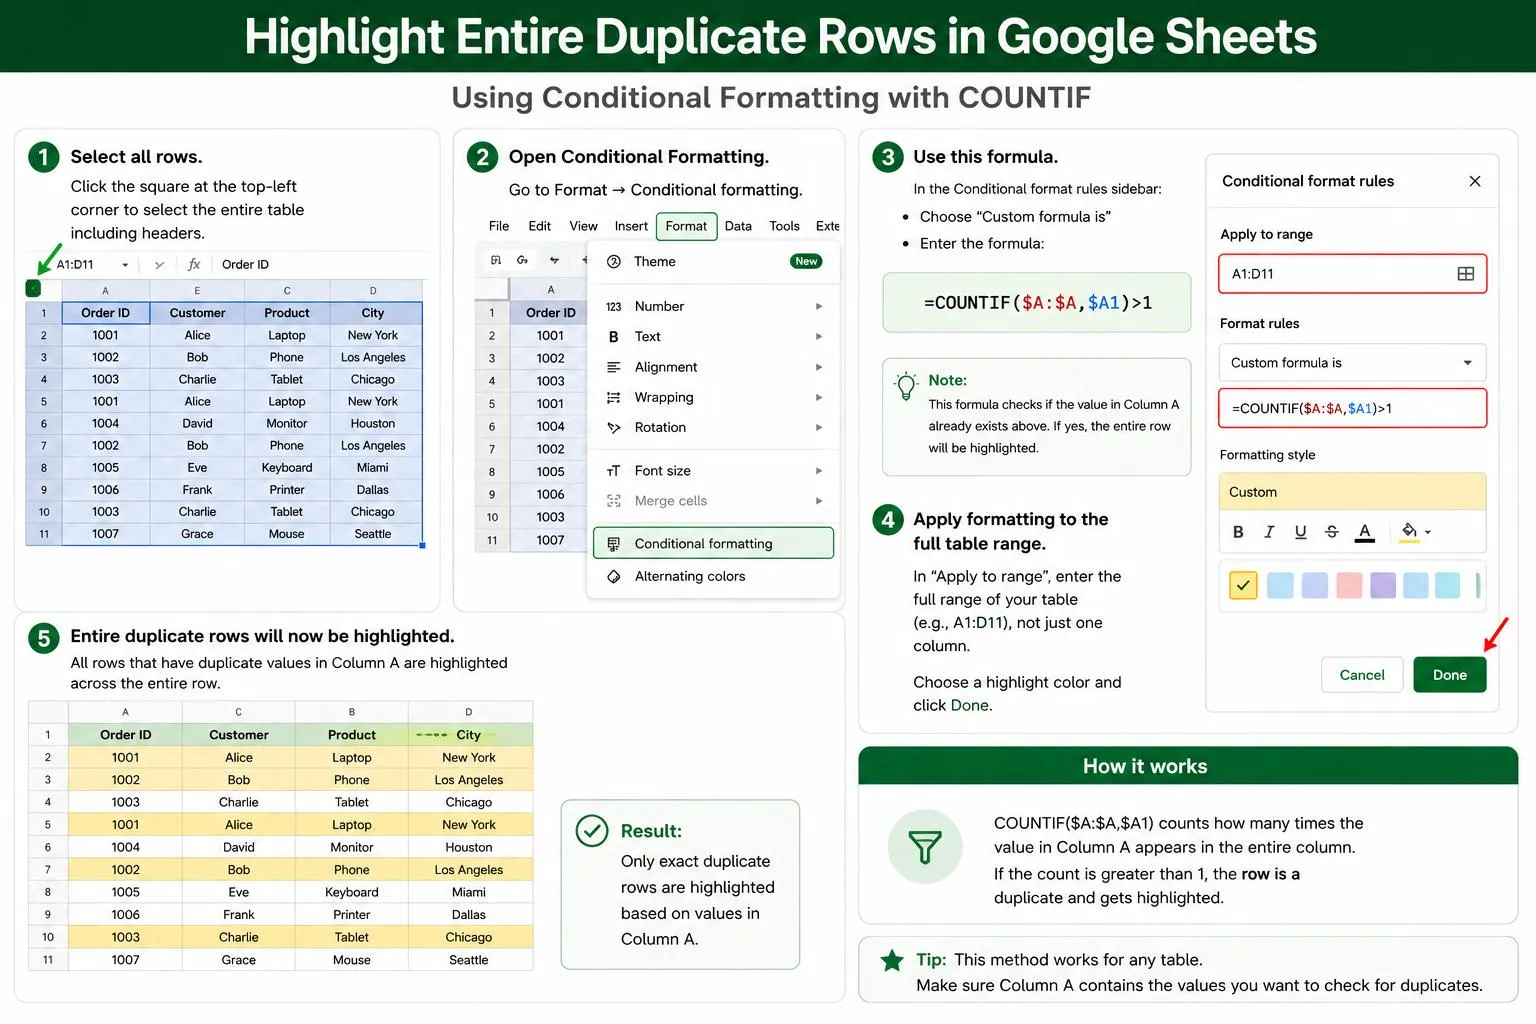
Sometimes you want the complete row highlighted instead of a single cell.
- Select all rows.
- Open Conditional Formatting.
- Use COUNTIF($A:$A,$A1)>1
- Apply formatting to the full table range instead of only one column.
- Entire duplicate rows will now be highlighted.
Method 6: Remove Duplicates Using a Pivot Table
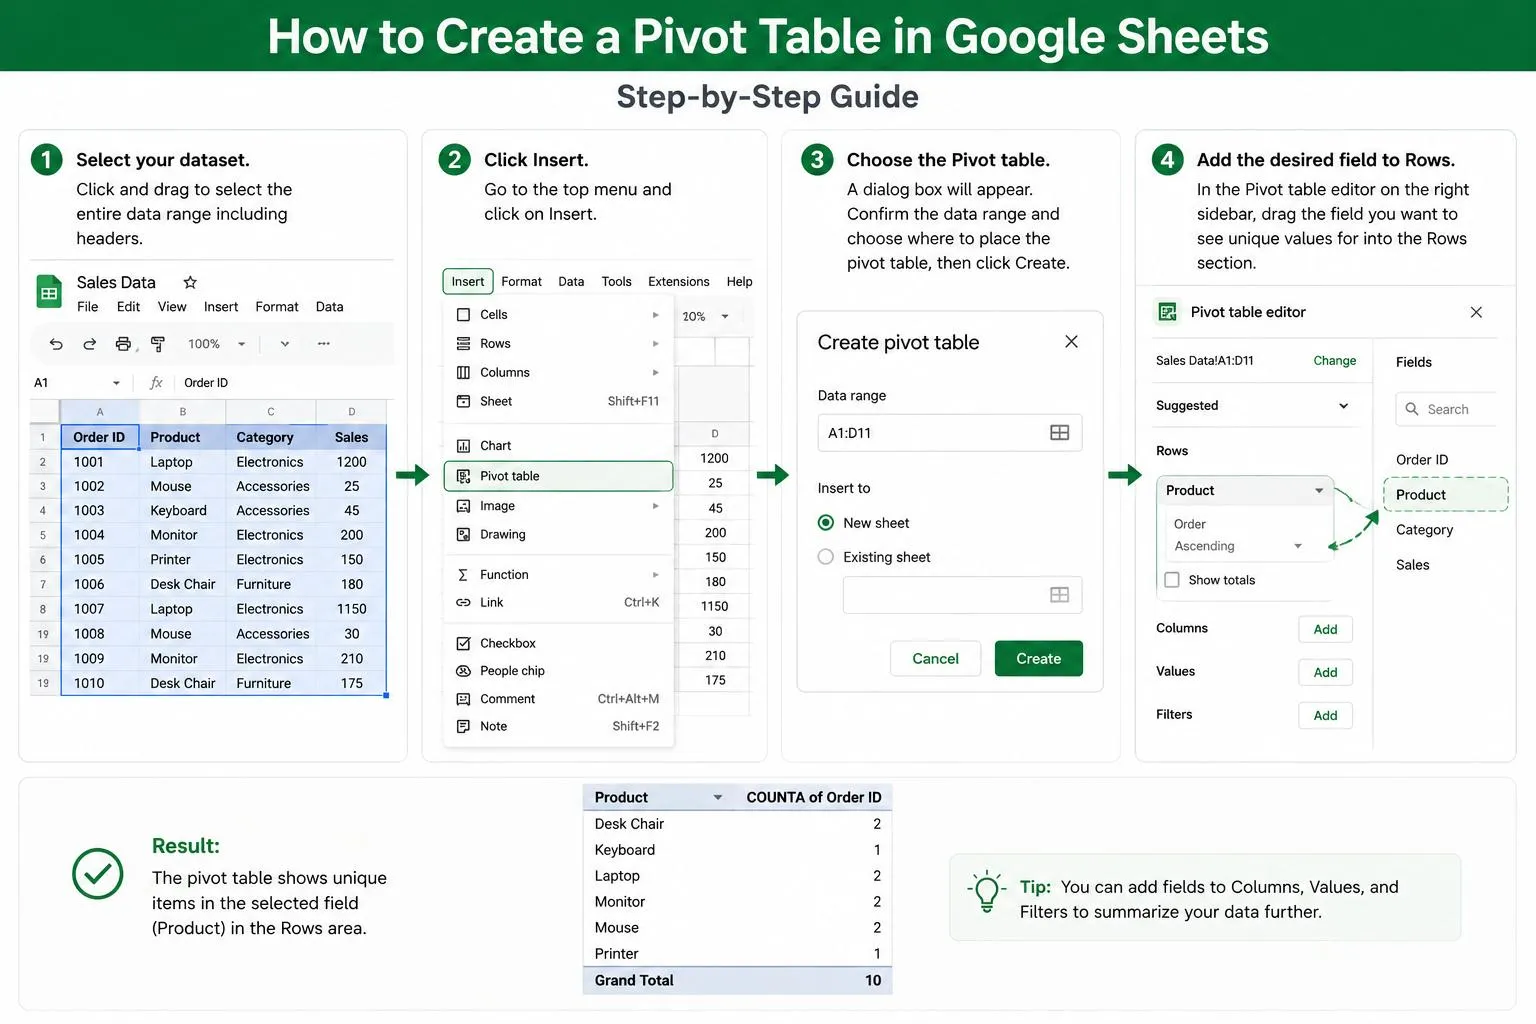
Pivot Tables help summarize large datasets while displaying unique entries.
- Select your dataset.
- Click Insert.
- Choose the Pivot Table.
- Add the desired field to Rows.
Google Sheets automatically groups duplicate values, allowing you to identify repeated entries.
Tips for Managing Duplicate Data
To ensure that there are no duplications or mistakes in your data set:
- Always remember to save your file before any deletion of duplicated entries.
- Use Conditional Formatting to check your duplicate cells before deletion.
- Use the TRIM() function to eliminate excess spaces.
- Use the UPPER(), LOWER(), or PROPER() functions to have all your cells in one case.
- Check for spaces and other characters that can affect duplication detection in Google Sheets.
- Use the UNIQUE() function if you want to create a new list and keep the old one unchanged.
Frequently Asked Questions
Final Thoughts
Eliminating duplicate data is one of the key processes in keeping spreadsheets precise and organized. Google Spreadsheets comes equipped with several useful features that allow users to easily detect, highlight, and delete duplicated information, no matter whether you work with contacts or with large company datasets.
For the majority of users, the easiest method to clean data would be the Removal of Duplicates option, whereas Conditional Formatting should be used when you want to check the presence of duplicates before making any alterations. For those who require a dynamic list of unique values, the UNIQUE function will be very helpful. Moreover, advanced users may automate routine tasks using Google Apps Script.







Leave a Reply