
The RAM or Random Access Memory is a volatile storage medium that stores your machine code and working data. It is also the short-term memory of your computer. This means that all the data it has is gone while you shut your computer down. RAM helps your computer multitask, which is why the higher the RAM, the smoother the functionality of your computer.
But, what is the use if you have lots of remaining RAM and you are unable to utilize it? Yes! You heard us right – oftentimes many users have come across a situation where their Windows 10 did not use all RAM properly.
Also Read: How to Free up RAM on Windows 10 Computer
What Does It Mean When We Say That Windows 10 Is Not Using All RAM?
There is some portion of your RAM which is system reserved. Also, if you have an integrated graphic card, some RAM might be reserved for the same. It is quite normal to have at least 2% RAM free which means if you have 4 GB RAM, the usable RAM will be 3.6-3.8 GB. There are also instances where your BIOS may reserve some amount of RAM which could be the reason why your Windows 10 is not using all RAM.
Where does the problem surface then? When you are not able to use the available RAM properly. For example, users have reported that they had installed 8 GB RAM and all that they could see in the Task Manager was 4 GB or a maximum of 6 GB.
So, what is to be done if your Task Manager is not showing all RAM usage. We have discussed in greater detail some of the steps you can undertake to resolve the “Windows 10 not using all RAM problem”
Ways To Deal With Windows 10 Not Using All RAM
List of Contents
1. Change Windows To 64 Bit From 32 Bit
First and foremost, if you are running Windows 10 on a 32-bit system, then no matter how much RAM you install, you will only be able to use 3.5 GB. In that case, you will have to freshly install Windows 10 64 bit if you desire to utilize more than 3.5 GB RAM.
2. Modify RAM That Used While Boot Up
If your Task Manager is not showing all RAM usage, then the next thing you can do is to modify the RAM which is used while booting up and then check if you have been able to fix the problem.
To do that –
- Press Windows + R to open the Run dialog box
- Type msconfig and press Enter
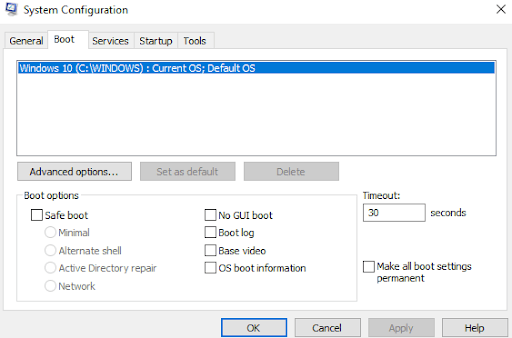
- When the System Configuration window opens, click on the Boot tab

- Select your Operating System
- Click on Advanced Options
- Clear the checkbox that you can see next to the Maximum Memory
- Click on OK

3. Update BIOS
Updating the BIOS is a very critical task but it can help you deal with an issue where your Windows 10 is not using all of its RAM properly. You must perform the below-mentioned steps under expert supervision since one wrong step can cause severe damage to your computer.
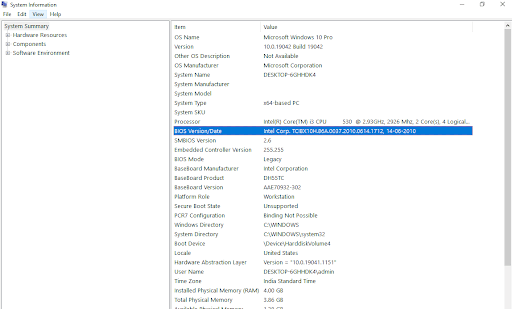
- First, we’ll identify the BIOS version. For this, press Windows + R and type msinfo32, and press Enter
- Locate BIOS Version/Date
- Go to your manufacturer’s website and then enter your computer serial number
- Now, from the list of drivers click on BIOS and then download the update that is recommended
Note: Please don’t shut down your computer or unplug it from its power source as this may damage your computer. While updating you will see a blank screen and also, your computer will restart several times during the process.
Once updated, you should have resolved the Windows 10 not using full RAM
4. Free Up Paging Files In The C Drive
Sometimes the paging files are responsible for why your Windows 10 is not using all the RAM that it has. To resolve this issue, you can free up paging files present in the C Drive. The steps for the same are mentioned below –
- Press Windows + R to open the Run dialog box
- Type cpl and press Enter
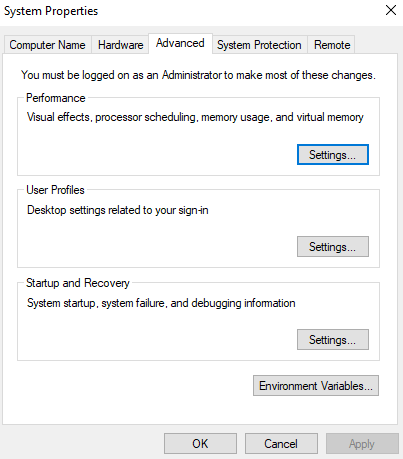
- Head to the Advanced tab
- Click on Settings
- When the Performance Options window opens, click on the Advanced tab
- Under Virtual memory click on Change
- Uncheck the box that says Automatically manage paging file size for all drives
- Select C: drive
- Click on the No paging file button and then click on Set
- If a prompt occurs click on Yes and then click on OK
5. Enable Memory Remap
Assuming you have 4 GB worth of RAM and have 64 bit OS, this feature can help you remap the overlapped PCI memory over the total physical memory. Here are the steps for the same –
- Reboot your PC and simultaneously press F2, F12, or any other button to enter BIOS setup. This varies from manufacturer to manufacturer
- Head to Advanced Chipset Features
- Under Memory Remap Feature or North Bridge Configuration click on Enabled
- Save and Exit
6. Perform Memory Diagnostics
One great way to keep tabs on memory corruption and stop it from decreasing usable memory is to run memory diagnostics. The steps are quite similar to the ones mentioned above –
- Press Windows + R to open the Run dialog box
- Type exe and press Enter
- Now, you can choose from two options –
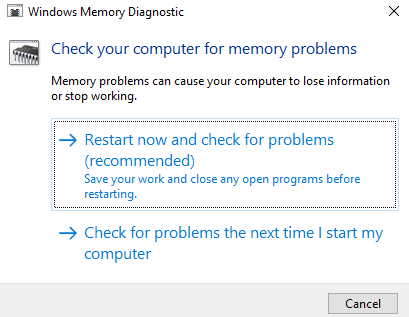
- You can either select Restart now and check for problems (recommended)
- Or, you can select Check for problems the next time I start my computer
Bonus Tip
If your Windows 10 is not utilizing RAM as it should, the culprits can be many. And, if you don’t have the patience to seek the manual ways, we have a great solution that’ll help you fix the issue. You can use a third-party utility like Advanced System Optimizer. It is an efficient RAM and junk cleaner. It also doubles up as a powerful Windows optimizer as well. For example, let’s have a glimpse at how it can help you –
1. Download and install Advanced System Optimizer

2. From the left-hand side, click on Windows Optimizers

3. Click on Memory Optimizer which will help you free unused allocated memory and optimize memory automatically
4. The same module also consists of Driver Updater as well
Wrapping Up
Were you able to fix the “Windows 10 not using all RAM” issue? If yes, which of the above methods was able to resolve the issue. Do share your experience in the comments section below. For more such Windows troubleshooting and fun-filled tech-related content, keep reading Tweak Library.


Leave a Reply