As much as we love using Wi-Fi, we are of the notion that a wired connection can provide you with even better connectivity. Which side are you on – Wi-Fi or an ethernet cable? Flood the comment section with which option would you prefer and why? But, before that let’s focus on a problem that many users face and that is “Ethernet Doesn’t Have a Valid IP Configuration”
Probable Reasons Why You Are Facing “Ethernet Doesn’t Have A Valid IP Configuration” In Windows 11
Just to give you an idea, here are some of the possible reasons why this problem surfaces –
- Ethernet is unable to receive a valid IP address from DHCP
- Damaged or wrongly plugged ethernet cable
- Faulty network adapter
- System error
- Outdated network driver
We have taken into account many such issues and now let’s have a look at some of the simple ways to deal with the “ethernet doesn’t have a valid IP configuration” issue.
Ways To Fix “Ethernet Doesn’t Have A Valid IP Configuration” In Windows 11
Restart Your Router
Restarting your router is one of the first few things you should do in case you receive an error stating “Ethernet Doesn’t Have A Valid IP Configuration” In Windows 11. That’s because you are likely receiving this error because of some technical issues on your ISP’s end. After you have switched off your router, wait for a minimum of 5 minutes and then restart your router. Additionally, we even recommend that you even shut your computer down. This step will further help if the issue has surfaced because of some glitch in your computer itself.
Also Read: How to Set Up a VPN on Your Router
Is Your Ethernet Plugged In Correctly
In this step, we shall be checking whether the ethernet cable is plugged in correctly and whether or not it is faulty. To ascertain if your existing ethernet cable is faulty or not, you may require another ethernet cable to check if the problem is persisting with your existing ethernet cable. Also, make sure that your ethernet cable is connected aptly on both ends. If there is no problem with your ethernet cable, move on to the next step.
Configure Network Adapter Settings
This essentially means you will be configuring TCP/IP settings manually. You can either configure TCP/IP settings manually or reset them. You will have to check which of these steps works well for you and more so resolves the issue for you. We have outlined the steps in the simplest way possible –
1. Open the Run dialog box by pressing Windows + R
2. Type cpl and press enter
3. Right-click on Ethernet and then click on Properties
4. Locate Internet Protocol Version 4 (TCP/IPv4) and double click on it
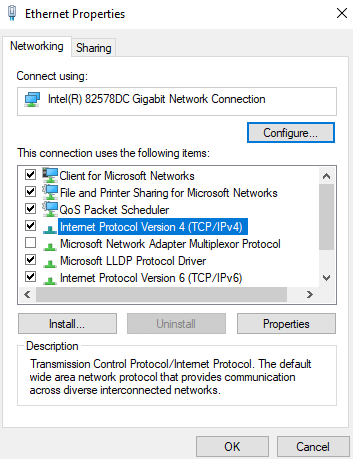
5. When the Internet Protocol Version 4 (TCP/IPv4 Properties opens, click on both the radio buttons i.e. Obtain an IP address automatically and Obtain DNS server address automatically
6. But, what if this does not solve the issue? You can then go on to set the IP address and DNS manually. For that under each of the above-mentioned options, click on the next radio button and enter the values as mentioned below –
- Under Use the following IP address enter these values –
IP address: 192.168.1.15
Subnet mask: 255.255.255.0
Default gateway 192.168.1.1
- Under Use the following DNS server addresses enter these values –
Preferred DNS Server: 8.8.8.8
Alternate DNS Server: 8.8.4.4
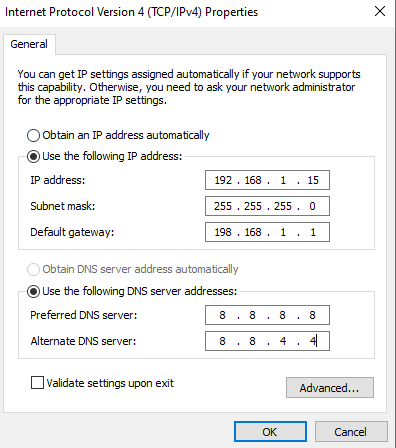
Click on OK and check if you have been able to resolve the issue. It is important to note that the above-mentioned DNS values are Google’s DNS settings.
Disable Fast Startup Feature
Many users have reportedly been able to resolve the “ethernet doesn’t have a valid IP configuration” In Windows 11 by disabling the fast startup feature. Although it is intended to make your computer boot fast, it is reported to cause ethernet issues. Here are the steps to disable this feature.
1. In the Windows search bar type Control and click on Open from the right-hand side
2. Select Power Options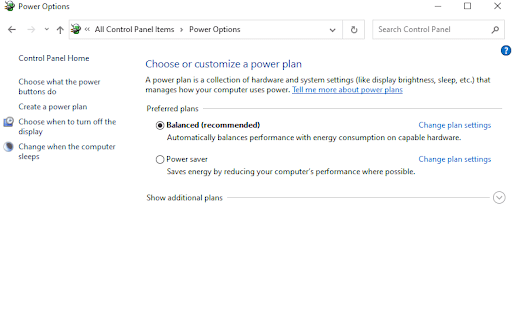
3. Next, from the left side of the window click on Choose what the power buttons do
4. Click on the hyperlinked Change settings that are currently unavailable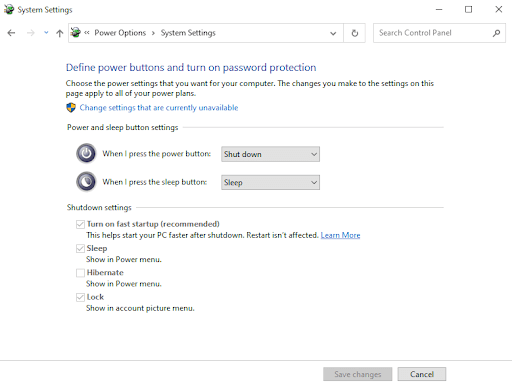
5. Uncheck the box that says Turn on fast startup (recommended)
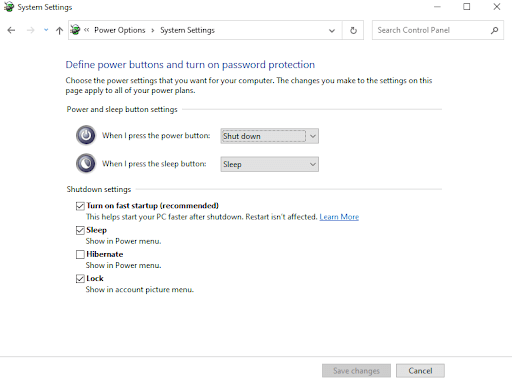
6. Click on Save changes
Reset TCP/ IP Settings
Resetting the TCP/ IP settings is believed to resolve the “ethernet doesn’t have a valid IP configuration” issue. This step can resolve a variety of issues pertaining to your internet connection. Here we have broken down the steps for the same –
1. In the Windows search bar, type command
2. From the right-hand side click on Run as administrator
3. When the Command Prompt window opens enter the following commands one after the another –
netsh winsock reset (press enter)
netsh int tcp reset (press enter)
netsh int ip reset (press enter)
- Reboot your computer and check if the issue has been resolved or not
Clean Your Cached Files
Does the problem persist? Again fire up the administrative command prompt as mentioned in the steps above. Now, enter the following command one after the another –
ipconfig /release (press enter)
ipconfig /flushdns (press enter)
ipconfig /renew (press enter)
Restart your computer and check if you have been able to resolve the issue or not. These commands would essentially help you in renewing the DHCP configuration as well as reset the DNS client resolver cache.
Update Network Driver or Reinstall It
Here we shall be focusing on two things – reinstalling the network driver and updating the existing driver. Both of these can attribute to the occurrence of no valid IP configuration issues. In either case, you can use a third-party driver updater utility. Smart Driver Care, for instance, is one of the best driver updater utilities around. And, here is how this tool can prove to be your life savior in both the cases mentioned in this point.
When reinstalling your network driver, you might consider backing up the existing network driver so that in case anything goes wrong, you can restore your existing driver. And, as for updating an outdated network driver, Smart Driver Care is a specialist. It lets you perform both these tasks without any errors.
Let’s have a look at how easily you can update and backup drivers using Smart Driver Care.
1. Download, install and run Smart Driver Care
2. Before doing anything, let’s first take a backup of our network adapter. Let’s have a look at how you can backup drivers using Smart Driver Care. From the left-hand pane of the interface, click on Backup
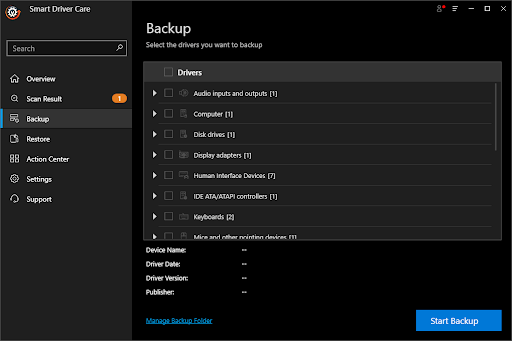
3. From the right-hand side locate your network adapter
4. Click on Start Backup and wait for the process to complete
5. Should you need to restore the backed up driver in case of emergency, click on the Restore option just beneath the Backup option, select your backed up Network Driver from the right-hand side and click on Restore Now
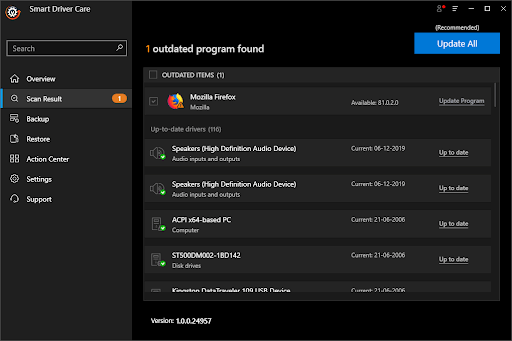
Now that you know how to backup and restore the network drivers. Let’s have a look at how easily you can update an outdated network driver that could be the reason why you are getting the “Ethernet doesn’t have a valid IP configuration error”
- Click on the Scan Result from the left-hand pane

- From the right-hand side, select your network card driver. More specifically, click on the checkbox next to your network card driver
- Click on the Update Program option and wait for the driver to update
That’s it! Your network driver is now up to date. Check if this step has been able to rectify your problem.
Wrapping Up:
The “ethernet doesn’t have valid IP configuration” could be the outcome of many network issues that we hope will be resolved once you try the troubleshooting steps mentioned above. Do give this post a thumbs up and share it with your friends and people you care for.




Leave a Reply