The Snipping Tool is an inbuilt utility tool for Windows Operating System. It allows users to capture, edit, and save screenshots straight to their PC. It is a lightweight and useful built-in screen capturing software.
Besides all its great features, we’ve recently received tons of complaints from users stating they’ve encountered the error message “Windows Snipping Tool not working” on Windows 7/8/10/11. Some users claimed that the Snipping Tool just displays a black or blank screen instead of the real snapshot window; some explained that nothing happens when they click on the “save as” button, while some received the pop-up message showing, “Snipping Tool not working.”
No matter what the issue is, in this article, we’ll tell you how to tackle the annoying problem of Windows Snipping Tool not working on Windows 11, 10, 8, 7 PC.

Also Read: Methods To Take Screenshots On Windows 10 PC
What Are The Main Reasons Behind This Issue Of Snipping Tool Not Responding?
- Microsoft’s digital certificate expired on October 31, 2021, causing several functionality issues, including Snipping Tool Not Working.
- In most cases, the snipping tool is not responding is caused due to an outdated Windows OS. So, probably updating your OS may help in fixing the issue.
- Sometimes, third-party apps or software may occasionally interfere with the operation of the screen capturing tool and cause the snipping tool not responding. properly.
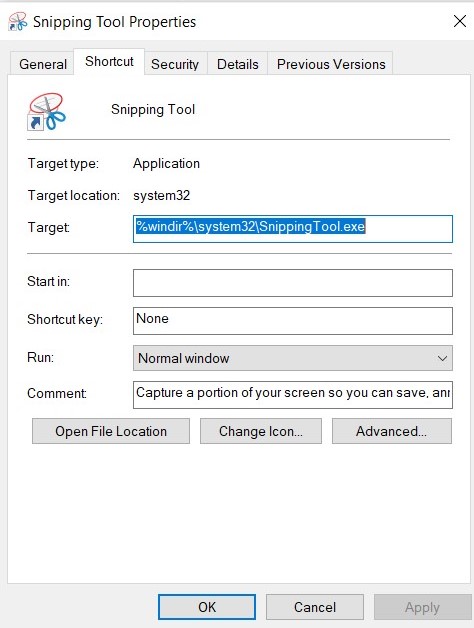
- It is also possible that the Snipping Tool’s shortcut key on your device is different. If the problem only occurs when you use a shortcut key, you may need to find out what the actual shortcut is by inspecting its characteristics.
- Corrupted or damaged system files might cause the Snipping Tool to stop operating.
These are the main reasons behind the Snipping Tool not working on Windows. However, to know the real culprit & repair it instantly, you can use the troubleshooter to determine what caused the problem.
In case you don’t want to get into the hassle of fixing “Snipping tool not working for Windows”, we recommend you to switch to a better alternative of Snipping Tool. The market has dozens of tools to grab screenshots, annotate them, record screens and do a lot more. One of the best recommendations is listed below!
| Which Is The Best Alternative To Snipping Tool For Windows?
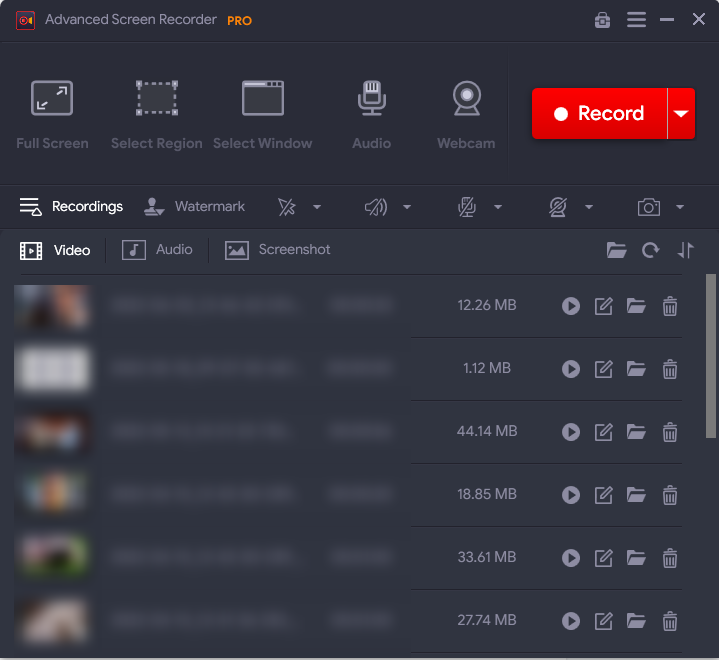
Advanced Screen Recorder is a personal favourite option for fulfilling screenshot capturing and screen recording needs. The installation process is relatively easy and is considered a wonderful alternative to the snipping tool with some great capabilities. One of the most crucial features I discovered in Advanced Screen Recorder is the modern and intuitive interface, which provides an integrated option to capture various screenshots and record everything on-screen. You may customise the hotkey per your preferences to make the most out of the tool.
Download Advanced Screen Recorder Read the unbiased review to know more about Advanced Screen Recorder: Advanced Screen Recorder Review – The Best Tool To Record Screen |
You might want to read: Best Snipping Tool Alternatives
How Do I Fix the Snipping Tool Not Working On Windows
List of Contents
- What Are The Main Reasons Behind This Issue Of Snipping Tool Not Responding?
- 1. Simply Relaunch The App
- 2. Run The “SFC /ScanNow” Command Line
- 3. Run the DISM Tool
- 4. Find out which software is conflicting with Snipping Tool
- 5. Update your Windows drivers
- 6. Turn off Focus Assist from Action Center
- 7. Run Windows Update Troubleshooter
- 8. Check out if the Snipping tool shortcut key is working
- 9. Simply let the Snipping Tool operate in the background
- FAQ’S-
- Conclusion
Let’s check out some methods to fix the Snipping Tool not responding properly on your Windows PC.
1. Simply Relaunch The App
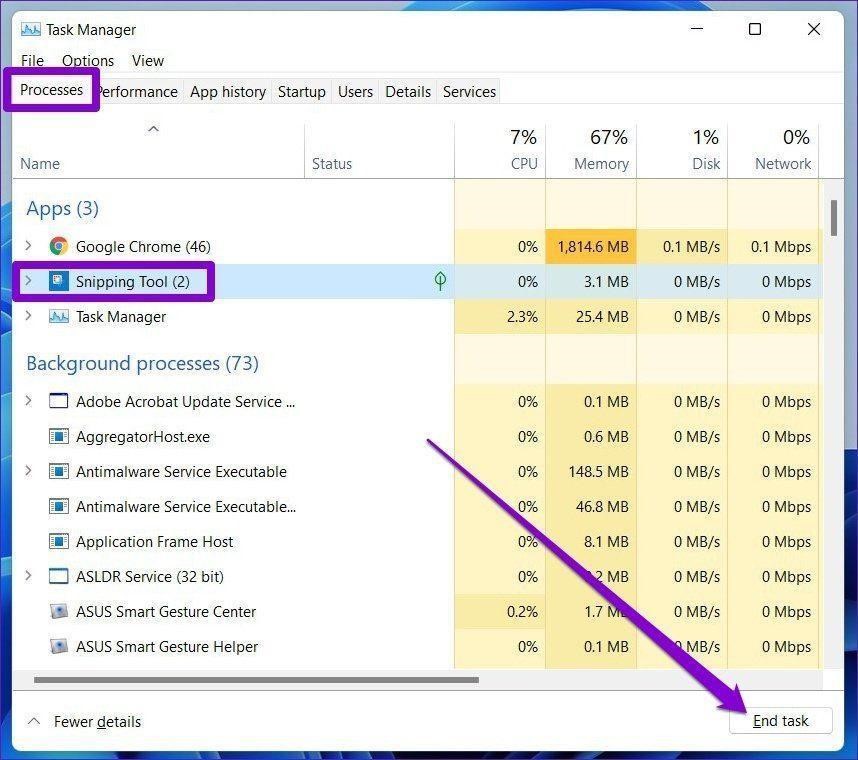
The Snipping Tool software may have encountered the issue during its launch. Hence, you can restart the program and see if it helps. Start the Task Manager by pressing the keyboard shortcut – Ctrl + Shift + Esc. Select the Snipping Tool program from the Process tab and click the End Task button at the bottom of the Window.
2. Run The “SFC /ScanNow” Command Line
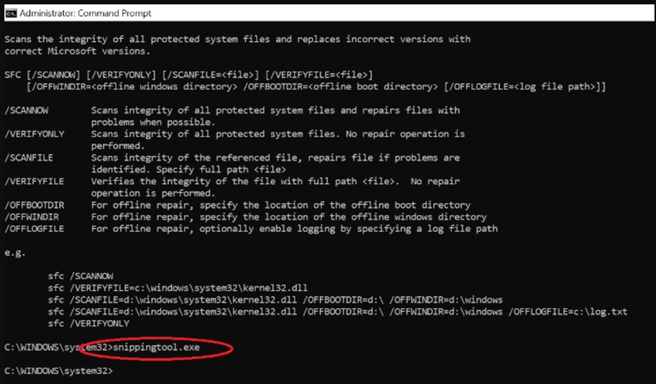
This is another tried and tested method to resolve “Snipping Tool not working” on Windows PC. The technique involves using System File Checker, a Windows built-in program that runs a comprehensive scan to discover and repair common system errors. You must run the “sfc /scannow” command line on the Command Prompt window without inverted commas.
- Launch Command Prompt on your PC and run as an administrator.
- On the CMD Window, simply type “sfc /scannow” and press the Enter button. Keep patience and let CMD do its job.
- To see if the tool is repaired, type “snippingtool.exe” and click “Enter.” Make a shortcut to test if the tool was successfully started.
Hopefully, this would have helped quickly fix the “Snipping tool not working” on Windows PC.
3. Run the DISM Tool
The Deployment Image Servicing and Management (DISM) command-line utility is used to service Windows images. One of its numerous applications is to fix system pictures when image-related issues arise. Whether your Snipping Tool isn’t operating correctly, you may use the DISM command with the RestoreHealth option to determine if the problem is with the system image.
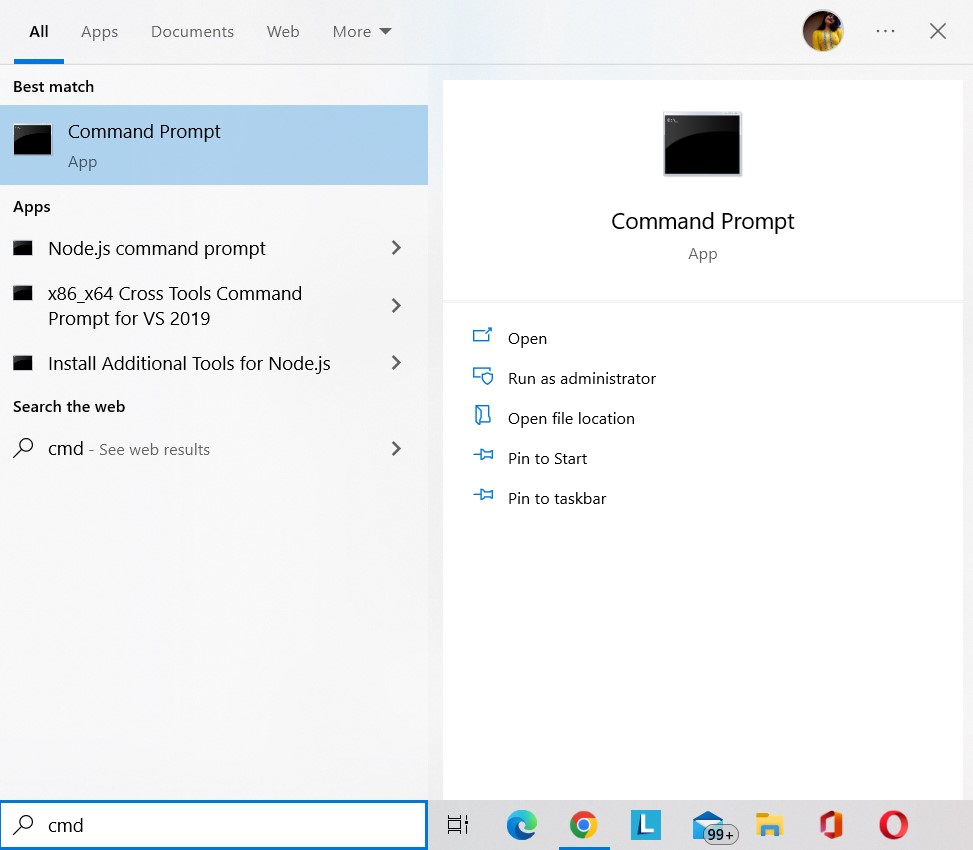
Step 1 = To launch the Command Prompt, type cmd into the search box and choose Run as administrator.
Step 2 =Copy and paste the following command into the Command Prompt and hit Enter.
DISM /Online /Cleanup-Image /RestoreHealth

Step 3 = Wait for the restoration process to finish.
Step 4 = Restart your computer to determine whether the Snipping Tool is now operational.
4. Find out which software is conflicting with Snipping Tool
As previously stated, other applications on your computer may be interfering with the Snipping Tool and causing it to fail. Here’s how to find the programs that hamper your experience while using the screen capturing tool and fix the error message Snipping Tool not working on Windows 10 and other OS versions.
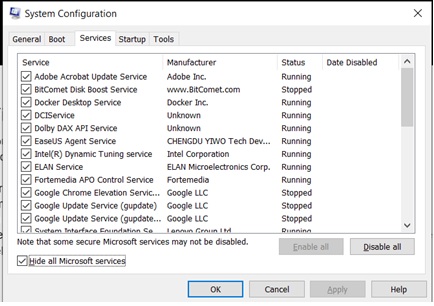
- Press the Windows logo and “R” keys together on the keyboard, then type “msconfig” and hit the “Enter” button.
- From the System Configuration window, head towards the “Services” tab and check the box next to “Hide all Microsoft services,” located below the window. Hit the OK button, which will stop the suspected services, particularly those related to newly installed software that might be causing the issues associated with the Snipping tool.
5. Update your Windows drivers
Having outdated, corrupted, or damaged device drivers also causes various issues, including the “Snipping Tool Not Working or Responding” appropriately. So, you need to keep all your Windows drivers up to date. We recommend using the Advanced Driver Updater, designed and distributed by Systweak Software.
Advanced Driver Updater is compatible with Windows 7, 8, 8.1, 10, and 11 and allows you to update faulty drivers using either the free (with limited functionalities) or registered version.
The following are the primary benefits of utilizing this driver updater software:
- Quickly detects obsolete drivers and helps update them with the latest & most compatible versions.
- Allows you to backup previous driver versions before updating them to the latest.
- Helps in restoring the previous driver versions in case of any mishap.
- Supports scheduling automatic driver scanning & updating.
Let’s see how you can use the Driver Updater Software on Windows PC. Try out the following steps:
Step 1: Download the latest version of Advanced Driver Updater from the official website:
You can also hit the Download button below to get your hands on the recent version of Advanced Driver Updater.
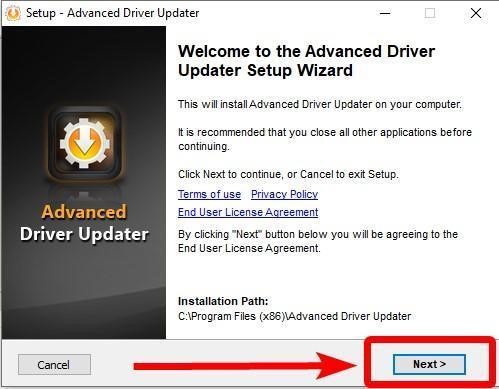
Step 2: Double-click the setup file and follow the on-screen instructions to complete the installation process.
Step 3: Press the Finish button to proceed further.
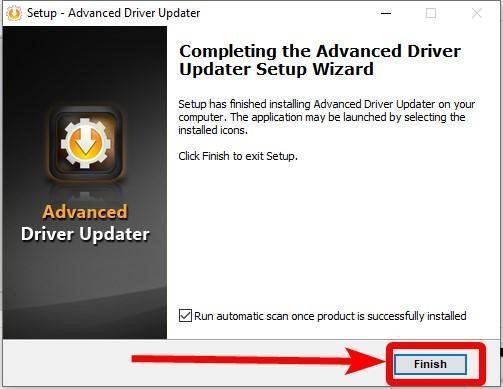
Note: When Advanced Driver Updater is initially installed, it will perform an automated scan. Uncheck the box next to “Proceed automatic scan after the product is successfully installed” if you want to prevent the driver updater software from scanning.
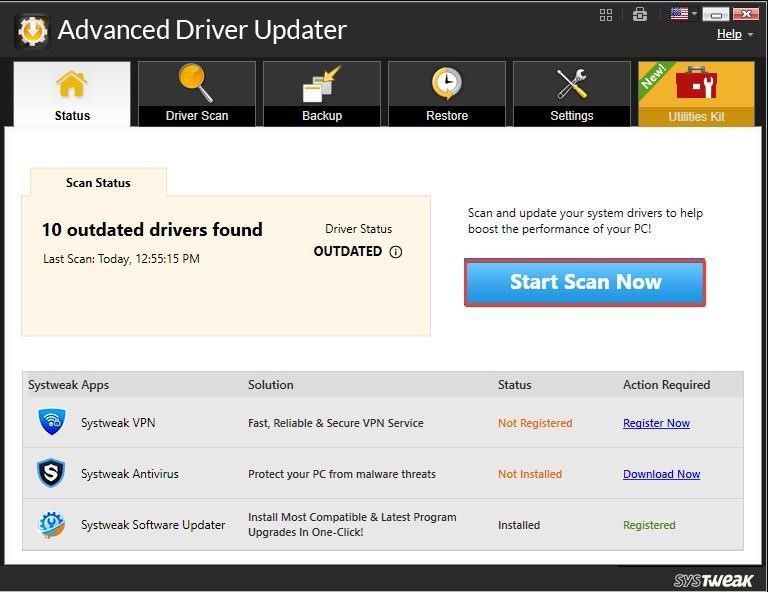
Step 4: Once Advanced Driver Updater is successfully installed, launch the tool and hit the Start Scan Now button to initiate the process.
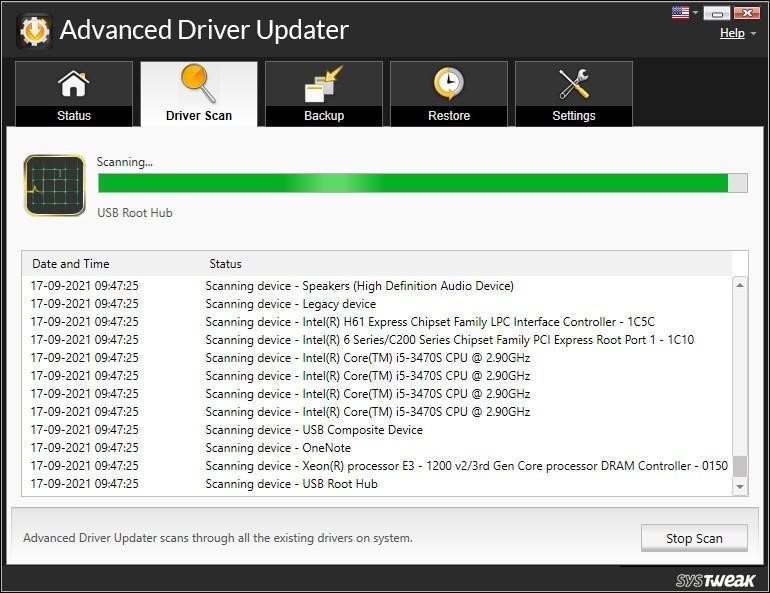
Step 5: Allow the tool to recognize the PC and scan for outdated, corrupted, missing, or incompatible drivers. You will receive a list of faulty drivers in a few minutes.
Step 6: After that, choose the drivers you want to update (especially graphics drivers to fix the Snipping tool not working issue) and hit the Update driver button next to the same. Alternatively, you can click the Update All button to update all the faulty drivers in one go with the registered version.
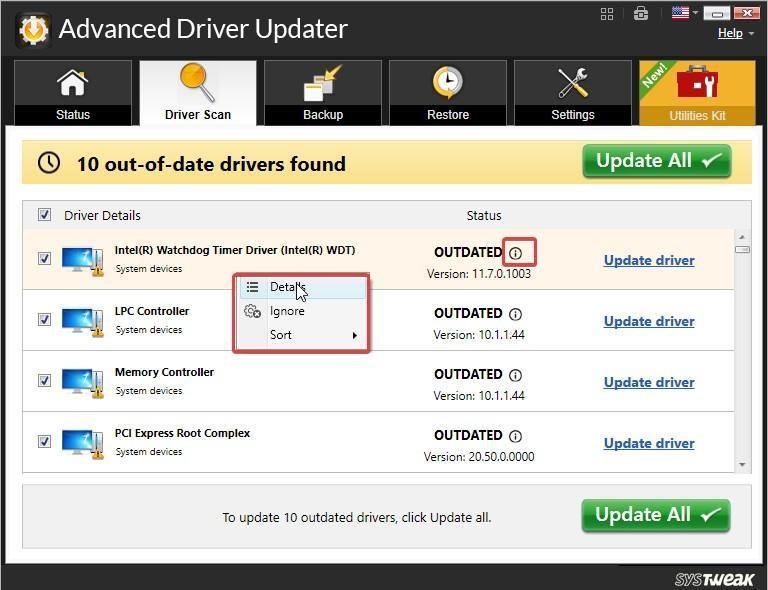
Note: The FREE version only allows you to update one driver at a time.
Step 7: Reboot the computer to implement the changes.
After running the latest drivers, your “Snipping Tool not working” issue should now be rectified.
6. Turn off Focus Assist from Action Center
Focus Assist is a well-known Windows 11 software that filters out notifications on your computer. But this feature does break the operations of the Snipping tool shortcut and cause the associated errors. Hence, disabling the Focus Assist temporarily may solve the “Snipping tool not responding error.”
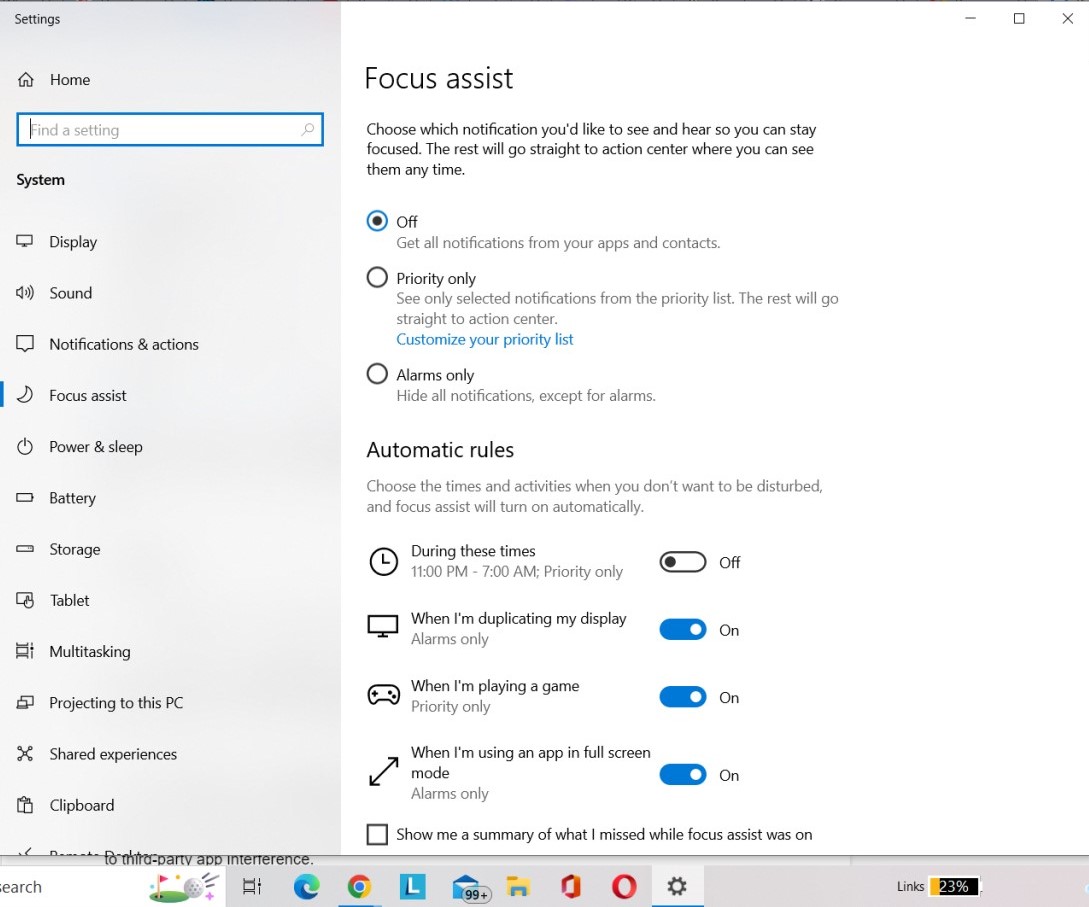
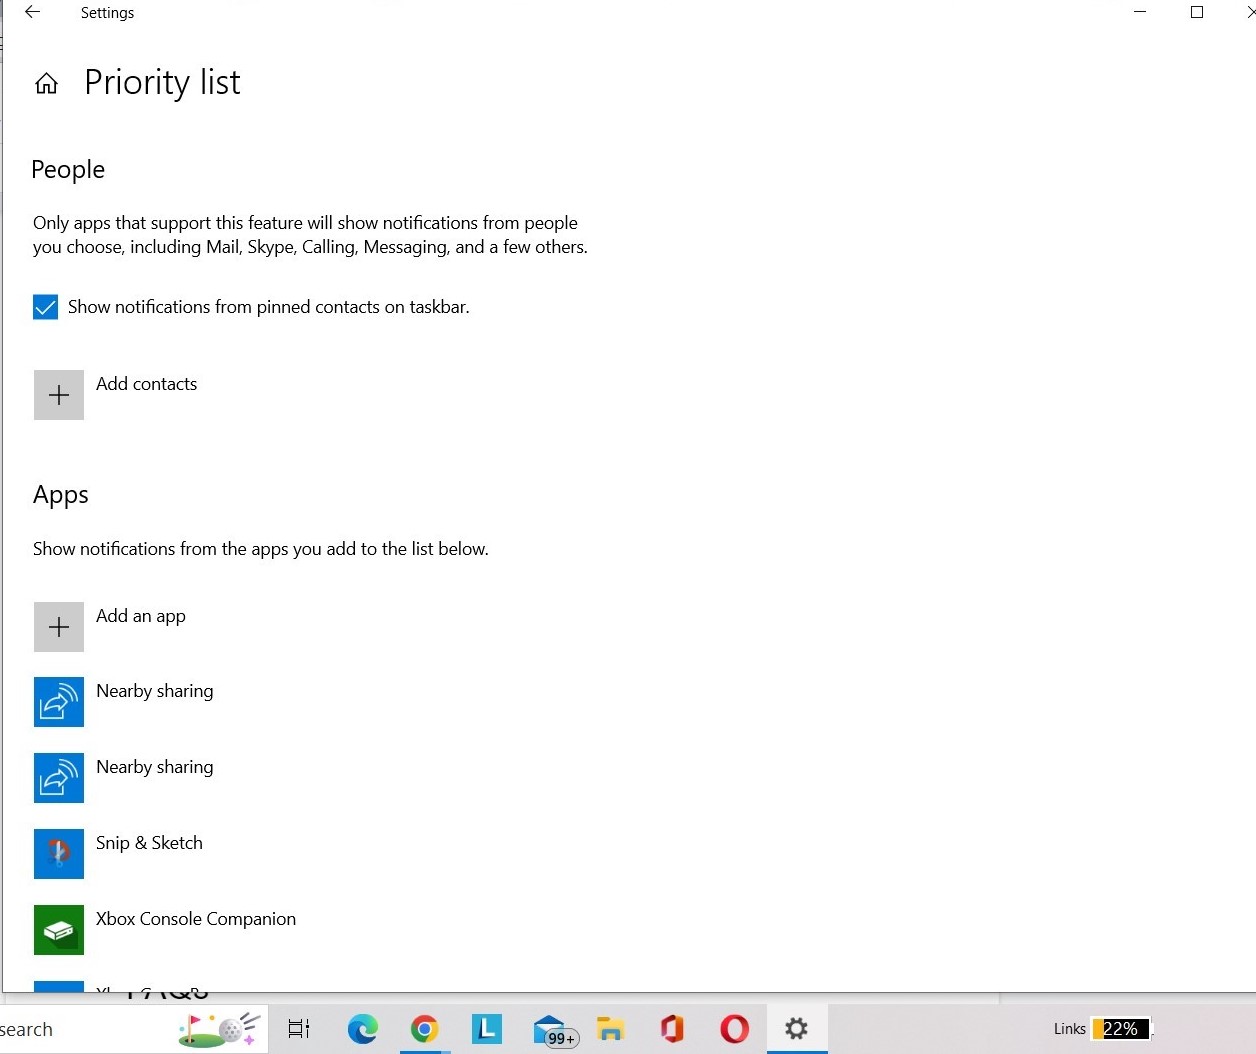
Additionally, consider adding the Snipping Tool app to the priority list to use the Snipping Tool with the Focus Assist enabled.
Follow the steps mentioned below to disable Focus Assist:
Step 1: Right-click on the Action Center icon in the System’s tray and choose Focus Assist.
Step 2: From the sub-menu, select Off option and check whether the Snipping tool is working fine or not.
Follow the steps mentioned below to add the Snipping tool app to the priority list:
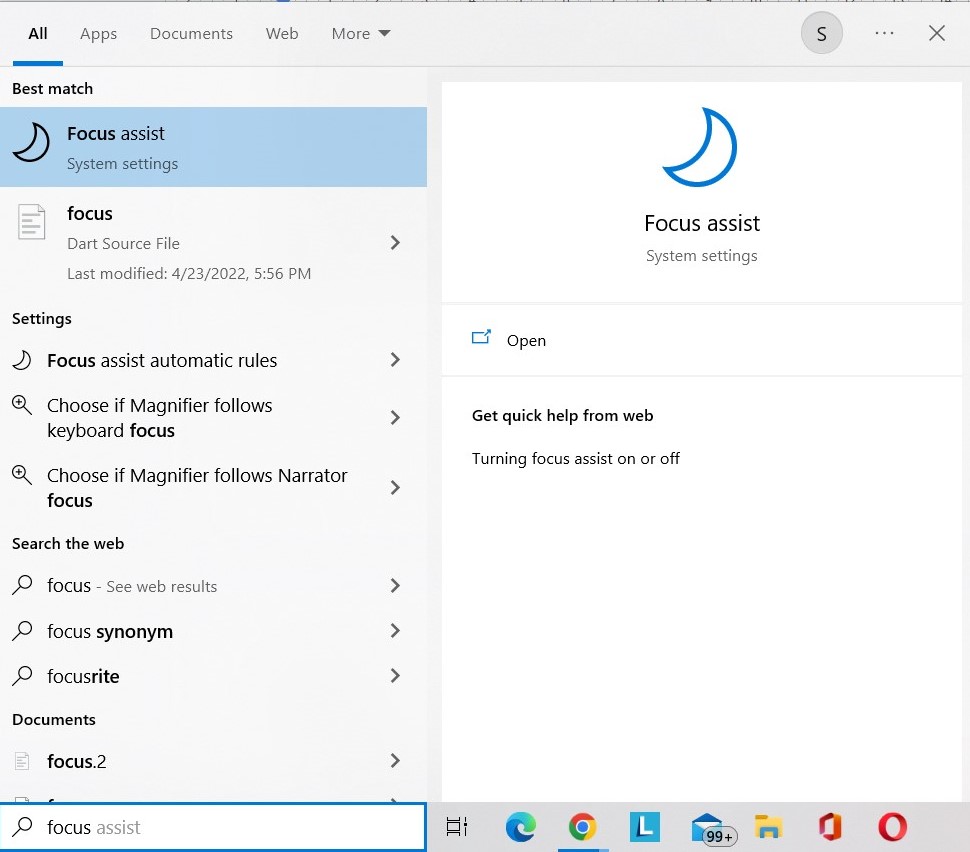
Step 1: Go to the Taskbar, select the search tool, type in Focus Assist, and then click the first result that shows.
Step 2: Next, select Customize your priority list.
Step 3: In the Apps section, click the Add an app button to add Snipping Tool to your priority list.
7. Run Windows Update Troubleshooter
If none of the above methods works out, it is time to troubleshoot the error with Windows Update Troubleshooter. It will run a comprehensive scan, find the potential issues causing the error and repair them instantly. To run the Troubleshooter, simply follow the steps below:
Step 1: You can access the Settings menu by hitting the Win + I keys.
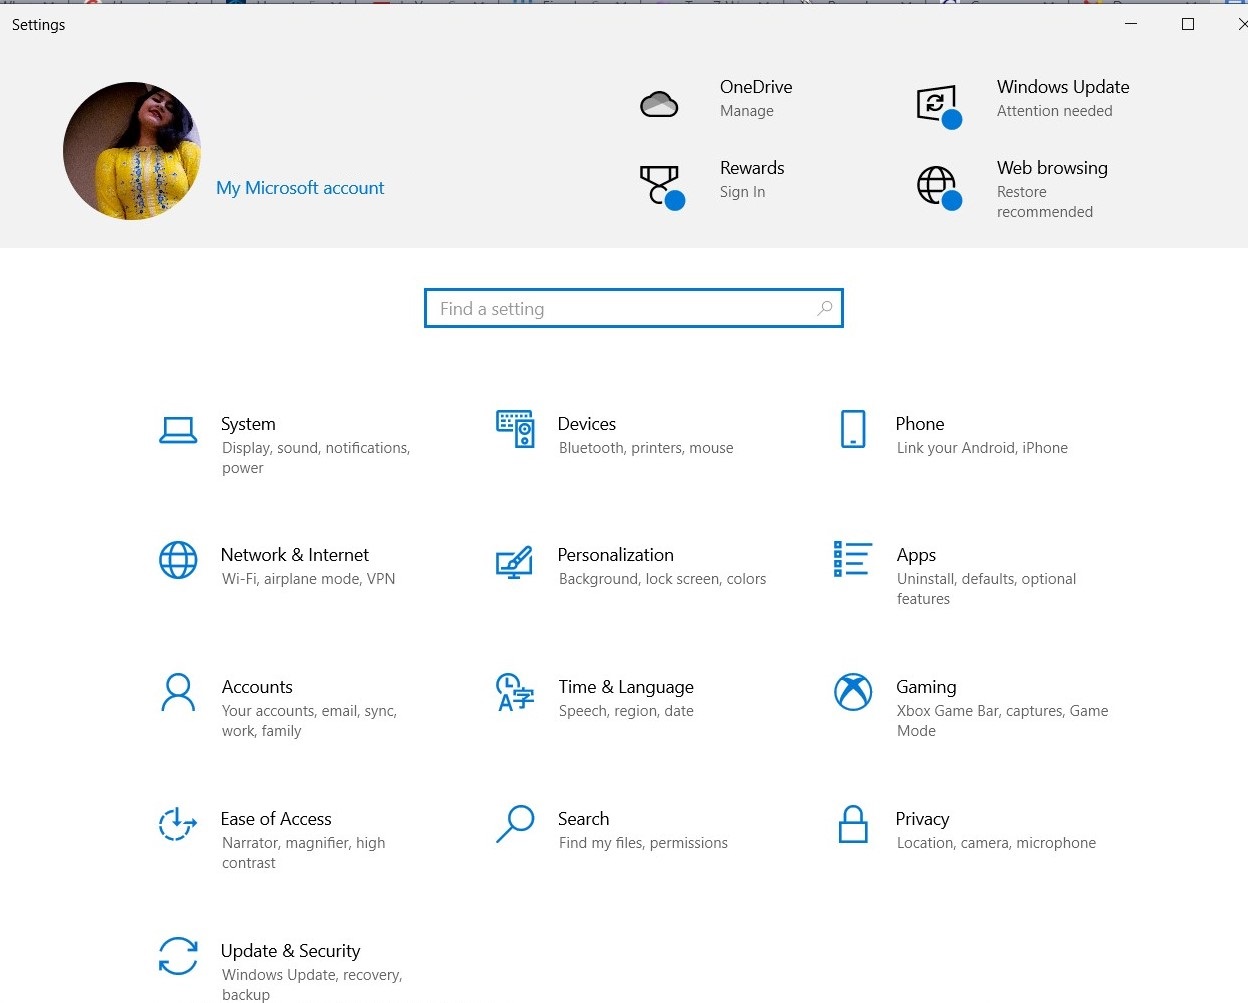
Step 2: Navigate to the Update and Security module.
Step 3: From the Troubleshoot module > select Additional Troubleshooters from the left-hand panel.
Step 4: Then, click the Windows Update Troubleshooter button.
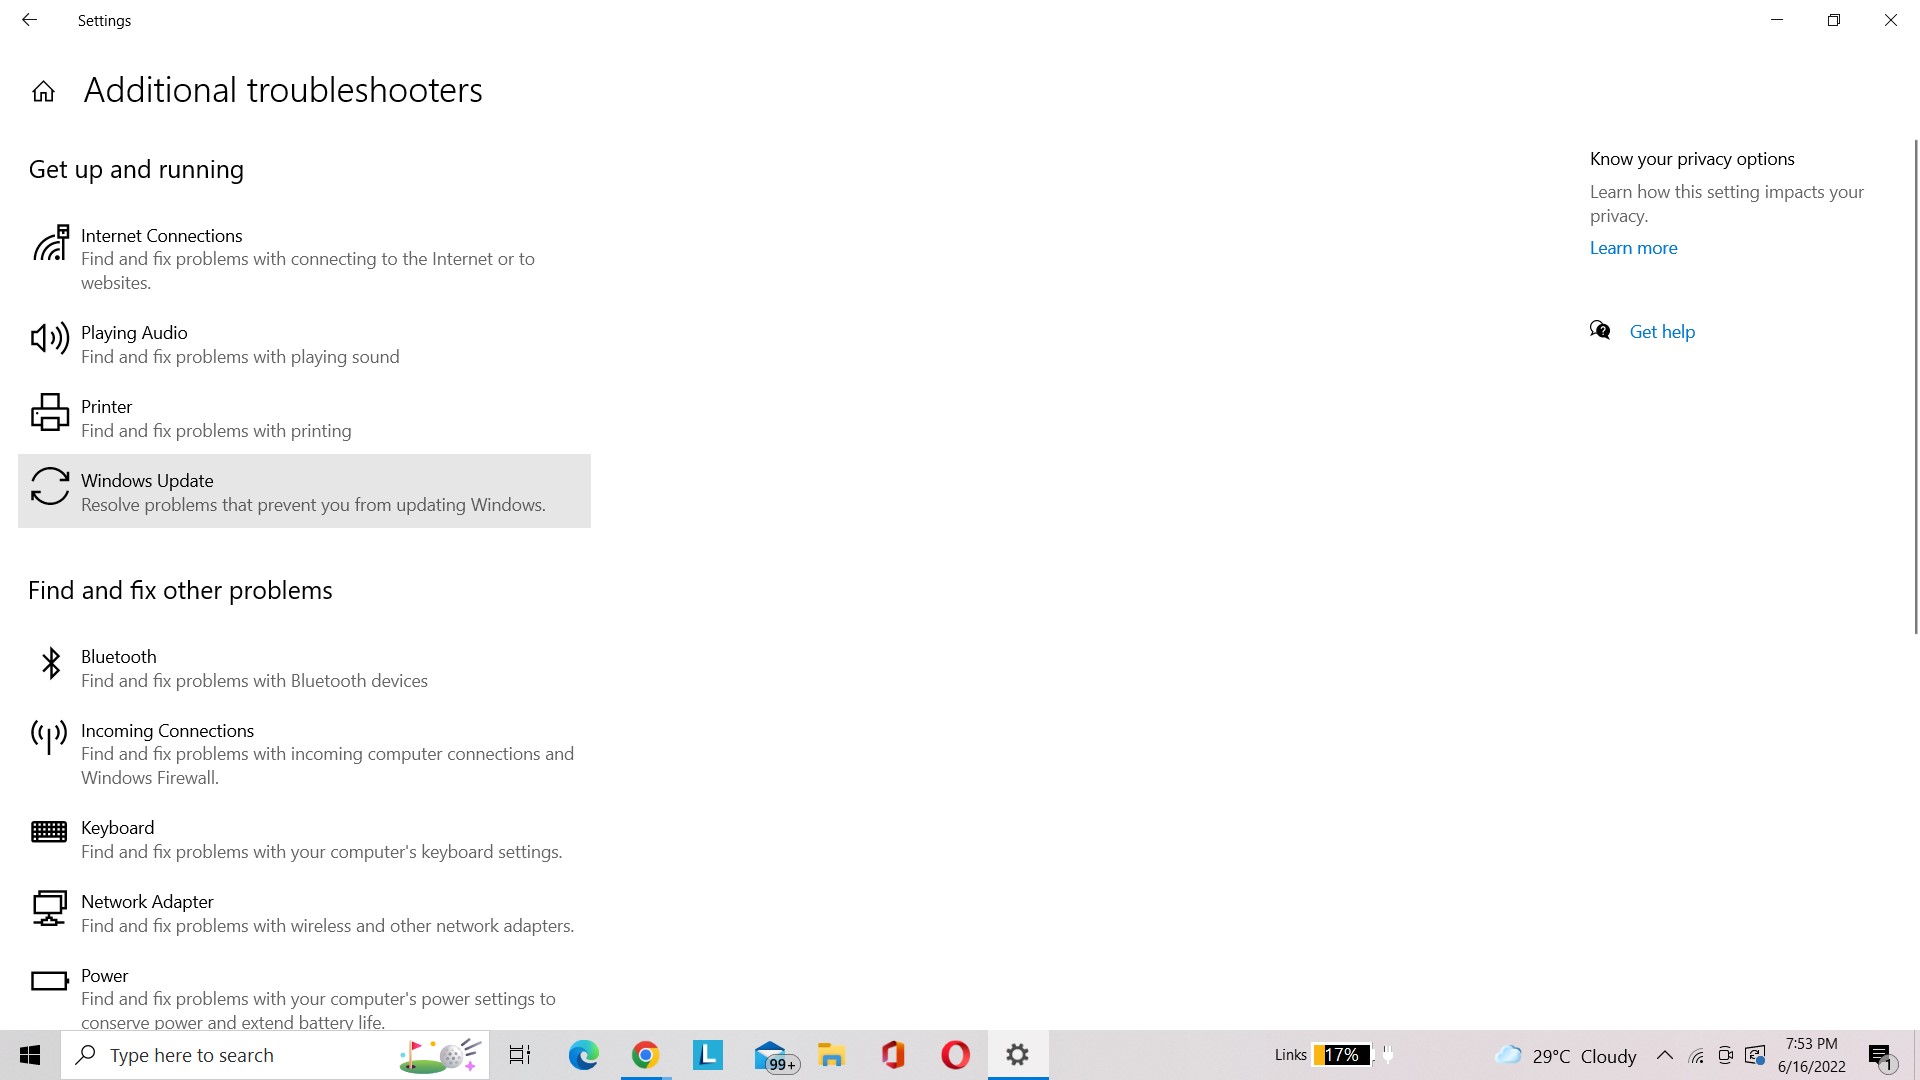
Hope the troubleshooter works well for you and helps in fixing the Snipping tool not working problem.
8. Check out if the Snipping tool shortcut key is working
If the problem only occurs while attempting to use the shortcut key, your respective device may have a different shortcut key or none at all. Please follow the instructions below to verify the Snipping Tool shortcut key.
Step 1: Navigate to the search bar and type Snipping Tool over there.
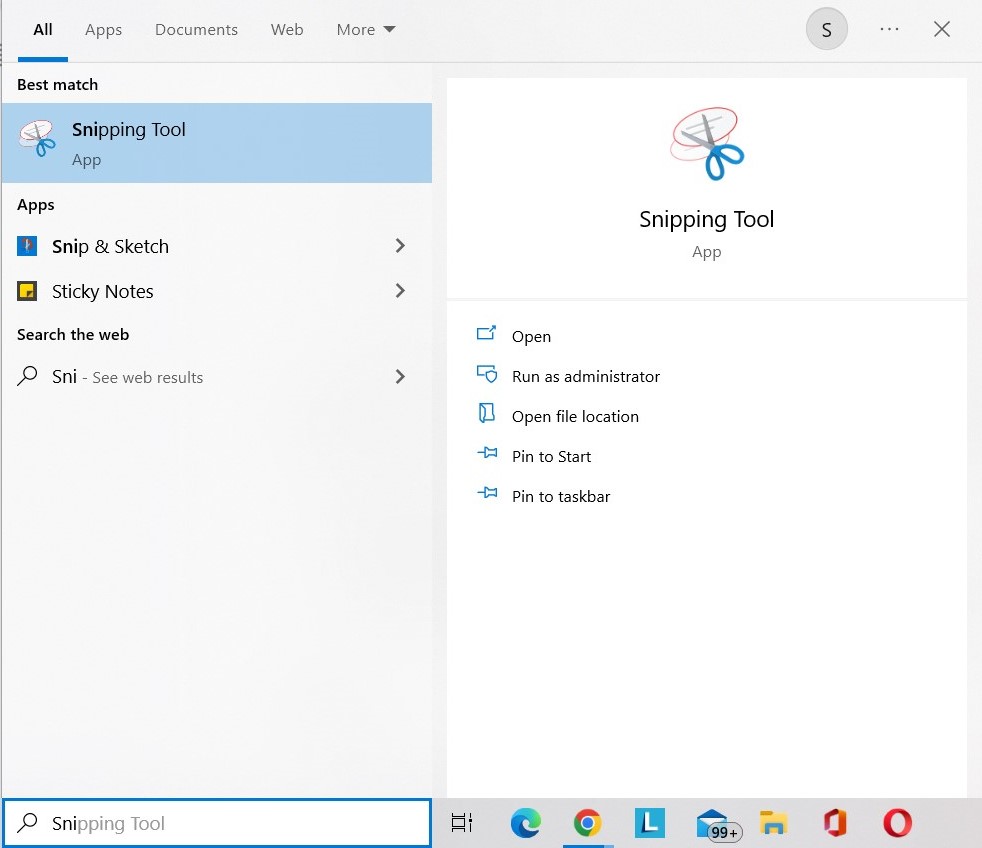
Step 2: Right-click the result and select open File Location’.
Step 3: Again, right-click and then choose Properties.
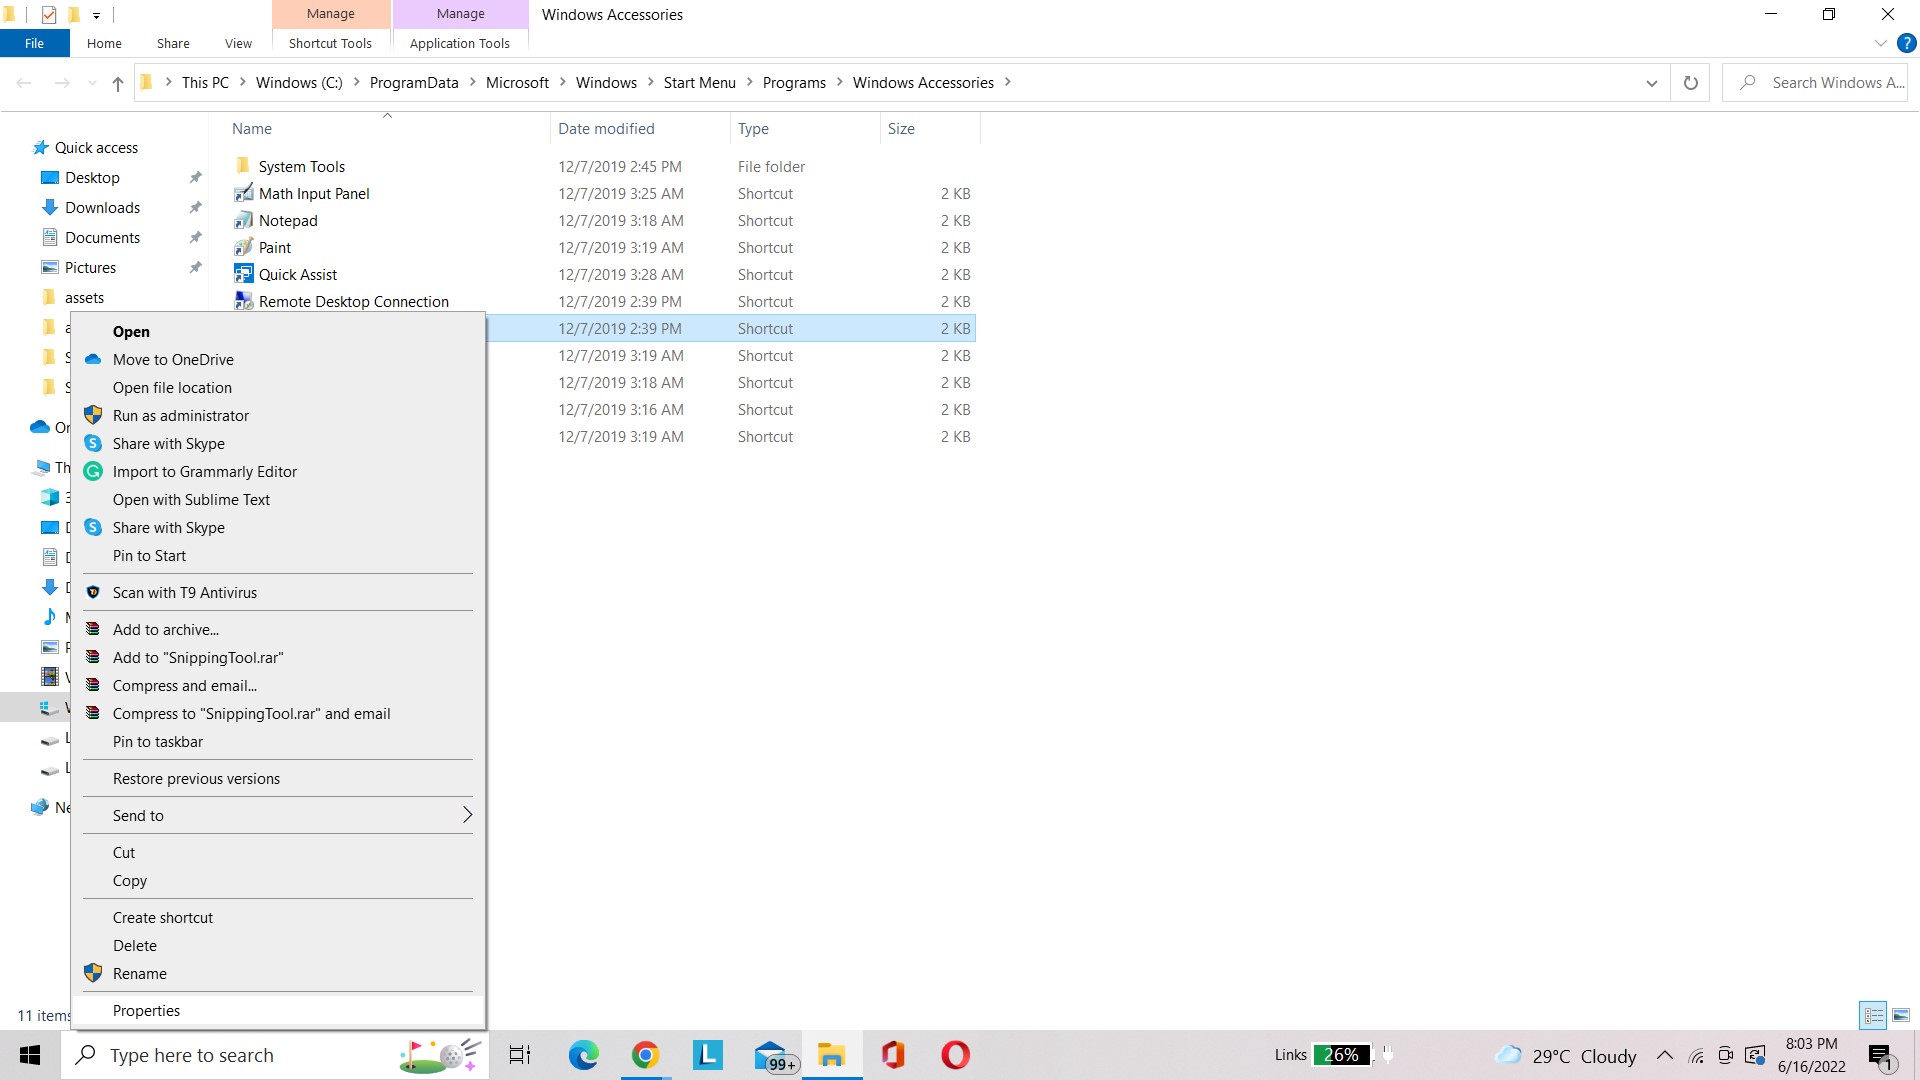
Step 4: Navigate to the Shortcuts tab.
Step 5: Check the shortcut key to see what has been saved. If there is none, you may enter your preferred shortcut key.
You might want to read: YouTube Screenshots – 2 Ways to Take Screenshots From YouTube Video
9. Simply let the Snipping Tool operate in the background
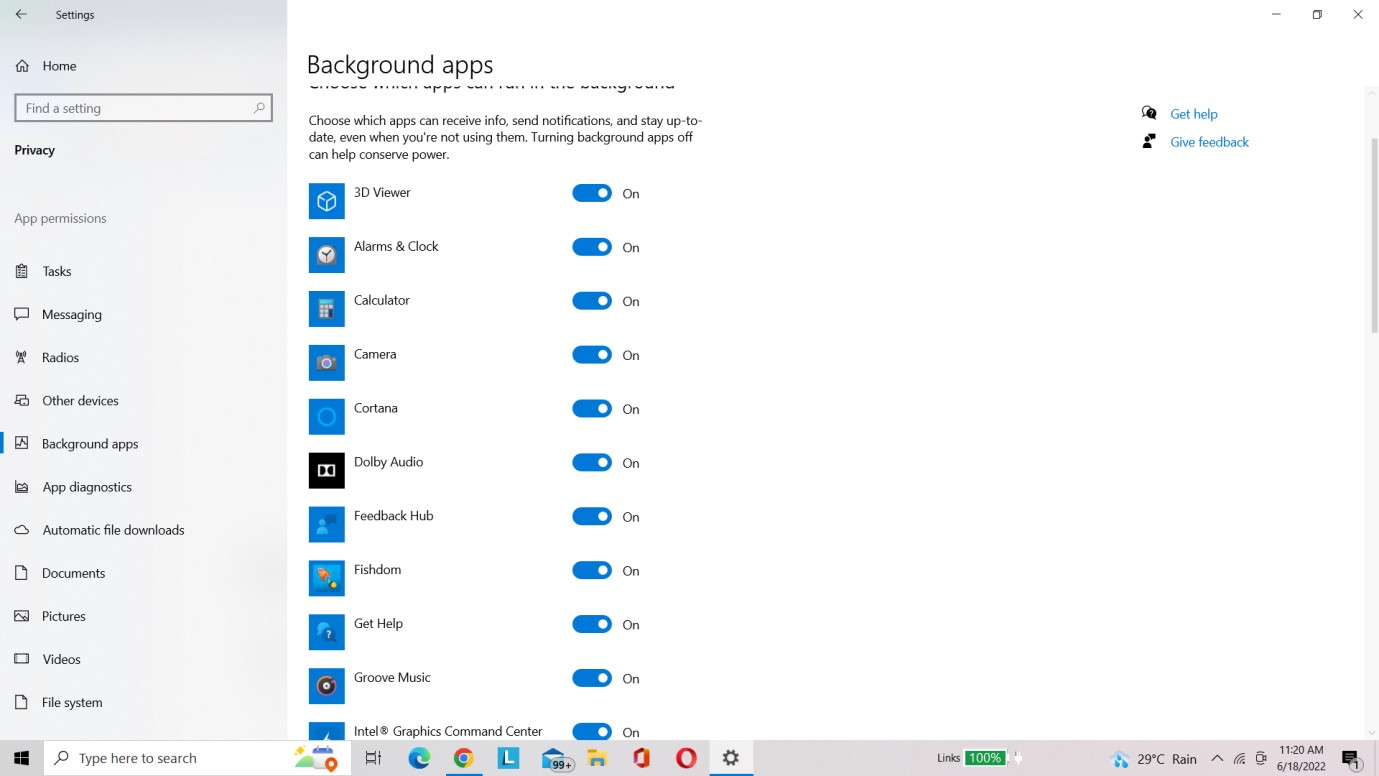
Snipping Tool is one such app that sometimes “stays behind the screen” and quietly waits to be woken up most of the time. However, if it does not have the authorization of your PC to operate in the background, the Snipping Tool will not be able to work while you are not active in the app’s window.
Step 1: To launch the Quick access menu, you must right-click the Windows icon on the taskbar and select Settings.

Step 2: Click on the Privacy option in the Settings menu.
Step 3: Scroll down to the Background apps section on the left list and see if the Snipping Tool is enabled. If not, turn the switch to On.
You might want to read:
- All You Need To Know About The Windows Snip And Sketch Tool
- How To Fix Windows 10 Snip and Sketch Not Working
FAQ’S-
1. How do I reset my snip tool?
To resolve this Snipping Tool not working problem, just exit and restart the Snipping Tool. Otherwise, use the keyboard shortcut “Ctrl + Shift + Esc” to bring up the Task Manager. Then, just locate and exit SnippingTool.exe before relaunching it.
2. Why is the Snipping Tool not working in Windows 11?
Microsoft’s Snipping Tool has been replaced with the new Snip & Sketch tool, and as a result, the old one no longer works on many PCs. The problem can potentially be attributed to third-party app interference as well.
3. How do I reinstall the Snipping Tool in Windows 11?
You need to follow the below steps to reinstall Snipping Tool in Windows 11.
- To open Settings, press Win + I.
- Then select the option ‘Apps’.
- From there, select Apps & features.
- Uninstall Snipping Tool by clicking the three-dot symbol.
- Open the Microsoft Store and look for the Snip & Sketch app.
- Download it, and your Snipping Tool will be reinstalled.
Conclusion
By now, you must know the leading causes of the Snipping tool not responding to errors and how you can troubleshoot the same. While trying to get rid of the error, I tried multiple solutions, and among them, updating Windows drivers did the magic. So, I highly recommend our users to try Advanced Driver Updates to detect outdated drivers and immediately update them. If you find this article insightful, please provide feedback in the comments below!



Leave a Reply