Without a doubt, every one of us loves to explore the whole world on our computers. Plus, thanks to the tech era, nothing is possible if you haven’t got a computer. And the whole experience worsens when your computer is working slower as hell. Sometimes you wish you wouldn’t have been using that computer in the first place.
This is when you realize your system might be storing junk files and unnecessary data which could have slowed down your computer speed. Since no one wants to use a computer that takes forever to respond to a simple command, they look for solutions. One of the promising & effective solutions to get your computer up and running like earlier is using a cleaning application.
Does Your Mac Also Become Slower Gradually?
Mac is one of the most powerful and advanced computers one can get his/her hands on. However, with time and usage, your Mac might tend to slow or lag. It could be because of junk files, or unnecessary applications piling up on your computer taking up valuable storage and reducing speed.
Irrespective of the computer you are using, if it’s not getting optimized constantly, it could slow down. The only solution to it is flushing out junk files and unwanted data from your Mac. Now, to do the same, there are many clean-up apps available in the market. These apps are quite helpful in identifying & removing useless files from Mac and improve the computer’s overall performance.
Since there are many apps, you need to be extra cautious while narrowing down one that you want to go ahead with. To help you with it, we are reviewing one of the efficient cleaning apps Movavi Mac Cleaner, a perfect combination of reliability & powerful features.
Clean Up Your Mac With The Movavi Mac Cleaner
List of Contents
One of the most powerful Mac cleaners available in the market is Movavi Mac Cleaner, reasons can be compatibility, reliability, & rich features. In this post, we will be exploring Movavi Mac Cleaner and how it works.
- You need to start the process by navigating yourself to the Movavi Mac Cleaner official webpage.
- Go through the downloading process on your Mac & after successful installation, it will launch automatically on your home screen.
Click Here To Download Movavi Mac Cleaner

A. Movavi Mac Cleaner Pricing
You can easily use Movavi Mac Cleaner’s trial version on your Mac, however, with a few limitations. You will be able to use all the main features without any restrictions but the cleanup limit will be capped at 500 MB. But I think that’s enough to know whether Movavi Mac Cleaner holds is worth the time.
In case, you wish to use the Movavi Mac Cleaner with full functionality, you need to buy the Activation key from this webpage. Using a premium version of this Mac Cleaner is best as the limitations & restrictions will cease to exist.
B. Movavi Mac Cleaner Features
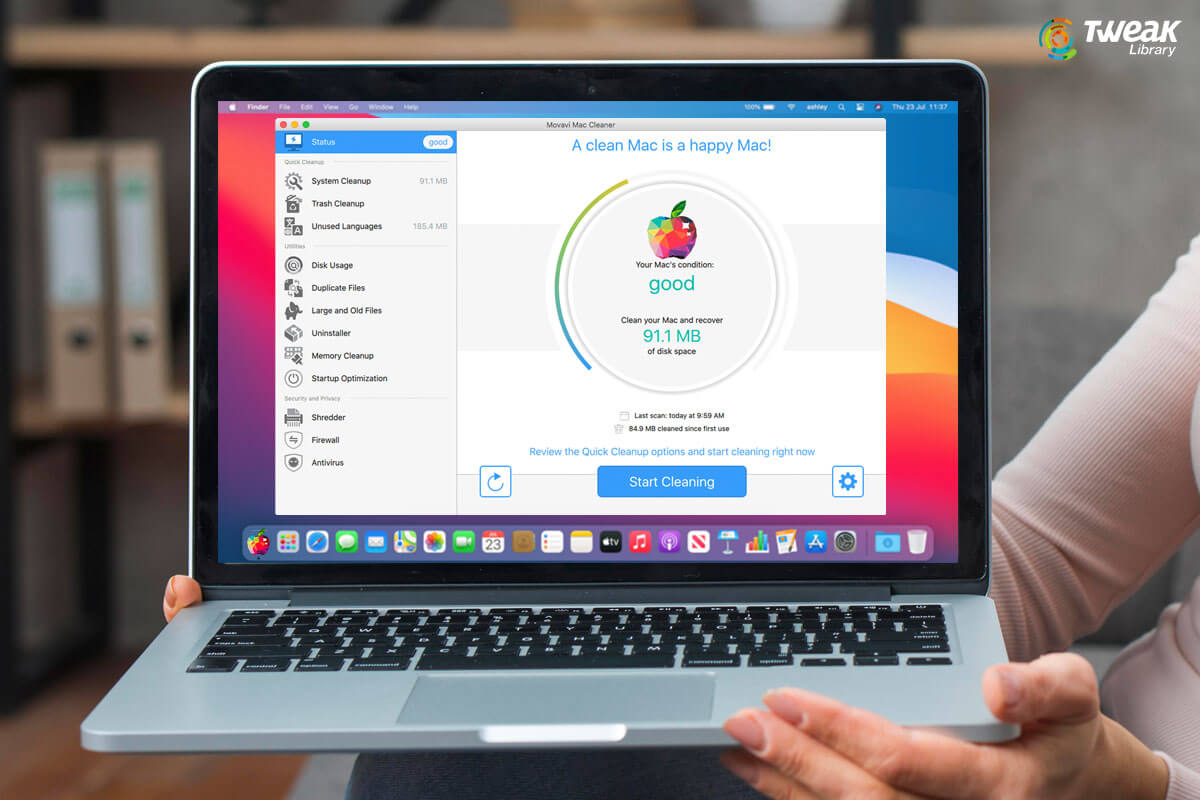
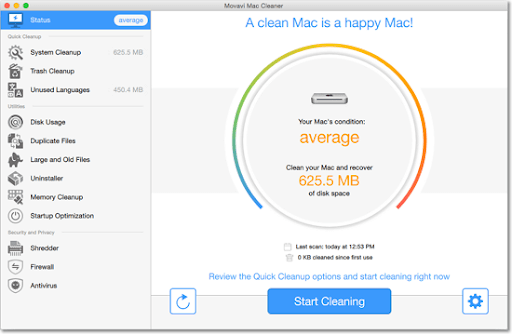
Once the Movavi Mac Cleaner has been launched, the homepage will suggest you (after scanning) clean up the Mac. The same notification can be seen as a command on the Movavi Mac Cleaner page (top left side of the screen, under Status).
Also Read: How To Check Storage On Mac – Quick And Easy Ways
1. Quick Cleanup: System Cleanup
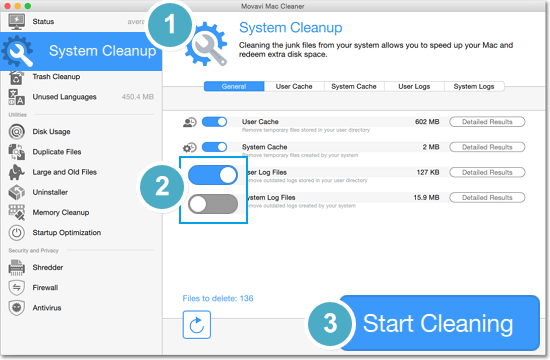
System Cleanup is one of the most important sections to get an idea about how many unnecessary files, you have got on the PC. Now to clean up your Mac, you need to tap on System Cleanup & you will see the screen has been categorized into different parts (General, User Cache, System Cache, User Logs, & System Logs). Please know the General section gives you the list of all the four other sections in one list along with the size of unneeded files they hold.

You can simply click on any of the tabs or tap on Detailed Results (on a particular section) to get a deep insight on either system logs or cache. Once you have been through the cache & log files, all you need to do is tap on Start Cleaning (bottom right side of the screen). Doing so will start the cleaning process and within a while, all the cache & log files will be flushed out of the system. You can try to run various programs on your Mac to see the difference after going through the cleaning process. The System Cleanup process will get back the unnecessarily covered space as well as boost up system speed as well.
Also Read: Duplicate Photos Fixer Pro for Mac
2. Quick Cleanup: Trash Cleanup
Another powerful way of looking deep into the system for unneeded files & flushing them out of the system is through Trash Cleanup. Though all of us, try our best to delete files permanently from the system, however, sometimes files don’t get deleted completely.
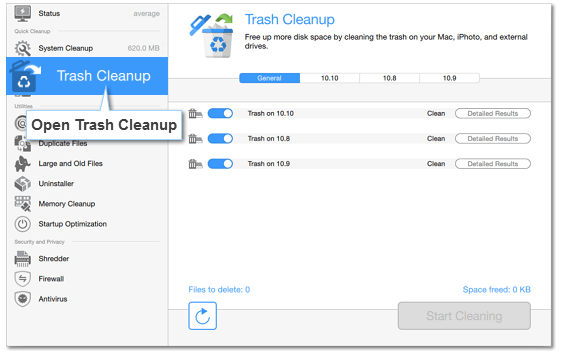
This is where you can opt for the Trash Cleanup feature from Movavi Mac Cleaner and throw out all those unnecessary files from your Mac. All you need to do is, tap onto the Trash Cleanup option & let it analyze the file size that needs to be flushed away. After the successful analysis, tap on Start Cleaning & within a while your system will be lighter than it was a few seconds ago. Voila!!
3. Quick Cleanup: Unused Languages
Not every one of us downloads different languages on the Mac, but you can surely delete them and recover space on your computer. Movavi Mac Cleaner gives you the list of all the languages that aren’t in use for quite some time and if they are to be deleted, please go ahead.
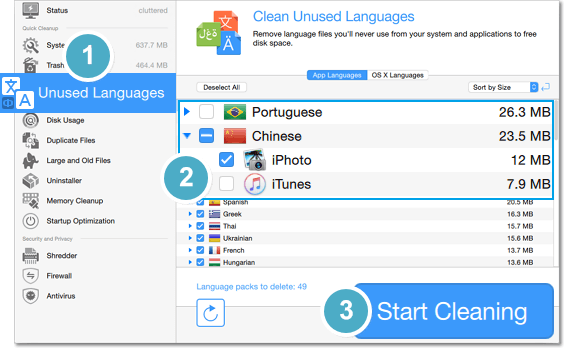
The ultimate decision will be depending on the user, but it’s necessary to point out the probable unnecessary files holding areas on the Mac.
4. Utilities: Disk Usage
Disk Usage under the Utilities section is one of the most important sections as it helps you know what files & folders are taking up most space. Not that, you wouldn’t know about it already, however, if something is being done automatically, why go manual then? So all you need to do is, tap on Disk Usage & the tool will ask you to add locations that you wish to scan for unnecessary data.
After tapping on Add Folder, Movavi Mac Cleaner will start analyzing the folder for every file possible in different color combinations. You can see which folder or file is taking up too much space and accordingly you can make your decision. You can select the particular file/folder & either go ahead with keeping it as it is or alter it up by deleting it from the system by tapping on Remove.
5. Utilities: Duplicate Files
All of us can relate to this annoying situation where there are multiple photos or music tracks stored on the cellphone that we transferred on Mac. Apart from downloading any file multiple times can also bring duplication that leads to unneeded files on the Mac. This is where Movavi Mac Cleaner works like magic by helping you identify those duplicate files on the system.
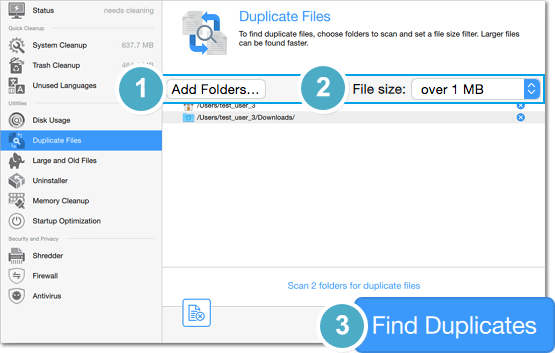
You need to tap on the Duplicate Files section (from the left panel on the screen) & use filters (Add Folders & File Size) to get the exact results related to duplicate files (tap on FInd Duplicates). Once the results are out in the open, you need to tap on Move to Trash and all the duplicate files will be deleted from the pre-decided location. Now you can open the Trash window and clear out everything and throw them out of the system.
6. Utilities: Large and old files
To delete all the possible unnecessary large and old files manually can be time taking. However, by using Movavi Mac Cleaner’s Large and old files tab, you can do it easily by clicking the Add Folders option (Find Large Files).
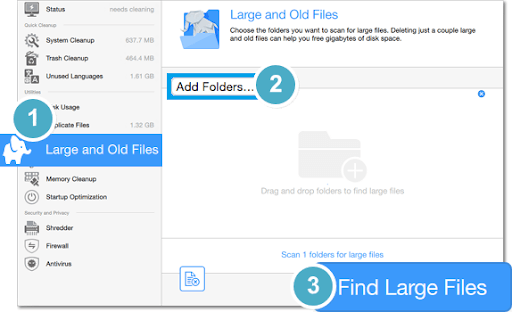
Once you can see the results in front of you, use the Sort by option or Sort by Size option. This will give you the results in (large to small) a uniformity order and it will be easy for you to take appropriate action of either deleting or keeping it on the computer. You can also use other sort filters (Sort by Name, Sory by Last Used, Sort by Type) to look for the unneeded files & delete them then & there only.
7. Utilities: Uninstaller
Up until now, I have considered the Movavi Mac Cleaner as the one-stop-solution to clean up the Mac thoroughly. Uninstaller is another powerful feature on the cleanup tool that helps you uninstall the applications (according to your convenience). As well, the same functions will help you clean up the leftover files which are also amazing. You just need to click on Uninstaller functionality on the tool & it will divide the screen into three sections (User Apps, OS Apps, & Leftovers).
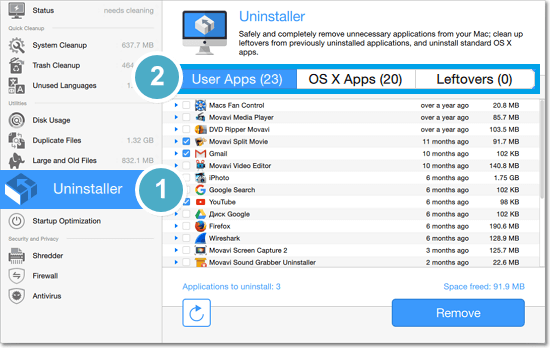
You need to go through all three sections and decide which apps you wish to uninstall from the mac. Also, don’t forget to check the Leftovers section as well so that there would be no loophole as long as it comes to installing or uninstalling apps on Mac. You can go through the apps you wish to uninstall and post selecting the same, tap on Remove. Simple as that!!
8. Utilities: Memory Cleanup
RAM (Random Access Memory) is the only thing that matters when we are going through too many programs on the system. From your cell phone to a computer system, RAM stores bits of info that are necessary. However, when many apps are open at the same time, they use all the available space and your system slows down unexpectedly. This is where Memory Cleanup from Movavi Mac Cleaner comes in to help you out seamlessly.
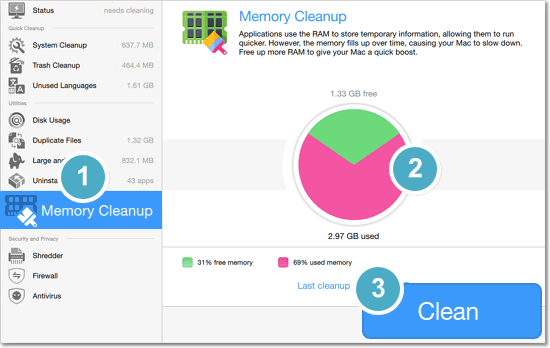
All you have to do is, tap on Memory Cleanup (under Utilities) and it will display a graph to give you a glimpse of how much RAM is being used. Here you need to tap on Clean and within a few seconds, the used RAM will come down drastically and your mac will start running faster. And I think that’s what we were looking for from a clean-up to improve the mac’s overall performance.
9. Utilities: Startup Optimization
Sometimes, the words speak for themselves and Startup Optimization is one of those words. Under Utilities on Movavi Mac Cleaner, Startup Optimization is one of the most powerful features. You have seen or experienced situations where as soon as the system starts, too many programs launch simultaneously. This is when your system takes almost forever to work smoothly and you need to take rapid action.
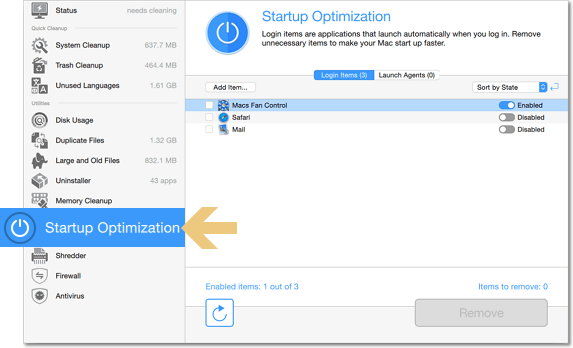
Here you can use the Startup Optimization from Movavi Mac Cleaner that will help you put a hold on the startup items. It simply means that all the startup items on your Mac will be reverified if they are necessary. Anything unnecessary will be removed from the list so that it can help you run your system smoothly. As soon as you tap on Startup Optimization, the tool will start analyzing and will give you results in two sections (Login items & Launch Agents). You need to check both the sections thoroughly and then make the decision of disabling them (if needed). Also, if you wish to remove them from the startup items list, select the item & tap on Remove to do so.
10. Security And Privacy: Shredder
All of us know what happens when we delete files from the system as it first moves to the Trash. After deleting the same from the Trash also, there are a few bits of data that remain on the disk. Here you need to take the action of permanently deleting those files (unnecessary) from your Mac because slowly these will become a pile of files in large size. So you need to use the Shredder option from the Security And Privacy (last section on the left side panel) and tap on Add Files (you can also use the drag & drop feature).
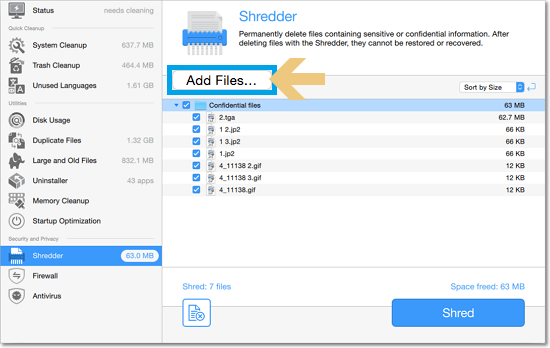
After the file has been added to the Shredder (Movavi Mac Cleaner), it will display all the unneeded data related to the same file. Here you can simply click on Shred and all those files will be wiped away from your Mac. Doing so will be another step of boosting Mac’s overall speed as well as performance.
11. Security And Privacy: Firewall
From the security point of view, using Firewall can be extremely necessary and it feels better that you don’t have to use a separate app altogether. Being a Mac Cleaner, Movavi Mac Cleaner also helps you keep analyzing your internet usage. This feature will help the users protect themselves from outside connections by limiting internet access.
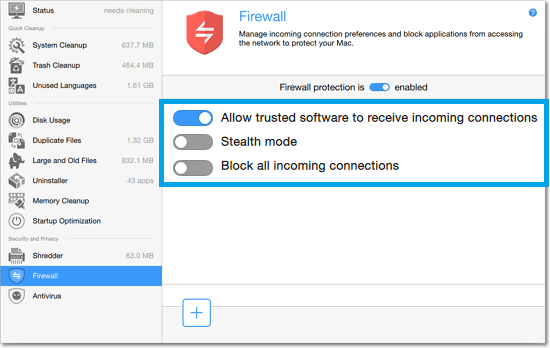
As soon as you tap on the Firewall feature, Movavi will display that Firewall is disabled for now that you need to enable it. Post enabling Firewall, you need to check all three options and enable ones that you think are appropriate from your end. Since the end-user is the only one who will get the security so you will be the decision-maker here. Once the chosen options have been enabled, the Firewall will start working for you to keep a track of outside connections.
12. Security And Privacy: Antivirus
To be true, I’m not at all surprised to see Antivirus features on the Movavi Mac Cleaner tool. Because just the perfect set of options have already made it one of the best Mac cleaners, and using Antivirus from the same app just raised the bar. We all are quite aware of all the possible online scams, identity theft, and other fraudulent activities. It’s already high time that you use an Antivirus on your PC & what if Movavi Mac Cleaner is offering you the same in the same app!!
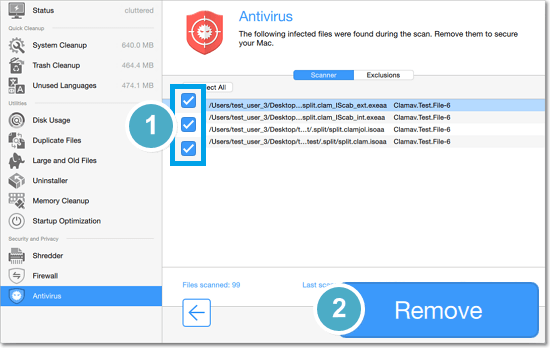
I would have wanted to explore it for sure to know its effectiveness and other features. You need to tap on Antivirus and if you are using it for the first time, the prerequisites are installing Scanner & Database. Once the Scanner has been installed, you will be all set to scan your Mac without any hassle. You can start with Adding locations to the list-to-be scanned and tap on Start. This will give you a list of all the infectious content that needs to be removed and all you need to do is, tap on Remove.
C. Other Notable Features
Apart from the above powerful features, you can also access other functions that will make your overall experience better than before. Sometimes, all of us tend to forget things that were important enough to be done on time. And not doing so does mess up things that take a lot of our time & energy. Keeping this thing in mind, Movavi Mac Cleaner helps you with reminding about cleanup (whenever necessary). The tool will start analyzing the system’s performance on its own and all you need to do is,
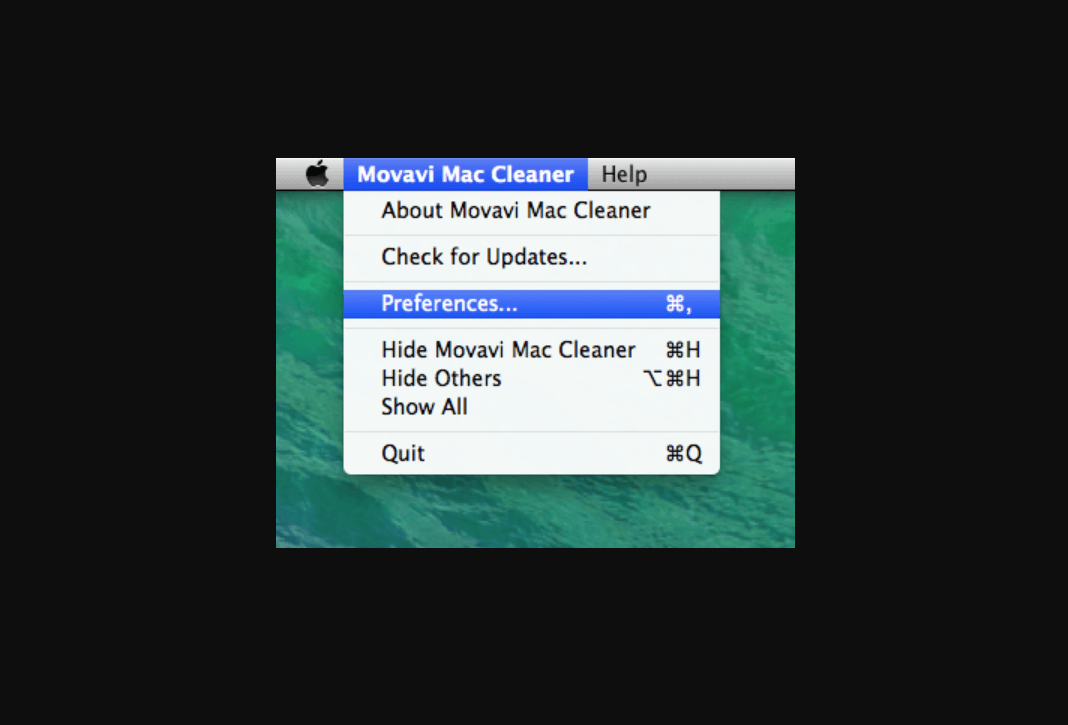
- You need to open the Movavi Mac Cleaner options menu (not the app itself) and tap on Preferences.
- Once the Preferences window opens up, you need to navigate yourself to the last tab (Monitoring) and enable all the notifications. While enabling all three options, you need to tweak their values as well (according to your preferences).
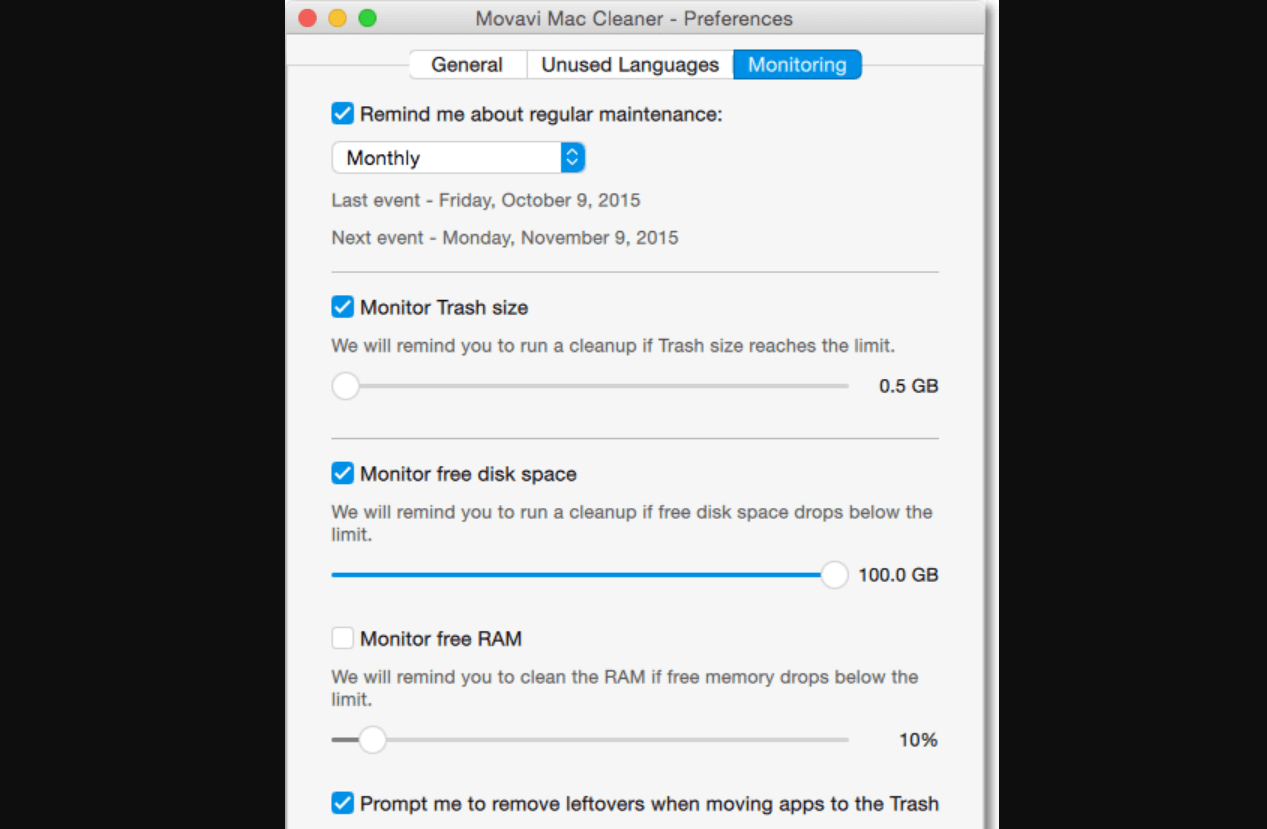
- This is like setting up a limit on all those options so that they can work automatically, instead of putting in manual efforts. This will take care of everything & within a while, the Movavi Mac Cleaner is all set to help you scan the system even if you miss out on the date & time.
Just like the above section, after you have explored everything related to the Movavi Mac Cleaner, you might have a few questions. In case you need any help or support related to the tool’s features, you can click on the link & the team will help you for sure.
Best Mac Cleaner to Boost Your Mac’s Overall Performance
There are many Mac cleaners available in the market that claim to be the best at what they offer. However, after going through the detailed & thorough exploration, you get to know which one you should go with. The elimination process comes to an end when you get your hands on something like the Movavi Mac Cleaner. One of the most powerful & solution-oriented Mac cleaners in the market which won’t disappoint you. From cleaning up your whole system in all the possible areas to helping you with firewalls & other rich features, it’s worth exploring.
Next Readings:
Other Ways To Clear Temporary Files On Mac
How to Compress Files in Mac, Windows and Linux PCs?
How To Force Quit Apps On Mac?

Leave a Reply