Android Debug Bridge (ADB) is an essential and versatile tool that allows you to communicate with a device. It covers several features that make it easier to perform various device operations, like installing and debugging apps. Besides this, it also provides you access to a Unix shell, making it easy to execute different commands on an Android device.
It is used widely to side-load apps and installs custom ROMs on Android smartphones. It also helps you improve the performance of your device and free up storage by removing bloatware. The tool allows you to do it all by establishing ADB wireless connection. If you don’t know how to use wireless ADB on Android, we’ll tell you in this guide.
Also Read: How To Optimize Battery Performance on Android
How to Use Wireless ADB on Android?
The primary method for using ADB entails connecting your Android device to the PC through USB. But as we are utilizing ADB wirelessly, you need to ensure that a few things as stated below –
Things you need to do before starting the procedure:
- Connect your Android device and PC to the same Wi-Fi network.
- Ensure your Android smartphone is running Android 11 or above. If not, update it to the latest version.
- On your PC, download the most recent version of the Android SDK Platform-Tools
Enable Developer options on your Android device –
Step 01: To enable the developer option on your Android smartphone, first open Settings:
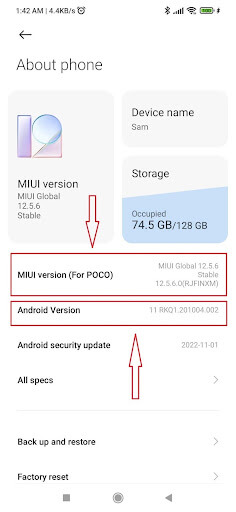
Step 02: As Settings open, find and tap on About phone.
Step 03: Next, tap five times on the MIUI version to enable the Developer option. (We have also added the steps for other Android models below).
Step 04: This will allow the Developer option on your Xiaomi or POCO Android device. The chances are that you are using an Android device of a different brand and model. Follow the step below to establish ADB wireless connection on your Android –
| Google Pixel: Settings –> About phone –> Build Number. Tap continuously on the Build Option seven times. Tap till you see the pop-up notification ‘You are now a developer!’.
Samsung: Settings –> About Phone –> Software Information –> Build Number. Tap continuously on the Build Option till you see the pop-up message ‘You are now a developer mode!’. OnePlus: Settings –> About Device –> Version –> Build Number. Tap continuously on the Build Option seven times. Tap till you see the pop-up message ‘You are now a developer!’. Vivo: Settings –> More settings –> About phone –>Software version. Click seven times on the Software version seven times until you see the ‘You are now a developer!’. Oppo: Settings –> About phone –> Build Number. Tap continuously on the Build Option seven times. Tap till you see the pop-up message ‘You are now a developer!’. Also read: How To Recover Data From An Android Phone With a Broken Screen. |
Enable Wireless debugging on your Android smartphone –
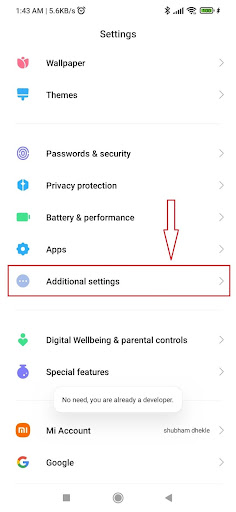
Step 05: Go back to Settings, scroll down, and tap Additional settings.
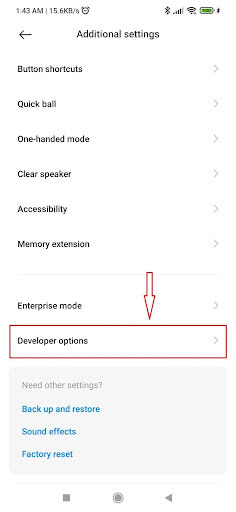
Step 06: On the next screen, find and tap on Developer options on the next screen.
Step 07: After entering Developer options, scroll down to the bottom of the screen, and tap on USB debugging to enable it. After enabling it, tap on Wireless debugging.
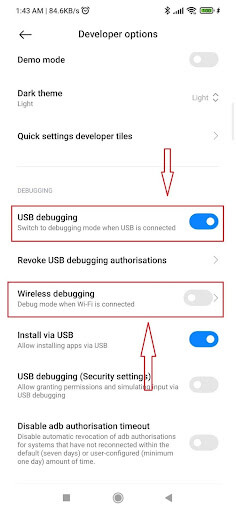
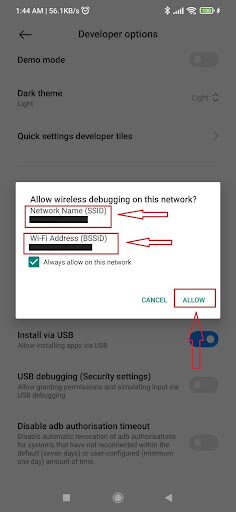
Step 08: Now, it will ask you for your permission. Check the Wi-Fi network your computer and Android device are connected to. After confirming, tap on Allow.
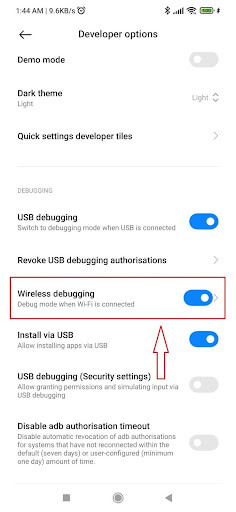
Step 09: It will successfully turn on the Wireless debugging mode on your Android device. Now you can move on to use wireless ADB on Android.
Step 10: If you use an Android device of a different brand and model, follow the step below to turn on the Wireless debugging –
| Google Pixel: Settings –> System –> Developer options. Enable Wireless debugging by clicking on Allow as it pops up.
Samsung: Settings –> System –> Developer options. Enable Wireless debugging by clicking on Allow as it pops up. OnePlus: Settings –> Additional settings –> Developer options. Enable Wireless debugging by clicking on Allow as it pops up. Vivo: Settings –> More settings –> Developer options. Enable Wireless debugging by clicking on Allow as it pops up. Oppo: Settings –> Additional settings –> Developer options. Enable Wireless debugging by clicking on Allow as it pops up. |
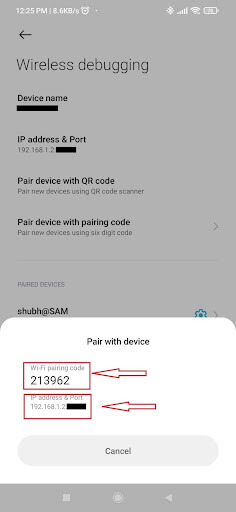
Step 11: Now tap on Wireless debugging. On the next screen, tap on ‘Pair device with pairing code’.
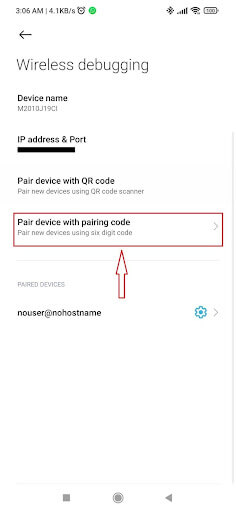
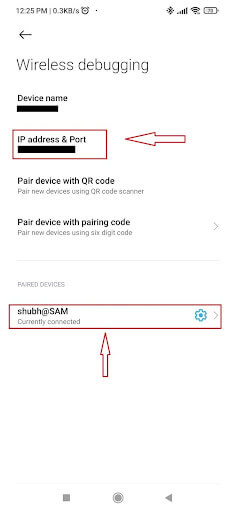
Step 12: Here, an IP address, port number, and a Wi-Fi pairing code will be displayed. Remember to note it down, as it will be asked in the next steps.
Use Wireless ADB on Your Android Device –
The main step is how to connect your Android to a wireless ADB device. Follow the instructions below to use ADB wirelessly after configuring it and connecting your Android smartphone to your PC.
Step 13: Before we jump onto the next step, first download SDK Platform Tools on your computer.
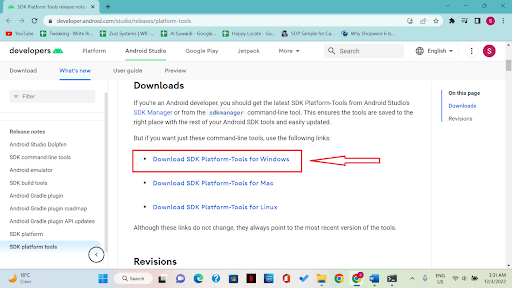
Step 14: A zip file will be downloaded. Find this file and paste it where you can find it easily, and then extract it.
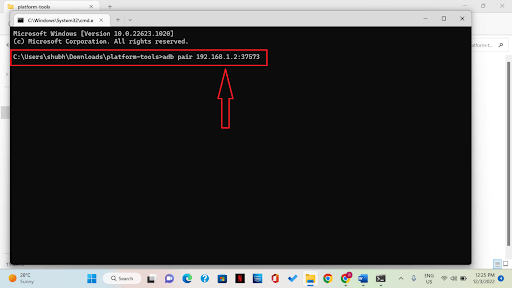
Step 15: Now go into the folder named platform-tools.
Step 16: Click on the address bar once you’re in the folder.
Step 17: In the address bar, type in cmd and hit enter. It will open a command prompt.
Step 18: As the command prompt opens, type in the ADB pair followed by the IP address and then hit enter.
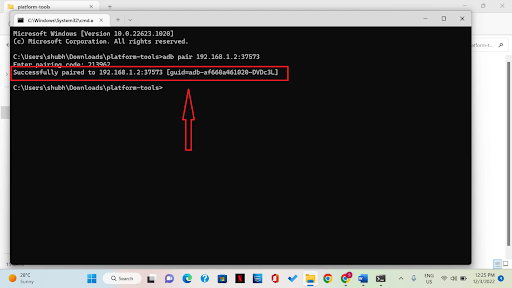
Step 19: You will be asked to enter a pairing code. To connect your Android device to your computer, type the pairing code given in the Wireless debugging option (refer to step 12) and hit Enter.
Step 20: As seen in the screenshot below, the successful pairing window will appear on both your PC and phone. This indicates that you have successfully established an Android wireless debugging connection.
Step 21: On the main Wireless Debugging page, you can see the IP address of the Android smartphone on this page.
Final Takeaways –
One of the most common misconceptions about ADB is that it can only be helpful when rooting Android. But it proves to be useful for many essential aspects. Android Debug Bridge enables wireless app deployment and debugging from your workstation for Android 11 and higher versions. Without physically attaching your device via USB, you may, for instance, deploy your debuggable app to several remote devices. By doing this, dealing with concerns with typical USB connections, including driver installation, is no longer necessary.
Next Read
Your Android Device Failed To Obtain IP Address?
How To Fix Google Apps Keep Crashing On Android Phone
How to Make Android Phone Faster


Leave a Reply