Recording 4K videos to show off your videography skills or for professional usage is common. However, if you are wondering how to do 4k video recording, then you have come to the right place! This article discusses why there is a need to record 4K videos and how the job can be done effortlessly using a screen recorder for Windows.
Why You Need To Record 4k Videos?
There was a time when recording in 240p was enough for most people. However, with the advancement of technology, we got 720p HD, followed by 1080p HD and then UHD 4K. A 4K video recording helps keep consumers immersed in a visual feast. This births curiosity how to video record in 4K on a PC. Therefore, to ease the process of recording 4k videos, software developers developed screen recorders for Windows and other platforms. This post talks about one such popular video recording software, TweakShot Screen Recorder.
Also Read:- How To Download 4K Videos from YouTube
TweakShot Screen Recorder – The Best Video Recording Tool For Windows
Tweaking Technologies has designed and developed a customizable screen recorder that helps capture screenshots, record activities performed on a PC/laptop, and create high-resolution lessons. Moreover, the program also allows recording webcam overlay footage.
The most important outstanding asset of this screen recorder is the functionality of the 4K screen recorder. Also, you can auto stop, auto split, set hardware acceleration, and record separate audio by selecting the options from the Settings. Users can even set up hotkeys to initiate different sorts of capture quickly and easily.
Key features:
- Simultaneously record PC and webcam with 4k UHD quality output
- Customize the size, shape, and color of the cursor
- Capture 4k UHD videos at up to 120 FPS at most
- Record gameplay, movies, and other activities.
Also Read:- How To Record Skype Calls Like A Pro With TweakShot Screen Recorder
How to do 4K Video Recording using TweakShot Screen Recorder?
If you don’t want to spend on a third-party tool, you can use Game Bar; however, while using it, remember you cannot record multiple screens. Therefore, if you are looking for a screen recorder that offers more than basic functionality, TweakShot Screen Recorder is the best choice.
To learn how to record a 4K video using TweakShot Screen Recorder, follow the steps below.
How to Record 4K video in Windows 11& 10 using TweakShot Screen Recorder?
Step 1. Download and install TweakShot Screen Recorder.
Click Here to Download TweakShot Screen Recorder
TweakShot Screen Recorder Review
Step 2. Launch TweakShot Screen Recorder.
Step 3. Click the three horizontal bars present at the top right corner > Settings.
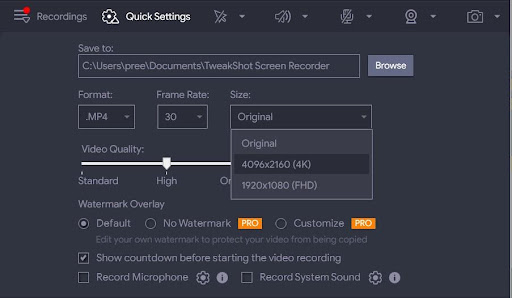
Step 4. Go To Record option > click the down arrow under Size and select 4K, as shown in the screenshot below:

Step 5. After selecting the size, you can make other changes to the setting as per the requirement.
Step 6. Next, select the screen recording options – Full Screen, Select Region, Select Window, and Webcam.

Step 7. To record the video click the Record button. You will get a small window in the taskbar with a timer when the recording starts. When done, click the red stop button.
Using these simple steps, you can record video in 4K.
Wrap Up –
This article has discussed how to record 4K video in Windows 11, 10, and other versions of the Windows using the best 4K video recorder TweakShot Screen Recorder. Although this is a premium tool, but you don’t want to pay upfront, you can first use its premium trial version. This trial version allows recording 2 videos without any time limit and watermark. After this, you can record videos with a time limit of 10 minutes with a watermark added to them.
This will help you decide if it is the right tool for you or not. We hope you like the post; use the screen recorder, and explain the steps to record the 4K video. If you have any questions about the tool or how to use it, you can email [email protected].


Leave a Reply