In Windows 10 and Windows 11, altering the letter of a drive is simple, but you should do so as soon as possible to avoid future headaches. Here’s how to alter the drive letter on your computer.
When Windows is first installed up, the drive letter is allocated, starting with C. If you wish to alter the letter of a drive, then you should do it before installing anything on computer. Changing a drive letter after applications have been installed may cause problems as references to an installation location that no longer exists might be broken.
Windows has grown quite good at changing shortcuts so that programs continue to operate after a drive letter change. The shortcuts in most of your programs will most likely be automatically adjusted. Windows, on the other hand, isn’t as excellent at changing file associations. If file associations were disrupted by changing the drive letter, you’ll have to manually change the default programs associated with files. Don’t worry, in this blog, we have mentioned how to change drive letters and also have discussed how to fix your programs broken in the process.
Warning: Although changing the boot drive letter to the other one is feasible, we do not suggest it. Changing C: to another letter is likely to cause serious problems, such as a computer that won’t boot into Windows at all. Even if it could boot, there would be a large number of apps that would fail to execute.
Also read:- How to Remove Shortcut Arrows in Windows 11 and 10
Steps To Change Drive Letters:-
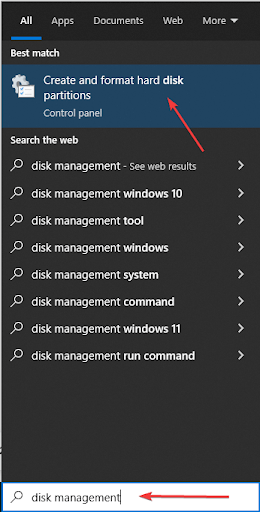
Changing a drive letter is a straightforward process. Navigate to the Start button and type “Disk Management” into the search field and press enter.
Note:-The name of the tool that appears in the search results will not be Disk Management but will be “Create and format hard drive partitions”
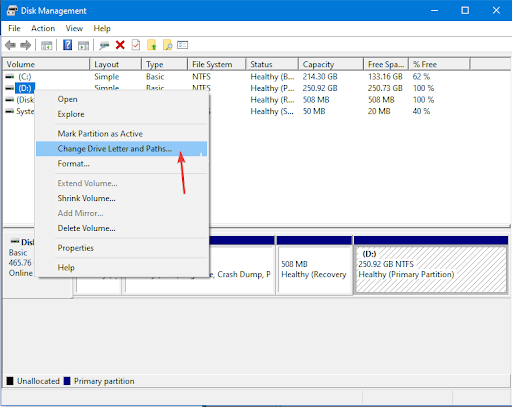
- In the Disk Management Window, locate the drive you want to modify.
We’ll modify the letter of the D: drive to J: in this example.
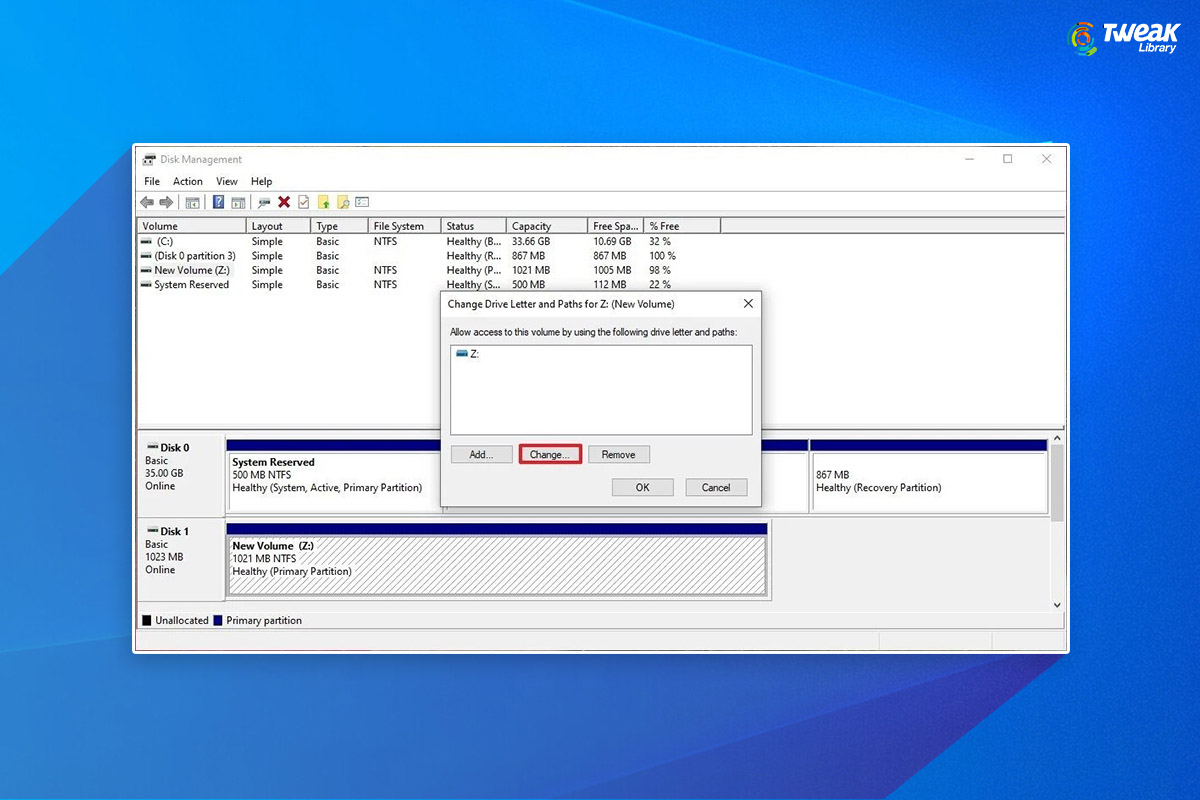
You may access the disc by right-clicking it in the text list and clicking on Change Drive Letter and Paths.
- Click “Change” in the new window that appears.
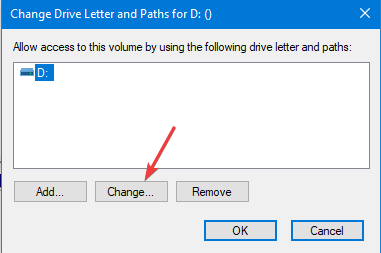
- Select I from the drop-down menu and click OK
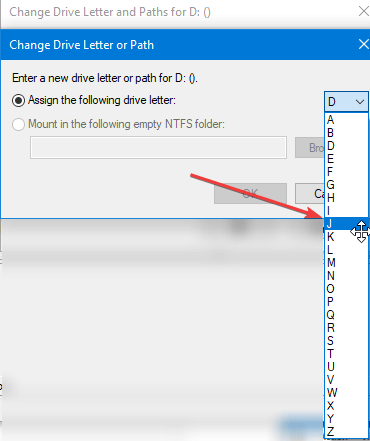
- You’ll see two popups warning you about changing your drive letter. Restart your computer after clicking “Yes” on each of them.
- The drive letter should be updated when Windows has resumed.
How to Fix Programs Broken By Changing a Drive Letter:-
By altering the drive letter, you may cure faulty programs in a few ways.
1. Fix the shortcut
- The shortcut is the only thing that is broken. To fix a shortcut, right-click it on your desktop and select Properties from the menu.
- The shortcut’s target must be changed to the new drive letter.
If GIMP was originally installed at “D:GIMP 2bingimp-2.10.exe,” and the D drive was replaced with J, update the shortcut’s target to “J:GIMP 2bingimp-2.10.exe.”
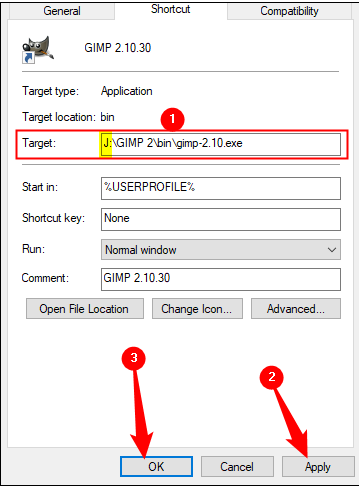
- Click “Apply” and then “Ok” to complete the adjustment.
2. Install the program again.
Reinstalling the software will create new registry entries, letting everything on the computer know where to look for it. Some installers won’t allow you to reinstall existing files, so you’ll have to rename or remove the old one first.
3. Edit Registry
Note:- Editing the registry might harm applications or even Windows itself. Before you do it, be cautious and learn how to alter the register. Before you begin, create a backup of the Windows registry. All you need to do is launch Registry Editor by typing Registry. Click on File> Export, save this file on your computer at the desired location. This procedure should only be used if you have no other choices.
The Windows registry is used by Windows and many other programs to keep track of where programs are installed. To resolve damaged applications, you can manually alter the registry. Keep in mind that you may need to update dozens of registry entries. For the context menu, the “Open With” option, any file associations, and the location of its executables, an application like GIMP can have registry entries. Other apps may include simply a few items pertaining to their installation location.
If you’re still interested, here’s how to go about it.
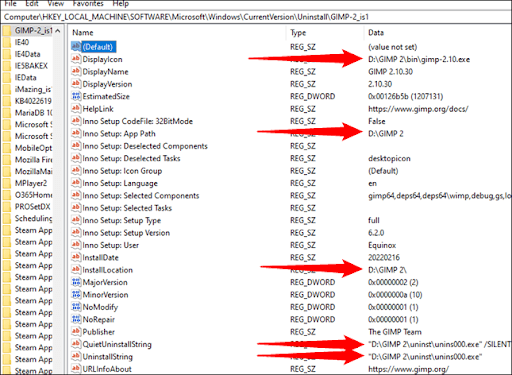
To begin, you must first determine where the software was previously installed. The program was installed in “D:\GIMP 2” folder, and the executables were found in the “D:\GIMP 2\bin” sub-folder. It is now located at “J:\GIMP 2” instead.
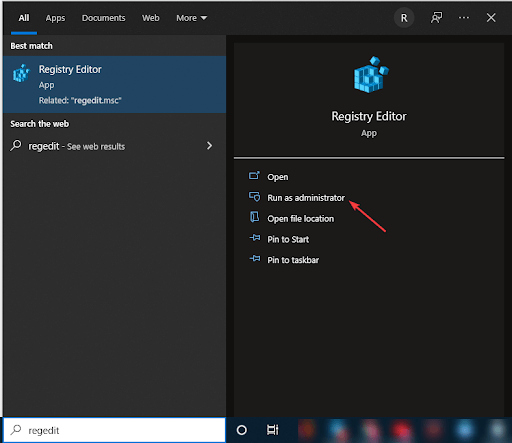
- To reflect the change in location, we must update the registration. Right-click Regedit and select “Run as administrator” from the context menu.
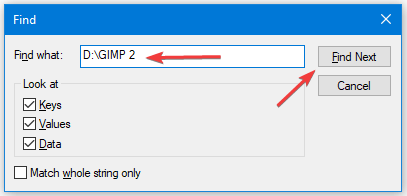
- To open a search window in Regedit, use Ctrl+F. Click “Find Next” after typing in the former location for the software you’re seeking to fix — in our case, “D:GIMP 2.”
- Regedit will show you anything with the path “D:GIMP 2” in it after it has been located. Here’s an example of a GIMP search result.
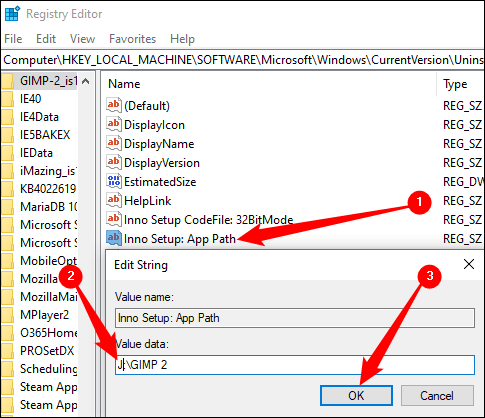
- Double-click the name of the registry item you wish to alter to make the changes. After that, change the drive letter to J or anything you choose. Leave the remainder of the path alone if you didn’t relocate the folder otherwise. Then press “Ok.”
You’ll have to do this several times. The F3 key may be used to get the next result based on your search query. Once you’ve located all of the entries, a popup will appear.
Changing your drive letters is an easy way to personalize your computer. However, do that before installing anything on the disc. You’ll avoid any issues before they arise, and you’ll probably save yourself a lot of debugging time.


Leave a Reply