
Windows 11 is the latest version of the operating system released by Microsoft. It comes with various advanced features and improved functionality. However, like any other operating system, it also has some limitations or can sometimes get into trouble.
In this post, we will talk about one such common issue – the microphone not working on Windows 11. The problem can be caused due to several reasons. However, the most common reason among them is outdated drivers. Luckily, there is an easy way to update drivers and fix the problem. Using Advanced Driver Updater, the best driver updating tool offered by Systweak, this can be done easily.
Get the tool today by clicking the Download button below:

In addition to this, there are other ways to fix the problem. Read along to learn about them and see which one works best for you to fix the microphone (both internal and external) problem.
Also Read: Fixed – Microphone Not Working On Mac
Best Ways to Fix Microphone Problem – Windows 11
Before we get into the details, let us learn the reasons that can be the reason for the mic not working on Windows 11.
Possible reasons for microphone not working in Windows 11:-
- The microphone is turned off
- Loose cable connection
- The microphone is not connected
- Mic is mute
- The incorrect microphone is selected
- Faulty or corrupt hardware/USB port
- Missing or outdated device drivers
Now, that we know what can cause the problem let us learn how to troubleshoot the problem on Windows 11:-
Method 1 – Check Connection
The first thing you need to do is check the connection. If you are using an external device, and unable to access it, try reconnecting the microphone and see if it works. But If it doesn’t, try connecting to another device and re-check. If it works, the problem is with the earlier device you were connecting it with. In such a case, try following other fixes.
However, if the mic doesn’t work on either system, it seems the hardware is faulty and you need to either replace or get the device repaired.
Method 2 – Make sure Microphone is enabled
- Press Windows + X > Device Manager
- Double click the Audio inputs and outputs section.
- Right-click the Microphone you want to use > Enable device.
If it is already enabled, you will find the Disable device option. In this situation move to the next fix.
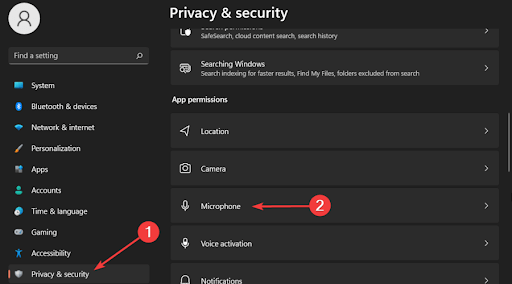
Method 3 – Check Privacy Settings
- Press Windows + I to open the Windows settings menu.
- In the left pane, look for Privacy & security > in the right pane scroll down and click Microphone.

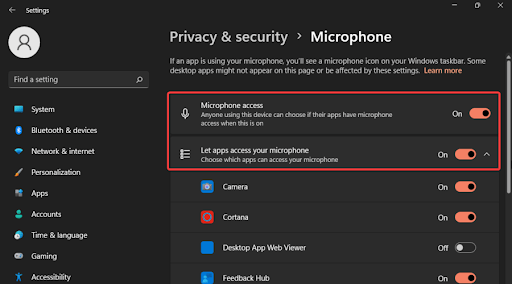
- Toggle the switch next to Microphone access and Let apps access your microphone, options.
- Mic should not be working.
Method 4 – Set it as the default device
- Press Windows Key and type Change system sounds > Enter.
- Under the Sound window, click the Recording tab and select the microphone or headset you want to use > Properties.
- At the bottom look for the Device usage section > it should read as Use this device (enabled).
- Click Apply > Ok to save changes.

This option comes in handy when you use multiple microphones and the wrong microphone is selected. To fix this, make sure the same microphone is selected as the default system microphone.
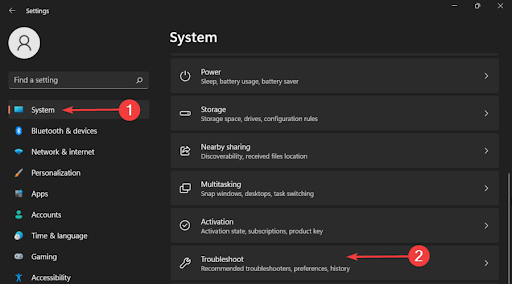
Method 5 – Run the Audio Troubleshooter
- Press Windows + I to open Windows settings
- Click System from the left pane > now on the right side scroll down to look for Troubleshoot click on it.
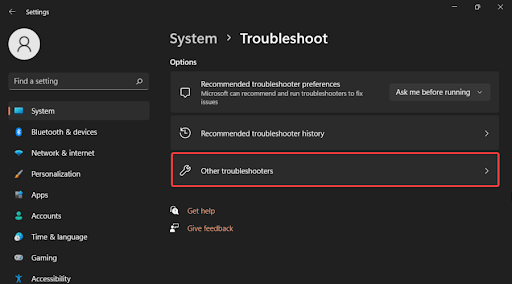
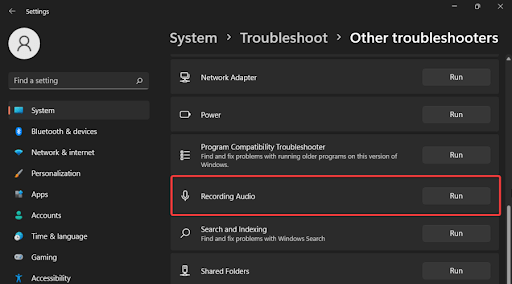
- Select Other troubleshooters.
- Scroll down and look for Recording Audio > Run wait for the troubleshooter to scan the system and fix if any issue is detected. If an issue is detected, you will need to follow on-screen instructions and fix the issue.
- Restart the system to apply changes and that’s it.
Method 6 – Update Microphone driver
Drivers can be updated both manually and automatically. While the manual method is time-consuming and involves risk, the automatic method is quick and safe. To automatically update drivers use Advanced Driver Updater. However, to update drivers manually you can use Device Manager or can visit the manufacturer’s website.
To update drivers manually using Device Manager follow these steps:
- Press Windows + X > Device Manager
- Double click the Audio inputs and outputs section
- Right-click the microphone you want to use > Update driver.
- Select Search automatically for drivers. Wait for Windows to look for updates and apply them.
- Restart the system to apply changes. Even If you get the message the best driver is running, just to be sure either visit the manufacturer’s website or use Advanced Driver Updater.
Update the Driver Automatically – Advanced Driver Updater
- Download and install Advanced Driver Updater
- Run the tool and scan the system for outdated drivers.
- If you are using the trial version, click the Update driver next to the microphone or audio driver. However, if you are using the registered version, click Update All to update all corrupt and outdated drivers.
- Restart the PC to apply changes
Now try to use the mic. It should be working.
Conclusion –
To fix mic not working issues on Windows 11, you can use either of the fixes explained above. Also to avoid facing the problem in the future make sure you always check the battery connection, check for available driver updates using Advanced Driver Updater, and scan the system for virus and malware infection. To scan the system for infections, you can use Systweak Antivirus.
This will help prevent facing the microphone problem and other issues.
Do share your feedback in the comments section.


Leave a Reply