
The microphone is an essential part of your Mac. Whether you are using apps like Skype, Zoom, Facetime, Siri or whether you are speaking to Mac, you need a microphone. But, what if you find that your Mac microphone has stopped working? Whatever the reason be, we’ll have a look at steps you can take to resolve the issue.
|
Why Your Mac Microphone Might Not Be Working? Let’s first have a look at a few reasons why your Macbook microphone might not be working –
|
Ways To Fix Microphone Not Working On Mac
Here are some of the easiest and effective steps you can undertake if the microphone is not working on your Mac, immaterial of whether it is a MacBook or iMac –
|
Table Of Contents |
|---|
| 1. Fix The Misconfigured Sound Input
2. Give Your Mac A Quick Restart 3. Throw The Junk Files Out Of Your System 4. Do Your Apps Have Access To Microphone? |
1. Fix The Misconfigured Sound Input
One of the reasons why the microphone on your Mac might not be working could be because of a misconfigured sound output. Here we will look at the possible steps which can help you fix the issue –
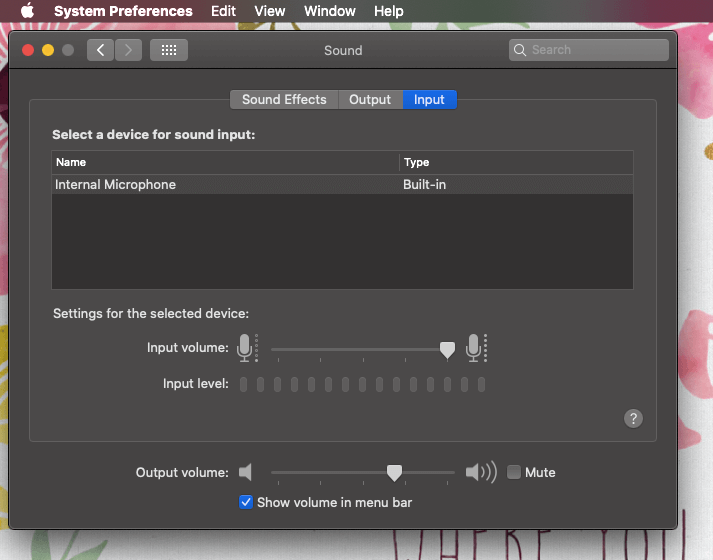
1. Go to Sound Preferences and then go to Sound
2. Click on the Input tab
3. You will be able to see a list of devices you use as a sound source. Here you will also be able to see the name of your Microphone as well
4. Now, as you click on your choice of microphones, you will see an Input volume bar at the bottom
5. Slide the bar and check if you are able to hear properly
2. Give Your Mac A Quick Restart
Let’s keep it simple at first. If your Mac microphone is not working, you can give your Mac a quick restart and then check if the problem is fixed. To restart, go to the Apple menu and then click on Restart.
3. Throw The Junk Files Out Of Your System
Junk files that get accumulated can meddle with the various settings of your Mac and the microphone is no different. This is when you can exercise the power of third-party Mac optimization and cleaning tools like Disk Clean Pro.
Here’s how you can use Disk Clean Pro to remove the junk out of your Mac in a few very simple steps –
1. Download and install Disk Clean Pro.

2. Scan your Mac for junk files. Click on Start System Scan to proceed.

3. Wait for the process to finish and then click on the Clean Now button.

4. Click OK on the confirmation box appears next.
That’s it! You have successfully removed all the junk items in your Mac.
|
Disk Clean Pro – Other Features |
|---|
Price: US$ $23.99 Compatibility: macOS 10.7 or later Click Here To Download Disk Clean Pro |
4. Do Your Apps Have Access To Microphone?
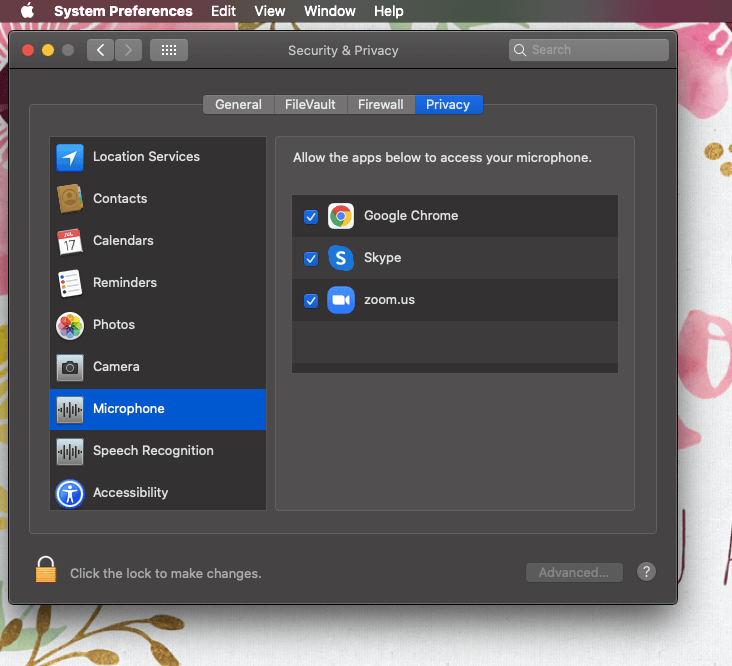
Let’s consider this scenario – you need your Microphone so that you can listen to your colleagues on a Zoom or Skype call and as soon as the meeting starts, you just can’t hear anything. A simple fix is to check app permissions, you can control apps that are allowed to use the Microphone.
1. Click on the Apple menu and then click on System Preferences
2. Click on Security & Privacy > Privacy
3. Choose Microphone from the left-hand menu
4. Now, click on the checkbox next to the app. For example Zoom
Alternatively, you can check if you have enabled sound settings for a particular app (Apps like Skype, Zoom, etc have dedicated sound settings that need to be switched on so that you can chat via microphone). You can also try to uninstall and then reinstall the app once again and then check if you are able to use the Microphone for that particular app or not.
5. Turn On The Dictation Option
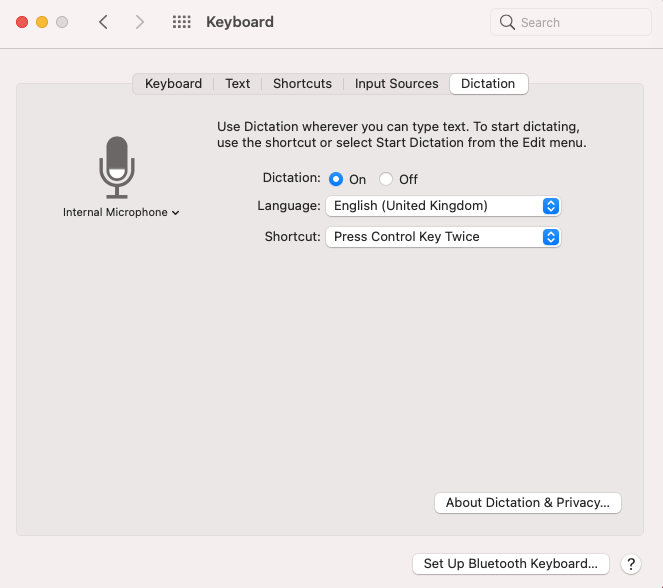
Maybe you don’t want to dictate your Mac and type it for you but this feature can also help download drivers which can resolve issues because of which your MacBook microphone is not working. Here are the steps to turn on Dictation –
1. Open System Preferences
2. Click on the keyboard window
3. Now, click on the Dictation tab and then on the Dictation radio button
Your Mac will now look for relevant drivers or language packs and will download them automatically. Once downloaded, check if your Microphone is working or not.
6. Reset Your Mac’s PRAM
In simple terms, just resetting your PRAM can help make your Mac microphone work again since this option resets your Mac’s settings –
1. Click on the Apple icon and then click on Shut Down
2. When your Mac has turned off press the power button and the cmd + alt + P + R buttons simultaneously
3. Hold them down for 20 seconds
4. When you release the keys, you would have reset the PRAM
Also Read: How To Reset Mac To Factory Settings
Wrapping Up
We sincerely hope that in case your Mac microphone is acting up or not working, the above-mentioned ways will help you fix the issue. We’d again like to reinstate that in case junk files and unwanted apps are interfering with your Mac microphone’s settings, you can always count on apps like Disk Clean Pro. If you liked the blog, do give it a thumbs up and share it with your friends.
Recommended Readings:
How To Screen Record With Sound On Mac & Windows
Best Ways To Deftly Deal With Slow Mac Startup
How to Unlock Mac With Apple Watch When It’s Not Working


Johnmerchant
I am also facing such problem now i can try this process and resolve my problem.