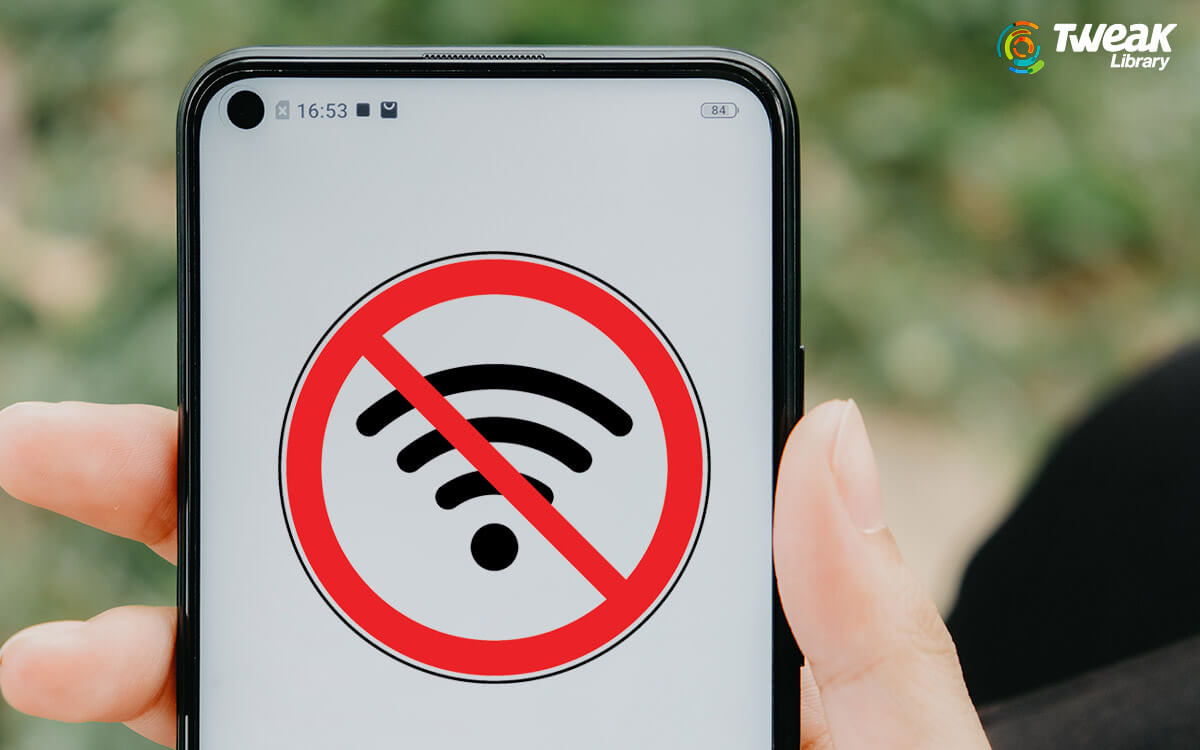
In this Corona pandemic situation we cannot meet our friends, our family members and other close one as we are following social distancing. But thanks to the Internet that has helped us to keep connected with all of them virtually from the comfort of our homes. Not only this, the Internet and our smartphones are a true savior when keeping boredom away from us. However, the situation can become annoying if suddenly you find that your Android phone is not connecting to Wi-Fi.
But the good news is that Wi-Fi connection problems on Android are easy to fix by following some simple steps. In this article we are going to discuss all those fixes that will help you fix the problem of Wi-Fi not working on Android.
Wi-Fi Not Working on Android
Although at first sight this problem looks quite complicated and seems to be related with some hardware breakdown. But there can be several other reasons like weak Wi-Fi signal, your distance from the router, problem with network settings and so on. In this article we will discuss all these and other problems that lead to the problem of Wi-Fi not working on Android.
Also Read: iPhone Not Connecting To Wi-Fi? Here’s How To Fix
Make Sure Wi-Fi is Enabled
It is quite likely that you have accidentally turned off Wi-Fi on your Android phone. So to rule out any such possibility first make sure that Wi-Fi is enabled.
1. To confirm open Settings and tap on Network & internet option.
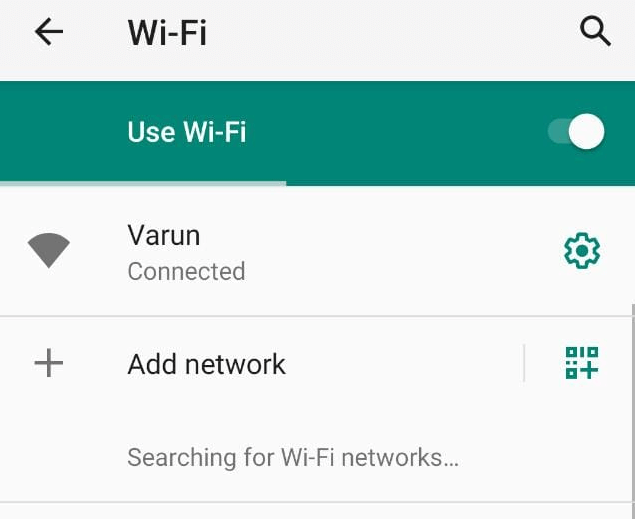
2. Now on the next screen tap on Wi-Fi option and make sure the Wi-Fi is set to on position. Also make sure that status below your Wi-Fi network read as connected.
You can also enable Wi-Fi by sliding down the notification bar and tap on the Wi-Fi icon.
Make Sure Airplane Mode is Disabled

When Airplane mode is enabled it disconnects all network connections whether they are cellular or Wi-Fi. So if your Android phone is not connecting to Wi-Fi then make sure that Airplane mode is disabled. You can check this by sliding down the notification bar and check Airplane mode is disabled. In case it is enabled, tap on it to disable it and check whether it resolves Wi-Fi connection problems on your Android device.
Disable/Enable Wi-Fi Connection:
Simply disabling your Wi-Fi connection by tapping on the Wi-Fi icon and then enabling it back has resolved the Wi-Fi connection problem on Android for many users.
If it worked for others it may work for you as well. Pull down the notification bar and tap on the Wi-Fi icon to disable it. Now wait for 30 seconds and then tap on the Wi-Fi icon to enable it.
Restart Your Android Phone
If you are a regular reader of our blogs then you might be wondering why we always suggest this step irrespective of the problem and device. Then let me clear that many users have told us that a simple restart of the device has solved their problem.
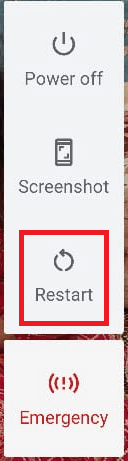
And it does not take more than a minute to restart your device. Just press the power button and wait for the power option. Now tap on Restart to reboot your device. After rebooting your Android phone check you are now able to connect to Wi-Fi.
Restart Your Router
Restarted your phone but still unable to connect to Wi-Fi, then your router/modem needs a fresh start. And that isn’t that difficult, either unplug your router from the power source, wait for a few seconds like 30-45 seconds and plug the device back to the power source. Now let the router turn back on and set up the network connectivity with the ISP. Once done, try connecting your Android phone to Wi-Fi network again. If it fixes then thumbs up for you but in case the problem persists try the next step.
Turn Off Switch To Mobile Data Automatically Setting
Many Android phones come with this setting, especially devices from Samsung and LG that helps you to switch to mobile data when Wi-Fi connection is weak, poor or unavailable.
Note: You may not find this setting in every Android phone like we are unable to find in the device using stock Android.
1. You can either find this setting by tapping on the 3 dots located at the top right corner of the Wi-Fi screen.
2. Now from the drop down menu select the option Smart network switch.
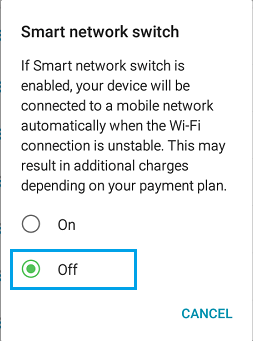
3. On the Smart network switch screen tap on the Off button to disable the setting.
You can also find this setting under Wi-Fi > W-Fi Preferences > Advanced > Turn off setting Switch to mobile data automatically.
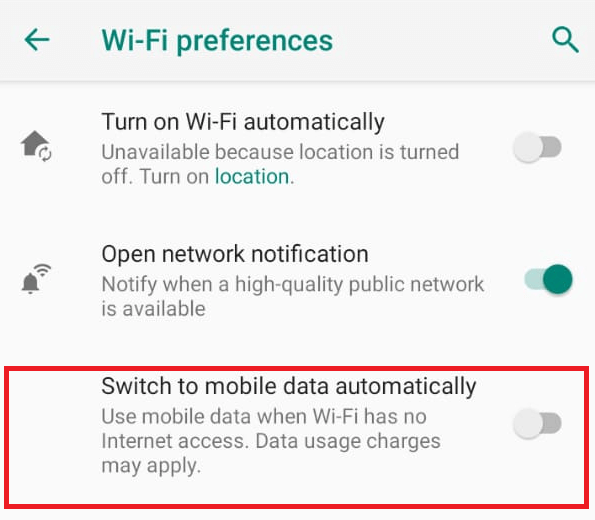
Now your Android device will not automatically disconnect from Wi-Fi and connect to cellular network in case of weak Wi-Fi connection.
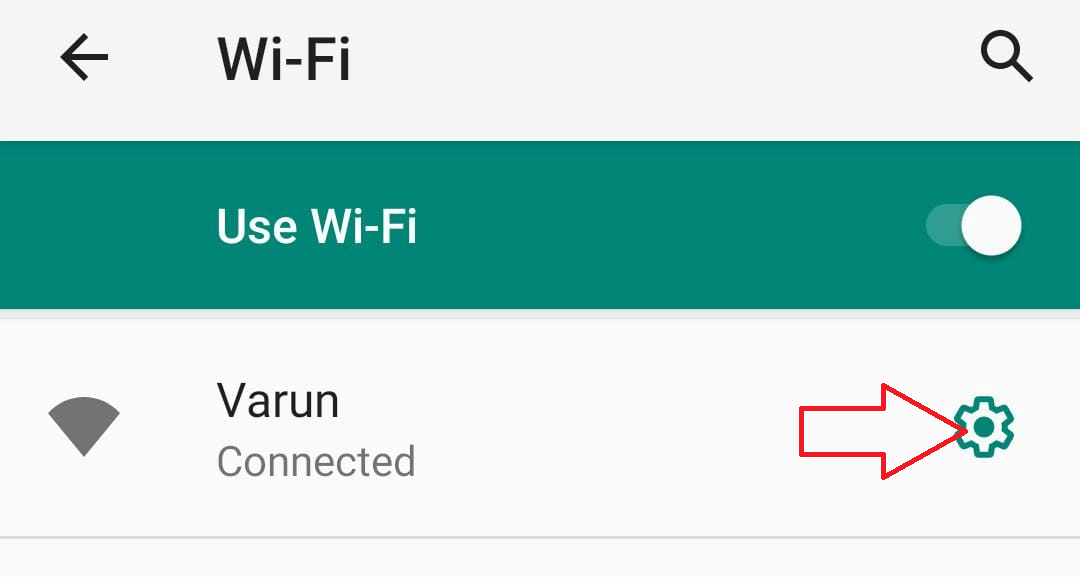
Forget Your Wi-Fi Network and Reconnect
Next troubleshooting step that we can follow to fix the problem of Android not connecting to Wi-Fi is forget the Wi-Fi network with which your phone is connected. After disconnecting with the network try connecting it to again by providing your Wi-Fi password.
1. Open Settings and tap on Network & internet option > Wi-Fi.
2. On the Wi-Fi screen tap on the gear icon located in front of the Wi-Fi network you are connected to.
3. Now on the Network details screen tap on the FORGET option
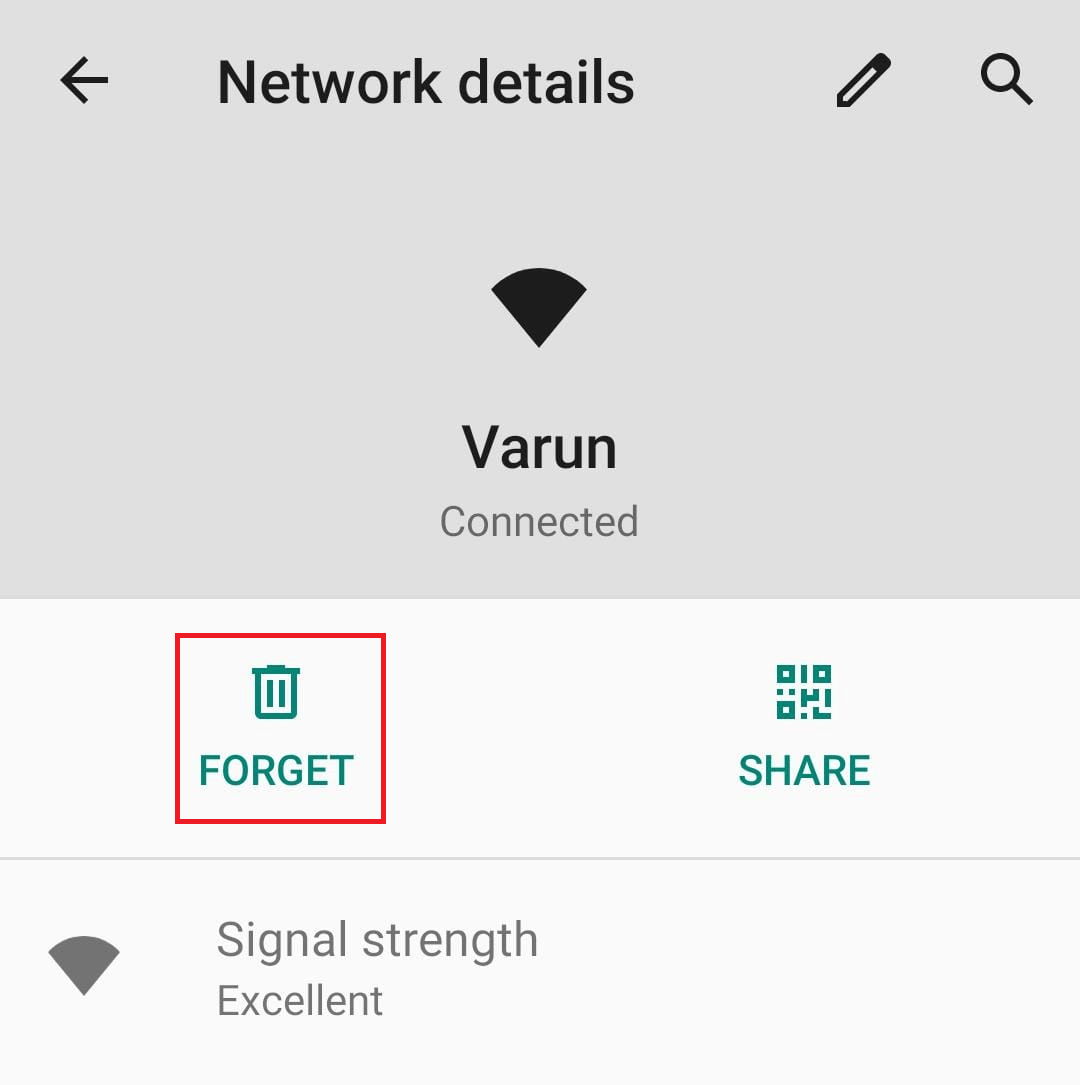
4. Now again tap on your Wi-Fi network, provide the password for it when prompted and then tap on Connect.
Now wait for your Android phone to connect to the Wi-Fi network.
Disable Battery Saver Mode:
Although battery saver mode generally limits the apps from draining the battery but in some devices battery saver mode disables Wi-Fi network as well, mainly if you are using a third party battery saving app.
So to resolve Wi-Fi connection problems on Android you can try disabling the Battery Saver or Power saving mode. In case you are using a third party battery saver app then dig into its settings and make sure it does not disable Wi-Fi when the app is turned on.
Get In Touch With Your Network Provider:
Now in case you are connected to Wi-Fi network but do not have internet access then the problem might be at your Network Provider end. Try connecting with them to check if there are any issues with the Internet connection in your area. They might personally visit your area for any loose connections or run diagnostic checks to fix the problem.
Change Default DNS with Google DNS:
Wi-Fi connection problems on Android can also be caused if the DNS server of Your ISP is facing any issues or going through congestion. But this can be fixed by changing the DNS settings from default to Google DNS. To do so follow these steps:
1. Open Settings > tap on Network & Internet and then tap on Wi-Fi.
2. Now tap on your Wi-Fi network.
3. On the Network details page tap on the pencil icon located top right corner of the screen.
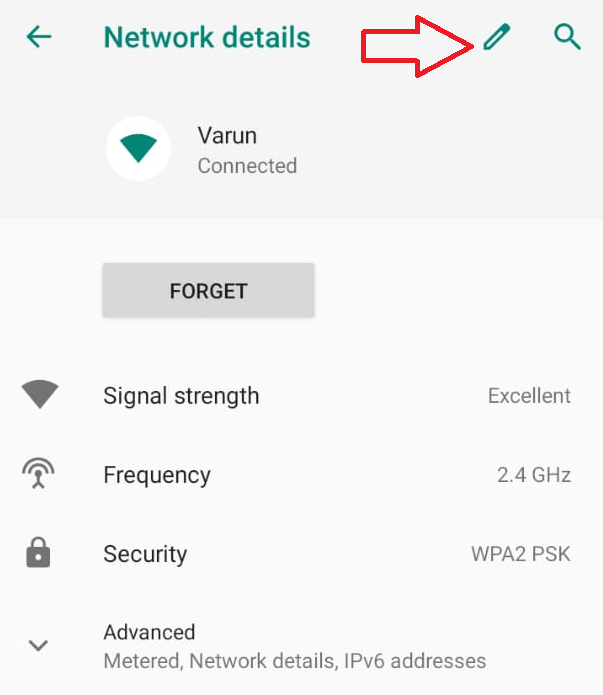
4. In the box that prompts tap on Advanced options.
5. Now tap on the IP settings and select Static.
6. Scroll a bit and in the DNS 1 and DNS 2 field replace the default values with 8.8.8.8 and 8.8.4.4 respectively.
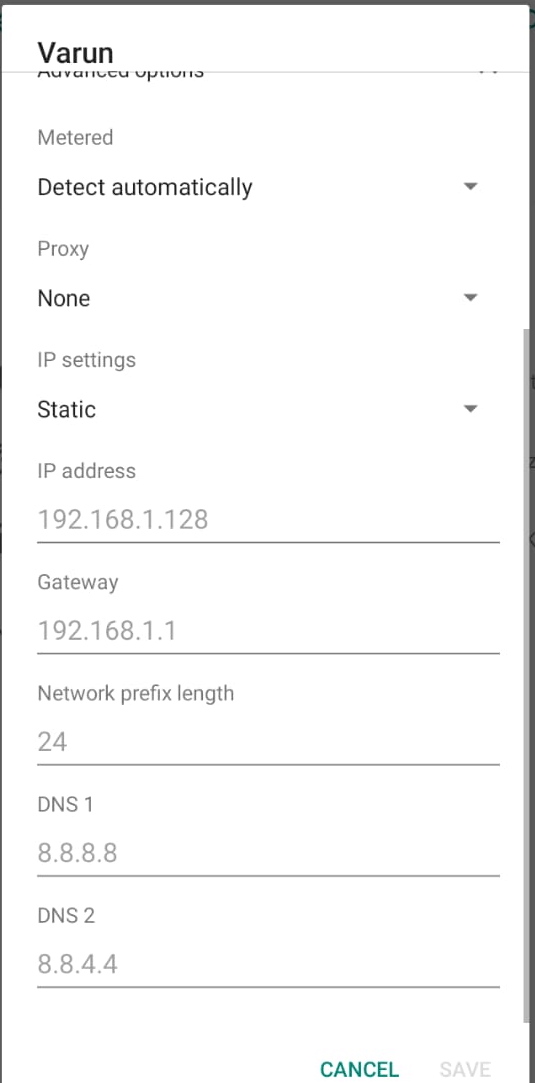
7. Once done tap on the Save button to save the settings.
After replacing the default DNS value with Google DNS check whether your Android phone can now connect with Wi-Fi.
Reset Network Settings
Many network problems including Android phone not connecting to Wi-Fi can be fixed by resetting network settings to default.
Please Note: Resetting Network Settings will reset all network settings that includes
Wi-Fi
Mobile Data
Bluetooth.
Also once you reset network settings you have to again type in the password to join with your Wi-Fi network. Also you have to pair all the previously attached bluetooth devices again.
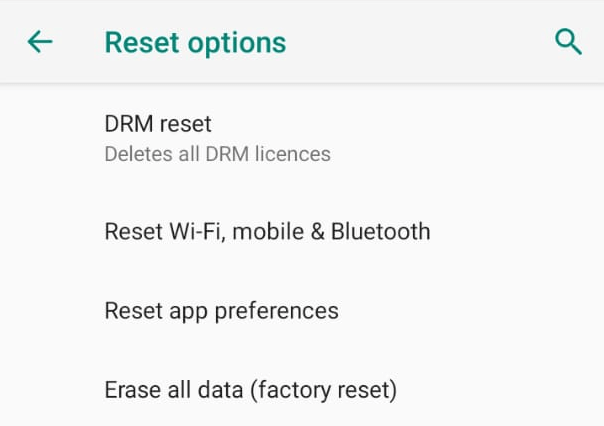
1. Open Settings > Tap on System option > Advanced > Reset options.
2. Now in the Reset option page tap on Reset Wi-Fi, mobile & Bluetooth.
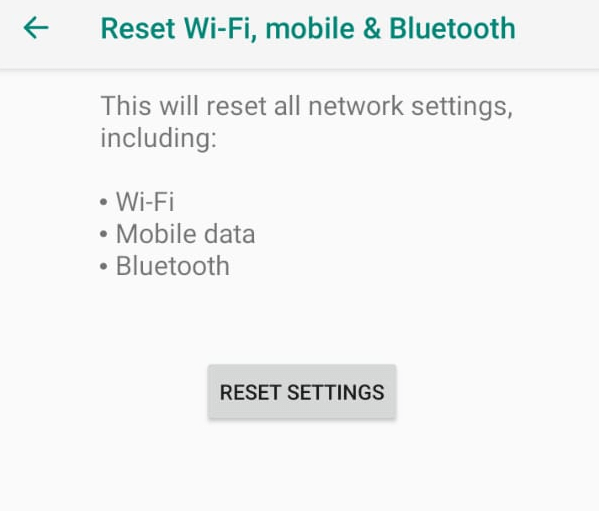
3. On the next screen tap on Reset Settings to reset network settings.
Now try connecting your Android phone again to your Wi-Fi by typing the Wi-Fi password when prompted. Hopefully this has resolved the problem. In case still the problem persists then try factory resetting your Android phone.
Factory Reset Your Android Phone
There can be various scenarios when you need to factory reset your Android phone. So if following all the above discussed methods still your Android phone can not connect to Wi-Fi then we will try this last resort.
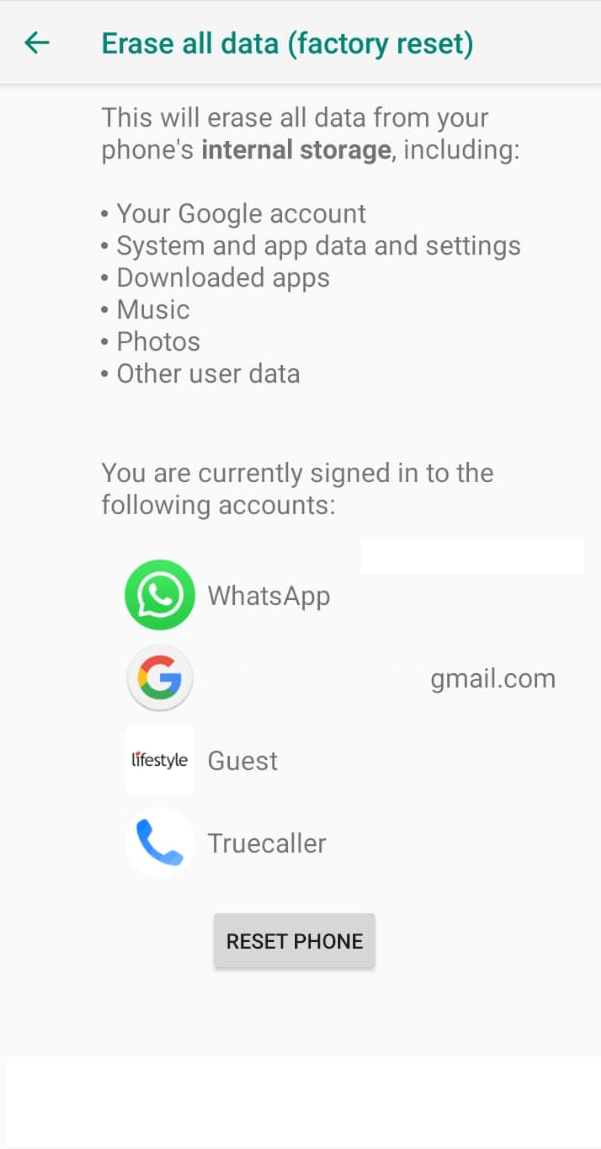
Note: Factory resetting your Android phone will delete all your personal data saved on your device and restore it to the day when you have used it for the very first time.
To factory reset your Android phone follow the steps below:
1. Open Settings > Tap on System option > Advanced > Reset options.
2. Now in the Reset option page tap on Erase all data (factory reset).
3. On the next screen tap on RESET PHONE.
You can also check our articles below on how to reset your Pixel and Samsung Phone.
How To Reset Samsung Galaxy S9
How To Reset Pixel Phone To Factory Settings
Connect To a Technician
So, if you have tried all the above steps and the problem of your Android phone not connecting to Wi-Fi remains as it is. Then it may be possible that either there is a hardware problem with your Android phone or Router. Try connecting any other phone or Wi-Fi enabled device with your home Wi-Fi network, it also does not connect then there may be a problem with your router. In such a case you need to contact your ISP and lodge a complaint. However, if all other devices connect to the Wi-Fi network then the problem might be your Android phone. In that case visit the authorized service centre of your phone(depending on the manufacturer) and let your device be checked by them.
Wrapping Up
So, folks, we have shared as many troubleshooting steps to fix the problem of your Android phone not connecting to Wi-Fi, and hope that one of the steps works for you as well. Do let us know in the comment box below which step worked for you. Also to keep yourself updated with the latest tech news and troubleshooting guide, connect with us on our social media platform.


Leave a Reply