Windows 10 is a feature-packed operating system that is also a host to multiple applications that can help you make the most of your OS. Out of many features, today we will be discussing in detail about Windows 10 Windows Security that offers efficient antivirus protection with its easy to navigate interface and proactive tools to manage the common yet effective security features. Not only this, you can even take advantage of Windows Defender Antivirus for its real-time protection for all kind of viruses and malware along with using Windows Security.
What Else Can You Do With Windows Security?
With Windows Security on Windows 10 you can use the Windows Defender Firewall to restrict and monitor any harmful element from entering into your computer and the data within. Windows Security keeps scanning for malicious content including viruses, and other security threats. Additionally, it offers real-time protection and helps you keep your device safe by protecting it from threats.
In this article, we will be discussing how to use Windows Security app and perform everyday tasks to secure your computer and all its data. There are multiple things that can be done using Windows Security. Before we proceed with this guide on how to use Windows Security on Windows 10, you should know how does Windows Security and Windows Defender Antivirus differ.
Windows Security is a built-in app available for Windows 10 operating system that provides you a space to check your system status and manage all the security features that includes antivirus, firewall, performance check, parental controls and multiple security features. While Windows Defender Antivirus is an anti-malware engine for your Windows 10 operating system. It is a host to multiple features like real-time protection against malware, viruses, spyware, and other malicious content.
Windows inbuilt security tools are efficient enough and makes your Windows 10 secure but if anytime you think of installing a third-party antivirus software like Systweak Antivirus, it will disable Microsoft Defender Antivirus automatically. Using any other antivirus software or Microsoft Defender Antivirus or Microsoft Defender Firewall on your computer will not anyway affect the working of Windows Security. It will keep running in the background to protect your data in all possible ways.
Click Here to Download Systweak Antivirus
Where To Find Windows Security on Windows 10?
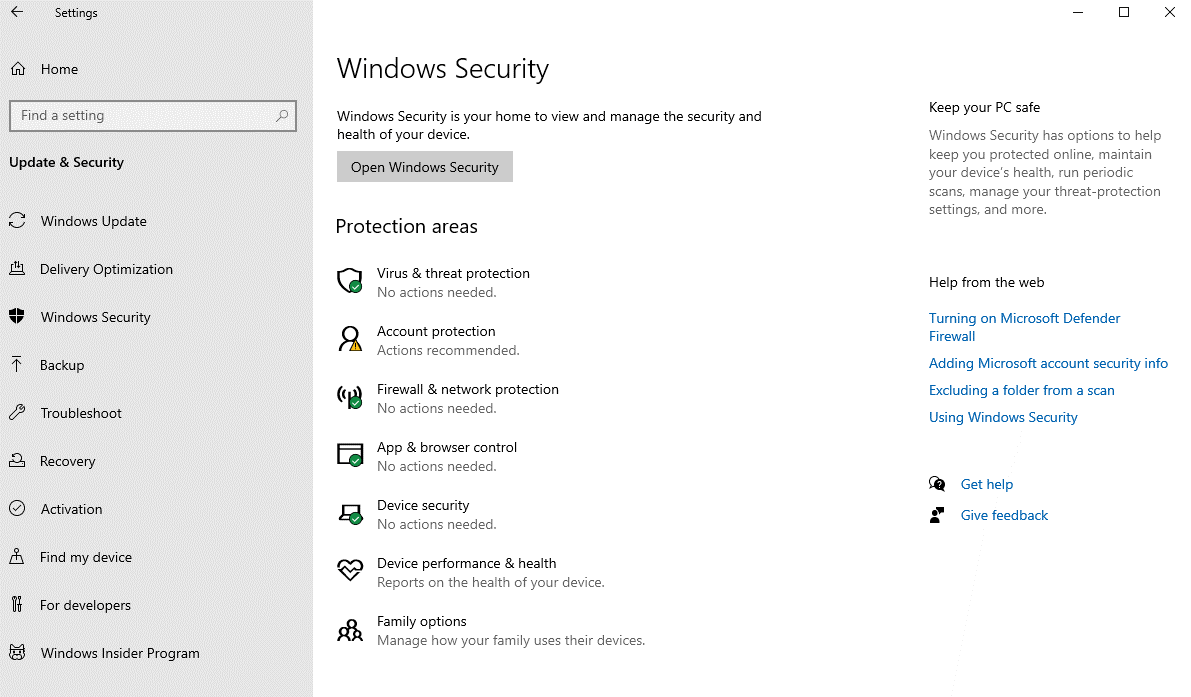
Windows Security is a built-in app in Windows 10 and can be located directly through Start menu or by double-clicking on the Shield-like icon on the taskbar. As soon as you open Windows Security, you’d be able to see multiple options. They are actually the features offered by Windows Security as a whole and proactively keeps your data safe. Here’s what Windows Security manages and monitors:
- Virus & threat protection monitors malware protection, scans your computer for possible malicious threats, processes offline scans and works with advanced anti-ransomware features.
- Account Protection helps you protect your Windows 10 identity.
- Firewall & network protection to configure network, and Firewall settings.
- App & browser control protects your PC and its content from all kinds of malicious content that is unfortunately stored on your Windows apps.
- Device Security feature enables you to secure your PC keeping its hardware at its best, protecting your PC from threats and attacks.
- Device performance & health takes proper care of your computer’s health and sends a performance report from time to time.
- Family options lets you take care of your kids’ online activity and devices signed in using Microsoft account.
Windows Security on Windows 10: Everything Explained!
Part A: Virus & Threat Protection
1. Choose From Multiple Scan Process
Windows 10 keeps regulating your system and its various parts for any malware. You can perform all kinds of scans using Microsoft Defender. The list of scans that can be performed manually includes Quick, Full, Custom, and Offline virus scan. Follow the steps below to start any of these virus scans:
- On your computer open Settings.
- Select Update & Security and choose Windows Security from the left pane.
- From the multiple options available, choose Virus & threat protection.
- Under Current threats, click Scan options.
- Now, select out of available options i.e. Quick, Full, Custom, and Offline
- Click on Scan Now. And it’s done!
As soon as you finish scanning, restart your computer to fix errors and you can later view report in the Windows Security app.
2. Check Protection History On Windows 10 Using Windows Security
Windows Defender Antivirus provides you with an option to view the updated protection history. Here are the steps you are required to follow:
- Open Settings on your computer.
- Locate Windows Security under Update & Security.
- Click Protection history under Virus & threat protection.
- Choose from many ‘Filters’ and choose from the history filters that includes Recommendations, Quarantined items, cleaned items, Blocked actions, and Severity.
- Complete the steps and you’ll get a report of the items that are cleaned, removed, and still waiting for the action.
3. Temporarily Disable Defender Antivirus
As said, there are a lot more things that you can do with the Windows Security app as a whole on Windows 10. The need to temporarily disable Microsoft Defender Antivirus arises when you need to install can’t install any antivirus software or its update. Here’s how to disable Windows Defender:
- Follow the path ahead until you locate Virus & threat protection under Settings > Update & Security > Windows Security.
- Under this section, look for ‘Virus & threat protection settings’ and click Manage settings.
- Now, turn off real-time protection.
That’s it! You can now perform all required tasks. You need not have to re-enable the antivirus as it will automatically re-enable once you reboot your PC.
4. Enable Anti-Ransomware
There is a feature in Microsoft Defender that is made to monitor and protect your data against ransomware attacks. It is known as Controlled Folder Access. Here’s how to do it:
- Follow the steps listed above to open Virus & threat protection settings under Windows Security.
- Go to Manage settings and locate the Controlled folder access section and click Manage Controlled folder access.
- Now turn the toggle on. Further you can access various controls like Block history to access protection history, Protected folders to add/remove protected folders, and Allow an app through Controlled folder access to make changes using the trusted apps.
Following these steps, you’d be able to enable security feature and app monitoring that can help you make changes to the files in the protected folders. The Controlled folder access will block all the unknown apps along with the ones that are marked as malicious.
5. Exclude Scan Locations Using Windows Security App
You can exclude files and folders that you do not want to scan for viruses. You can follow the steps below:
- Follow steps until Virus & threat protection settings and click Manage settings
- Post that, look for the Exclusions section and click Add or remove exclusions.
- Now, click Add an exclusion and choose one from many kinds of exclusions like File, Folder, File type, Process.
- Select the folder location and click the select folder button to complete the process.
Once done, the Windows Defender antivirus will not scan the folder you have excluded.
Part B: Check Account Protection Using Windows Security
Account Protection under Windows Security app lets you monitor and notify you about any problems with your account and lets you protect identity on Windows 10. Here’s how to check account protection on Windows 10:
- Open Windows Security under Settings > Update & Security.
- Click Account Protection and check if Microsoft account, Windows Hello, and Dynamic lock are indicated with a green mark. The green mark indicates that everything is working correctly. If there is any issue with account security, you can see an alert seeking your attention.
Part C: Manage Network Security With Firewall
Use Windows Security to monitor and manage the Firewall settings. You can use these settings to view firewall status and enable/disable firewall. Here’s how to do it:
- Open Settings > Update & Security > Windows Security.
- Click on Firewall & network protection.
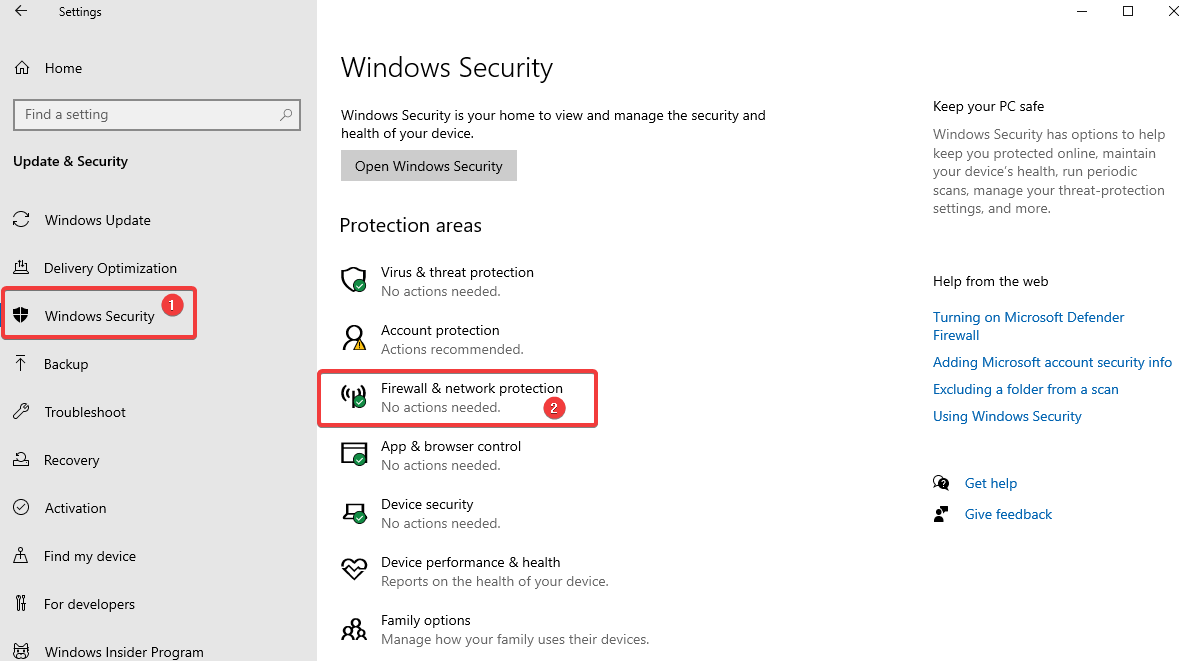
- The next page will give you an overview of what is happening with your firewall. The network that is currently in use is marked as Active.
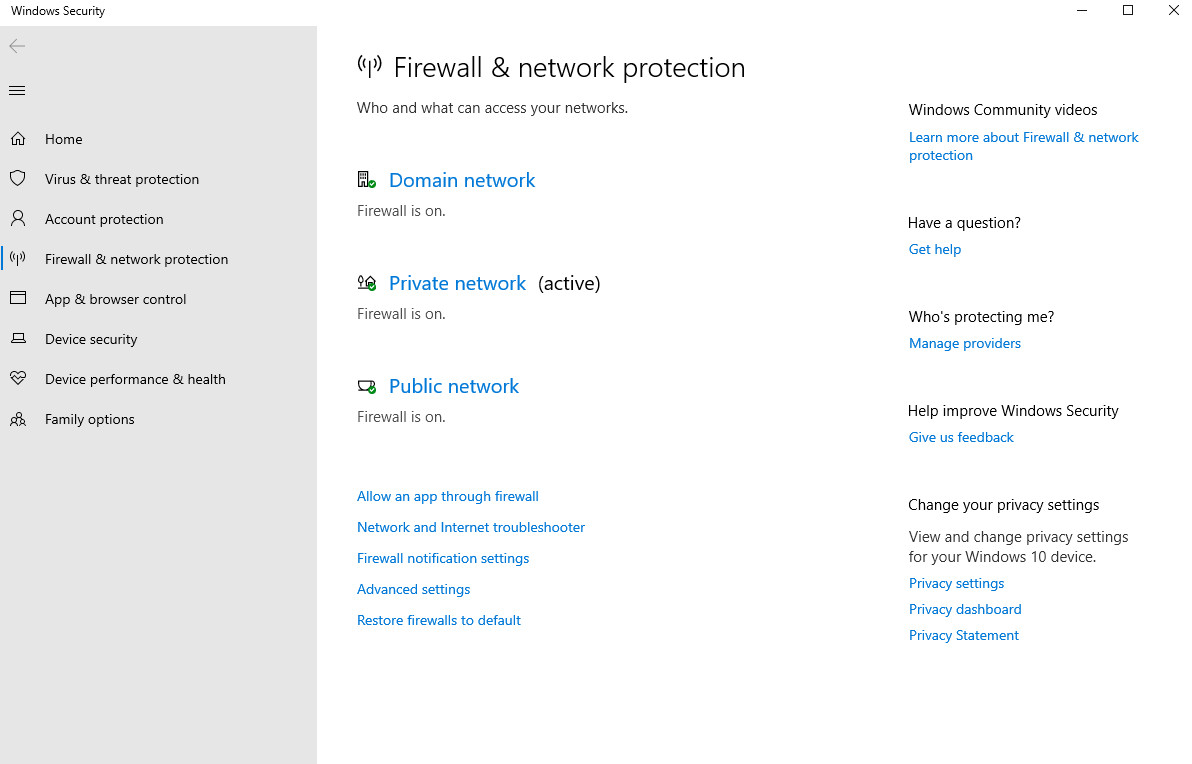
- To Enable/Disable Firewall click on the active firewall. For instance, in the image displayed above select Private network.
- Under the settings that open, turn on/off the Microsoft Defender Firewall.
- Check the box saying ‘Block all incoming connections…’.
Once the steps are done, the firewall protection will disable on your computer.
Part D: Protect Your PC Against Malicious Code Using App & Browser Control
Just like we have learnt how to use all available options under ‘Virus & threat protection’, the next part is to learn how to protect your computer from any malicious content that hides within your system apps and browser. Here’s how to manage app protection and online security settings. You can although freely use the default settings and if you anytime need to change it, check out the process below.
1. Reputation-based protection
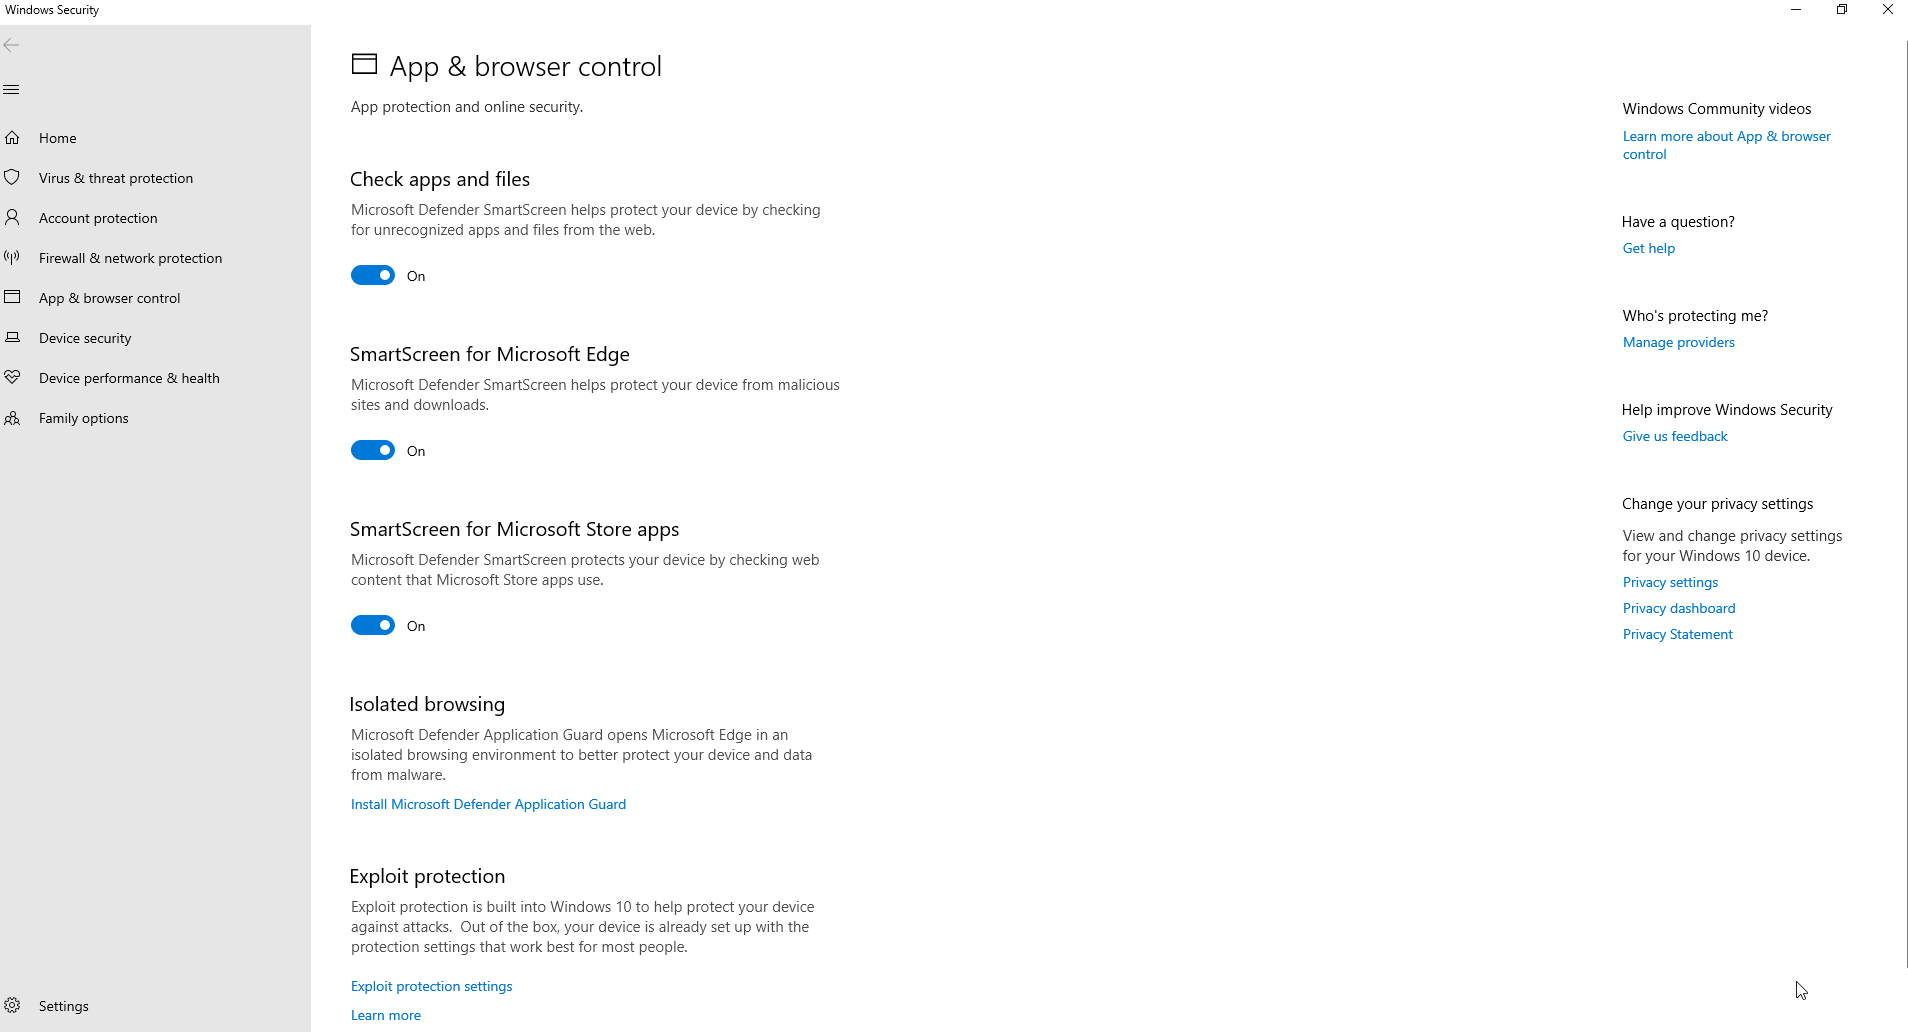
Follow the steps below to access these settings under Windows Security > App & browser control section.
Then, locate Reputation-based protection and toggle it on. Later go to Reputation based protection settings and turn on or off the options as per your requirements. Available options includes-
- Check apps and files
- SmartScreen for Microsoft Edge
- Potentially unwanted app blocking
- SmartScreen for Microsoft Store apps
On your Windows 10 you can enable or disable these default settings based on your preferences. Post these steps, you will be able to protect your device from unwanted apps, files, and websites.
2. Isolated browsing
This feature under Windows Security on Windows 10 allows you to isolate Microsoft Edge at the hardware level ensuring the protection of your device and data from malware and zero-day attacks. You can anytime change Application Guard settings following the steps below:
- Follow the path ahead to reach the App & browser control settings option.
- Click Change Application Guard settings under Isolated browsing. The feature is only available if the feature is already installed on Windows 10.
- Install Microsoft Defender Application Guard if you aren’t getting the option to make changes. Once done you can browse securely using Microsoft Edge.
3. Exploit protection
Windows Security is such an amazing tool as far as your computer is concerned. It allows you to access advanced features that can pre-identify malware and other such vulnerabilities. It is advised not to make any changes to these settings unless you are having a pro knowledge regarding these changes. You can customize the settings under Exploit protection using the steps below:
- Go to Windows Security > App & browser control.
- Select Exploit protection settings.
- Then go to System settings and customize as per your preferences.
- Click Program settings and again make changes as per your requirements.
Although the default settings are kept at its best. If you anytime makes changes to Exploit protection settings, it will run as per your choice after you finish these steps.
Part E: Tweak Core Isolation Settings Using Windows Security
Core Isolation adds an extra security layer and the feature configurations may vary system to system. Though the feature is enabled keeping in mind all the important components. You can still turn it on using the steps below:
- Locate Device Security under Windows Security.
- Select Core isolation details and enable Memory integrity.
Restart your PC once completed to apply changes. If you do not see the option, it is because the virtualization settings are not enabled. You can enable them under Basic Input/Output System (BIOS) or Unified Extensible Firmware Interface (UEFI).
Part F: Device Performance & Health under Windows Security
You can check for your system’s health and performance under this tab. To view a health and performance report, follow the steps below:
- Locate Device performance & health under Windows Security.
- Check for the displayed health report.
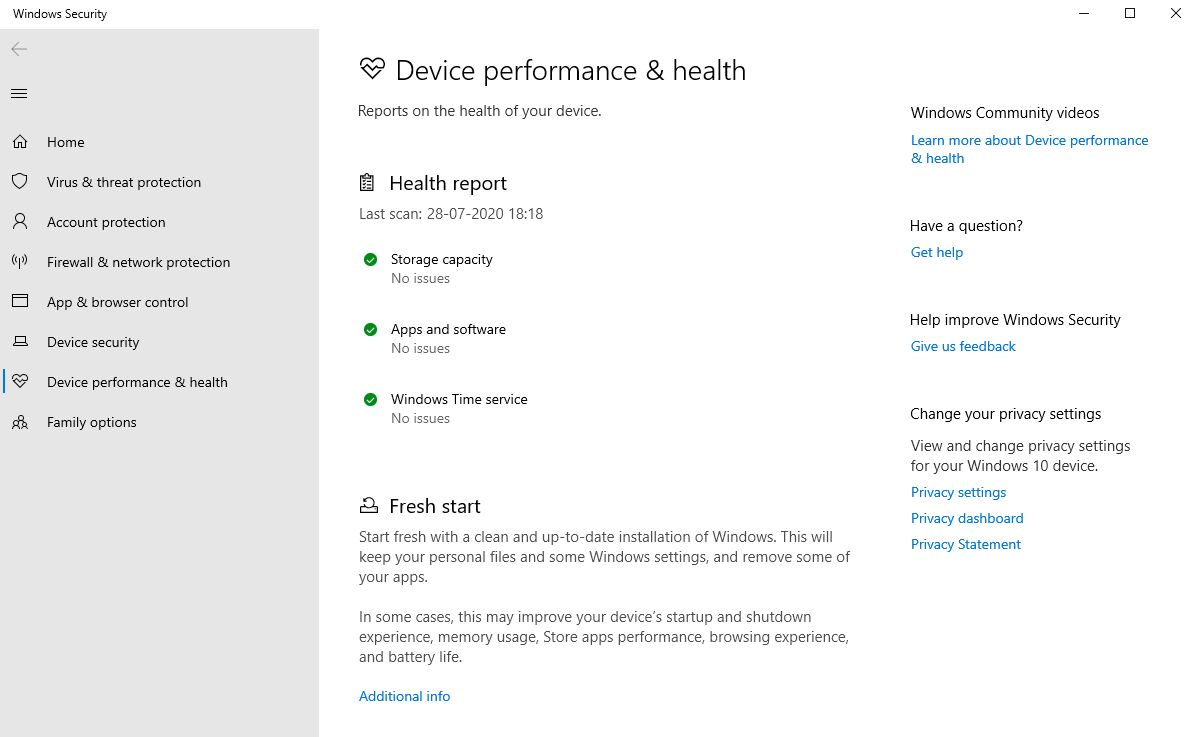
Here’s how to identify your system’s health based on the color signals it displays:
- If the color is green, everything is rightly working.
- If the color is yellow, there is some recommendation you need to check.
- If the color is red, there’s an alert for you. You immediately need to take action.
Part G: Manage Family Options using Windows Security
Family options under Windows Security lets you manage parental controls on devices connected to the account. To access the Family options, follow the steps below:
- Open Family options under Windows Security.
- Under Parental controls, go to View family settings to open these settings.
- Then, under See your family’s devices at a glance and View devices to view settings online.
These are internal settings of Windows 10, you can anytime use Parental Control software for Windows.
Wrapping Up The Guide
Although there is always an option to use third party software for antivirus protection of your PC. We recommend you to use Systweak Antivirus for its variety of features offering a complete protection to your Windows PC using its different scanning options. While Windows Security on the other hand offers efficient protection with its bunch of security tools and features. The feature that makes it the best choice is that it is free to use tools that work alongside any antivirus program you choose for your PC.
Recommended Readings:
How to Secure Your Identity On Windows 10
Ways to Secure and Manage Windows 10


Leave a Reply