Are you a gamer and want to improve the performance of your computer suddenly and surprisingly way? Well, you can do so by enabling Windows 10 feature GPU hardware scheduling. This feature was added by Microsoft in the May 2020 update and since then it has become a magic key for many gamers.
In this blog, we will see whether you should enable GPU hardware Scheduling or not in your computers or not for better performance.
How does GPU hardware Scheduling Work?
When GPU hardware is enabled, then the CPU sends commands in batches, rather than one at a time. GPU Scheduler (Windows Display driver Model- WDDM) arranges multiple processes which need to be submitted to GPU. The task of the GPU is to render and then the CPU takes the responsibility to plan and send these tasks to the GPU.
This process is called frame buffering and the rate at which the performance increases is called framerate. GPU hardware scheduling shares the load of the CPU by taking the high priority tasks from the CPU but it also increases input latency because your commands are going in batches rather than one by one.
Also Read: Tips To Maximize And Improve GPU Performance
Should you enable GPU Hardware Scheduling on your computer?
If you have an old computer that has become slow or reaches 100% load at times, then enabling GPU hardware scheduling can help you in getting better performance. Enabling the GPU hardware schedule may give you a better performance altogether but be ready to face increased input latency which you might like.
Requirements of enabling GPU Hardware Scheduling:-
GPU Hardware Scheduling was introduced in the May 2020 update and since then it has become a key for gamers to boost the performance of their computers. As mentioned, it was introduced in May 2020 therefore this feature is available only on the latest computers with Windows 10, 2004, and newer versions with GPU installed on them.
Note:- Only NVidia GPU supports hardware scheduling and not Intel and AMD.
Also Read: What is Windows Terminal and Ways To Open Windows Terminal
How to Enable GPU Hardware Scheduling
Method 1. How to turn on hardware Scheduling via Windows Settings:-
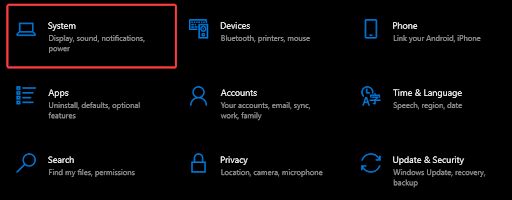
- Click on Start> Settings> System

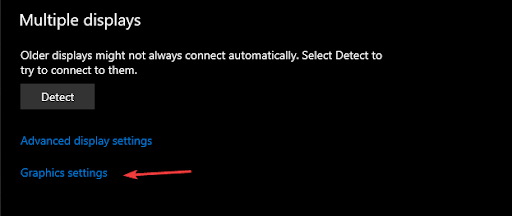
- Select Display from the left-hand menu and then under Multiple Displays click Graphics Settings
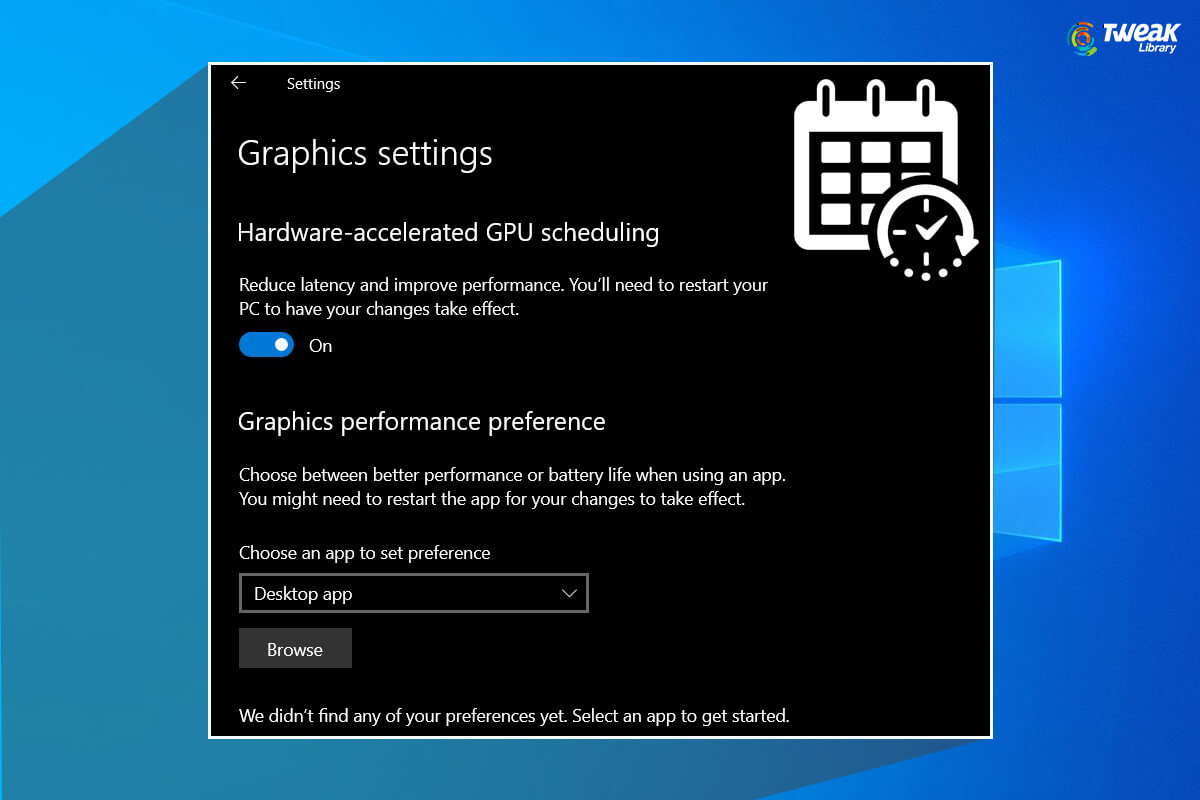
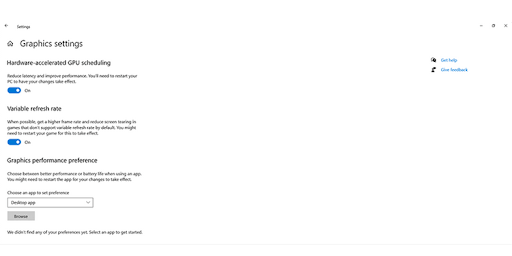
- Now turn on the toggle for hardware-accelerated GPU scheduling
- Restart computer
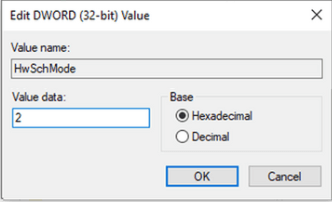
Method 2. How to turn on hardware scheduling using the Registry Editor:-
- Select registry editor in start menu search bar and click on Run as administrator
- Navigate to
HKEY_LOCAL_MACHINE> SYSTEM> CurrentControlSet> Control> GraphicsDrivers - Open
HwSchMode - Select the base to Hexadecimal and set Value data to 2
- Click OK and restart the computer
Final verdict:-
Enabling GPU Hardware Scheduling may give you a next-level experience while playing gamers because it distributes the load of CPU and hence you get great efficiency. Gamers generally need this performance while playing games. However, if you are not a gamer then you should not enable GPU Hardware Scheduling because by enabling it you will experience an increase in input latency which might be not normal for you.
If you are a gamer and want to see enhanced performance of a computer while playing games then enable GPU Hardware Scheduling and let us know about your experience in the comment section below.


Leave a Reply