You have finally got your dream Macbook air, but, ever since you bid adieu to your Windows OS, you’ve been missing it like everything. How about we told you that you can still have the best of both worlds? And that wonderful utility that can make this magic happen is Boot Camp assistant. And, once you can switch between Windows and macOS, your happiness will hold no bounds. So, let’s get straight into the journey, shall we?
Before Anything Else, What is Boot Camp Assistant?
When you download the Boot Camp Assistant for Mac to download Windows, you only have to download a copy of Windows 10 (ISO image file) and the Boot Camp assistant takes you through the whole process in a very simple format. And, the best part is that you needn’t download it from elsewhere as it comes ingrained in your macOS provided you have a Mac with an Intel processor.
A Few Prerequisites
Here’s a list of things you will need apart from Mac’s Boot Camp Assistant for Windows 10 to smoothly install Windows 10 on your macOS. We’d suggest that you keep this checklist handy –
- Device: MacBook 2015 or later, MacBook Pro 2012 or later, MacBook Air 2012 or later, Mac mini 2012 or later, iMac 2012 or later, All iMac Pro and Mac Pro 2013 or later
- Storage Space: minimum 64 GB (Startup disk), minimum 128 GB (recommended). If you have an iMac or Mac Pro with 128 GB RAM, your startup disk should at least have memory equivalent to that of your RAM
Also Read: Know More On How To Check Storage on Mac
- A USB flash drive with 16 GB of storage space. We will format this FAT format. Ensure that there is no data on it as when you will format it, all the existing data will be erased.
- ISO Image or other installation media of 64-bit Windows 10 Home or Pro. if you are installing Windows on Mac for the first time, make sure that you have the full version of Windows
Step 1: Fire Up Boot Camp Assistant
Wondering where would you find the Boot Camp Assistant? It is located in the Utilities folder of your Applications folder. You can follow the path mentioned below –
Finder > Applications (left hand pane) > Utilities > Boot Camp Assistant > Continue
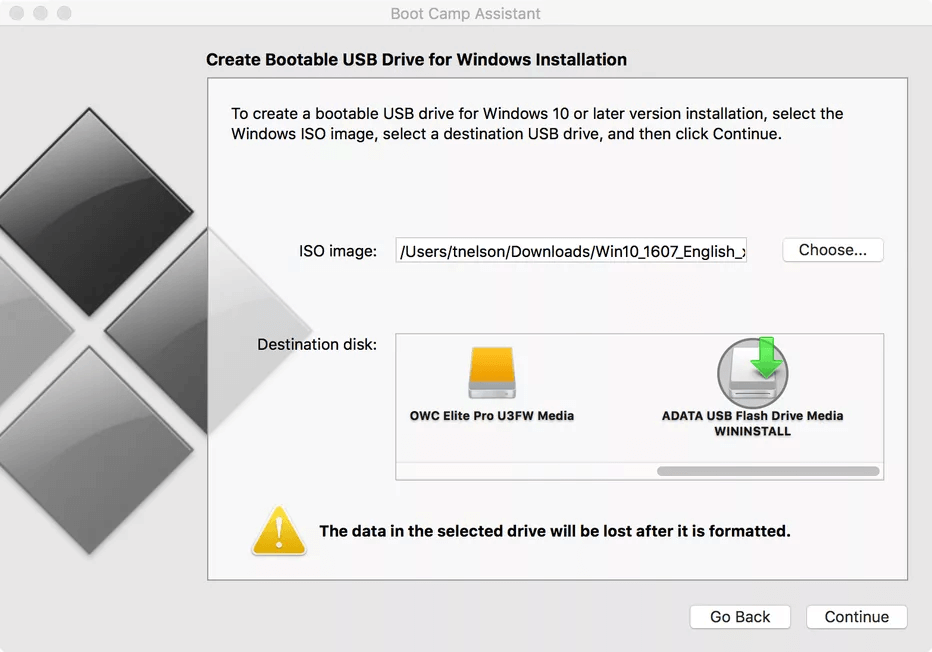
Several options will appear as soon as you will open Mac’s Boot Camp Assistant for the first time. Choose the ISO image that you wish to use. For that, click on the Choose button and navigate to the location where you have already created an ISO image of Windows or have downloaded it. When you do this, the ISO file will be copied to a USB memory stick that you can later use to install Windows.
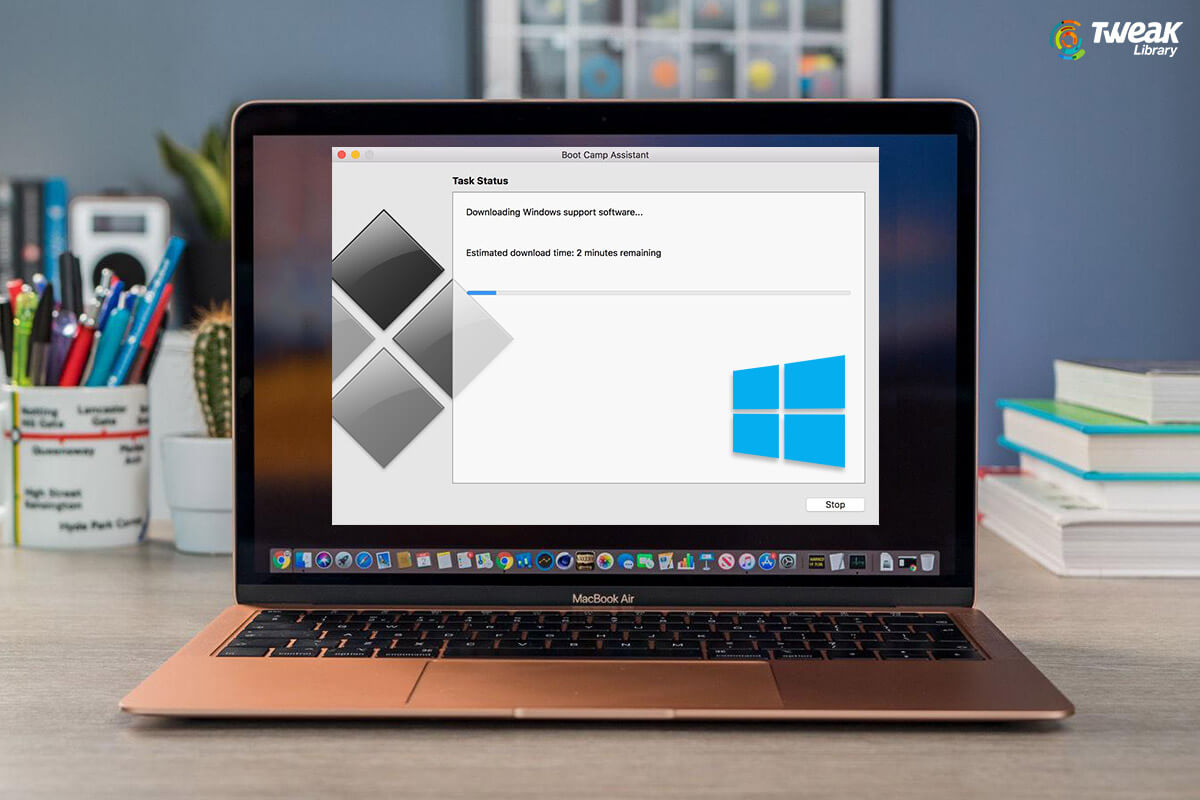
Step 2: Download Drivers
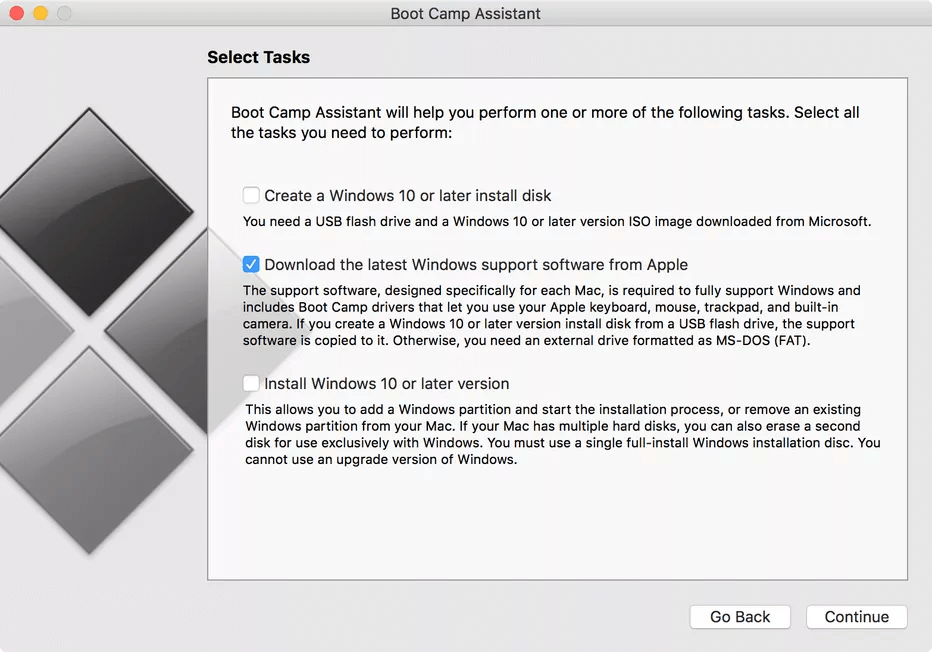
Boot Camp Assistant may now ask you to download the driver software for Windows 10. The driver will further help control components such as Mac camera, monitor, mouse, and keyboard which are different from that of Windows. Although some Macs may be able to download this.
For this, you can take the help of the USB stick we mentioned earlier. It is important to note that the USB flash drive needs to be formatted in MS-DOS (FAT) format using Disk Utility. For this, here is a detailed guide.
Exit the Disk Utility and in the Boot Camp Assistant, select the formatted flash drive as destination disk and click on Continue. Boot Camp will start installing all the latest drivers straight from the Apple support website. You may have to furnish the password so that a helper file can be added. Once the drivers are saved, you can Quit the Boot Camp Assistant.
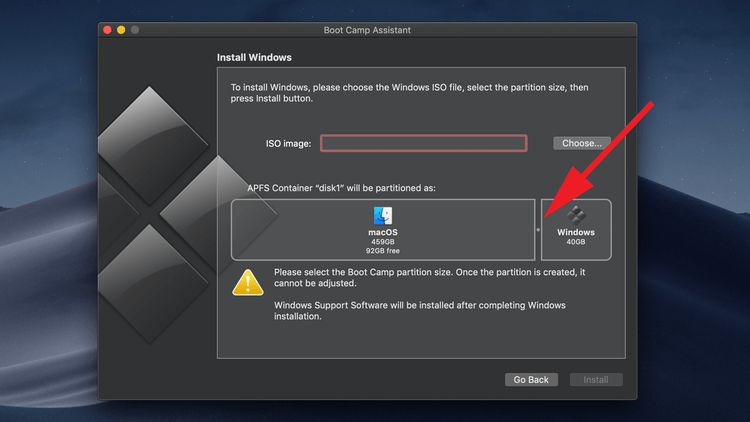
Step 3: Assign The Storage Space To Boot Camp Partition Windows 10
You can now drag the space you want to assign to macOS and Windows. Practice caution and assign partition appropriately. You would want to leave enough space for the macOS partition. So, keep at least 128 GBs assigned to macOS so that the day-to-day functions can be carried out smoothly. The same is the case with Windows 10
What if I have an external USB drive?
It is highly recommended that you remove the external drive, especially during the installation process.
Step 4: Time To Install Windows 10
Now that you have the partition in place, Boot Camp will shut your Mac down, and it will launch Windows installed from your USB stick. You can now follow the prompts and install Boot Camp drivers from your memory stick.
Voila! You can now choose the Windows version you want to run, for instance, Windows 10 Home or Pro. You can customize settings to get rid of all the personalization features which you might not want at the moment. Also, you can set up your account and password as well.
How Do You Get Back To macOS?
1. Click on the System Tray represented by (^) icon at the bottom right of the screen
2. Click on Boot Camp
3. Click Restart in macOS
To Again Go Back to Windows 10
System Preferences > Startup Disk > Click the lock to make changes (option located at the bottom left) > authenticate with your username and password > Bootcamp Windows > Restart
Another way (and possibly a faster way) is to reboot your Mac while holding the option key. After this, you will get the option to select your desired operating system.
Wrapping Up
If you have a macOS (MacBook Pro or even iMac), you don’t just have to confine yourself to macOS, instead, you can now relish all those Windows apps, games, and much more. You might as well flaunt your prowess across both the operating systems. And, if this blog helped you do that, give it a big thumbs up. You can also find us on YouTube, Facebook, Linkedin, Twitter, Pinterest, Flipboard, and Tumblr.
Recommended Readings:
Create a Virtual Machine on Windows 10 PC in Easy Steps
Windows 10 Clock Showing Wrong Time? Here Are Some Quick Fixes
Here’s How to Run Windows Programs on a Mac
Want To Update Microsoft Office Apps On Mac And Windows? Here’s How


Leave a Reply