
Windows system restore is like a time machine to roll back your Windows settings to an earlier stage. If you have made some changes in the Windows operating system that is causing trouble in your operations, you can roll back previous settings that were working at its best.
Though Microsoft Windows operating system is robust enough to fix most of the issues on its own, we still need manual intervention to tweak a few settings to work for us. Here is a complete guide on working with Windows system restore on Windows 10 computer.
How to Enable System Restore in Windows 10
By default, the Windows operating system keeps system restore options disabled. You need to manually enable the option.
Step 1. Click on the Start button and type system restore in the search bar.
Step 2. Click on ‘Create a Restore Point’ from the search results.
Step 3. ‘System Properties’ window will open. Click on the ‘System Protection’ tab on the top of the window.
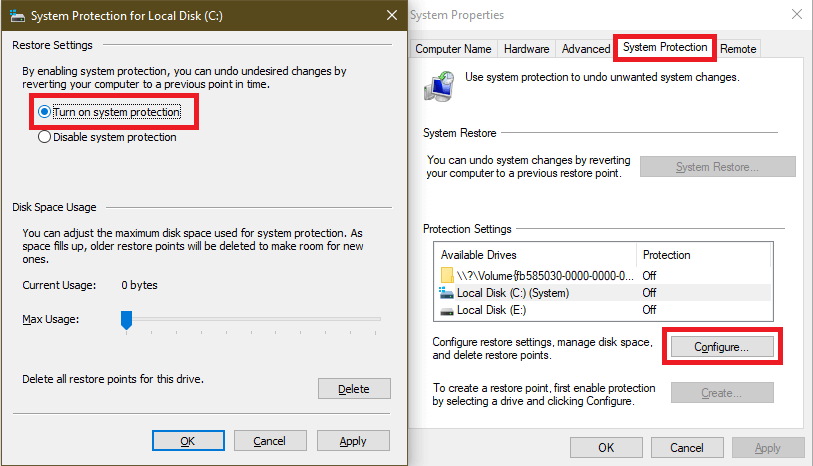
Step 4. Select the main system drive under the protection settings section and click on the ‘Configure’ button to configure restore settings.
Step 5. Another window will open to configure restore settings. Select ‘Turn ON System Protection’ and click on Apply and Okay buttons. Windows will automatically start creating a restore point for the first time and will create a system restore every time there is a major system change.
How to Create a System Restore Point
Though Microsoft Windows automatically creates a system restore point, you can also create a system restore point whenever you are about to make a major change on your computer.
Step 1. Click on the Start button and type system restore in the search bar.
Step 2. Click on ‘Create a Restore Point’ from the search results.
Step 3. ‘System Properties’ window will open. Click on the ‘System Protection’ tab on the top of the window.
Step 4. Click on the ‘Create’ button to start creating a system restore point.
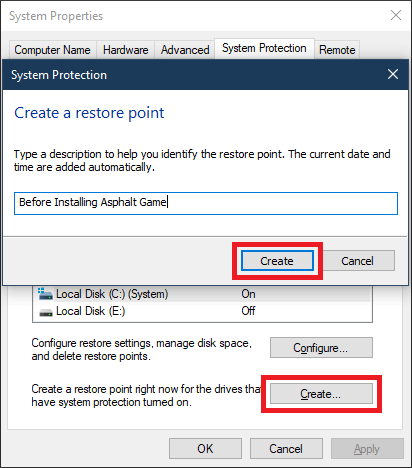
Step 5. Type a descriptive name that describes why you have created this system restore point.
Step 6. Click on the ‘Create’ button to create a Windows 10 restore point.
Step 7. Click on the ‘Close’ button and then click on ‘Okay’.
Also Read: How to Backup Drivers in Windows 10 and Restore them
When to Perform Windows System Restore
There are times when we install a new program or software and the system runs into a problem. The system gets into an unstable state or may not perform as desired. Microsoft system restore is one of the basic steps that you can perform before initiating any other troubleshooting. Performing a Windows system restore takes the computer back to the initial settings when the computer was working properly.
How to Perform System Restore in Windows 10
Performing system restore is as easy as creating a system restore point.
Step 1. Click on the Start button and type system restore in the search bar.
Step 2. Click on ‘Create a Restore Point’ from the search results.
Step 3. ‘System Properties’ window will open. Click on the ‘System Protection’ tab on the top of the window.
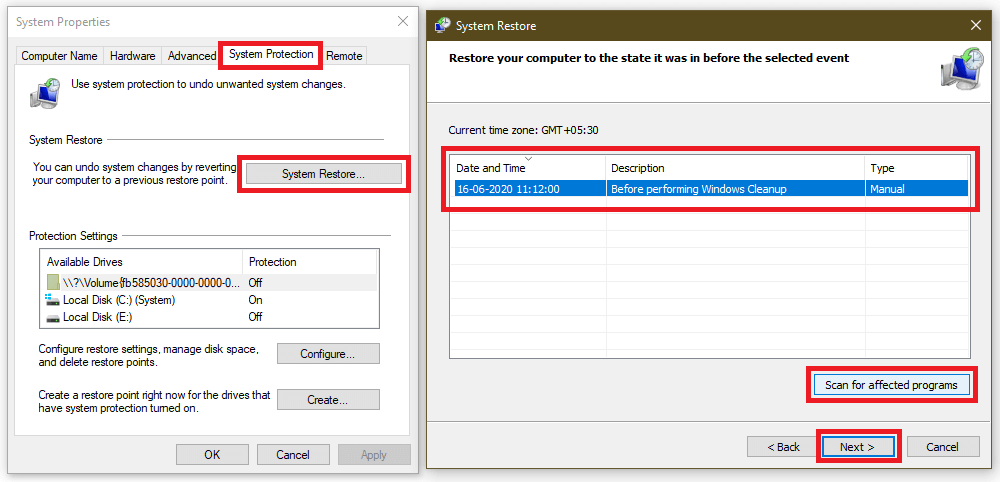
Step 4. Click on the ‘System Restore’ button to revert your computer to a previous state.
Step 5. Another window will open to restore system files and settings. Click on the ‘Next’ button.
Step 6. It will show you different restore points with date and time that can be used. Select a restore point when you think the computer was in stable mode.
Step 7. Click on the ‘Scan for Affected Programs’ button to learn which programs will be affected and removed.
Please Note: Performing a system restore will uninstall the programs installed after the system restore point. It will not affect the files created after the system restore point was created.”
Step 8. Click on the ‘Next’ and ‘Close’ buttons to finish the task.
Wrapping Up
Microsoft system restore is a lifesaver utility that helps you in critical times. Windows system restore should not be used on a regular basis and should only be used in tough times. Windows system recovery options are your first troubleshooting step to fix major issues with Windows. Now that you know how to create a Windows 10 restore point, ensure that you create one before making major changes to your operating system.
Read Next:
Windows 10 Keeps Restarting? Here’s the fixes!
How to Fix Windows 10 Start Menu Not Working?
Backspace Not Working in Windows 10? Here’s the Fixes!


Leave a Reply