Windows 10 is a smarter operating system when compared to its predecessors, as it automatically performs many tasks based on your preferences or the recent activities. One such example is setting the default printer in Windows 10.
Among many nifty features, Windows 10 has provided you with the ability to set a default printer automatically. However, if you don’t want Windows to make this choice then you can manually set a particular printer as default. In this article we will discuss both the ways that will really make it easy for you to set a default printer in Windows 10.
Also Read: How To Fix Printer Offline Issue on Windows 10
Set Default Printer in Windows 10 Automatically
Windows 10 has an inbuilt feature, “Let Windows manage my default printer” that when enabled automatically sets the default printer to the one that you have used recently at your current location. This feature ensures that when you are at the office, Windows automatically switches the default printer from home to office.
You can enable this feature by following the steps listed below:
1. Click on the Windows Start button and click on the gear icon to open Windows Settings.
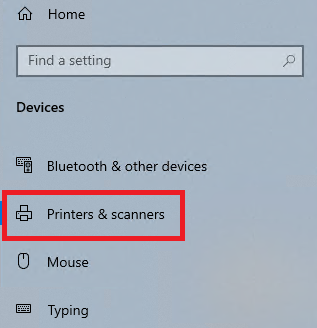
2. In Windows Settings click on Devices.
3. Now on the next screen, click on Printers & Scanners from the left-pane.
4. On the right pane scroll down and check mark the setting that reads, “Let Windows manage my default printer option”
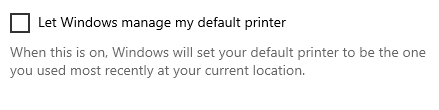
Now once you have enabled this feature, Windows will automatically set the default printer to the one that you have used most recently at your current location.
Also Read: How To Fix Windows Cannot Connect to the Printer Issue?
Set Default printer in Windows 10 Manually
The method that we have discussed above of Windows 10 automatically change printer default for you based on your recent history and location can come as handy for some of the users but for some it can be a pain. And mainly for the users who tend to use one printer primarily for the majority of their tasks and other one occasionally.
So if you too find the above method problematic, then follow the steps below to manually set the default printer in Windows 10.
Note: Since you have enabled the settings Let Windows manage my default printer selected in the previous step, you will need to disable it to choose a default printer manually.
1. Click on the Windows Start button and from the menu click on the gear icon to open Windows Settings.
2. On the Windows Settings Screen, click on Devices option.
3. Now, on the next screen, click on the Printers & Scanners from the left-pane.
4. In the right pane scroll down and unchecked the setting that reads “Let Windows manage my default printer option”
5. Now from the available list of printers click the one that you want to set as default and then click on the Manage button.
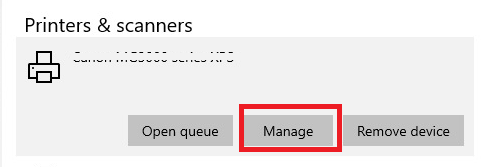
6. On the next screen, under Printer Status click on “Set as default” button.
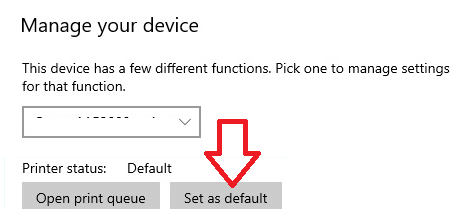
Now the selected printer will be set as default printer. All your requests for print will now automatically go to the default printer.
This way of setting a default printer manually is really handy if you have a preferred choice of printer. However, in the future you can anytime switch your printer to another available printer as default by following the above instructions.
Are You Still Using Windows 7?
Ahh, the above steps do not work for you as you are still using Windows 7. Folks, you must be aware that the promise made by Microsoft to support Windows 7 for 10 years has already been ended. This means that Microsoft has discontinued its support for Windows 7 on 14th January 2020. All Windows Updates, technical assistance, software updates, and bug fixes are no longer available for the Windows 7.
Therefore it is strongly recommended from our end to update your operating system to the latest to receive all latest updates and security patches from Microsoft.
However we still providing you with the steps to set default printer on Windows 7
1. Click on the Windows Start button.
2. Now in the search box, type printer.
3. From the available results, select Devices and Printers.
4. On the Devices and Printers window , right-click on the printer that you want to set as default printer and from the menu select the option, Set as default printer.
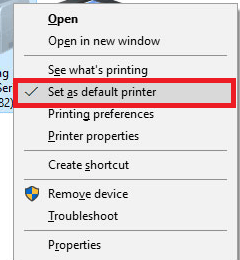
The printer that you set as default will now have a check mark next to it
Guys also do note that you can only have one default printer at a time. However, there is no such restriction on how many times you can change the default printer.
Wrapping Up:
So, readers this is all from our side. We hope now you have learnt how to set the default printer in Windows 10. If you still face any problem then do share it in the comment box below, and we will try our level best to come up with a solution. Also if you have any feedback or suggestion regarding the article then also do share it in the comment box below. Also do subscribe to our YouTube channel to get the latest tech videos.
Read Next:
Add and Connect Wireless Printer In Windows and Mac
How to Fix Offline Printer On Mac
Solve ” Computer Not Recognizing Printer” Error


Leave a Reply