If there is one thing that you should be fearful of being a Windows 10 user, then it is the BSOD or Blue Screen of Death. However, not all BSOD means serious business, and some can be resolved quickly with any major software or hardware changes. And one of such errors is Driver Power State Failure in Windows 10.
The BSOD driver power state failure in Windows 10 occurs under two circumstances, the first being inconsistent drivers installed, and the second is related to power management of the computer. As there are two prime causes, hence the methods to fix this issue are also divided into two parts.
| Power Options Fixes | Driver Related Fixes |
|---|---|
| Modify Power Management Selection | Fix Corrupted files via SFC |
| Adjust Power Plan Settings | Restore Drivers via System restore |
| Change Power Options | Update Drivers via Driver Updater |
Also Read: How to Backup Drivers in Windows 10 and Restore them
The Power Management Fixes To Resolve Driver Power State Failure In Windows 10
Method 1. Modify Power Management Selection
Power management is an essential feature in any electronic device. If the power set is low, then it will cause issues with the software and display BSOD errors and on the other hand, if the power is too high, then this will cause hardware damage. It is not clear why the computer which has been working fine for many days suddenly develops a problem. The steps to check the power management are:
Step 1. Type “Device Manager” in the search box on the taskbar and click on the top result.
Step 2. Expand ‘Network Adapters’and double click on your network adapter to open the properties.
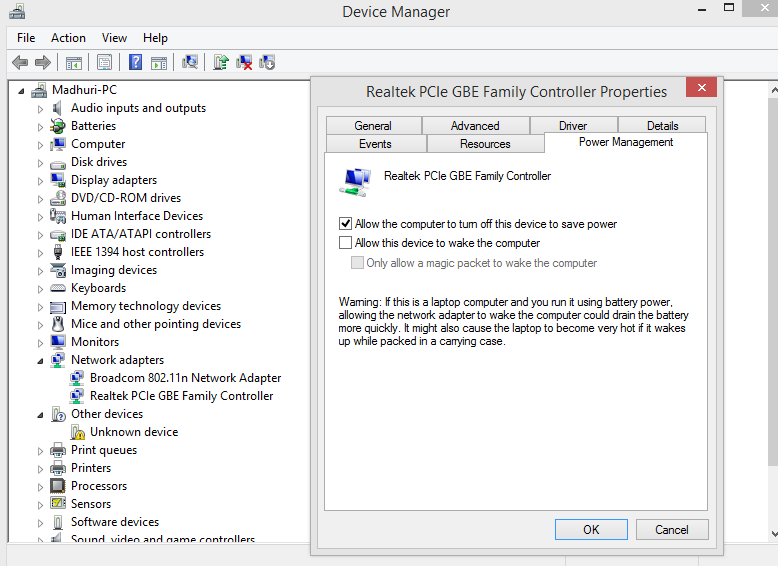
Step 3. Now click on the Power Management tab and uncheck “Allow the computer to turn off this device to save power”.
Step 4. Click on OK to save the changes.
The change in Power Management options is one of the most important methods of driver power state failure windows 10 fixation.
Also Read: Manage Power Throttling on Windows 10
Method 2. Adjust Power Plan Settings
The Windows Power Plan Settings is a point where the hardware and software settings related to power are located in one place. You can set the options that manage how your computer uses power. To make changes follow these steps:
Step 1. Type “Edit Power Plan” in the search box on the taskbar and click on the relevant result.
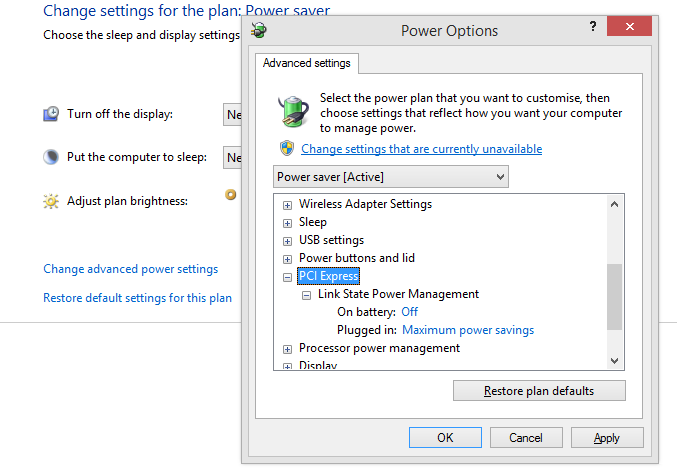
Step 2. Click on Change Advanced Power Settings.
Step 3. In the Power Options Window, under Advanced Settings, find “PCI Express” and locate “Link state Power Management” and double-click on it. Now change the “On battery” and “Plugged in” options to “Off”.
Step 4. The next click will be on “Wireless Adapter Settings“, and under Power Saving Mode theOn battery and Plugged in options are set to “Maximum Performance”.
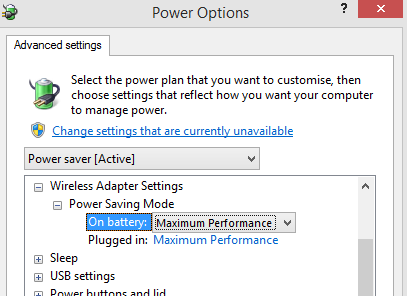
Step 5. Click on Apply And then OK.
Restart your computer and check if you face the Driver Power State Failure error again in Windows 10.
Also Read: Customize Windows Taskbar Setting To Fit In Everything
Method 3. Change Power Options
Step 1.Type Control Panel in the search box on the taskbar to open Control Panel.
Step2. Locate and click on Power Options
Step 3. From the menu list on the left side, click on Choose what the power button does.
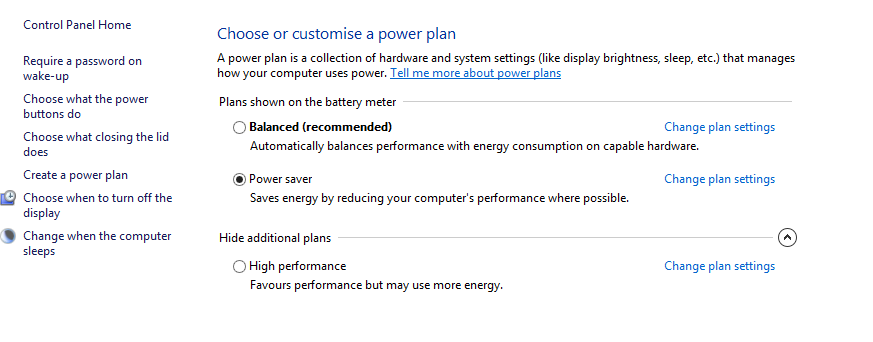
Step 4. Now locate and click on Change settings that are currently unavailable.
Step 5. Under Shutdown settings, disable all settings except Lock by removing the tick in the checkbox beside them.
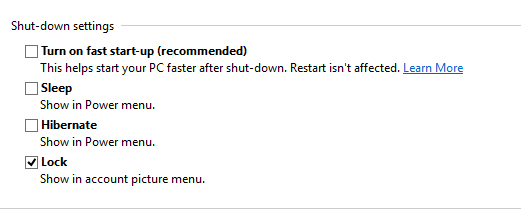
Step 6. Click on Save Changes on the bottom right corner and restart your computer.
The Driver Related Fixes to resolve Driver Power State Failure in Windows 10
Method 4. Fix Corrupted files via SFC
Running the System File Checker is a step that is debated by some as a part of Driver Power State Failure in Windows 10 fixes as this system utility tool checks for corrupted files. But the argument in favour of running SFC states that this tool will repair any missing or corrupted system files including the DLL files. To run the System File Checker on Windows 10 follow these steps:
Step 1. Type Command Prompt in the search box on the taskbar and when command Prompt appears in the search result, click on Administrator mode.
Step 2. Type the following command in the CMD window and let the process begin. This is a lengthy process, and it will take time.
sfc /scannow

Step 3. Restart your computer and use it for some time to observe if you receive the same error again.
If your issue is not fixed then move to the next method.
Method 5. Restore Drivers via System restore
Another way to fix Driver Power State Failure in Windows 10 is to restore your system to a previous date. This is only possible if a restore point in the backdate has already been created. Restoring the system will not affect your file but will make specific changes that will take your computer to a stable state. Any programs installed after the restore date will be removed, and the system will go back to a previous state when it was working fine. The steps for system restore are:
Step 1.Press Windows + R to open the Run box and type in “rstrui.exe” and press OK.
Step 2. In the new window, click on System Restore and check for the list of dates. You can always click on show more restore points to view previously created safe points.
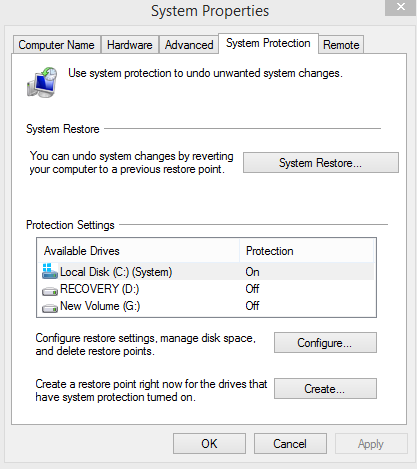
Step 3. Select the point which you think to be right and click on next and follow the onscreen instructions.
The system will restart, and the Driver Power State Failure in Windows will be fixed.
Method 6.Update Drivers via Driver Updater
The final method to resolve the Driver Power State Failure in Windows 10 is to update the drivers of your computer. Updating the drivers can be done majorly in two ways: Manual Update and Automatic Update.
Manual Update. This method of updating drivers is the Microsoft’s default way of scanning for driver changes and installing new versions. To initiate a manual update, follow these steps:
Step 1. Open Device Manager by typing devmgmt.msc in the Run box.
Step2. The new window opened will list all the drivers installed in your computer, categorized by the type of hardware they correspond to. Every category will have a few driver entries underneath it.
Step 3. Look for driver entries with a yellow triangle mark and make a right-click on them and choose Update driver from the contextual menu.
Step 4. The Windows operating system will conduct an automatic search for the driver and install it in your system.
Step 5, Once all the drivers with yellow triangles have been installed and updated, the mark will automatically go away, and this will resolve the driver power state failure in Windows 10.
However, the above method has two limitations:
1) It will not update the existing drivers without the yellow mark to their latest version.
2) Windows device manager has a specific limitation of Microsoft approved websites from where it can load the driver. It may not search the OEM manufacturer’s website for the latest driver
To overcome these limitations, the automatic method of updating drivers is mainly preferred.
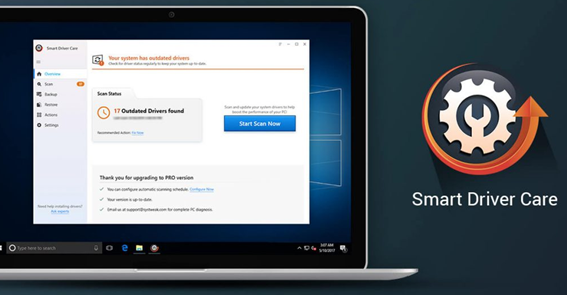
Automatic Update. This method involves using a third-party software to scan your computer and update all the drivers with the latest version available on the internet. It has no limitation and will check all drivers installed in the system even though they are working correctly and has no restrictions of not downloading from third party websites. This method has two significant benefits:
All drivers updated. Even if a driver is working properly, it must be updated to the latest version so that the operating system can make the best possible utilization of the hardware.
Easy to use with a couple of clicks.A driver updater software is easy to use as it requires the first click to scan for the new drivers and the second click to update them. It does not require the person to know the exact model number of the hardware installed and automatically retrieves all details about the hardware configuration of the computer.
Although there are many software that falls into this category, I recommend using Smart Driver Care which I have been using for quite a few years now. Smart Driver Care is an intelligent driver updater software that I run every once a week, and it has kept mu computer error-free ever since. You can download Smart Driver Care from the following link:
Click Here to Download Smart Driver Care
Step 1. Use the above link to download the Smart Driver Care on your system.
Step 2. Once the file download is completed, double click to begin the installing process. Click on The Next button, and this process will be completed automatically.
Step 3. Once the Smart Driver Care is installed, open the application and register it.
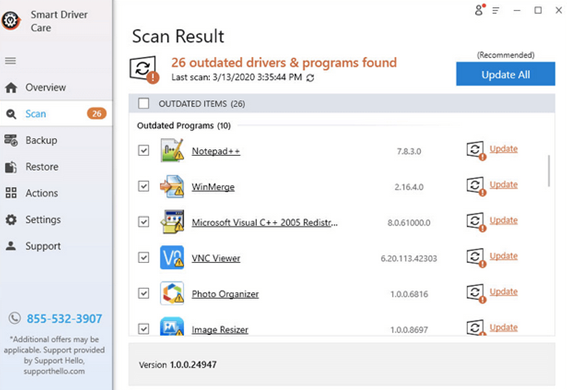
Step 4.The interface is very easy and simple to use. Just click on the Start Scan Now button and let the app scan your system for drivers.
Step 5.SDC will scan your computer for all driver issues, like missing, outdated and corrupted drivers and fix them with a single click on the Update now button.
Also Read: Best Free Driver Updater Software For Windows 10
Which One Did You Choose – Fix Driver Power State Failure In Windows 10
All the methods described above have been used as Driver Power State Failure in Windows 10 fixes and have worked as reported by the multiple tech forums out there. My personal favourite is to run Smart driver care, every time my computer acts fuzzy, and this has worked for me. However, it is essential to determine if the error is caused by Power or driver failure first. Try to use all the steps one by one if you face this issue in your computer and drop in a note in the comments section below if you need further assistance.
Follow us on social media – Facebook and YouTube. For any queries or suggestions, please let us know in the comments section below. We would love to get back to you with a solution. We post regularly on the tips and tricks along with solutions to common issues related to technology. Subscribe to our newsletter to get regular updates on the tech world.
Recommended Readings:
Basics of Windows Powershell Script
How to use Maximum CPU Power in Windows 10
Fix Device Driver Issues in Windows 10




Leave a Reply