Has it ever happened that you clicked on a YouTube video link that is shared by your friend? But instead of any video you just see a black screen with an error message, “Audio renderer error. Please restart your computer”. You might’ve thought it’s a temporary glitch and tried refreshing the page, but still the error message persists on the black screen. Worried? You need not to be. As in this article we have come up with all the tested solutions that can fix this problem with ease.
How to Fix Auto Renderer Error on YouTube
If you are getting this error message of “Audio renderer error. Please restart your computer” while watching videos on YouTube then you are not alone. Many users have posted on various forums about this problem.

There can be various fixes for the audio renderer error like restarting the computer as suggested itself in the error message, roll backing audio drivers, updating outdated audio drivers, disconnecting and reconnecting an audio device. In the article we will be going to discuss all these fixes in detail.
Also Read: How To Fix Audio Problems On Windows 10 PC
Unplug Your Audio Device:
Starting with the easiest of the solutions for audio renderer error, just unplug your audio device from the audio jack. So, whether you have connected wired headphones or external speakers to your laptop/computer, unplug them and then plug them back in, to check whether it fixes the error. However, for many users it works as a temporary fix. If it doesn’t work for you as well then continue your read.
Restart Your Computer
If you are seeing this error message for the first time then before delving into more detailed troubleshooting steps let’s begin with the basics, i.e. restart your computer. The error message also itself suggests restarting the computer.
So save your work, close all the running programs and click on the Windows Start Button> Restart to reboot your computer. After restarting the computer try playing videos on YouTube to check whether you are still getting Audio renderer error. If the error message reappears then head on to the next step.
Restart Audio Drivers
If the system restart does not resolve the problem and you are still getting “Audio renderer error. Please restart your computer” on YouTube, then the next would be restarting audio drivers by following the steps listed below:
1. Press the Windows + R button to open the Run command box, then type devmgmt.msc and hit Enter.
2. In Device Manager expand the option Sound, video and game controllers and right click on your Audio device.
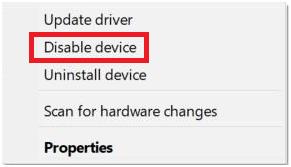
3. From the drop down list click on Disable device option.

4. Now wait for 30-45 seconds and then again right click on your Audio device and select the option Enable the device.
5. Restart your computer and check whether the problem is resolved.
Also Read: YouTube Not Working? Here’s How To Fix It!
Run Audio Troubleshooter
Windows 10 comes with an inbuilt troubleshooter that diagnoses and fixes most of the common problems faced by a user. Audio troubleshooter is a part of Windows troubleshooter that helps you to fix all the audio related problems. To run audio troubleshooter follow the instructions below:
1. Click on the Windows Start button and select gear icon to open Window Settings.
2 In the Windows Settings window click on Update & Security option.
3. On the new window select Troubleshoot in the left pane. On the right pane click on Playing Audio > Run the troubleshooter and follow on screen instructions.

Now the Audio troubleshooter will diagnose for audio renderer error and fix it automatically if a fix is available. Once done restart your computer and check whether you’re still getting “Audio renderer error. Please restart your computer” message while watching YouTube. If the problem is resolved then no need to follow further instructions. But if you are still encountering the error message then this could be due to a faulty driver.
Roll Back Audio Driver
Have you recently updated your Audio driver manually? If the answer is yes, then it is quite possible that you have ended in installing a faulty or incompatible audio driver that leads to Audio renderer error. Now to fix this we will have to roll back our audio driver by following the steps given below:
1. Press the Windows + R button to open the Run command box, then type devmgmt.msc and hit Enter.
2. In Device Manager expand the option Sound, video and game controllers and right click on your Audio device.
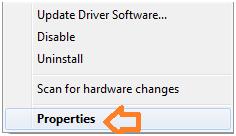
3. From the drop down list click on Properties.

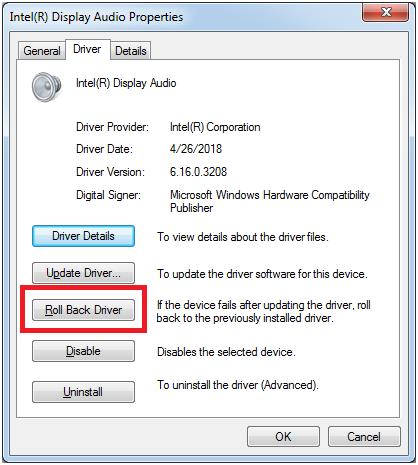
4. In the new window that opens, select Driver tab and select Roll Back Driver option.

Now, this will uninstall the currently updated audio driver and will roll back it to the earlier version. This step will surely work if you have started getting Audio Renderer Error after updating the audio driver.
Update Your Audio Driver
An outdated audio driver leads to various audio related issues. Therefore it always recommended that your system should be running with the most updated drivers. One can either manually update the drivers by looking for their latest update on the respective vendor site or directly updating them with a dedicated driver updater tool. We recommend you using a dedicated driver updater tool like Advanced Driver Updater. To get a detailed review of the product click here This amazing tool helps you to easily update all the outdated drivers in a single click without worrying about the compatibility issues.
Wrapping Up
So guys, that’s all from our side. We hope that you were able to solve the Audio Renderer error by following the above steps. Do let us know in the comments section below which of the above resolutions worked for you. Also do follow us on our social media channels to stay updated with all our latest blogs.
Next Read:
No Audio On Windows 10? Here Is The Fix!
How to Fix YouTube TV not Working?


Leave a Reply