Skype as we all know is one of the most used messaging and chat tools and let us stay connected for both personal and professional commitments. Skye is used across the globe by people to conduct important business calls from multiple locations via the Internet. Such
Being so important, there are instances when you wish to eliminate Skype from the System tray on Windows 10 due to some reasons.
Skype Pinned To The Task Bar
An easy way to access programs in Windows 10 is to pin them to the taskbar. It not only saves the frustration in locating the app, but also saves time. An important feature of Skype is whenever it is installed; it automatically gets pinned to the taskbar. What actually happens is whenever the user closes the Skype window, rather than quitting, the program sits in the taskbar which some users find weird and hence they want to remove Skype from the System Tray in Windows 10.
Also Read: Skype Vs Zoom: Which One To Consider?
In order to remove it, users need to right click on Skype from the System Tray and then eliminate it.
How To Remove Skype From Windows 10 Taskbar:
Read the steps mentioned below to eliminate Skype from Taskbar in Windows 10:
- On your Window 10 PC, login to your Skype account.
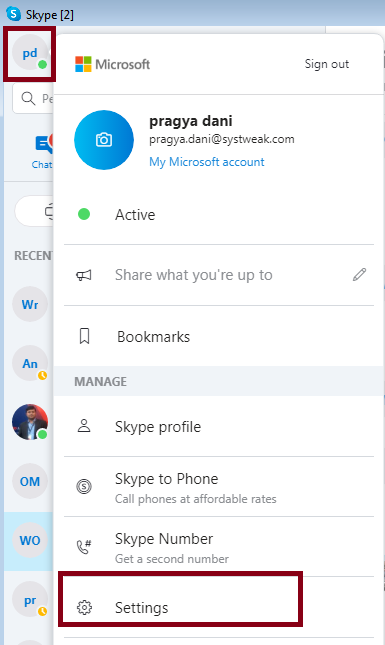
- Select your profile picture from the top-left corner of the main Skype screen.
- From the drop-down menu click on Settings.

- From the Settings window, click on General from the Left panel.
- Finally toggle on the option named on close, keep Skype running on.

This is how you can eliminate Skype from the System Tray when it is pinned to the taskbar.
Also Read: Skype VS WhatsApp: Who Will Win?
How To Eliminate Skype From the System Tray on Windows 10
Everyone has their valid reasons behind removing Skype from Windows 10 System Tray. If you too want to do the same, read the steps below to know how you can do it without quitting the program. As long as you have an internet connection you can easily eliminate Skype from the System Tray as well as get all the notifications and other Skype alerts.
For this, follow the steps below and remove Skype from taskbar in Windows 10:
- Login to your Skype account from the Browser.
- Look for the Tool menu and click on it.
- From the drop-down menu, click on Options.

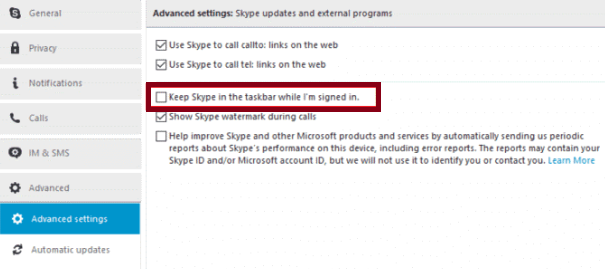
- Post this click on Advanced Setting.
- Uncheck the option that says “Keep Skype in the taskbar while I’m signed in”.

- To save the changes in settings, click on Save.
After you have performed the steps mentioned above, you will be able to eliminate Skype from the task-bar in Windows 10. You will see that though you have removed Skype from the task-bar, you will still be able to receive all the notification since the application runs in the background.
If you want to completely quit the application, simply right-click on the Skype icon from the System Tray and click on Quit.
Even the most loved tools can leave us frustrated. Skype is loved by a majority of people and everyone uses it to make audio and video calls. But getting continuous notification or just sitting in the System Tray when we want to quit the application is not what we expect from an application. If you too are a regular Skype user and want to get rid of the constant nagging, read the article and know how to quit Skype from the System Tray.
Also Read: Fix: Unable To Send Messages On Skype In Windows 10
Your Feedback’s is Valuable:
We value our readers. We keep a close look on our readers and their comments, so feel free to key your precious feedback in the comments section below. Also, we hope that the article was of help, in case you have anything you want us to add or improve upon do let us know.
For more such tech related articles, do subscribe to our newsletter and YouTube Channel and follow us on Social media platforms as well.
Thanks for reading.
Next Read: Jitsi Meet VS Skype – Which is the best Video Calling App


Leave a Reply