
Skype is one of the best Text and Video chat platforms for personal and professional use. You can connect to anyone using Skype online across the world on a Voice or Video call. All you need to go for a Skype download on your device and create a Microsoft Skype Account and go for a Skype login to connect the world. Once you are logged in, you should always look for Skype updates or upgrade to Skype latest version. Though you must be using Skype Account since long however there are still ways that you might not be aware of. There is always a scope of improvement in the experience using tips and tricks to do small tweaking and enhance the quality or do more. Here in this article, we are going to put some light on the most useful and unknown tricks.
Create a Skype Meeting Within Outlook
Use Microsoft Outlook to setup a Skype Meeting without wasting time on scheduling meetings on other tools. Chances of errors are higher on other tools. Someone might forget to join on time while others don’t have appropriate browser plugins installed or some other issue. Avoid all this hassle by simply using a Skype for Business account.
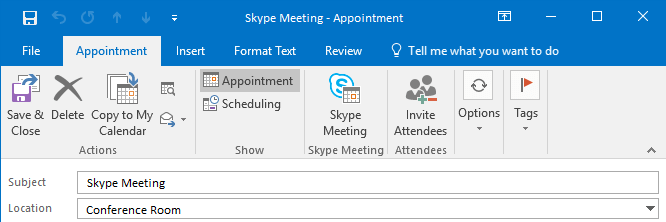
Step 1. While creating an appointment on Outlook, Go to ‘Skype Meeting’ on the Appointment tab.
Step 2. This will send an Email invitation with an embed link in the description. People can click on the link to join the meeting or setup a reminder to click and Join Meeting whenever it pops up.
Step 3. Skype for Business will automatically launch to join the meeting.
Note: If you are unable to see the ‘Skype Meeting’ option on your Outlook, Go to File menu à ‘Options’ à ‘Add-ins’. Go to ‘Manage’ dropdown à select ‘COM Add-ins’ à click on ‘Go’. Put a check in front of ‘Skype Meeting Add-in for Microsoft Office’ and click on ‘Ok’.
Know Few Skype Shortcuts
During a meeting or a call, if you know a few basic simple keyboard shortcuts, life becomes easy to manage or take control over the meeting.

| Accept an Incoming Invitation | Win + Shift + O |
| Decline an Incoming Invitation | Win + Esc |
| Mute/Unmute Audio | Win + F4 |
| Pause/Resume Video | Win + F5 |
| Put a Call on Hold | Ctrl + Shift + H |
| End a Call | Alt + Q |
| Stop Sharing Your Screen | Ctrl + Alt + S |
| Regain Control of a Shared Screen | Ctrl + Alt + Spacebar |
There are hundreds of keyboard shortcuts for Skype. We have listed a few basic shortcuts and rest can be accessed on Support.Microsoft.com.
Record A Meeting
There are people who get complete blank once the meeting is over or after the call ends. To overcome this, you can record all your Skype meetings. Skype latest version not only records a call, but also records call activity, audio, video, screen share, and instant messages. You can do the same by following these steps:
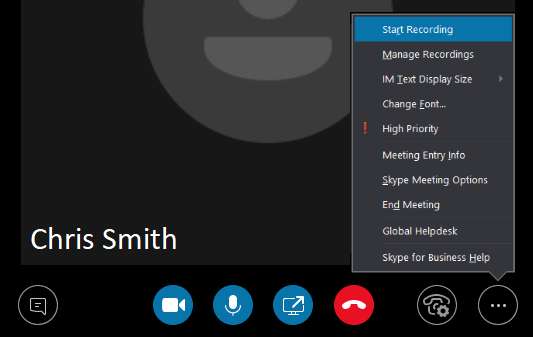
Step 1. When a Skype meeting or Conference is initiated, click on Meeting options (…) and then click on ‘Start Recording’.
Note: Everyone connected to the meeting will be notified that you’re recording the session. A red circle symbol will appear at the top of the call throughout the session. The meeting can be paused or stopped as per the need. As soon as the meeting finishes, the recording will end and will be automatically saved in MP4 format.
Where to Look for A Recorded Session?
To find the recorded session, open the main screen of Skype for Business and go to ‘Settings’ dropdown list. Click on ‘Tools’ -> ‘Recording Manager’. Here you can find metadata of your recordings, like file name, date and length. You can also browse the files on your PC and play the recordings or share it with someone.
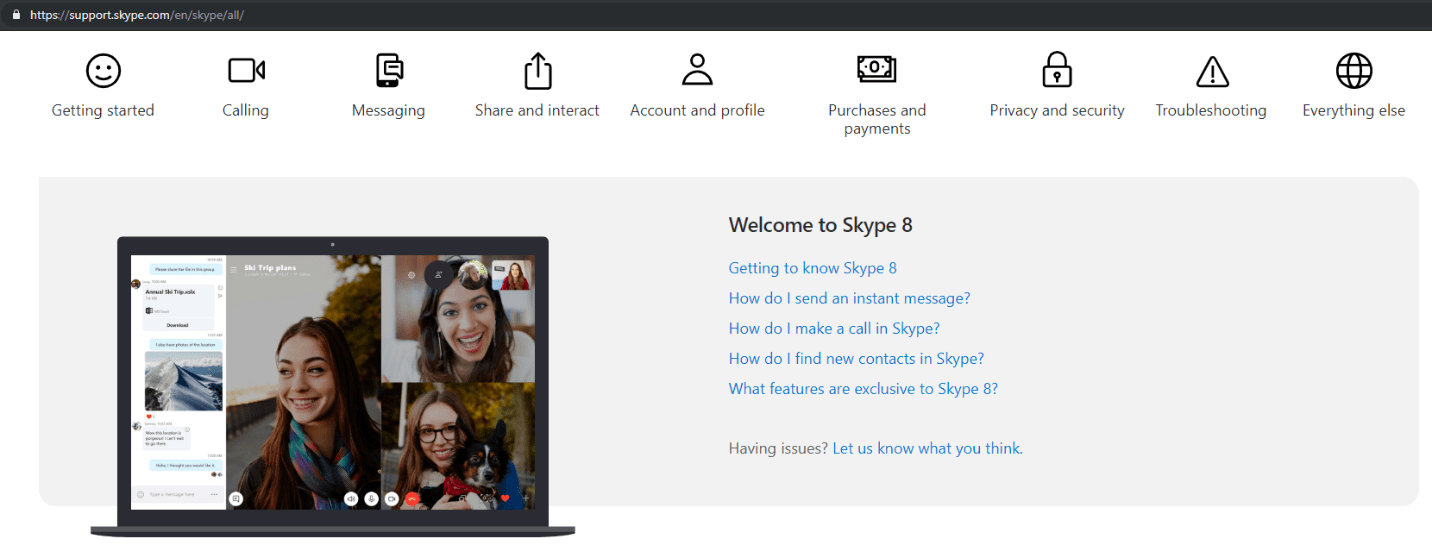
| Tip: For more categoricaly listed settings, Follow https://support.skype.com/en/skype/all/ |
Set Privacy Relationship for Contacts
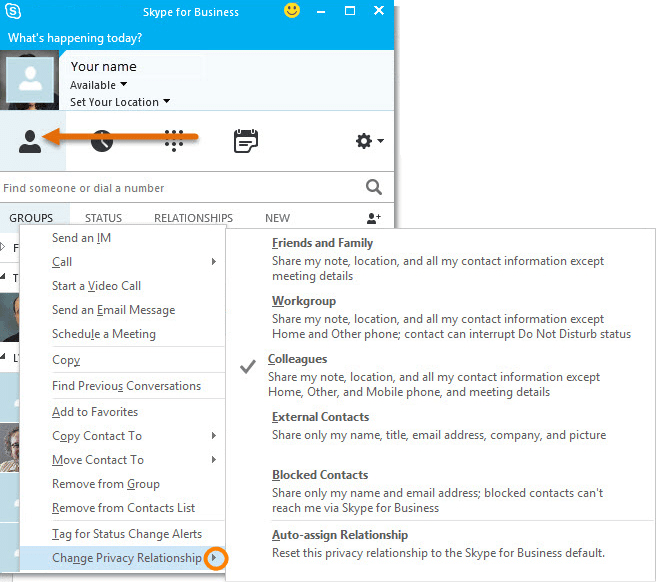
There are Five Relationship Levels by default in your Skype contact category. Every individual contact can be assigned within one of these categories. Each relationship level is assigned with different permissions. For example, Friends and Family can’t see your meeting details and Workgroup can interrupt your ‘Do Not Disturb’ status.
To modify a contact’s privacy relationship status, Right-click on their name and select ‘Change Privacy Relationship’. You can review the current category and change according to your preference. You can also select multiple contacts to change the relationship category but pressing Ctrl key and clicking on multiple contacts one by one. If you want to revert the changes of relationship categories, you may click on Auto-assign Relationship at the bottom.
Click here to know How To Unlock Skype Account If You Forget Skype Login Password
Start a Poll, Q&A, OR Whiteboard
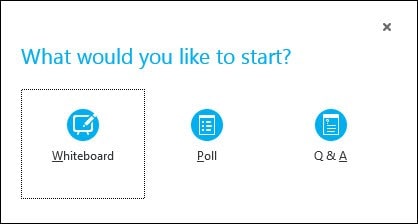
You can add more fun and creativity to your meetings by adding these small features to it. To add any of these, click on ‘Present Content Button’ à click on ‘More’, and then choose any of the above three options (Whiteboard, Poll, or Q&A). These options will be displayed on everyone’s screen once selected.
Selecting Whiteboard will open a white drawing area with tools to draw or highlight something just like MS Paint. The whiteboard will minimize if you switch to other presenting options, but the content will remain intact for further use.
If you go for a Poll option, it will open a window to vote out options. You can gather choices of other participants by using a Poll option. You can select ‘Poll Actions’ to adjust the settings, like hiding the votes from attendees, saving the results, or closing the poll.
If you go with Q&A, it will switch the standard chat window into a Question and Answer module. If any attendee asks a question, you’ll receive a notification to type a response and press Enter. This will display the question and answer to everyone in the meeting. You can also save the recorded Q&A session for further references.
Presenting a PowerPoint Presentation
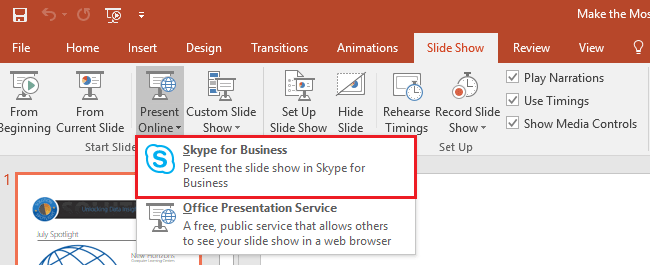
Whenever you want to share a PowerPoint Presentation, the integration with PowerPoint allows you to do so. Just open your presentation in PowerPoint à Click on ‘Slide Show’ tab and select ‘Present Online’ à ‘Skype for Business’. This will start sharing the presentation with a current meeting or you can initiate a new meeting with PowerPoint Presentation. You can do the with other Office applications. Simply navigate to ‘File’ à ‘Share’ à ‘Present Online’. Select ‘Skype for Business’ from the dropdown to start presenting any file.
There are hundreds of personal settings and ‘How To’ options within Skype. For more information, you may navigate to Support.Skype.com page and explore more tip and tricks on Skype.
Summing Up
If you use Skype as an alternative, then the information handy is enough however using Skype like a Pro takes a lot of time and energy. If you use Skype for Business then the above tips and tricks must be fruitful to you. Skype download is available for almost all communication devices and it’s recommended to proceed to Skype login and look for Skype updates. Skype latest version will surely provide you an enhanced experience and more options to use. You should always keep your Skype account safe and secured with more personalized options when you Skype online. If this article turned out to be helpful to you, Please like and share this with your colleagues.
For more such tips, tricks and tech related updates Tweak Library and if you are more into tech-related videos do watch and subscribe to our YouTube channel. You can also reach us on Facebook and Pinterest.
For any suggestions and queries, you may drop a comment and we shall revert ASAP.


Leave a Reply