There is nothing more frustrating than the malfunctioned keyboard of a laptop. Various users have complained on social forums that some of the keys on their laptop are not working. So if you are facing the same issues with your laptop keyboard then this article will help you out in permanently fixing this issue.
So without further ado let’s discuss how to fix the problem of laptop keys not working.
How to Fix Laptop Keys Not Working
Note:The solution that we have suggested will work for almost all the leading laptop brands like Dell, HP, Acer, Lenovo etc.
List of Contents
1. Restart Your Laptop
If some of your laptop keys are not working then it could be due to minor software glitch that can be fixed with just a restart of your laptop.
Click on the Windows Start button > click on the Power button and select Restart.
After the computer restarts, check whether the keyboard of your laptop is now working properly. In case the problem remains unresolved move toward to the next step.
Also Read: How to Fix Keyboard Shortcuts and Hotkeys Not Working in Windows 10
2. Power Reset Your Laptop
If the keys of your laptop are still not working after the simple restart of your laptop then it’s time to power reset your laptop by following the steps below.
- 1. Click on the Windows Start button > click on the Power button > Shut down to power off your computer.
- 2. If there are any attached peripherals to the laptop like usb drive, external mouse, monitor, then disconnect them all. If your laptop is running low on battery and you have attached a power cable, then remove that as well.
- 3. Now after removing the battery, press and hold the power button of your laptop for 15-20 seconds.
- 4. Install the battery again to your laptop, along with the power cable and press the power button to turn on your laptop.
Once your laptop starts check whether the laptop keys are now working properly. If the keys are working fine then you do not need to proceed with further steps. But if the problem persists then check out for the next step.
3. Disable Filter Keys
If the keys of your laptop are slow in responding or there’s a lag in the keyboard, then it does not always mean that the keyboard of your laptop is faulty. To fix this all you need to do is disable the Filter keys.
Note: Filter keys when enabled, ignore the repeated keystrokes to make the keyboard typing easy mainly for the people with hand tremors. But if you have no such problem and your typing is firm and fast then enabling the filter keys will slow down the typing speed.
To disable filter keys follow the steps below:
1. Click on the Windows Start button and select the gear icon to open Windows Settings.
2. On the Windows Settings screen click on the Ease of Access option.
3. Now on the next screen click on Keyboard from the left pane. On the right pane toggle the button below Filter Keys to OFF position.
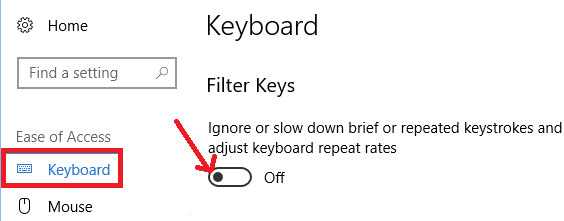
4. Now restart your computer and check whether your laptop keyboard is back to normal.
4. Reinstall your Keyboard Driver
The problem of laptop keys not working properly can be due to a faulty or corrupt keyboard driver. Therefore to fix this problem our next step is reinstalling the Keyboard drivers by following the steps below:
1. Open Run window by pressing Windows + R keys on the keyboard at the same time.
2. Now on the box of Run Command type devmgmt.msc and press the Enter key to open Device Manager. Alternatively you can click on the Windows Start button and on the Windows search type Device Manager. Click on the top available result to open Device Manager.
Note: If some of the keys that are not working on your Laptop includes the one needed to open Device Manager, then you can enable On Screen Keyboard.
3. On the Device manager screen click on the arrow before Keyboard to expand it.
4. Now right click on your keyboard and from the available drop down menu select Uninstall device option.
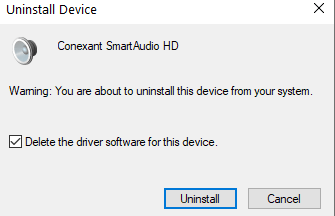
5. On the dialogue box that prompts click on the Uninstall button to uninstall keyboard drivers.
6. Now restart your computer.
7. After the computer restarts Windows will automatically look for the drivers and reinstall them.
8. You can also manually open Device Manager, right click on the Action at the top and select the option, Scan for hardware changes.
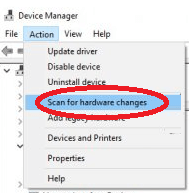
Now once Windows is finished reinstalling the Keyboard drivers, check whether all the keys of your Laptop keyboard are functioning correctly.
5. Update your Keyboard Driver
An outdated or corrupt keyboard driver can be the reason for laptop keys not working properly. However, updating the keyboard driver can fix this problem. You can update your keyboard driver to the latest version either by manually checking it at the manufacturer site or automatically updating it through Device Manager or using a Driver Updater tool.
(a) Update your driver using Device Manager
It is one of the automatic methods to update your device drivers for free, however the only problem with this approach is that it rarely provides you with the latest drivers. To update the outdated drivers using Device Manager follow the steps below:
1. Open Run window by pressing Windows + R keys on the keyboard at the same time.
2. Now type devmgmt.msc on the box of Run Command and press the Enter key to open Device Manager.
3. On the Device manager screen click on the arrow before Keyboard to expand it.
4. Now right click on your keyboard and select Update driver option from the drop down menu.
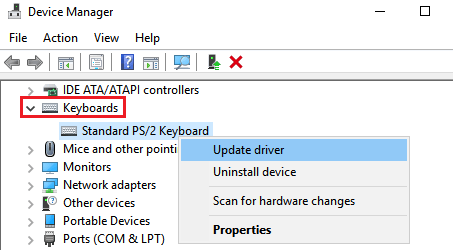
5. On the next screen from the available set up options select the first one that reads, Automatically search for the options of updated driver software.
6. Now the Windows will search your computer along with the Internet for the latest available drivers for your device. And once located follow all the given instruction to install the latest drivers on your computer.
7. Although this process of getting the driver updates is straightforward, however as discussed earlier it usually does not provide you with the latest updates.
Now to get the latest driver on your computer you either need to manually check the manufacturer website (that needs a lot of research and time) or getting help with a dedicated driver updater tool.
Advanced Driver Updater is one such driver updater tool from Systweak that automatically scans your entire computer for all the outdated drivers and then updates them with a single click. This amazing tool is there in the market for more than a decade and trusted by millions of users from every part of the world.
You can download Advanced Driver Updater from here.
Read Full Review of Advanced Driver Updater
After downloading the program you can easily do it by following the onscreen instructions. Once the installation process completes click on the Start Scan Now button to start the scan so that the product can find all the outdated drivers of your computer. The scan engine of the product is so advanced and fast that it will take a few minutes for the scan to complete. In my case the scan took less than 2 minutes and I can’t believe my eyes.
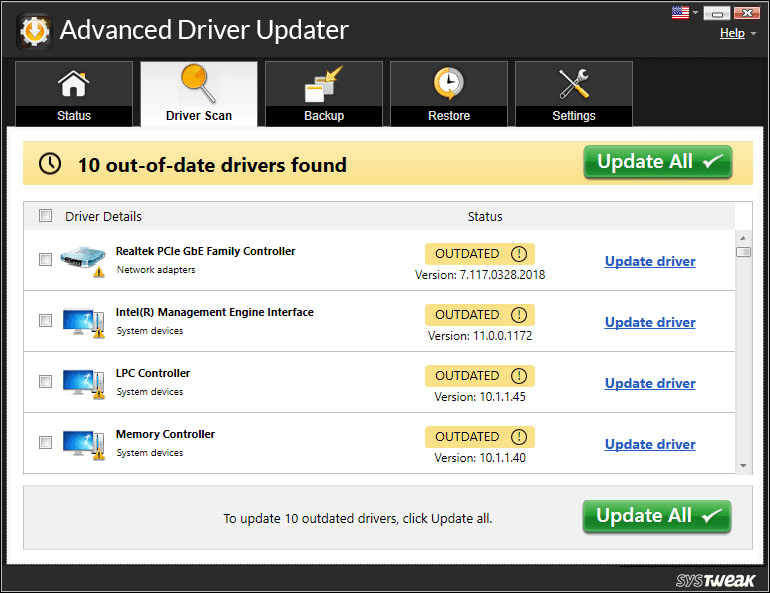
Now to update all these outdated drivers all you need to is click on the Update All button. And as soon as you click that Update All button the product starts downloading the latest drivers on your computer.
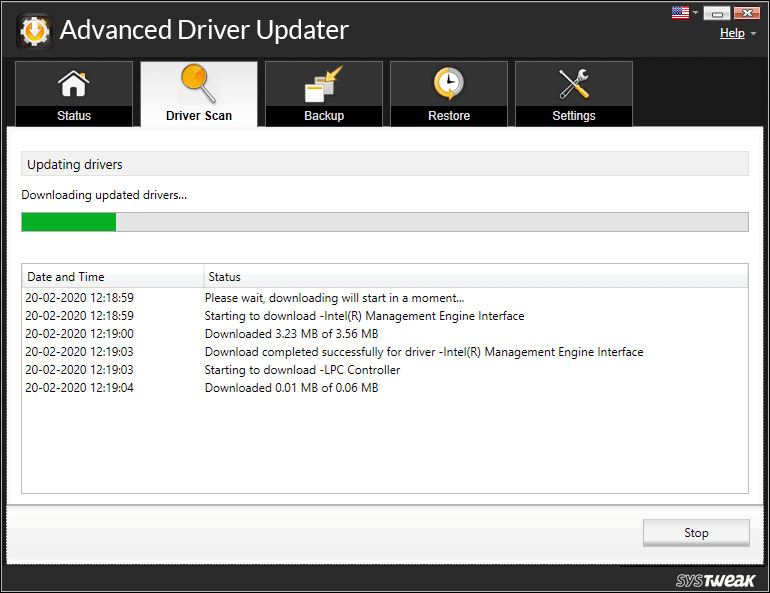
Note: The product also creates a complete backup of the old drivers before installing the new ones. This helps you to revert to the old driver in the rarest of the rare case where the newly installed driver starts misbehaving.
After installing all the latest drivers just restart your PC to check whether the keys of your laptop are working properly.
Read Also: How To Fix Mouse Cursor Disappears On Windows 10
We are quite sure that if the keys of your laptop are not working due to software related issues then it will be resolved by trying the above steps. But if it is hardware related issues then you have to fix it manually.
(a) Clean Your Laptop Keyboard With a Brush/Compressed Air
If there’s lots of dust particles on the keyboard then this could be the reason for some keys not working on your laptop. First power off your laptop and try with a clean cotton cloth to remove all the dust from the keyboard of your laptop. Now if you still find the dust in between the keys then use a soft, dry brush and gently remove the dust. Make sure to clean all the dust smoothly so that no dust particles are left behind. You can also use compressed air to remove the dust from your keyboard. Once you feel that you cleaned all the dust, power on your laptop and check whether the keys are functioning back as normal.
(b) Make Sure Keys are Not Physically Damaged
Beside cleaning the dust from the keyboard also make sure that the laptop keys that are not working properly are not damaged. Because if they are physically damaged there nothing much you can do apart from carrying it to the authorized service center.
Conclusion:
Here come to an end with all the troubleshooting steps to fix the problem of laptop keys not working properly. And we are quite confident that now you can use your laptop keyboard as before. But in case the problem persists then write us in the below comment section, we will try to look out for the resolution. Also do not forget to mention your feedback and suggestions in the comment box below.


Mansi Vijay
I've tried all the methods to make my keyboard key work. Unfortunately, one key is still not working. What to do? Is remapping keys the ultimate resort? Please Help?