
Sometimes users face very common issues in their Mac machine of trackpad not working. This is a very common issue and can be resolved by taking certain measures and by performing some diagnostic tests. In this article, we will see why the trackpad stops working and what are the best ways to resolve this issue.
Reasons for Mac Trackpad not working
- The untidy surface of the trackpad restricts detecting fingertips correctly
- A troubling software can be a reason
- An unknown change in a setting can cause the trackpad unresponsive
- Hardware damage can be a reason for the unresponsive trackpad
You can easily check the reason for an unresponsive trackpad by identifying the nature of the problem, that is it has some software problem or a hardware issue. If the trackpad has some software issue, then it can be corrected with a diagnostic test but if there is a hardware issue, then either you can get it replaced, or you can find a solution that can resolve it at home only.
Also Read: How to Fix The Mac Mouse Frozen Issue
How to Fix Mac Trackpad Not Working 2021:
There are various ways to fix an unresponsive trackpad and we will be discussing it all here. If all the solutions fail, then you can seek the help of Apple support.
1. Clean trackpad and restart MacBook
Dust particles on the trackpad can make it unresponsive therefore clean the trackpad with a clean piece of cloth and then restart the computer. It is the thumb rule of computer-related problems to turn it off instantly and then again turn it on after a couple of minutes. And most of the time, this hack works.
Also Read: How to Fix MacBook Keyboard Issues?
2. Check system preferences
Check system preferences to ensure everything is set up as default or as per how you selected it.
Follow the steps:-
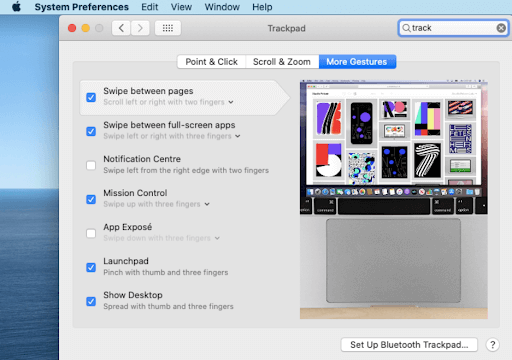
- Open System Preferences
- Click Trackpad
- Check settings of all three tabs:- Point & Click, Scroll & Zoom, More Gestures. If they are default everything is Ok and if you have made some changes to it, then make sure that they are not causing any issue.
3. Change haptic setting if the trackpad is not clicking
Sometimes the trackpad is responsive but it does not click. You can change click settings to firm which will give you greater haptic feedback.
4. Disable force click
Force Click is a feature that allows users to press firmly on the trackpad to invoke features like Quick Look and Look Up and use variable speed media controls.
Note:- Try disabling force click because as per many users it creates a problem.
5. Check For updates
Sometimes software issues are because of the outdated version of the OS running on the computer. This can be easily removed by downloading and installing the latest OS. If you have not installed the latest OS on your Mac, then install it and see if the issue is resolved or not.
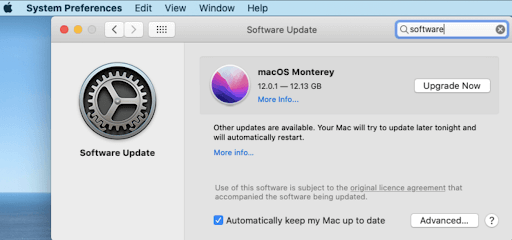
To download and install the latest OS Open System Preferences> Click Software Update.
If there will be an update available, then click on the Update Now button to download and install.
Note:- If you are downloading and installing a new OS make sure that the battery is full on the Mac.
6. Reset Trackpad
If updating OS also is of no use in solving unresponsiveness, then you can reset the trackpad by manually removing its property files which are corrupted.
You can do it by navigating to:-
- Go> Go to
- Type /Library/Preferences and hit enter
- Look for file named
apple.AppleMultitouchTrackpad.plistandcom.apple.preference.track.plistand delete them (If present) - After the files are removed from the Mac, restart the computer to restore the files.

7. Reset SMC
System management controller (SMC) is responsible for all low-level settings like thermal management, power management, ambient light sensors, battery status, keyboard, trackpad. Resetting SMC can resolve the unresponsive trackpad issue.
Note:- Users with Mac- M1 chip do not follow the process because M1 laptops do not have SMC
Follow the steps if you have MacBook or MacBook Pro with T2 Security Chip:-
- Press and hold Control+Origin+Shift keys and simultaneously hold the power button to shut down the laptop for 7 seconds.
- Wait for a couple of minutes and then start the laptop.
If you do not have a MacBook with T2 Security Chip but is equipped with a non-removable battery then follow the steps:-
- Press and hold Control+Origin+Shift keys and simultaneously hold the power button to shut down the laptop for 10 seconds.
- Wait for a couple of minutes and then start the laptop
If you have a MacBook older model with a non-removable battery, then follow the process:-
- Shutdown Mac and remove the battery
- Press and hold the power button for 5 seconds
- Again insert the battery and start the laptop.
8. Reset NVRAM or PRAM
Nonvolatile random-across memory (NVRAM) or Parameter RAM (PRAM) are both store settings. You can make changes in settings by resetting them.
To initiate the process follow the steps:-
- Shut Down Mac
- Turn on the laptop and press and hold Option+Command+p+r keys
- Release the keys after 20 seconds when you hear the startup sound
Note:- On MacBook models with T2 security chip release all keys after you see Apple insignia.
Note:-Do not follow this step on MacBook with M1 chip because in M1 chip NVRAM automatically detects the problem and resolves it.
9. Run Apple Diagnostics

Apple Diagnostic is a tool that checks computers for any hardware issues.
To initiate the process on the Apple M1 machine follow the steps:-
- Shut down your MacBook
- Turn on Mac and press and hold the power button
- Once the startup options windows visible release the power button
- Press Command+D
To initiate the process on the Apple-Intel machine follow the steps:-
- Shut down your Mac
- Turn on Mac and press and hold the D key
- Release the key when you see a progress bar
After the diagnostic test is complete you will get results and if the trackpad is found not working then it will be resolved.
10. Get Apple Support
If none of the above methods work then it the time to visit Apple’s authorized service center. Although all the methods we have discussed above will surely fix the issue for you but in some cases, none of the above will work for you and that is the time you must visit Apple’s authorized service center.
All the above methods are tried and tested and users having the same issue are resolved by performing these steps. Therefore before visiting Apple’s authorized service center try these methods and let us know about your experience in the comment box below.

Leave a Reply