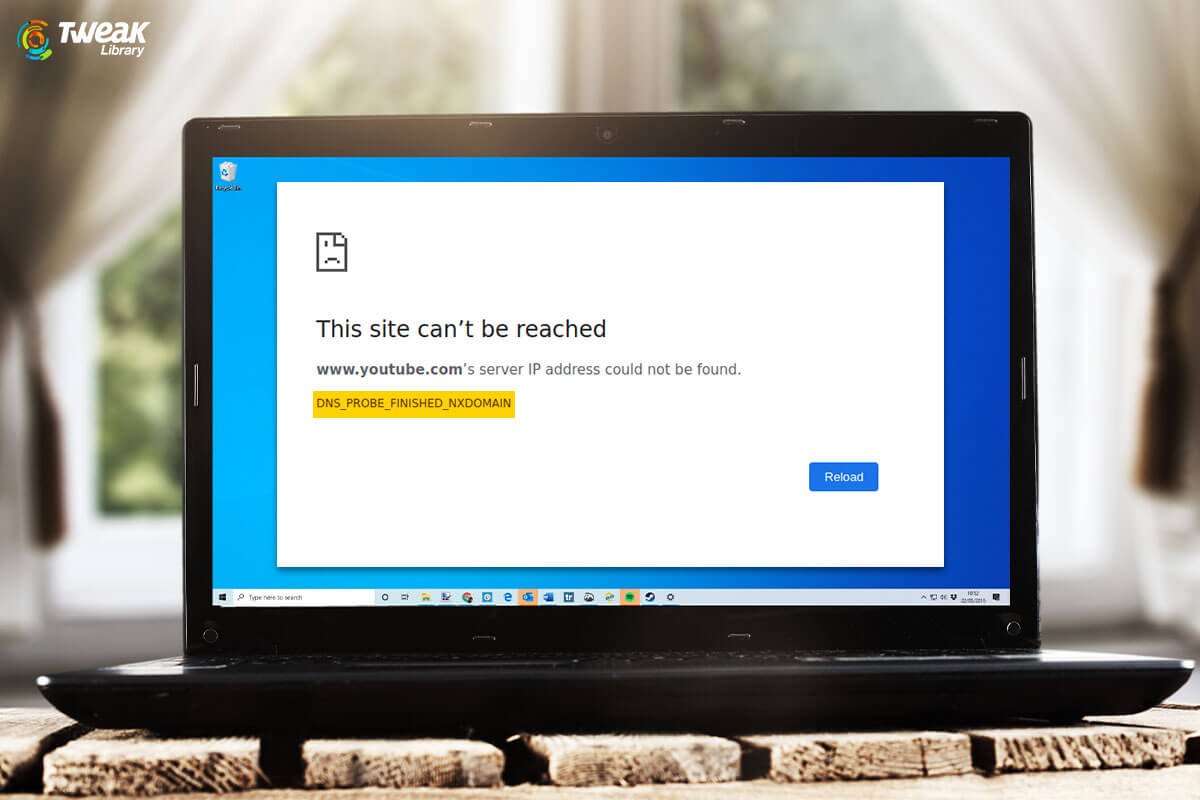
Are you getting an error DNS_PROBE_FINISHED_BAD_CONFIG while connecting to the internet? You have restarted your computer, disconnected and reconnected to the network but the error message still persists? Don’t worry as you have landed at the right place and we are here to help you.
In this article we have summed up various fixes that will help you to permanently fix this error and you access the internet as before that is without any error message.
Also Read: How to Fix ERR_EMPTY_RESPONSE Error on Google Chrome
Causes for DNS_PROBE_FINISHED_BAD_CONFIG Error
Basically DNS_PROBE_FINISHED_BAD_CONFIG error occurs when your network connection is facing tough times and your DNS server is not responding. Also some users think it is a Chrome browser specific problem but it’s not true. Users using other browsers also faced this error. Moreover along with PC users this error is faced by users on their Android devices. Therefore we have provided you the steps below that will help you not fix this problem on your computer but also on an android device.
Fix 1: Restart the Router
It is a thumb rule then if you are getting any network related problems then the very first step you need to try is restart your router. Also, it is one of the simplest process in which all you need to do is power off your router > unplug it from power source > wait for 60 seconds and then plug it back to power source and turn it on. This will reset the IP address and probably fix the error, DNS_PROBE_FINISHED_BAD_CONFIG.
Fix 2: Release And Renew Your IP Address
Have you ever noticed that the websites you have visited earlier loads faster as compared to the websites you are accessing for the first time? Do you know why? It is because the Windows operating system stores the DNS data of the website in its cache after your first visit. This helps you to access the website faster in future. Although there is nothing wrong with this approach as all it does is make the accessibility faster. But if in case the website is moved to some other location resulting in the change of its IP address, then you may receive the DNS errors like DNS_PROBE_FINISHED_BAD_CONFIG.
However you can easily fix it first by flushing the DNS cache and then renewing the IP address.
To do so follow the steps given below:
1. Open Run command box by pressing Windows logo Key + R Key at the same time.
2. Now type cmd in the box and hit the Enter key. This will open the Command Prompt window. Alternatively you can also click on the Windows button and in the search box type command prompt and click on the Command Prompt from the top results.
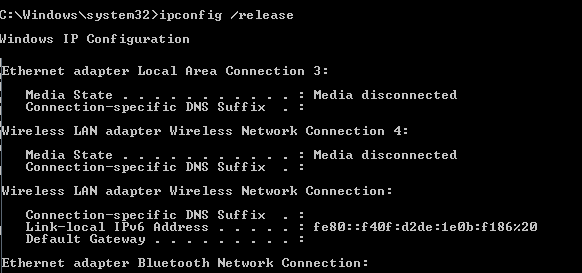
3. In the Command Prompt window type the following command ipconfig /release and hit the Enter key on your keyboard. Your active connection will automatically disconnect and reconnect after a few seconds.
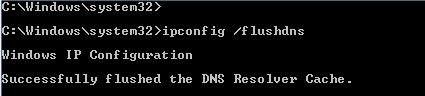
4. Now type ipconfig /flushdns and again press the Enter key on your keyboard. A message will prompt confirming DNS is successfully flushed.
5. Next type ipconfig /renew command and press the Enter key again. This command will ask for a new IP address from the DHCP server.
6. Now try to open the website again to check whether the problem is resolved or you are still getting an error message.
Fix 3: Change Settings for DNS Server
If the above method of releasing and renewing the IP address has worked for you then you do not need to change your DNSserver settings. But if you’re still getting the error message then change DNS server.
Usually when a user tries connecting to the Internet the Internet Service Provider also known as ISP automatically assigns a DNS server. But if the assigned DNS server is having some problems or issues then you are likely to get a DNS_PROBE_FINISHED_BAD_CONFIG error.
But fortunately you always have an option to change the DNS server to an available one.
Note: Although there are various available free DNS servers, we strictly recommend using Google Public DNS server for safety as well as stability.
To change DNS server on your computer follow the steps given below:
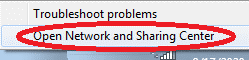
1. Right-click on the network icon that is at the bottom right corner of the screen in the taskbar. From the available options click on the Open Network and Sharing Center option to open the Network and Sharing Center screen.
2. You can also open the Network and Sharing Center screen from Windows Settings. Open Windows Settings > Network & Internet. Now click Status from the left pane, and from the right pane select Network and Sharing Center option.

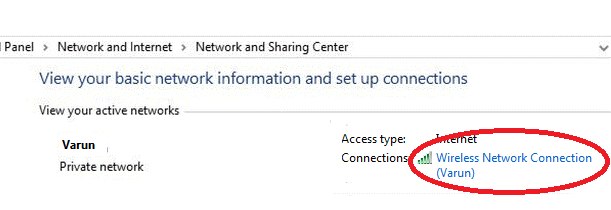
3. In the Network and Sharing Center screen, click on the network to which you are presently connected. You can find it under View your active networks.
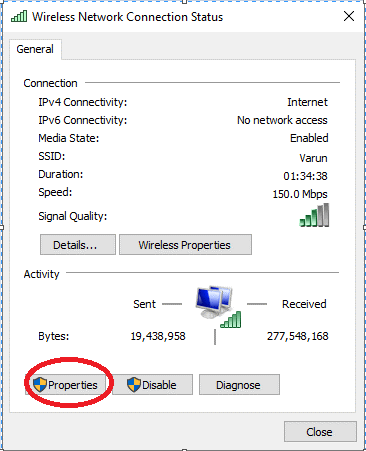
4. On the Wireless Network Connection Status screen click on the Properties button.
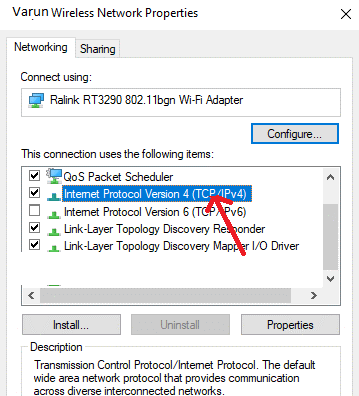
5. Next double click on Internet Protocol Version 4.
6. On the Internet Protocol Version 4(TCP/IPv4) properties window make sure that the General tab is selected. Now select, Use the following DNS server address and enter the values 8.8.8.8 in Preferred DNS server field and 8.8.4.4 in Alternate DNS server field.
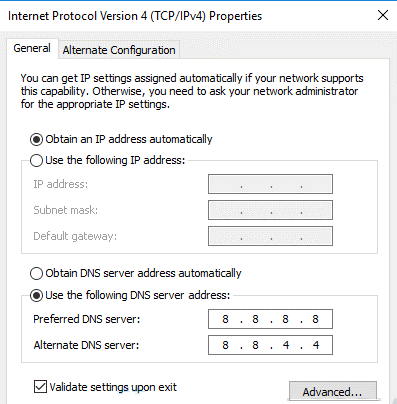
7. Now at the bottom, check the option, Validate settings upon exit and click OK
If this doesn’t works then you can also use the Open DNS:
Preferred DNS server: 208.67.222.222
Alternate DNS server: 208.67.220.220
Now open the website to check whether it is correctly loading or you are still getting the error message.
Clear Browsing History and Cache
Whether you visit shopping websites, banking websites, videos websites or any other websites, your browsing data along with cache will be created. Although this helps in speeding up the loading process of websites for your future visits however excessive piling of that data may lead to errors like DNS_PROBE_FINISHED_BAD_CONFIG. So clearing your cache and browser data may help you in resolving this error.
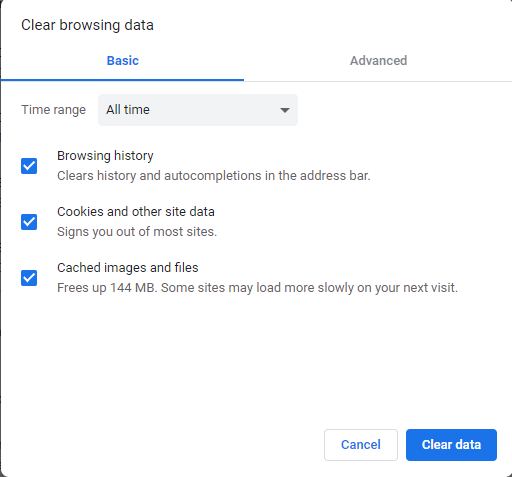
To clear Cache on Chrome follow the steps below:
1. Launch Chrome browser and click on the menu icon at the top right corner of the screen.
2. From the drop-down menu select Settings.
3. After selecting the Privacy and security option from the left pane, click on Clear browsing data in the right pane.
4. Now on the Clear browsing data box select the time range as All time and click on the Clear data button.
To clear Cache on Firefox follow the steps below:
1. Open Firefox browser and click on the Menu button at the top right corner.
2. From the drop down menu select Options.
3. Now select Privacy & Security from the left panel. In the scroll down until you find Cookies and Site Data. Once located click on the Clear Data button.
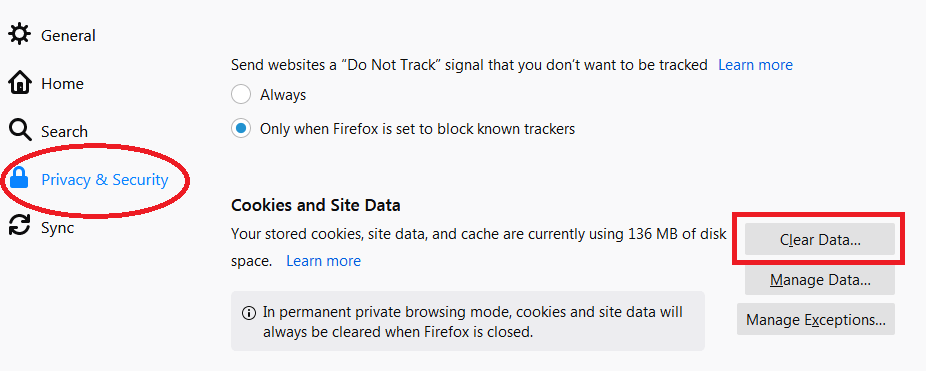
4. On the dialog box that prompts, check-mark Cached Web Content and click on Clear.

5. To clear cache and browsing data on Safari browser read our article Clear Cache on Safari & Chrome to Make it Run More Efficiently!
Now after clearing the browser cache try reloading the website to check whether the error you were getting is fixed or not.
Update Outdated or Corrupt Network Drivers
If you haven’t updated your network drivers from past many years then there is a good chance that the error DNS_PROBE_FINISHED_BAD_CONFIG is caused due to an outdated driver. Few years back updating any driver of your computer is an uphill task that can only be done by a trained professional. But thanks to the technology that has made updating the driver so easy that a novice user can do it within no time. How? The answer is simple, with a driver updater tool that first scans your computer for all the outdated drivers and then provides the latest and compatible drivers that you can install with a single click.
Although there are various available driver updater tools in the market however our recommendation is Systweak Advanced Driver Updater that has a blazing fast scan engine and huge database of compatible and updated drivers.
To get started download Advanced Driver Updater from here

Read the Full Review of Advanced Driver Updater
After downloading the product just install it on your computer like you install any other software on your computer. Once you have installed the product all you need to do is click on the Start Scan Now button and the product will start looking for obsolete drivers in your computer.
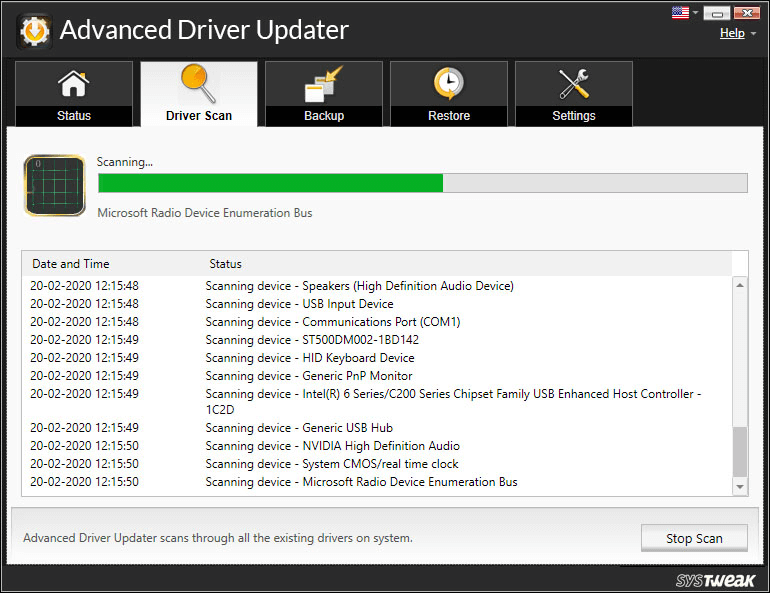
Believe me it will not take more than a couple of minutes. Once the scan is finished, the product will list all the outdated drivers. And to fix those outdated drivers all you need to do is click on the Update All button.
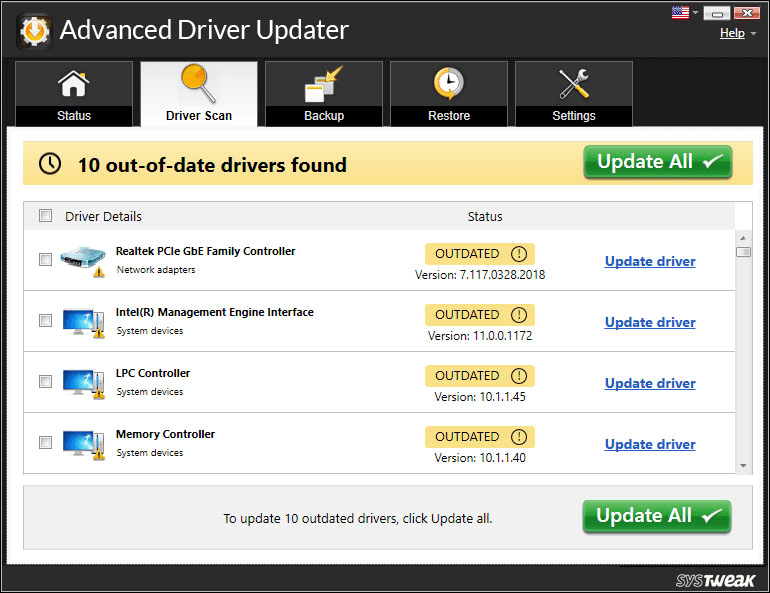
Isn’t it easy. It’s just like getting an updated driver with a mere click.
Now if the error is due to an obsolete network driver then after updating the driver with Advanced Driver Updater it will fix the error.
Bonus Tip: Fix DNS_PROBE_FINISHED_BAD_CONFIG Error on Android
The error DNS_PROBE_FINISHED_BAD_CONFIG Error is not limited to computers as many users have reported that error on Android devices as well. However, this can be easily fixed by changing the DNS settings. To do so follow the steps below:
1. Open Settings on your Android device and tap on Network & Internet > Wi-Fi.
2. Tap on the Wi-Fi network you are connected to.
3. Now on the Network details page tap on the pencil icon that is at the top right corner.
4. Tap on Advanced options on the box that appears.
5. Next tap on the IP settings and select Static.
6. Now scroll and replace the default values with 8.8.8.8 and 8.8.4.4 in DNS 1 and DNS 2 fields respectively.
7. Tap on the Save button to save the settings.
8. Now once you have replaced the default DNS with a new DNS you can easily browse the web without any error message.
Also Read: Android Phone Not Connecting To Wi-Fi? Here’s How To Fix.
Wrapping Up
Although the DNS_PROBE_FINISHED_BAD_CONFIG error is quite annoying, we hope that the above listed steps have helped you in fixing this problem. Do let us know in the comment box below which steps have worked for you. Also if you have some other problem on which you wish to need the guidance then let us know in the comments below? We will try to write a troubleshooting article on that.


Leave a Reply