SSDs are gaining immense popularity for being fast and stable. An SSD is not a cheap investment especially if you put it against an HDD. And, despite being a strong performer, an SSD is far from being impeccable, and on and off users do come across issues. There have been instances where users tried to install an SSD but despite everything, their SSD didn’t show up. For instance, a user recently reported that –
He tried to connect a Samsung SSD to his laptop but even after proper setup, he was unable to see the same next to other drives under This PC.
Quite a similar scenario has been reported by several other users where they even didn’t find the SSD in disk management as well. So, if that’s you and the SSD is not showing up either in your Disk Management or File Explorer, before you question your investment, how about giving a few workouts a fair chance?
Fixes- SSD Not Showing Up in Windows 10/11
List of Contents
Verify That Your SSD Is Connected Properly
Here we will check if the SSD is detected by your BIOS. In case it is listed there, you may move on with some other step. But, in this case, your SSD is not showing up in BIOS chances are you have faulty hardware or you might need to configure SATA controller settings. So, let’s check if the SSD is properly connected to the BIOS. For this first, open the BIOS of your computer or laptop. Different manufacturers have different ways of opening the BIOS.
For instance, in HP laptops, you need to turn off the computer and wait for 5 minutes. Then, you need to turn on your computer and immediately press the esc key until you see the Startup Menu., To enter the BIOS Setup, you have to press the F10 key. This is just an example, please look up the appropriate way of entering the BIOS setup on your laptop.
Once you are in the BIOS menu, head to the Boot menu and check if your SSD is listed there. If it is move on to the next step.
Properly Format Your SSD Drive
In case it is a new SSD that is not being recognized either by your File Explorer or Disk Manager, you may want to check if it is properly formatted or not. For this –
1. Press Windows + R to open the Run dialog box
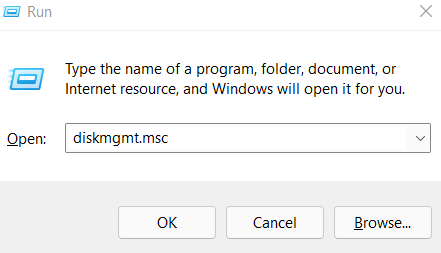
2. Type devmgmt.msc
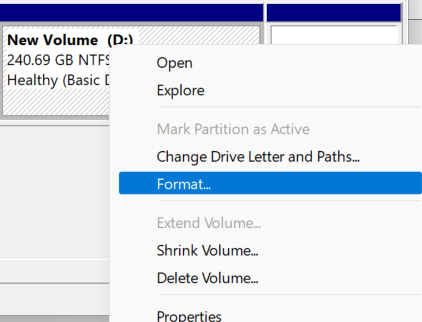
3. Select your SSD and then select Format
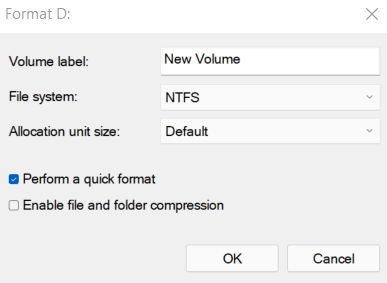
4. Format the drive in NTFS file format
5. Eject the drive and then replug the drive back into your computer
Reconfigure SSD Settings
Before we move ahead with this step, we’d urge you to take technical assistance before performing any steps related to BIOS. in case your BIOS does not recognize your SSD, you can try and change the SATA controller mode. For this –
1. Again, enter the BIOS setup depending on your manufacturer
2. Head to Storage Options > Serial ATA > SATA Configuration
3. Select IDE Compatibility Mode
4. Save changes
5. Restart your PC
Update Storage Controller Drivers
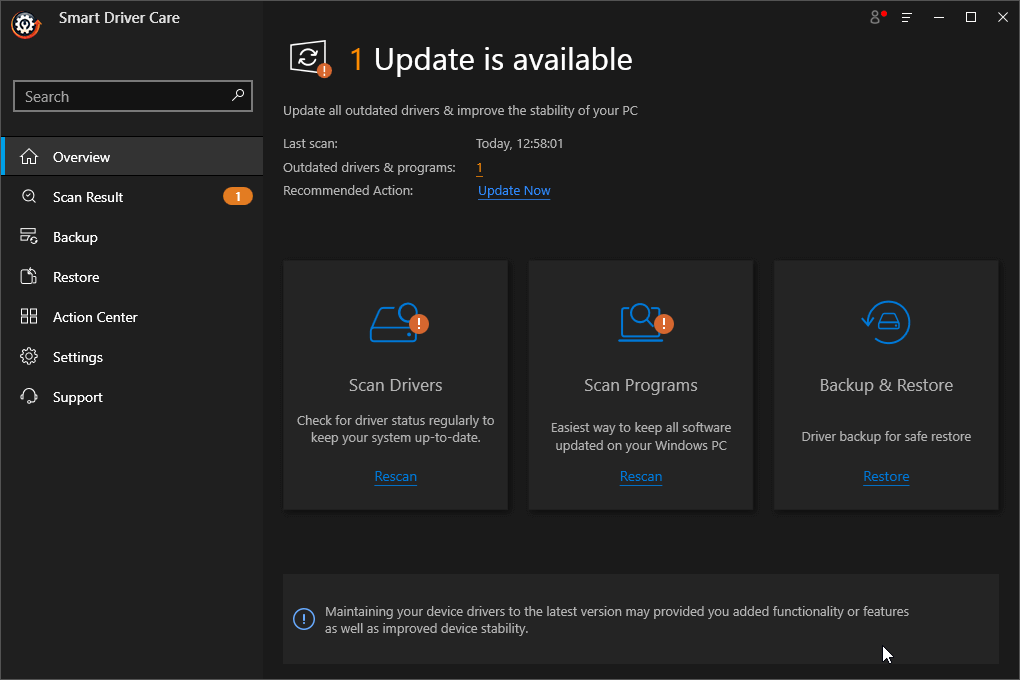
Obsolete drivers, in any case, are culprits when it comes to device malfunctions. And, with respect to the issue in hand i.e. SSD drive not showing up, the villain could be outdated storage controller drivers. You can either update them manually using methods mentioned in this post or you can take a faster, more effective, and more foolproof way of updating drivers. Wondering what that method is? You can instead bring into force a driver updater tool like Smart Driver Care. It is capable of immediately bringing an outdated driver to your notice and then you can update your driver in no time at all. Apart from that, Smart Driver Care offers you a foolproof way of updating drivers because –
- It lets you take a backup of your existing drivers which you can later restore if an issue occurs with the updated driver
- You can schedule driver scans as per your needs. For instance, you can schedule a driver scan out of your working hours i.e. when your laptop is idle
- Exclude drivers you don’t want to include in the scan
How Does Smart Driver Care Work?
Let’s give you a small glimpse of how this utility works –
1. Download, run and install Smart Driver Care

2. Click on the Scan button from the right-hand side
3. If you have an outdated Storage Controller Driver, you will be able to see it on the right-hand side
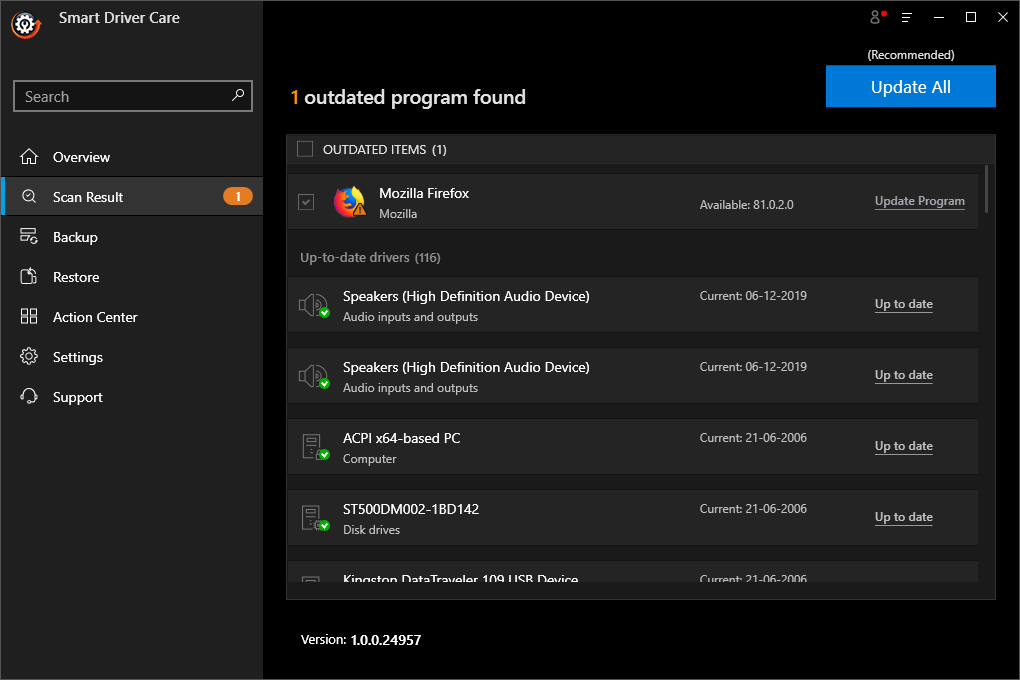
4. Click on the Update Program button and sit back
5. In a short while, the driver will be updated
6. With the driver updated, you should be able to see your SSD again.
Manually Assign A Drive Letter To Your SSD
If your SSD is not showing up in disk management, quite possibly it is conflicting with another drive or is missing a drive letter. This issue can be fixed with utmost ease by manually assigning your SSD a new driver letter. Here are the steps for the same –
1. Press Windows + R to open the Run dialog box

2. Type devmgmt.msc
3. Right-click on the SSD partition and choose Change Drive Letter and Paths
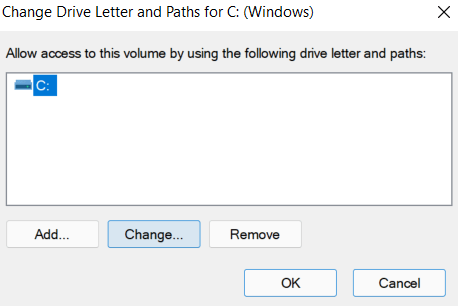
4. Click on Change and select a drive letter
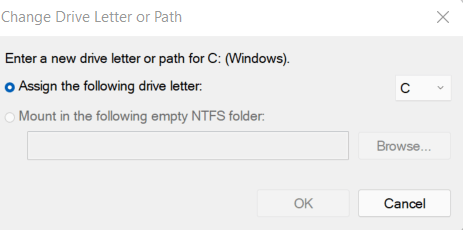
5. Click on OK
Initialize The SSD
So your new SSD is not showing up in File Explorer nor it is not detected in disk management. There are chances that it is uninitialized. An uninitialized SSD could also run you into disk unknown not initialized error as well. To initialize your SSD –
1. Again open Disk Management by pressing Windows + R key and then typing devmgmt.msc

2. Right-click on your SSD and then click Initialize Disk
3. Choose your SSD and select partition style
4. Click on OK
5. Again return to Disk Management, right-click on your SSD volume and select New Simple Volume
6. Follow the instructions that appear on your screen and assign a drive letter
7. Restart your computer
8. Check if your SSD is now showing up or not.
Did We Resolve Your Issue?
SSD not showing up after installation can be really annoying. No matter what your intent is – be it being able to run apps and games faster or keeping a laptop cooler if you aren’t able to see your SSD, it defeats the purpose of having one, isn’t one. We hope that the above workarounds have been able to resolve the issue. And, if you have, do share in the comments which of the above methods helped you fix the issue. For more such updates, keep reading Tweak Library.


Leave a Reply