
Not everyone is proficient in dealing with a lot of emails at a time. Those who use Microsoft Outlook got a different level of skill set to manage their emails, meetings, reminders, tasks, and a lot more with proficiency without failing. They can’t compromise on their deadlines and deliverables.
Those who are not using Microsoft Outlook, are seriously struggling in dealing with bulk emails. Here in this article, you are going to explore one of the quick tips to deal with Outlook group emails. Right from how to create a group in Outlook to manage the Outlook distribution list, everything will be simplified in the next few minutes.
How to Create a Group in Outlook
Creating a group or creating a distribution list is one and the same thing. There are different ways to reach the ‘Create Group’ option.
Step 1. Open Microsoft Outlook on your computer.
Step 2. On the ‘Home’ menu, click on the ‘New Items’ under the New section.
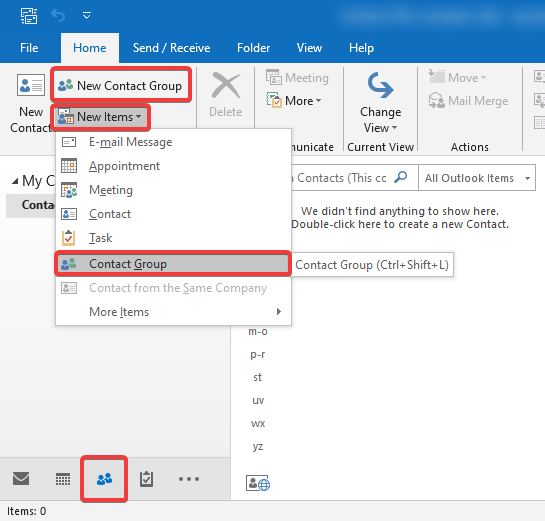
Step 3. Click on ‘More Items’ from the drop-down list and click on the ‘Contact Group’ option. You can also click on the ‘People’ option in the navigation panel at the bottom left, it will take you to more options and you will find the ‘New Contact Group’ option under the menu ribbon.
Step 4. A new window will open. Give a name to your contact group on the top.
Step 5. Click on the ‘Add Members’ button on the ribbon.

Step 6. You have options to choose contacts from your ‘Outlook Contacts’, from the ‘Address Book’, or add a new email contact. You can also copy and paste contacts from a sent or forwarded email in the ‘Members’ section at the bottom.
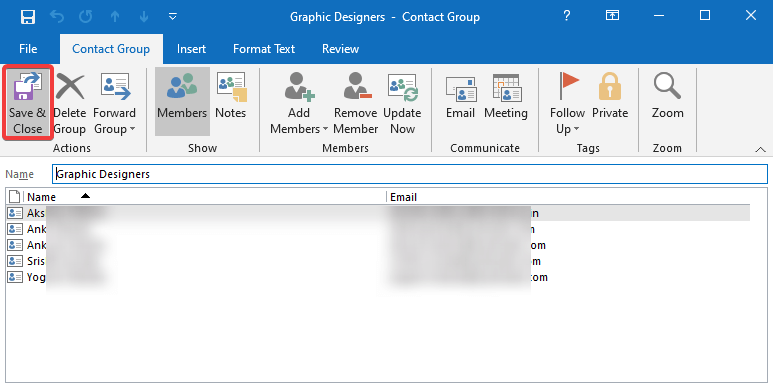
Step 7. Once you are done adding all the required contacts in your distribution list, you can click on the ‘Save & Close’ button on the top left corner of the ribbon.
Step 8. Now create a test email and type in the name of the contact group and press enter. It will automatically add all those contacts in the list to send an email.
“Please Note: The maximum number of contacts that you can add to a distribution list is not specific. It is recommended to keep it between 60 to 120 people as the list is measured in kilobytes and it should not exceed more than 8 KB.”
Create a Distribution List in Outlook Using an Excel List
If you are maintaining a lot of contacts in an Excel Workbook, they can be imported straight into your Outlook Contact list. You can use them to create a distribution list in Outlook. Importing contacts from excel sheet will also fetch their names and other details associated with a particular contact. If you don’t know how to import contacts to Outlook, you can copy and paste the contacts in the ‘Members’ section as mentioned in step 6 above.
How to Edit a Distribution List
Editing the Outlook distribution list is as easy as creating one. You can edit it while drafting an email or directly edit it from your Outlook contacts.
Step 1. Open Microsoft Outlook and create a new Email.
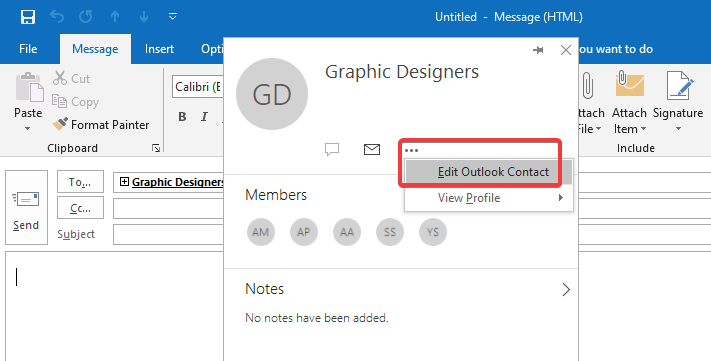
Step 2. Enter the Outlook contact group name in the ‘To’ section and press enter.
Step 3. Right-click on the group name and click on ‘Edit Contact’. You can also click on the three horizontal dots to edit Outlook contact.
Step 4. It will take you to the same screen when you added contacts. You can add remove or modify the contact list as per your need. Once you are done, remember to click on the ‘Save & Close’ button on the top right.
Also Read: How To Find Archived Emails in Gmail
How to Share a Contact Group in Outlook
You can also share contact with your colleagues or anyone in an email. It is as simple as sending an attachment.
Step 1. Open Microsoft Outlook and look for People in the ‘Navigation’ panel.
Step 2. Double click on the ‘People’ icon on the ‘Navigation’ panel.
Step 3. Double-click on the group contact list that you wish to share. The contact list will open.
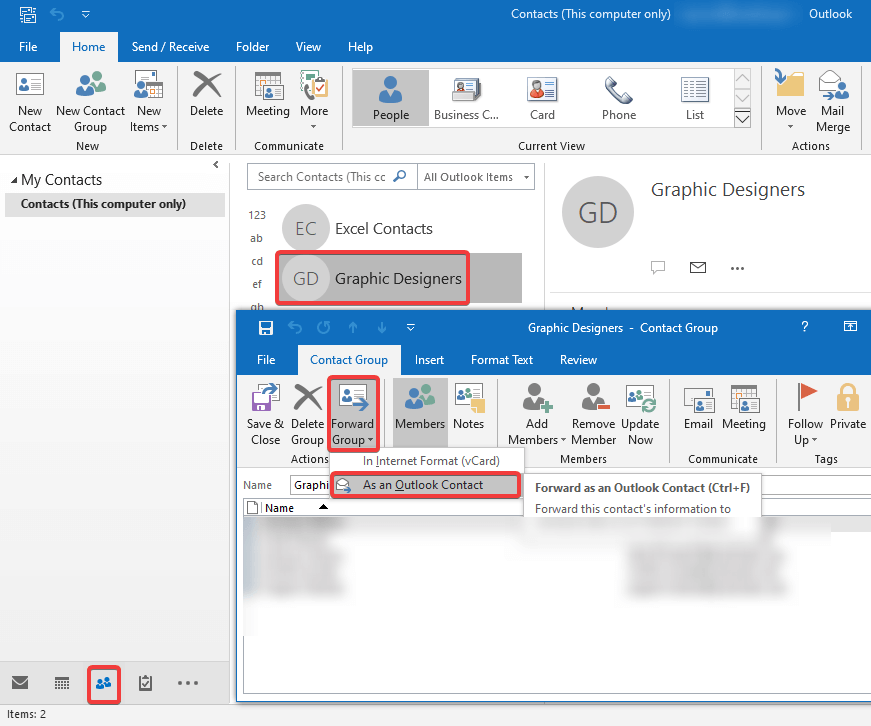
Step 4. Under the ‘Contact Group’ section, click on the ‘Forward Group’ button on the ribbon.
Step 5. Click on ‘As an Outlook Contact’ from the sub-menu.
Microsoft Outlook will open with a new email task with the group contact as an attachment. You just need to enter the recipient in the ‘To’ section and send the email.
Summing Up
I hope this article added those extra minutes you used to spend in adding recipients one-by-one. Now that you know how to create a distribution list in Outlook, you can create a group in Outlook and send Outlook group emails. You may also like to read how to create a mailing list in Gmail. Creating an Outlook distribution list is most essential for those who deal with bulk emails or perform mass messaging tasks on a routine basis. Hope this help, Happy Computing!
Next Read:
Microsoft Outlook Won’t Open? Here are the Fixes
How To Add Signature & Send Automatic Replies Using Microsoft Outlook


Leave a Reply