Windows Defender or Microsoft Defender is an ultimate tool that offers your Windows system overall security. From blocking the latest malicious contents to keeping the unwanted apps away from the system, Microsoft Defender keeps your PC protected. And an inbuilt software will always be highly recommended than using an external one or a third party tool.

Microsoft Defender is an inbuilt security tool you have on your Windows 10 PC which gives a good fight to those claim-to-be-perfect antivirus tools. A set of tools, Microsoft Defender works in the background to keep monitoring the PC protection against threats your PC might face. It’s a powerful packed tool which starts defending your system as soon as it encounters anything suspicious on your system.
Top Ways Microsoft Defender Boosts Windows PC Security
There are many security threats wandering around your system & Microsoft Defender works its best to fight them. Encountering malicious software & increasing system security eventually boosts the PC performance which is the ultimate goal of every security software. So let’s dig in deep & understand the ways how Microsoft Defender can boost your PC security:
1. Detecting & Removing Hidden Malicious Contents
One of the very first ways to protect a system is to know what the actual issue is with the PC & this is where Microsoft Defender helps you. The inbuilt security software helps you detect those malicious contents that are invisible to your eyes. And for that to happen, Microsoft Defender performs a scan which starts detecting those hidden malware contents on your PC. Once those contents have been found, it doesn’t take much time to remove them from the system entirely. Usually, Microsoft Defender helps your device with scanning the system everyday (as scheduled), however, sometimes, you’d want to scan the system manually as well. This is where, you can start following below path & scan the system for virus & threat protection:
Settings > Update & Security > Windows Security > Virus & Threat Protection
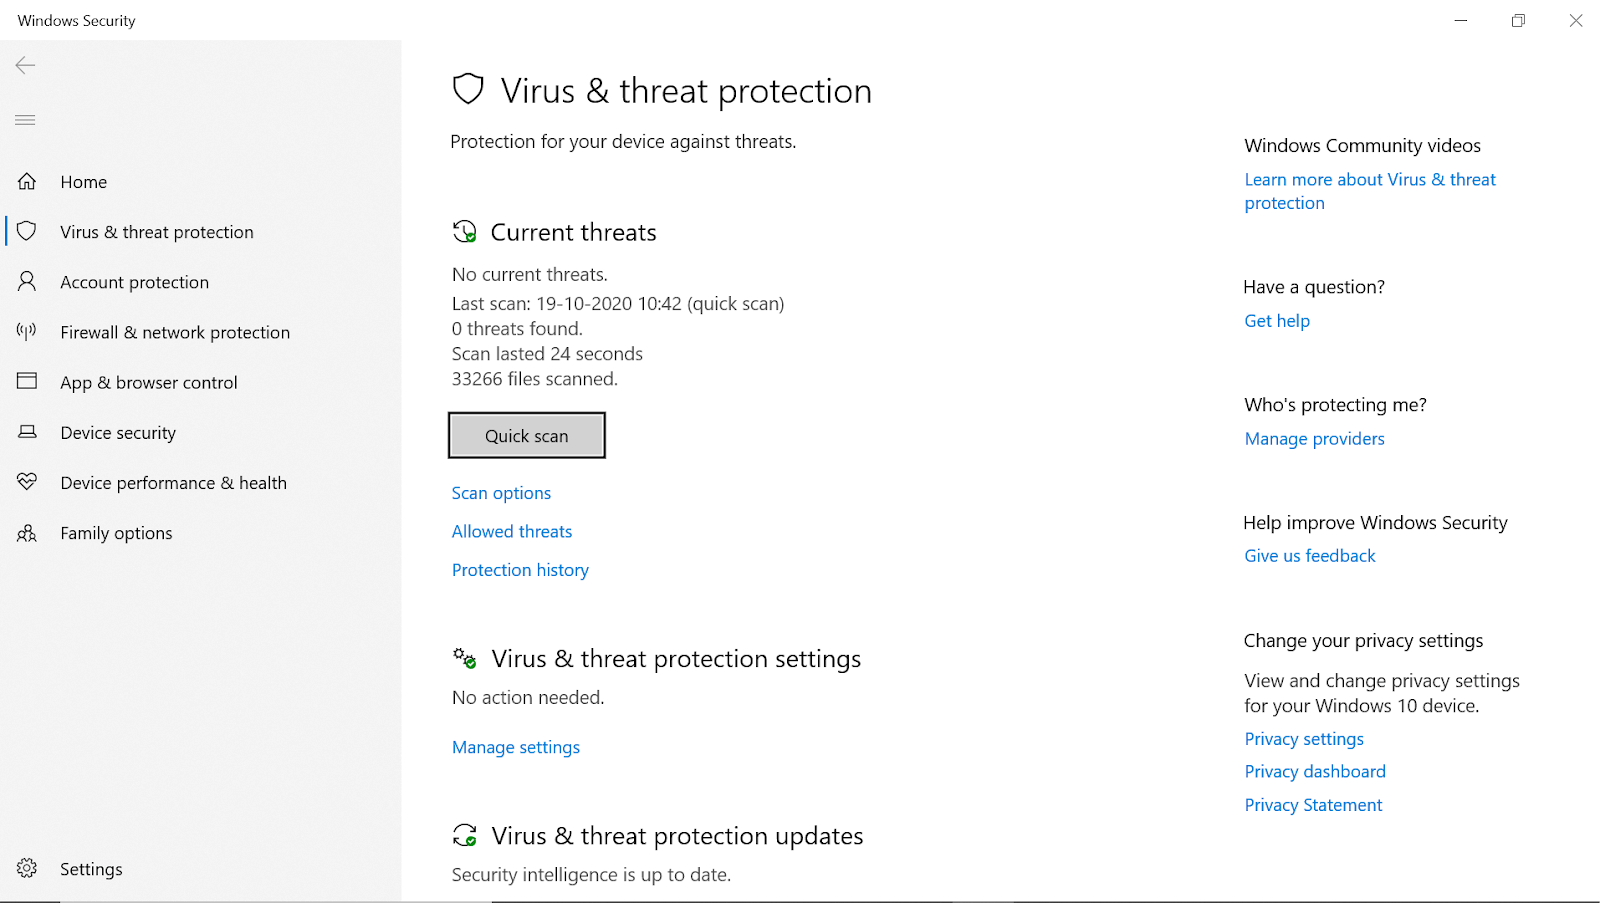
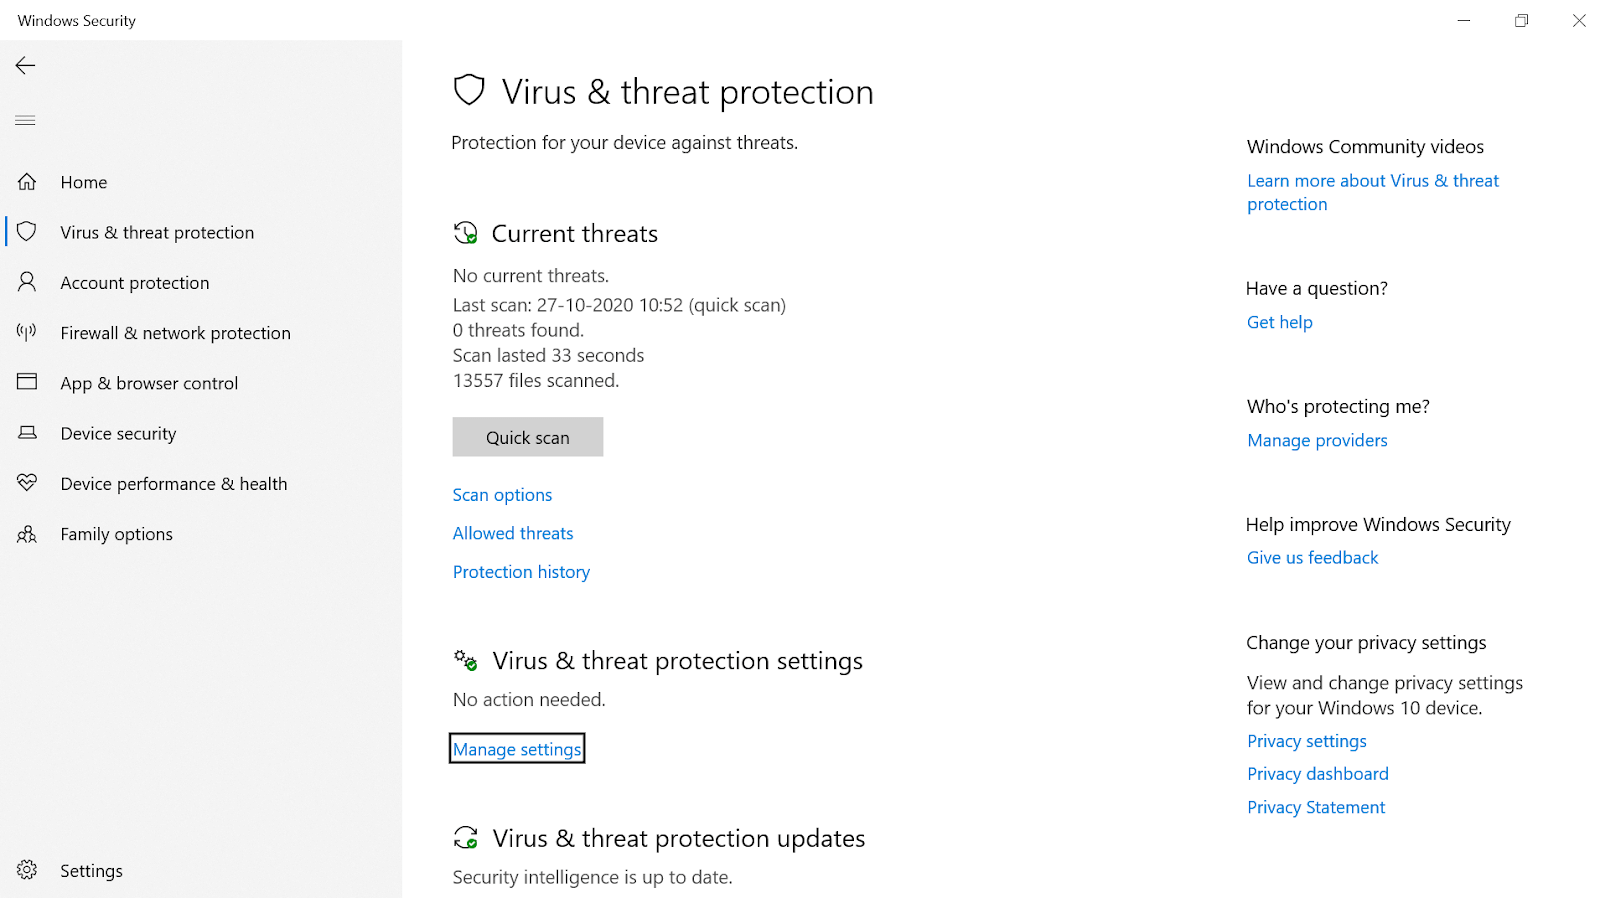
Once you have reached the above path, you will see an option called, Quick Scan that will help you with protecting the device from virus & other malware threats. The option will display the last scan results including the last scan time as well as threats (if there are any).
Just tap on Quick Scan & it will start scanning your system for the threats (including all the files & folders).
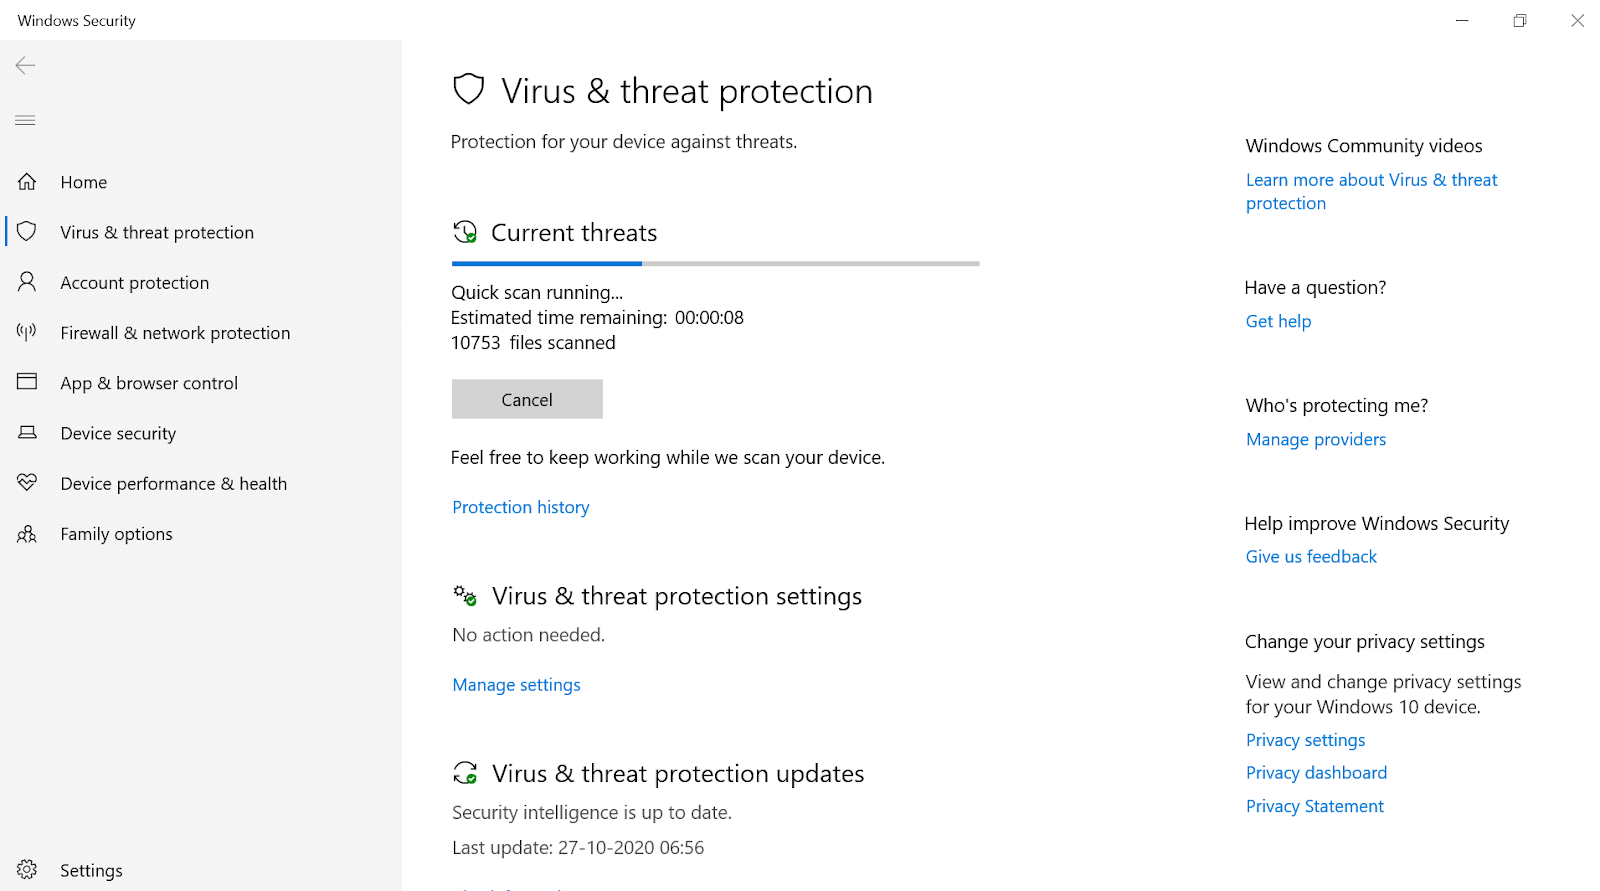
Alternatively, if you think your system has malicious contents, however, the Quick Scan couldn’t find it, tap on Scan Options.
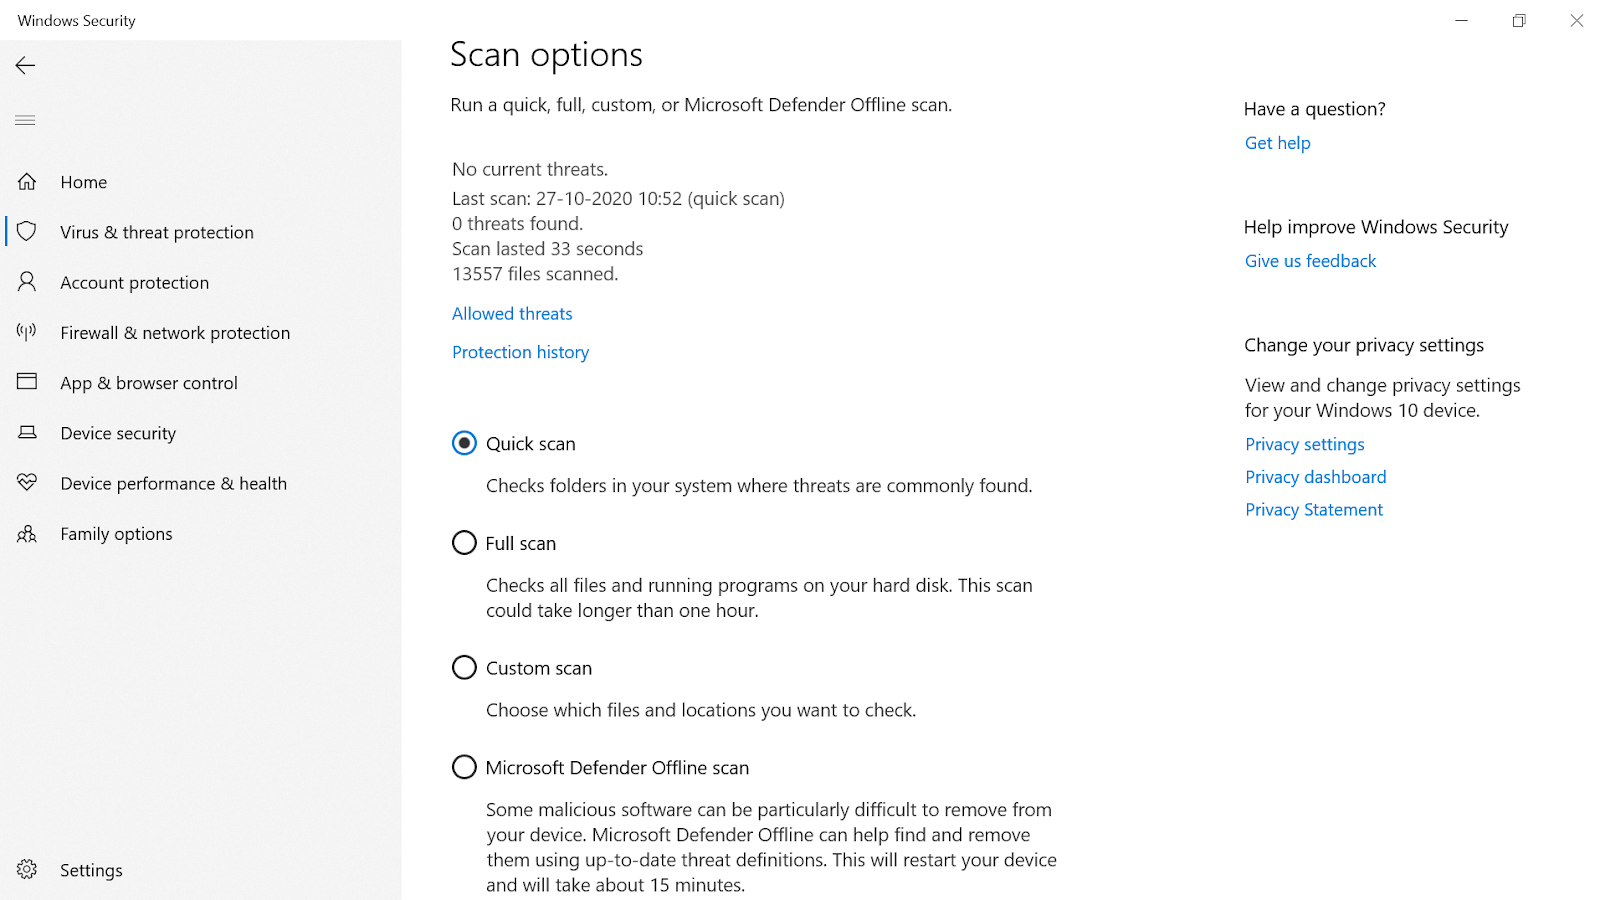
The other scanning options (Full Scan & Custom Scan) help you find malicious threats from different angles.
You can also opt for Microsoft Defender Offline Scan (last in the list) to increase system security. There are a few threats that are not at all easy to detect & for that, this Offline Scan can help you with up-to-date threat definitions.
Doing so will definitely detect the malware threats & remove them from the system as if they were never here before.
Also Read: Bitdefender Mobile Security Full Review
2. Offering Your System Ransomware Protection
Just like malware, any other form of the threats can hamper your system security big time & can give you nightmares. One of those threat forms is Ransomware that can cause your system serious problems like locking files & folders and seeking payments to unlock the same. Additionally, you have no idea if this locking-files-folders will happen in the future or not which is a big aspect to be considered (knowing that a payment has been demanded).
As well as, this came as quite a shock to me that Ransomware protection is disabled (default setting) on Microsoft Defender. Maybe because enabling this setting may block some of the legitimate software on your system. However, enabling ransomware protection on your PC can be as easy as scanning your system manually.
You need to follow the path to Virus & Threat Protection (or simply type Virus & Threat Protection on Windows search command).
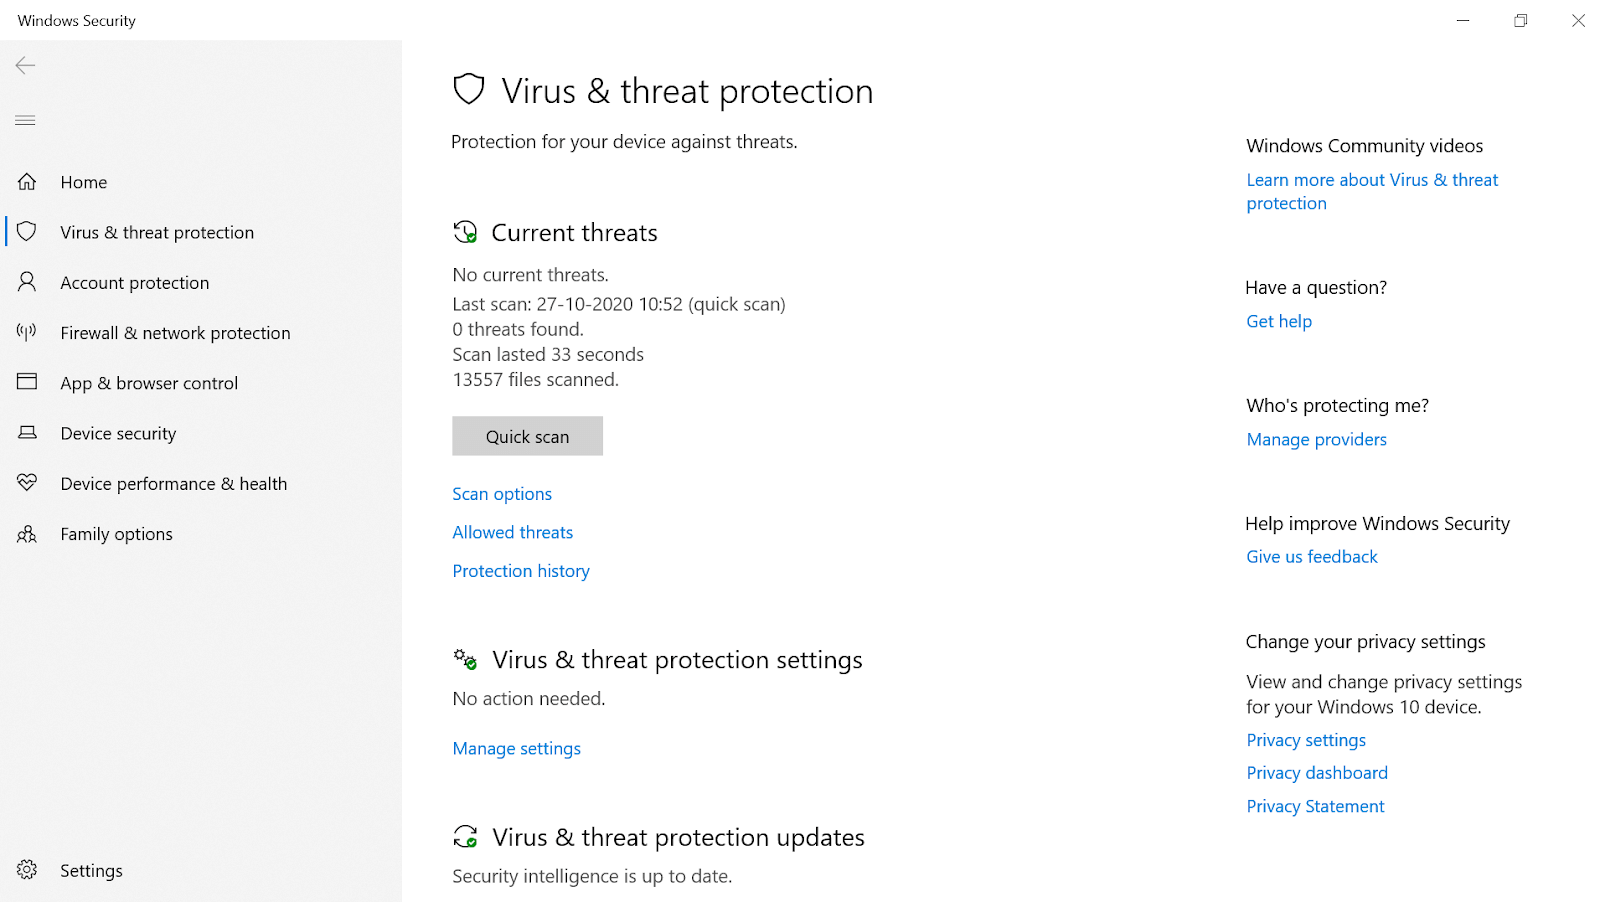
Once you are on the page, you need to look for the Ransomware protection option (scrolling down). Under Ransomware protection, you will find another option “Manage ransomware protection” that will open a new window for your system security.
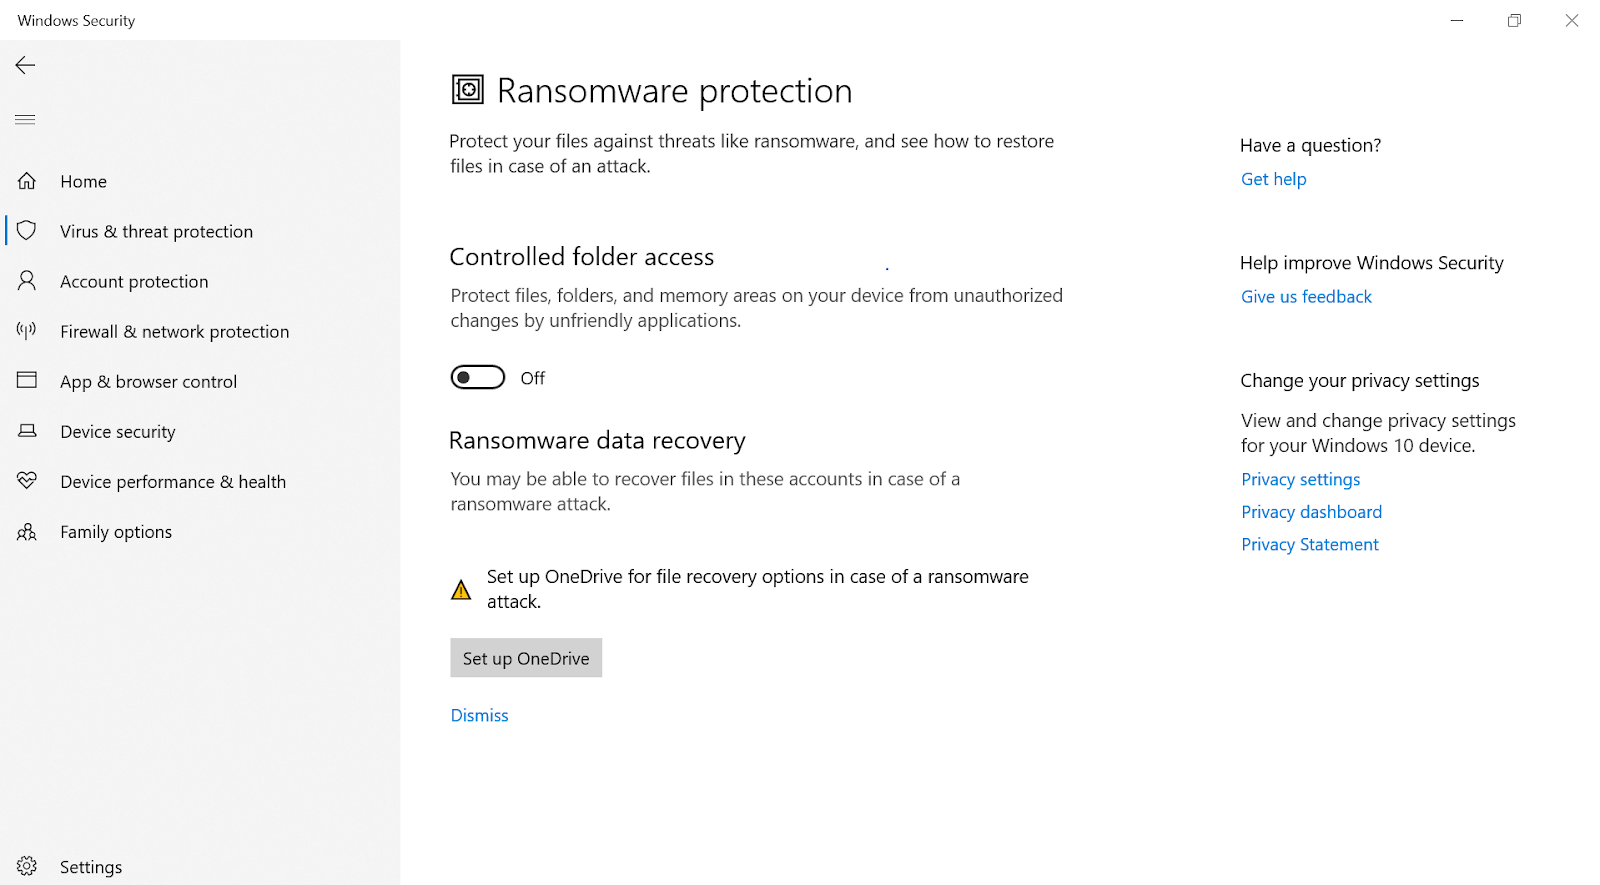
Post reaching to the Ransomware protection (separate) page, you need to toggle on the switch option under Controlled folder access. After tapping on to the On-Off Switch, go with the system prompts & within a second, ransomware protection will be enabled on your system.
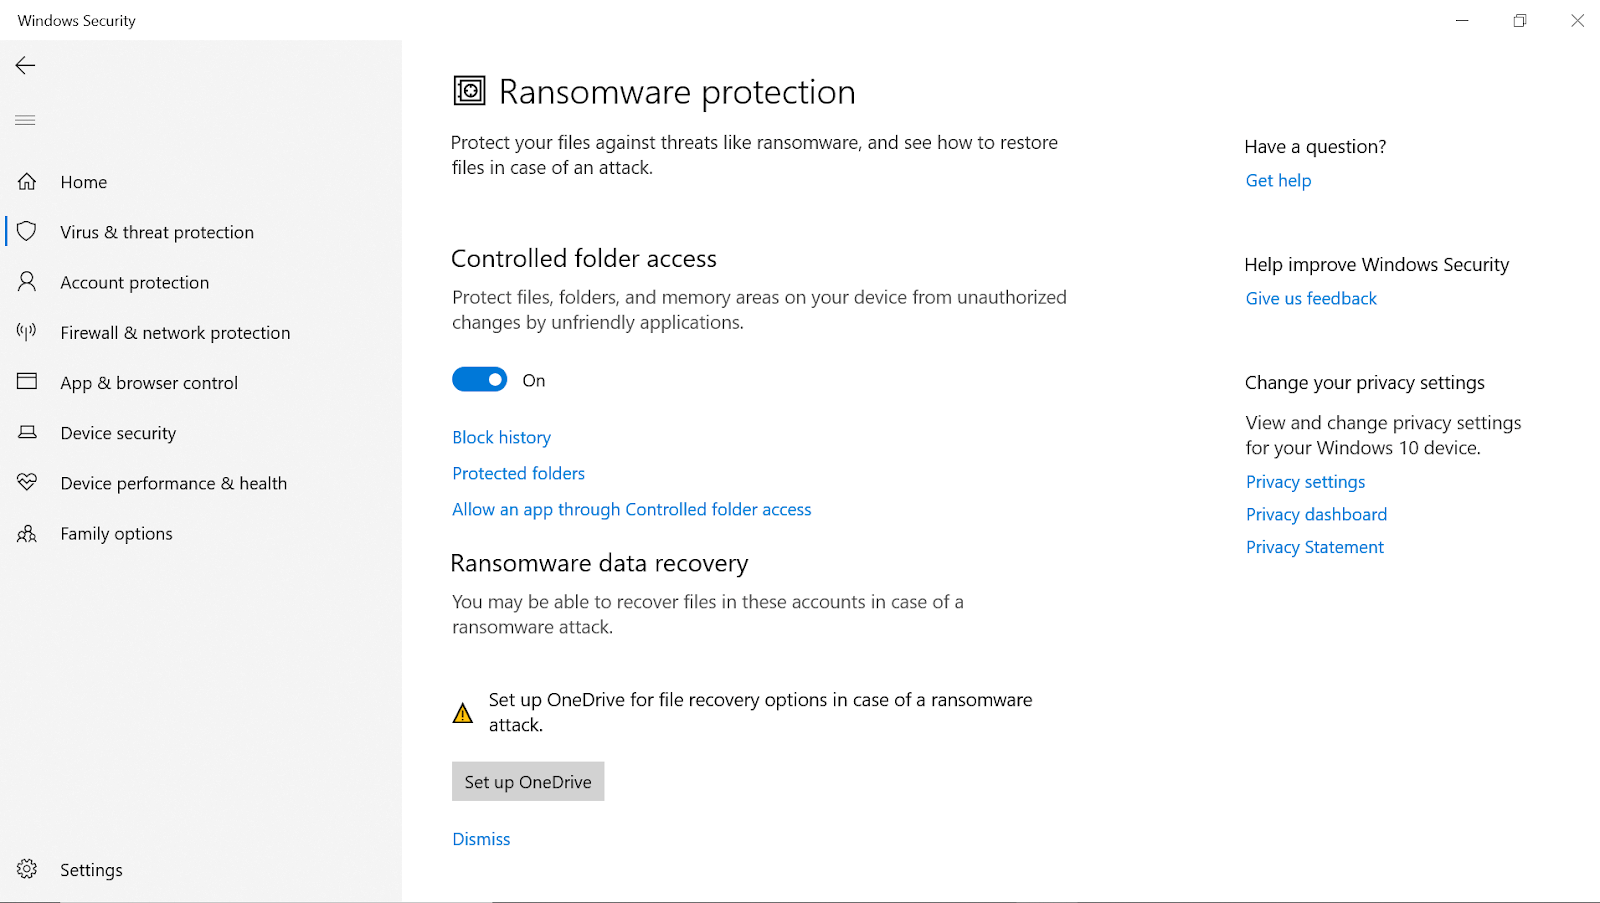
After enabling another Microsoft Defender protection, your system will have an additional security layer. This feature will start protecting all your system folders including picture, music, video, documents, & other folders.
3. Blocking Latest Malware Contents From System
Apart from detecting & removing malicious content from your PC, Microsoft Defender also blocks the latest malware threats as well. The system security software comes with the goal to boost PC security & for that, Microsoft keeps it updated with latest updates. And if your system encounters any latest malware, Microsoft Defender starts blocking the same, without any delay. Additionally, the tool offers your system real-time protection against all those malicious contents that keeps updating on a constant basis.
Surprisingly, Microsoft offers you an advanced protection feature where you can determine the contents that are yet to be identified as a threat to your PC. Yeah!! I also had no idea that my Windows PC offers this level of protection. The feature is called Cloud-delivered protection or Microsoft Active Protection Service (MAPS).
All you need to do is, go to the Virus & Threat Protection page (under Settings) & the page will open up in front of you. Here, you need to look for the Manage settings option & once you find it, tap on the same.
After tapping on Manage settings, another page will appear where you will see an option, Cloud-delivered protection. Please know that this option needs to be enabled & if not, please enable the same without thinking twice.
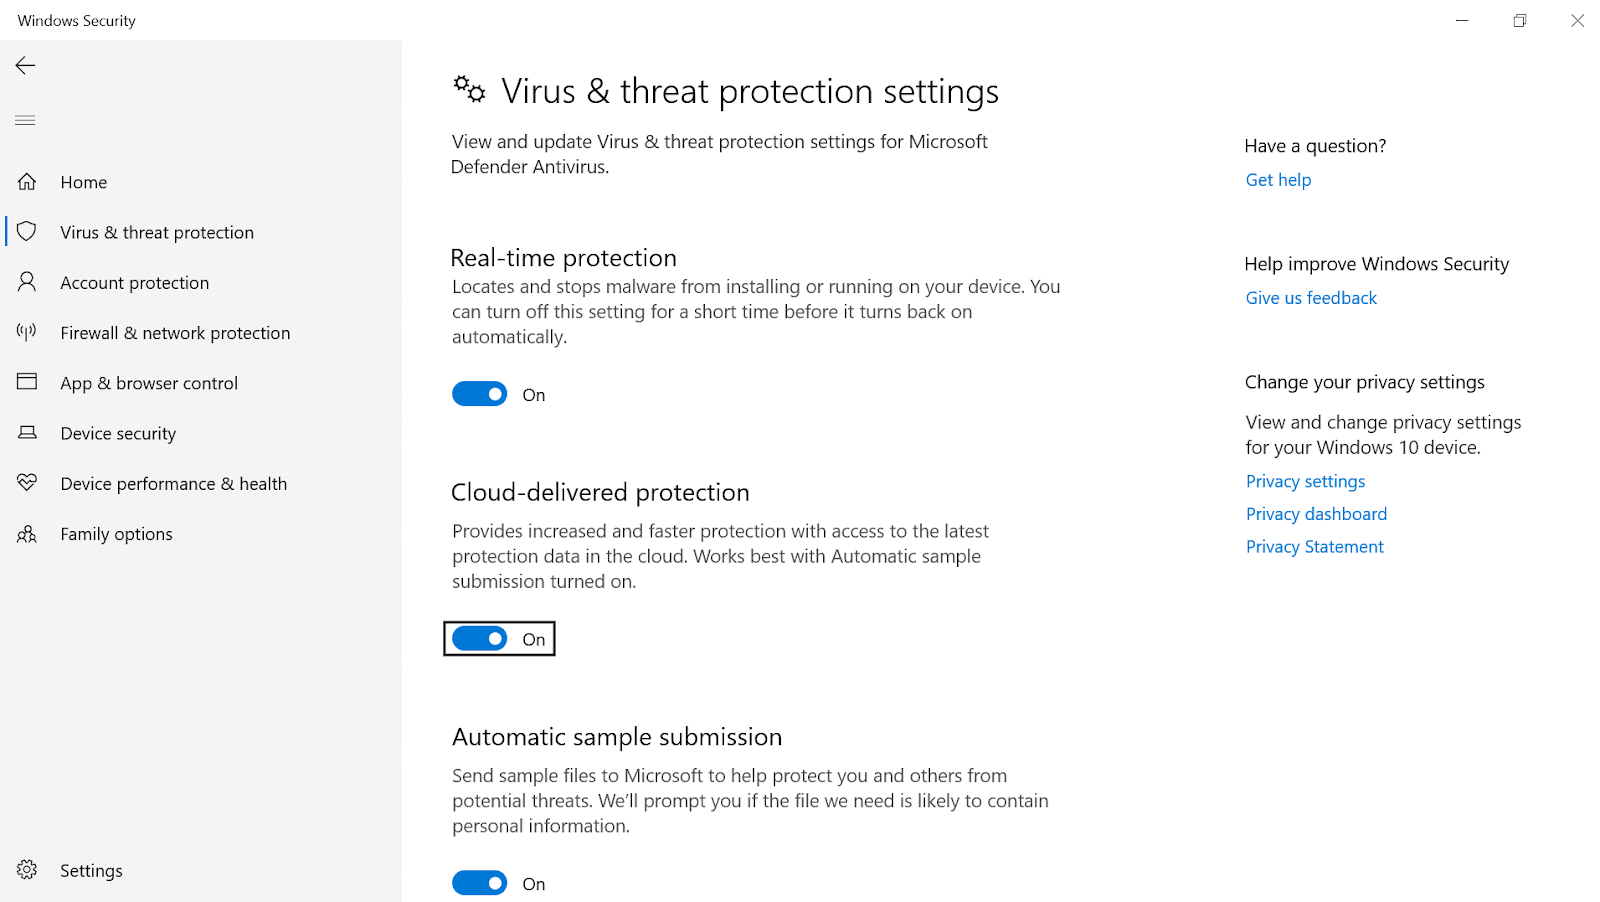
This feature (Cloud-delivered protection) helps your device with faster protection & eventually boosts PC security. How this functionality works is that if Microsoft encounters any of the file is behaving badly or is dangerous for your system, Microsoft Defender blocks the same. Please know that including your PC, the malicious content gets blocked on other systems as well because they might also face this issue as a threat in coming days or months. So it’s like you are doing your bit for the whole security community by letting them know about this about-to-be-identified-as-a-threat situation.
4. Blocking Unwanted Apps or Programs From Your Computer
If you got through your whole system thoroughly, there will be many apps or programs that can come into the “unwanted apps or programs” category. Microsoft already has an inbuilt feature that keeps monitoring these kinds of apps to improve the system security, Potentially Unwanted Programs (PUPs).
So in order to keep ensure that these unwanted apps or programs don’t bother you much, you need to take action as mentioned below:
Under System Settings, you need to tap on the App & Browser Control category (left side of the screen).
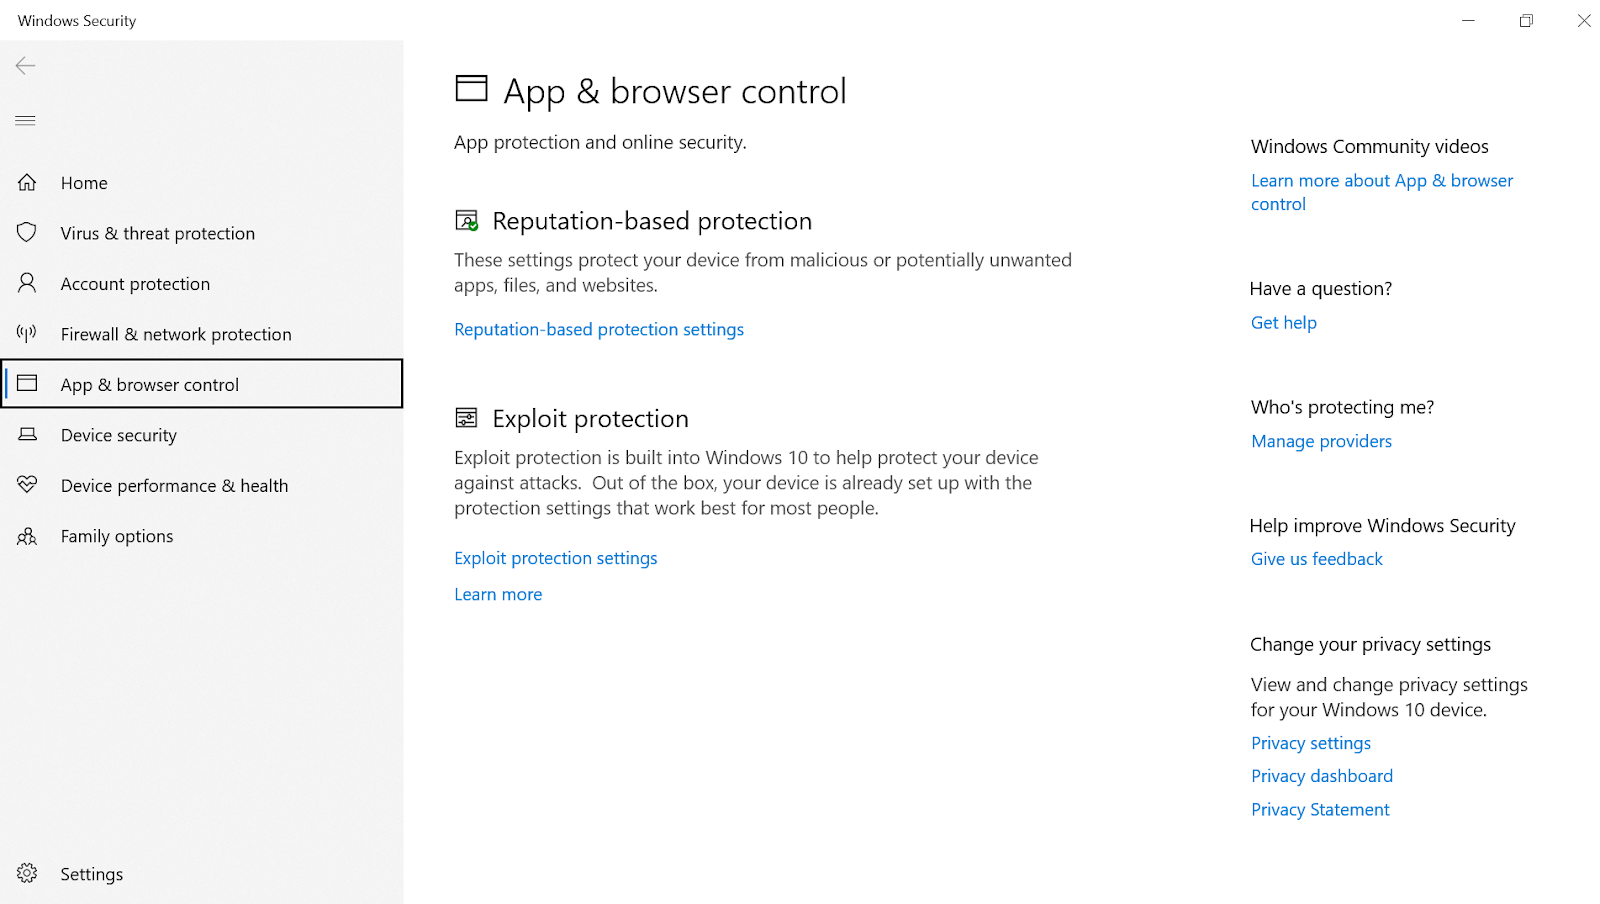
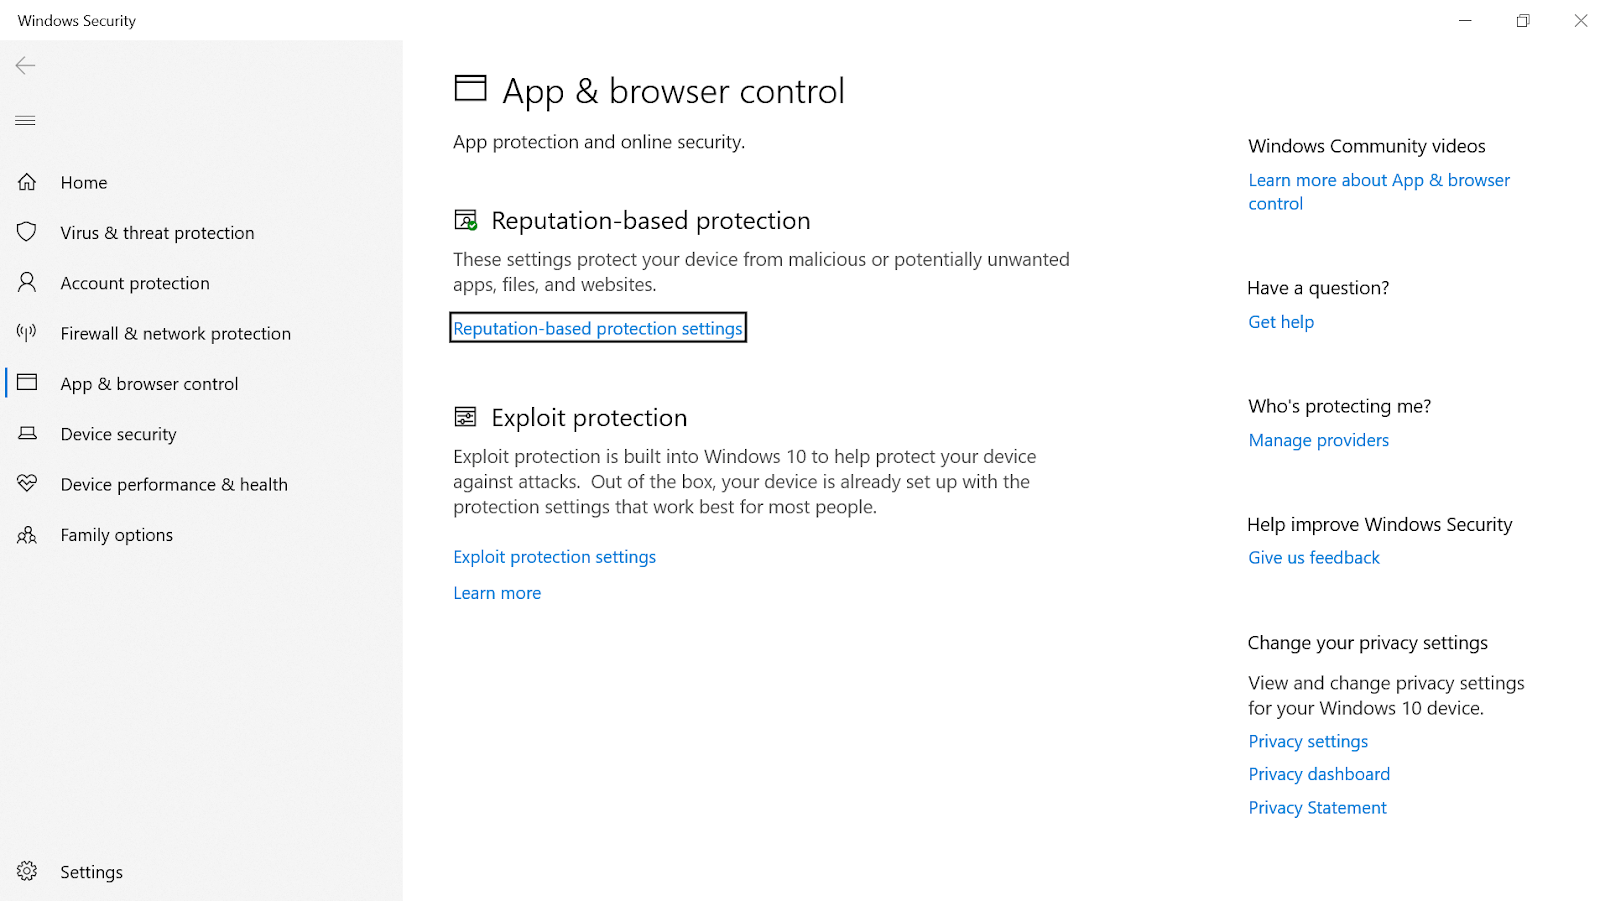
Once tapped, you will see the Reputation-based protection category on the top & you need to click on Reputation-based protection settings.
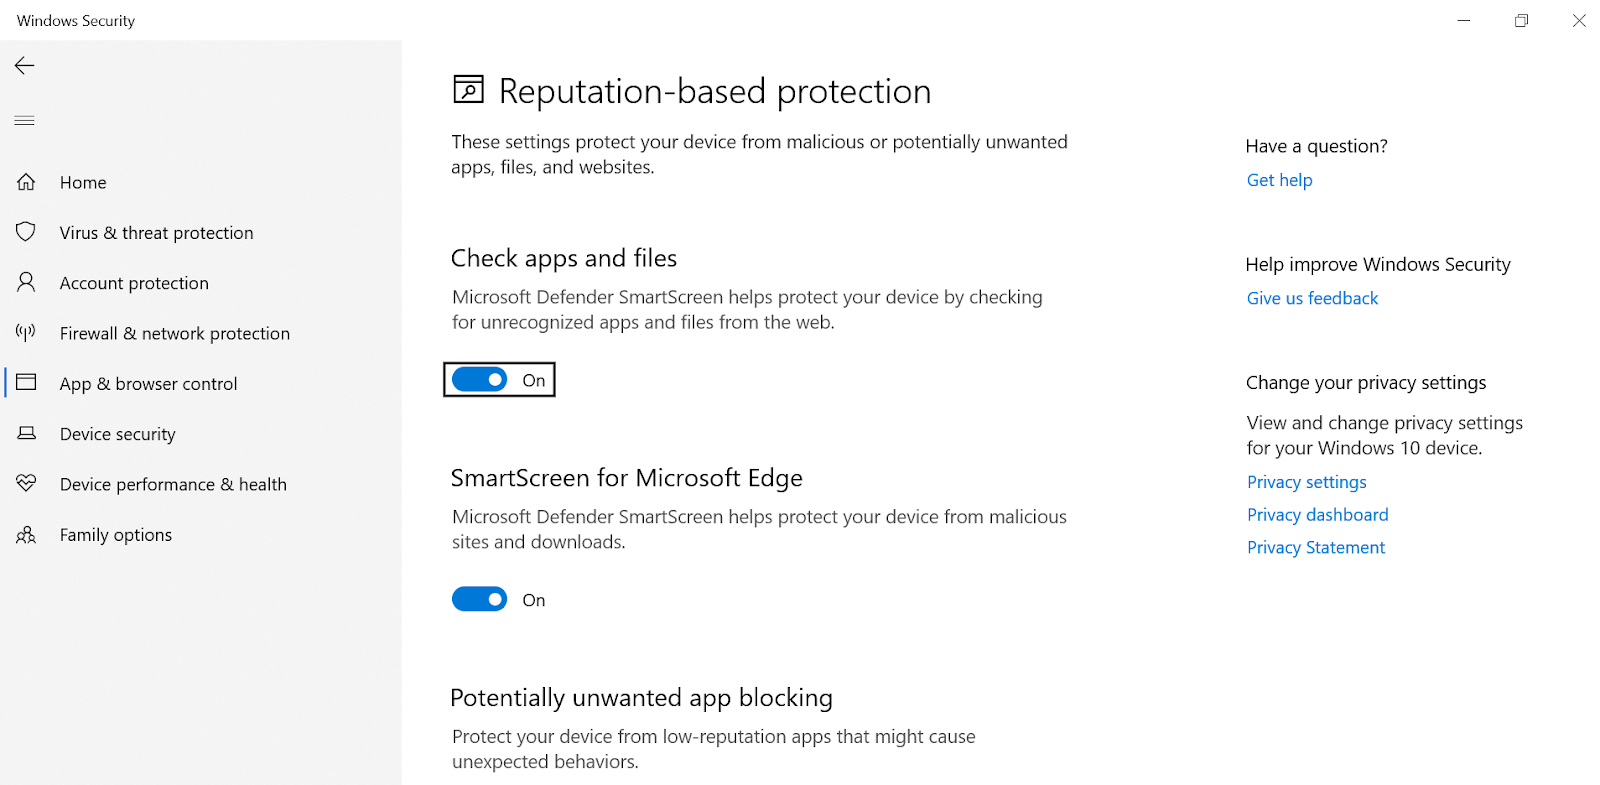
Under Reputation-based protection settings, you need to make sure that the very first option “Check apps and files” is enabled. The option takes care of identifying unrecognized apps & files from the web in order to protect your device.
Additionally, please ensure that the second last option on the page “Potentially unwanted app blocking” is also enabled along with both the sub-options (Block apps & downloads).
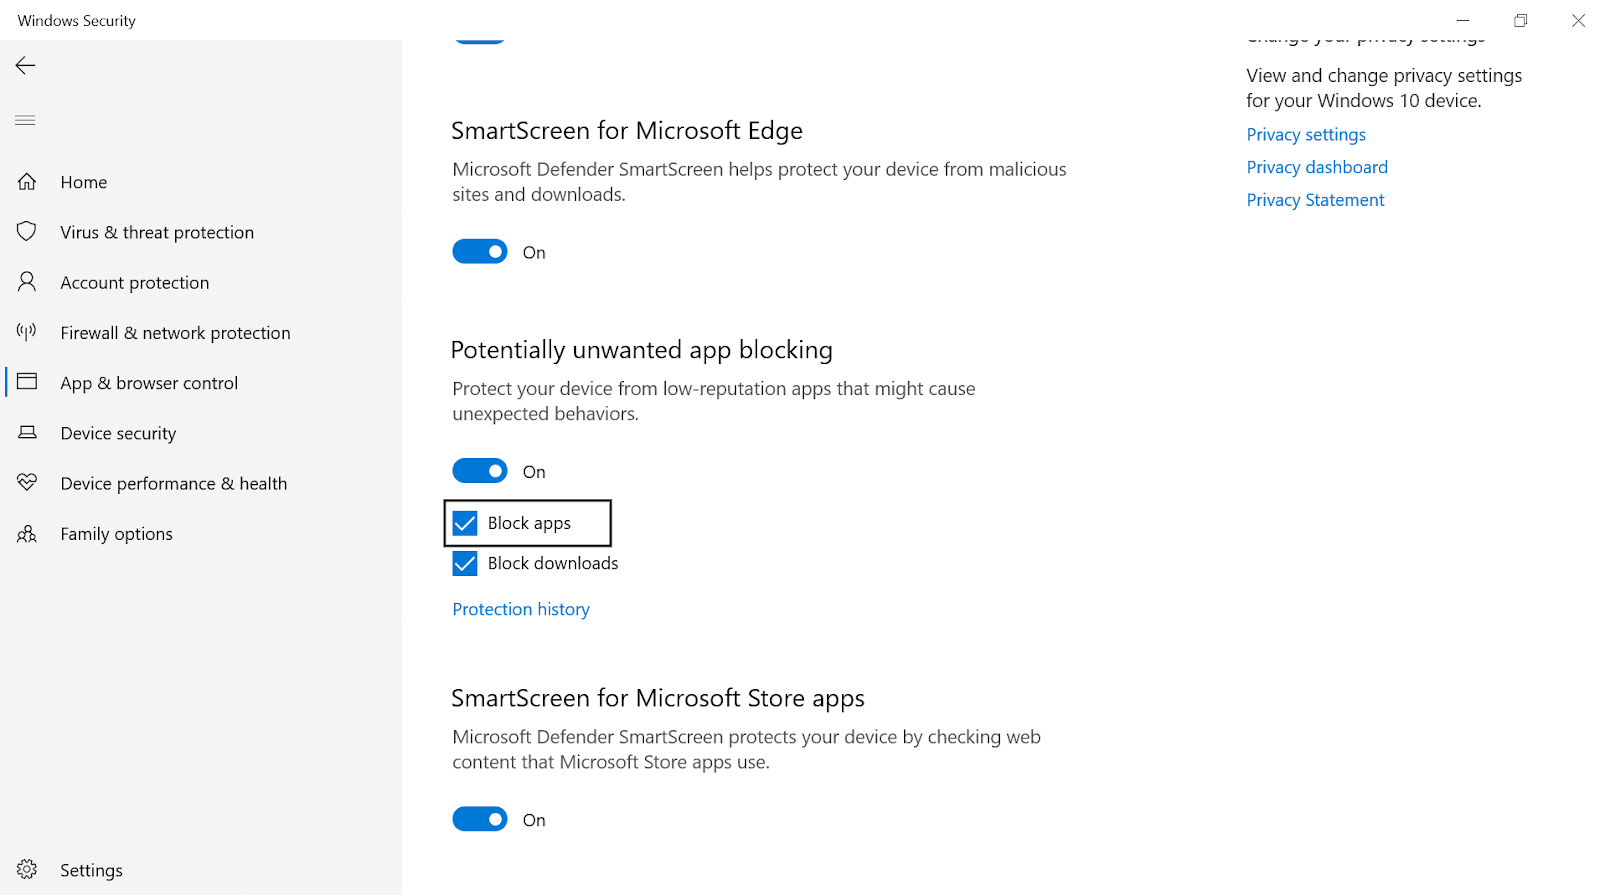
Potentially unwanted app blocking keeps monitoring the low-reputation apps & programs (if they start behaving differently) to protect your device.
5. Configuring Microsoft Defender’s Firewall Settings
After going through almost every aspect that can add value to your system security, you can also configure the Microsoft Defender’s firewall settings as well. We all know that firewall is being used to identify & block the threats from the device, however, it can only do so if it’s properly configured. So you need to make sure that all those configurations have been saved properly in order to boost PC security.
You need to navigate yourself to Windows Security & look for the Firewall & network protection section.
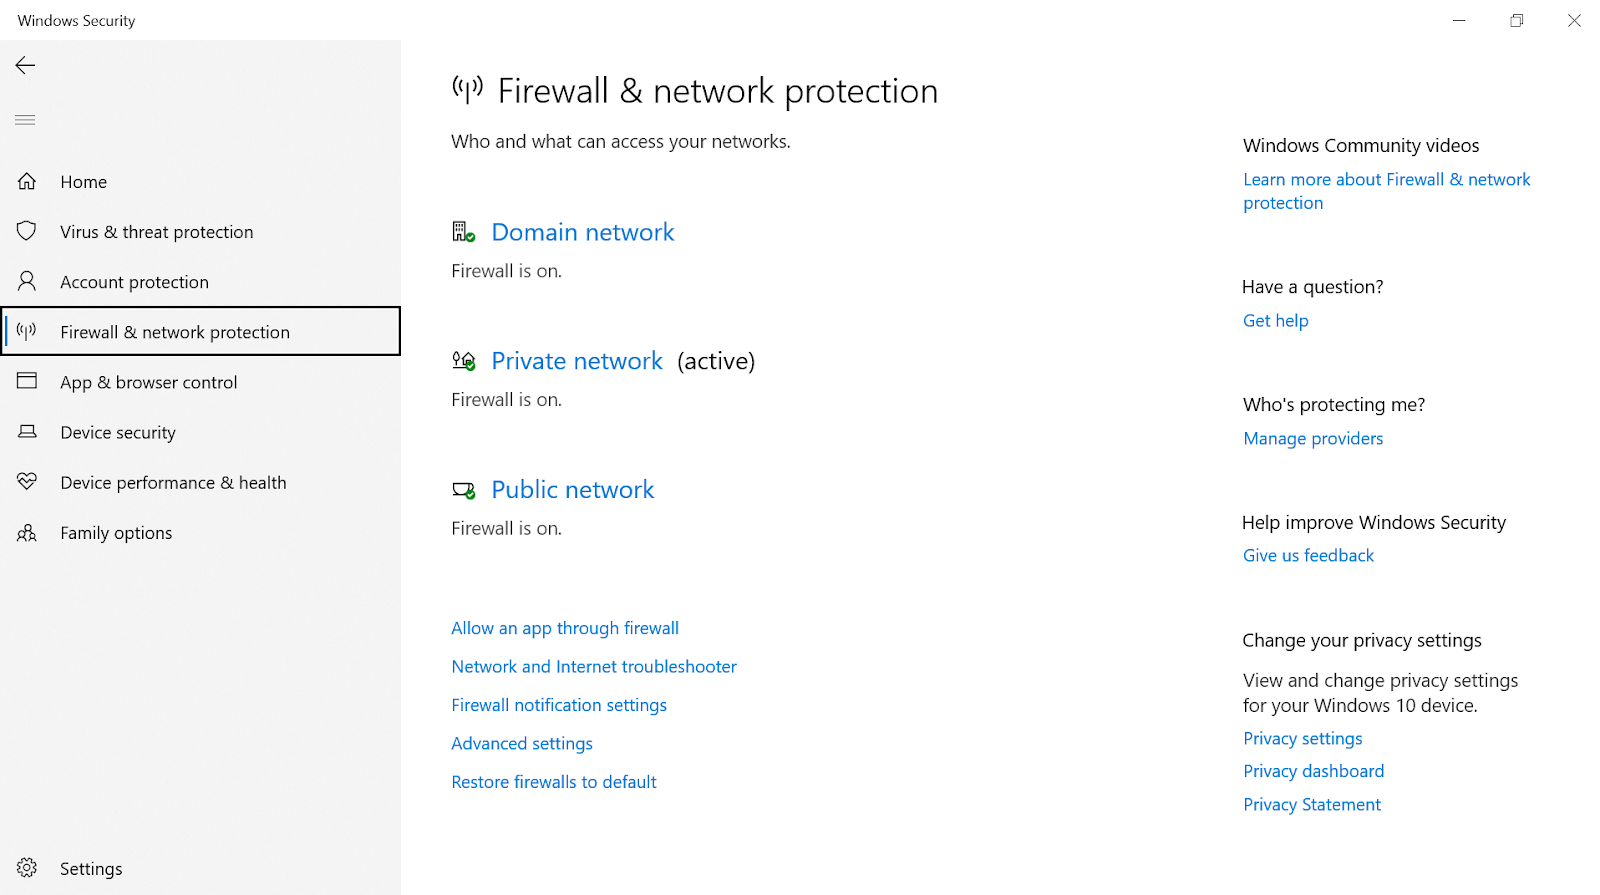
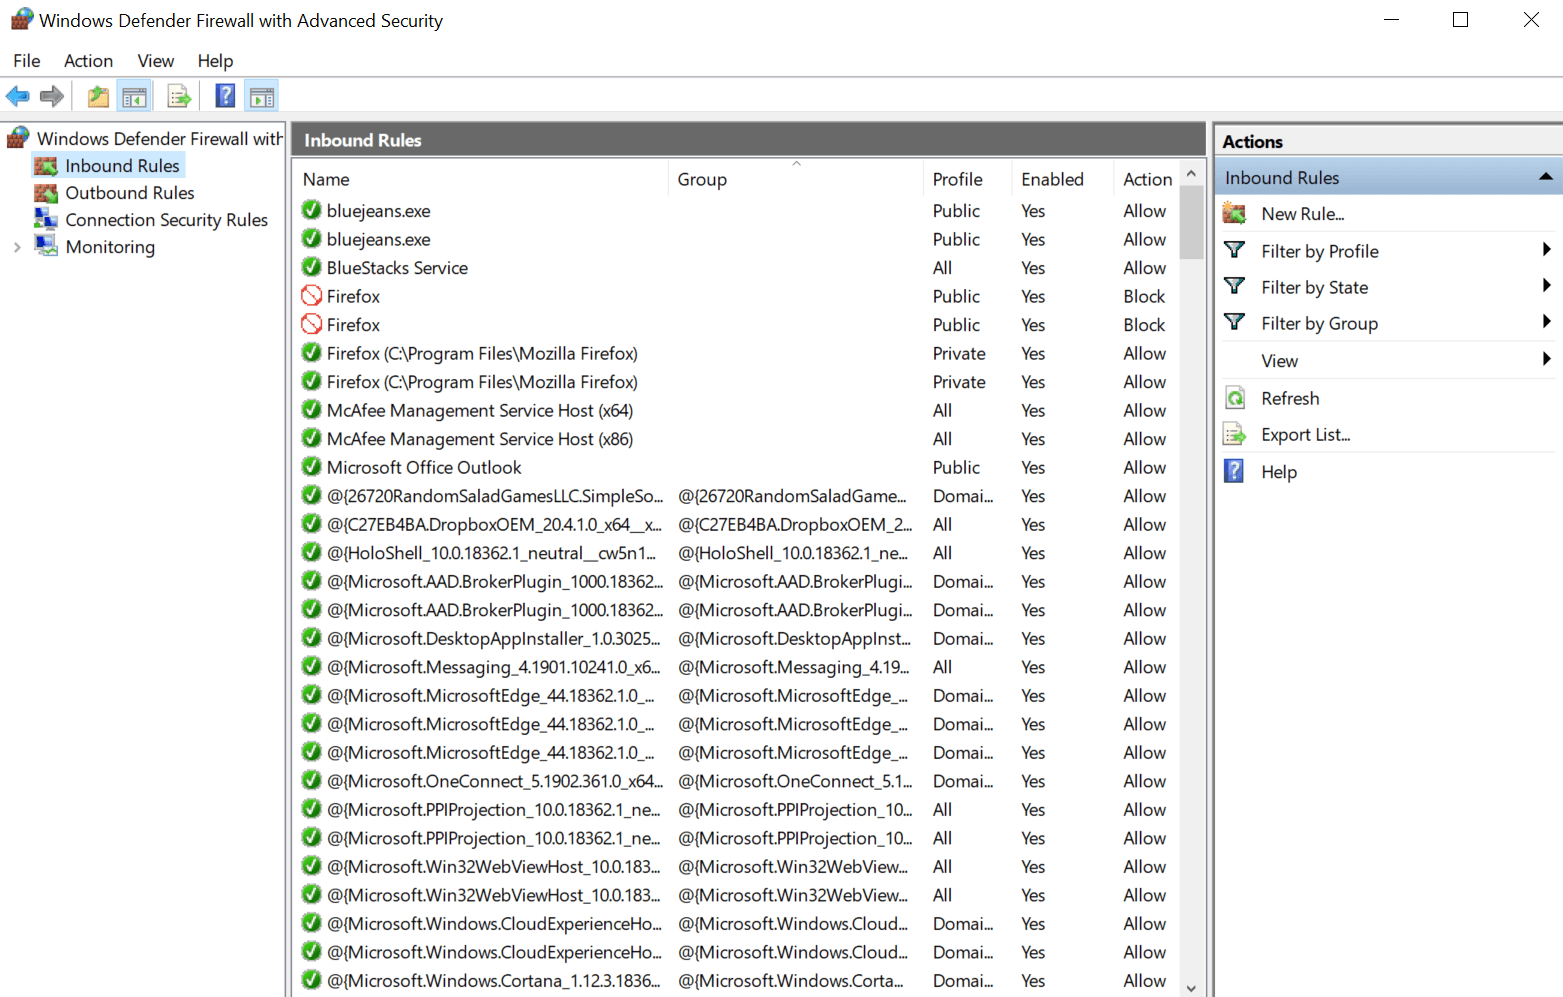
Just as shown in the above screenshot, you need to make sure that the firewall is ON for all three networks (Domain, Private, & Public). Since firewall functions on the rules where all your internet traffic data is being checked, you can also create your own rules. It means, you can control the data that’s been going out to the internet (from your PC) as well as the data that’s been coming to your PC.
And for that to happen, all you have to do is, click on the Advanced settings (2nd last option on the above screenshot) & choose the ruling category accordingly.
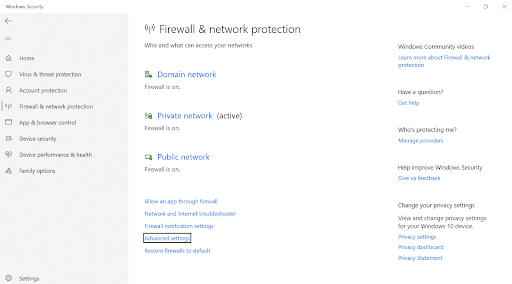
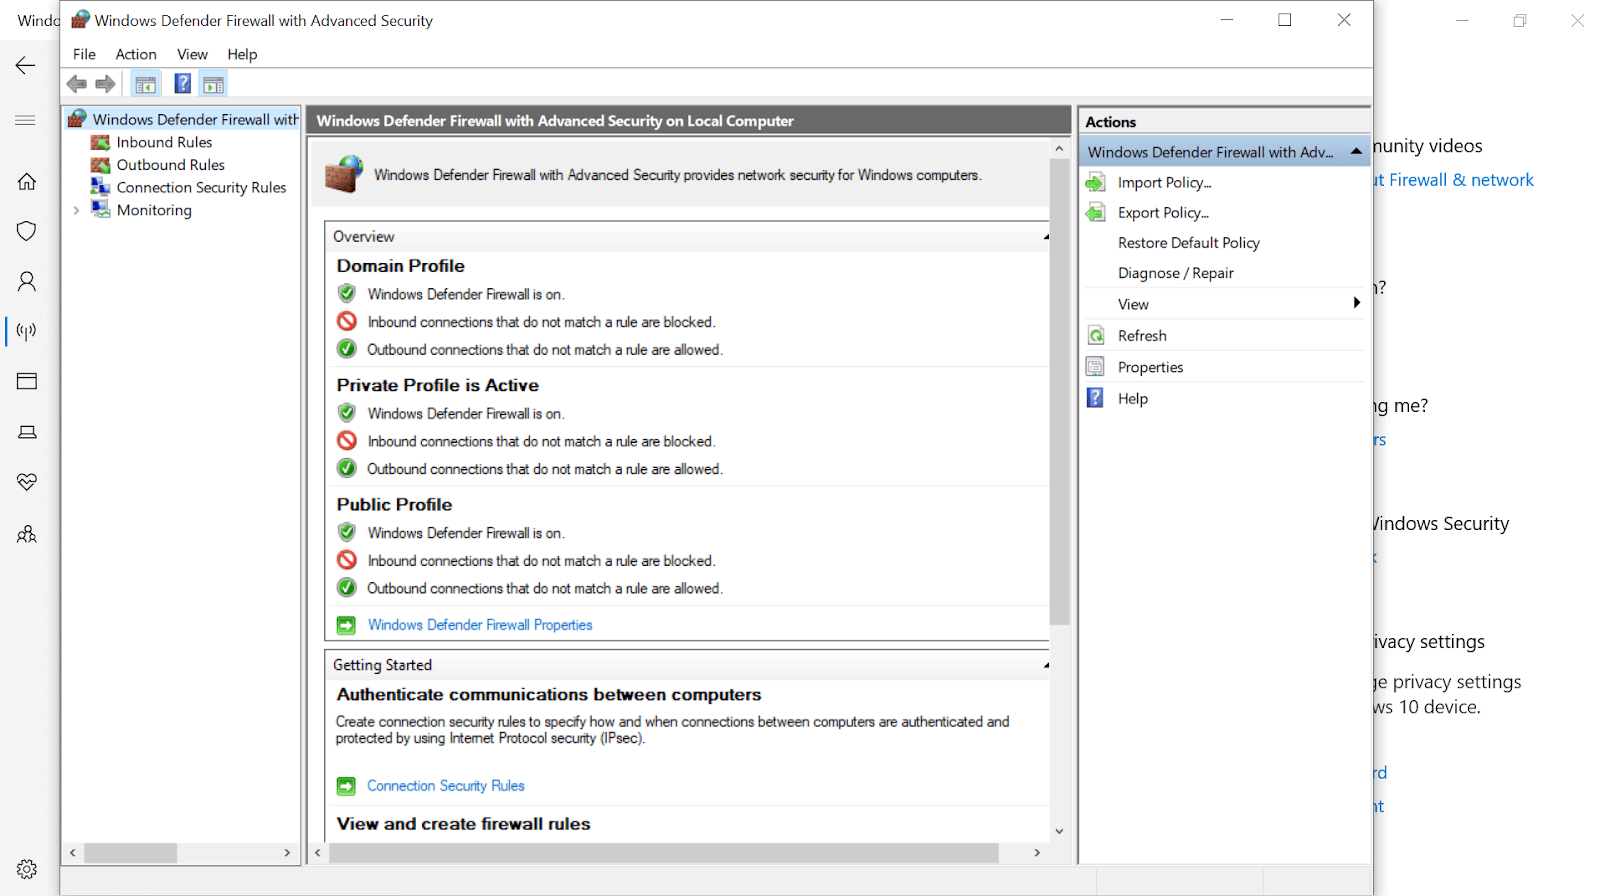
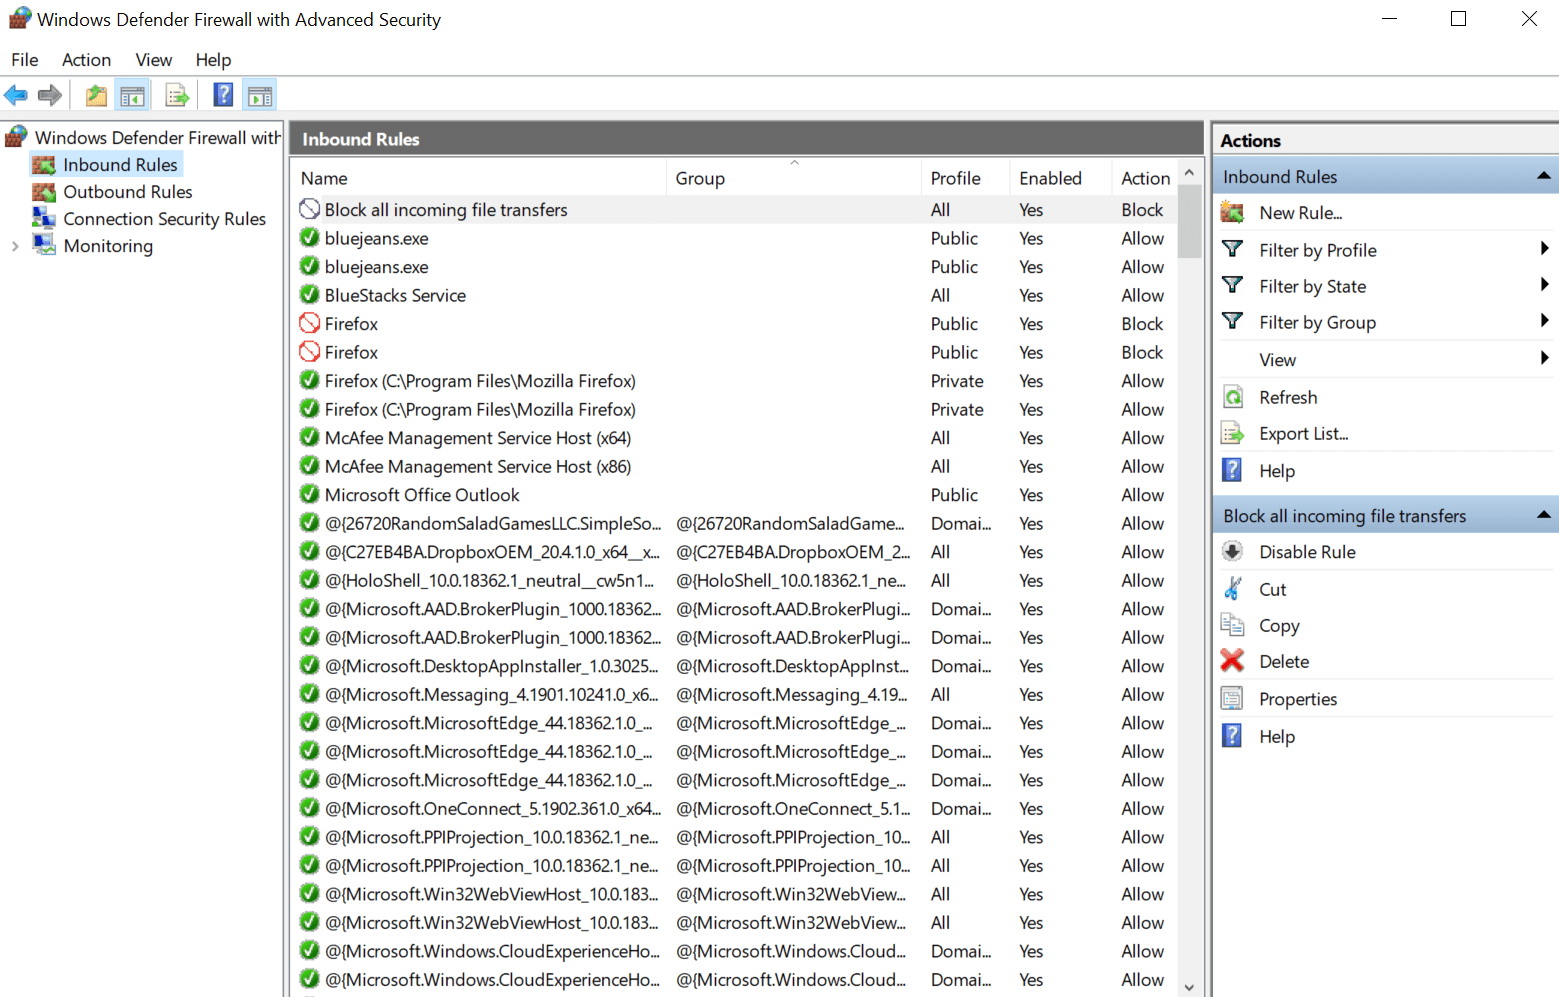
Here, for example, if you wish to control the data that’s coming to your PC, you can block the ports (like Port 21) which manages file transfer sections. In order to do that, you need to follow below steps (along with the screenshot):
1. Start with tapping on Inbound Rules (top left side on the screen) & click on New Rule… (top right side of the screen).
2. Post clicking on New Rule, another window will open up (New Inbound Rule Wizard) where you need to select Port (instead of Program).
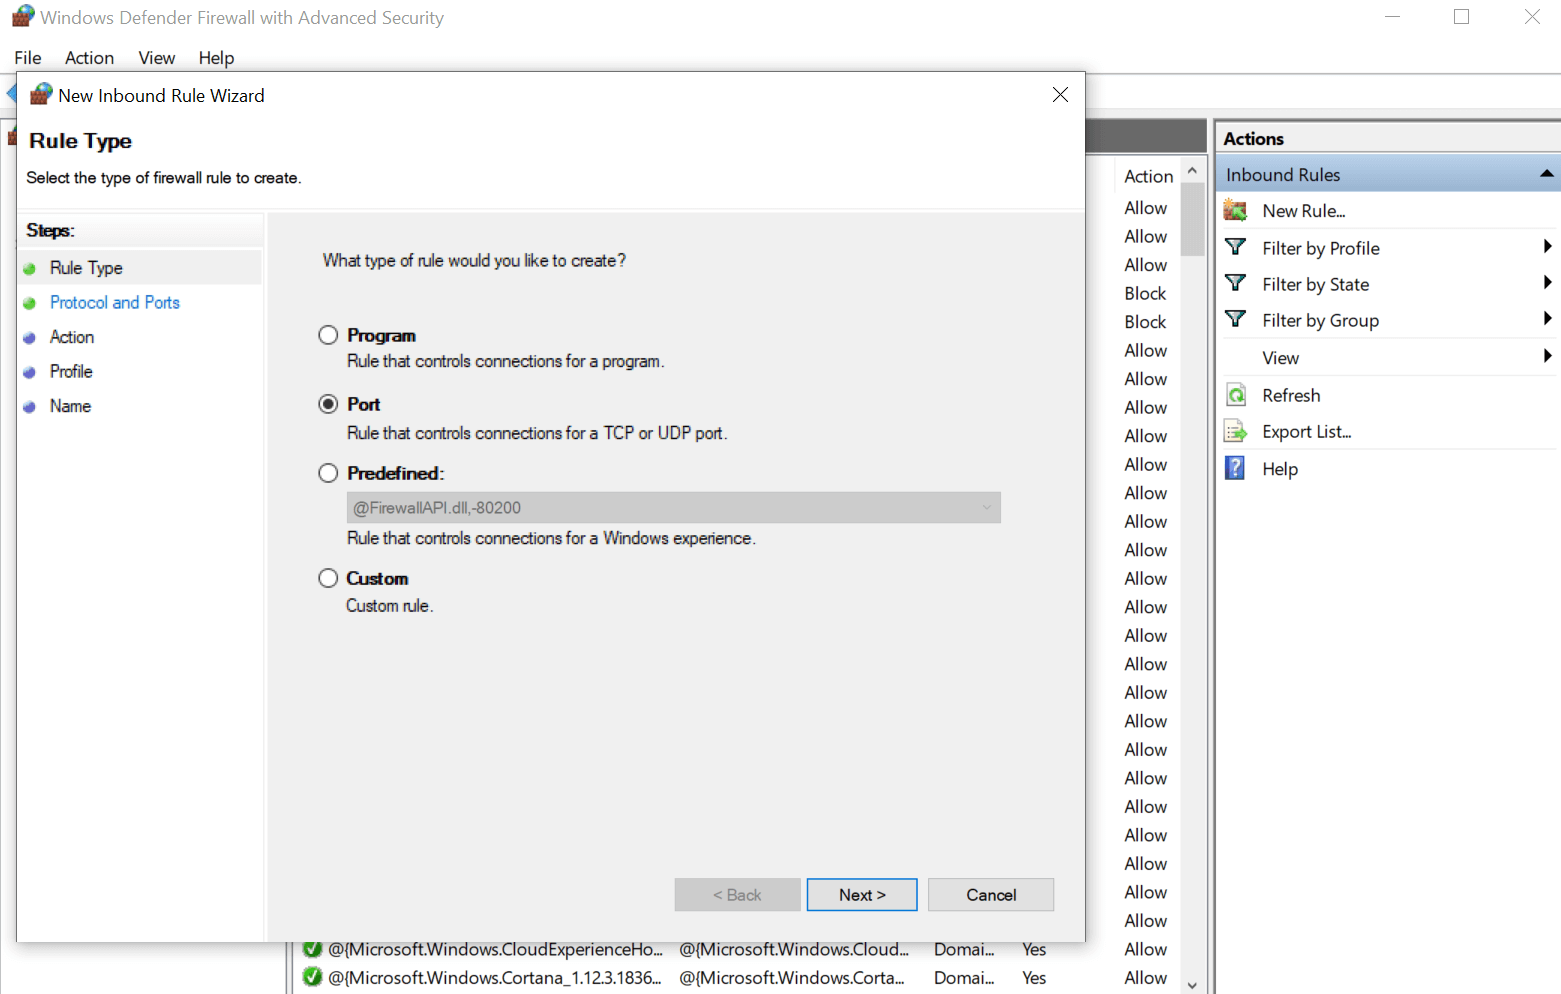
3. After selecting Port, tap on Next (bottom right side of the screen) & type in the port code (example – 21 in this scenario) under Specific local ports.
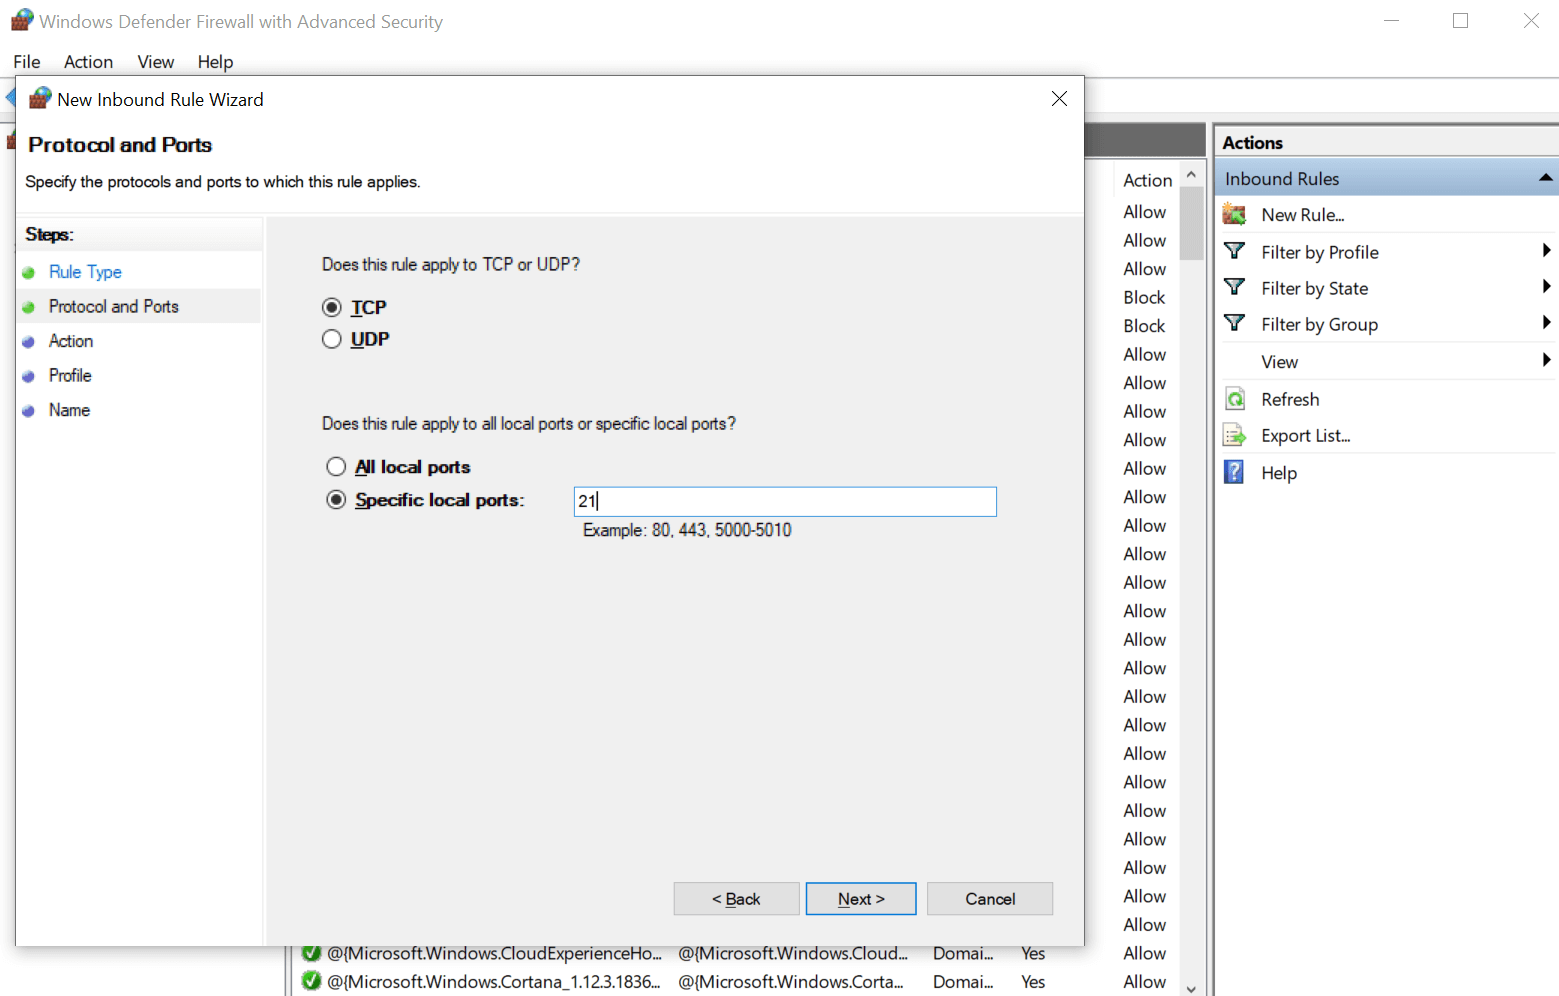
4. Next step would be to tap on Next & choose Block the connection among all the connection guide options you see on the screen.
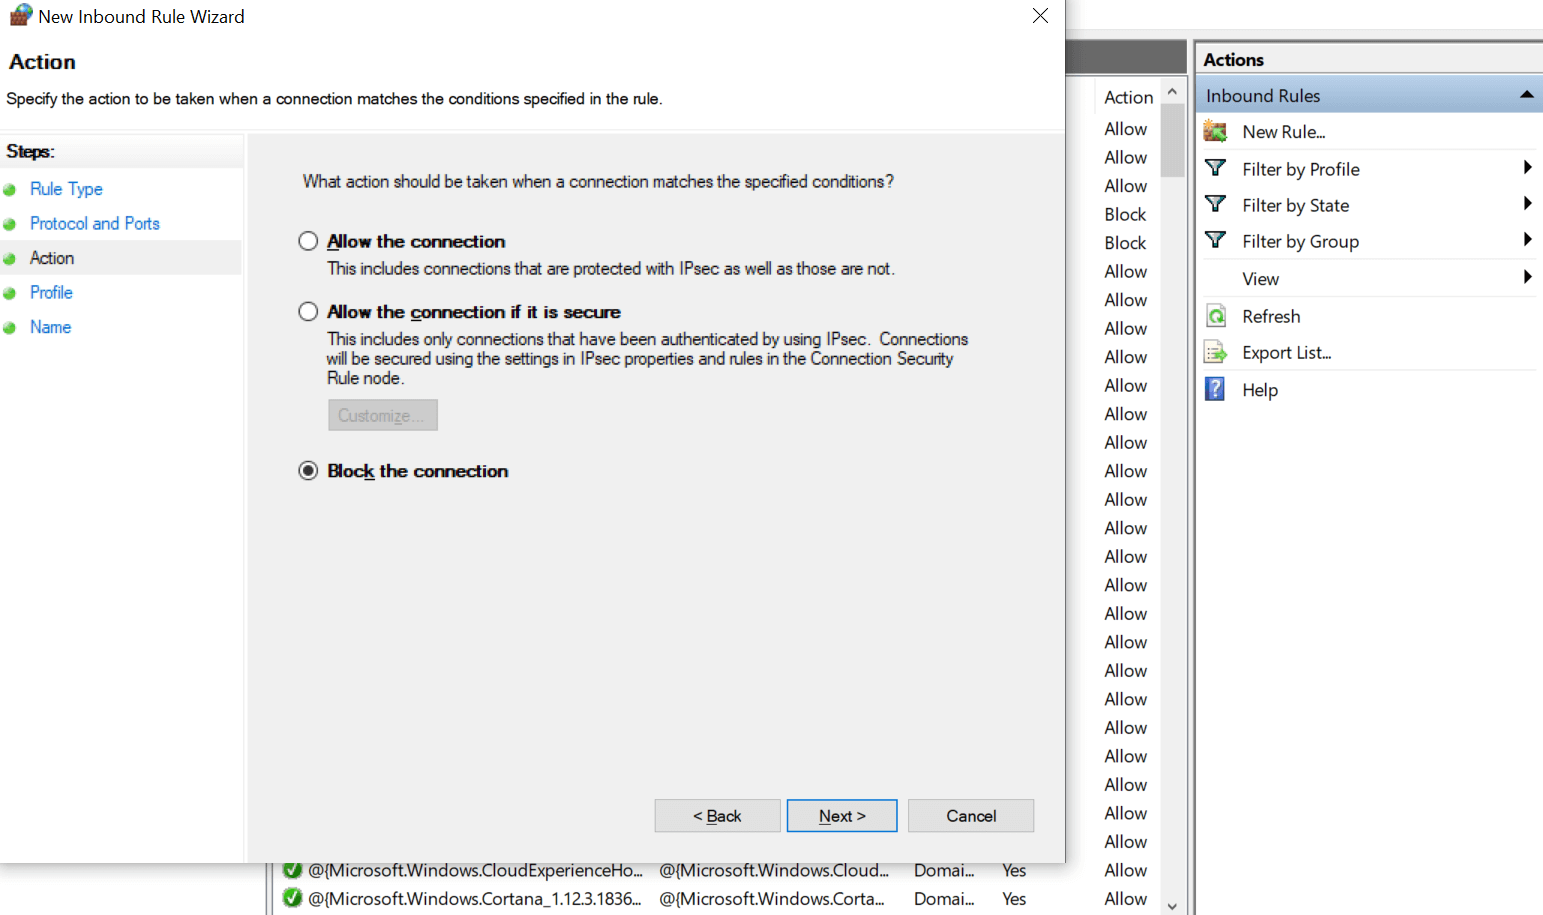
5. Again tap on Next & keep the boxes checked for networks you want to save this rule for (Private/Domain/Public).

6. The last step would be to type in the name of the rule & the description (if you need to) so that you can identify the reason why you created the rule in the first place. After typing in the required details, tap on Finish & your inbound rule will be saved to control the incoming data on your device.
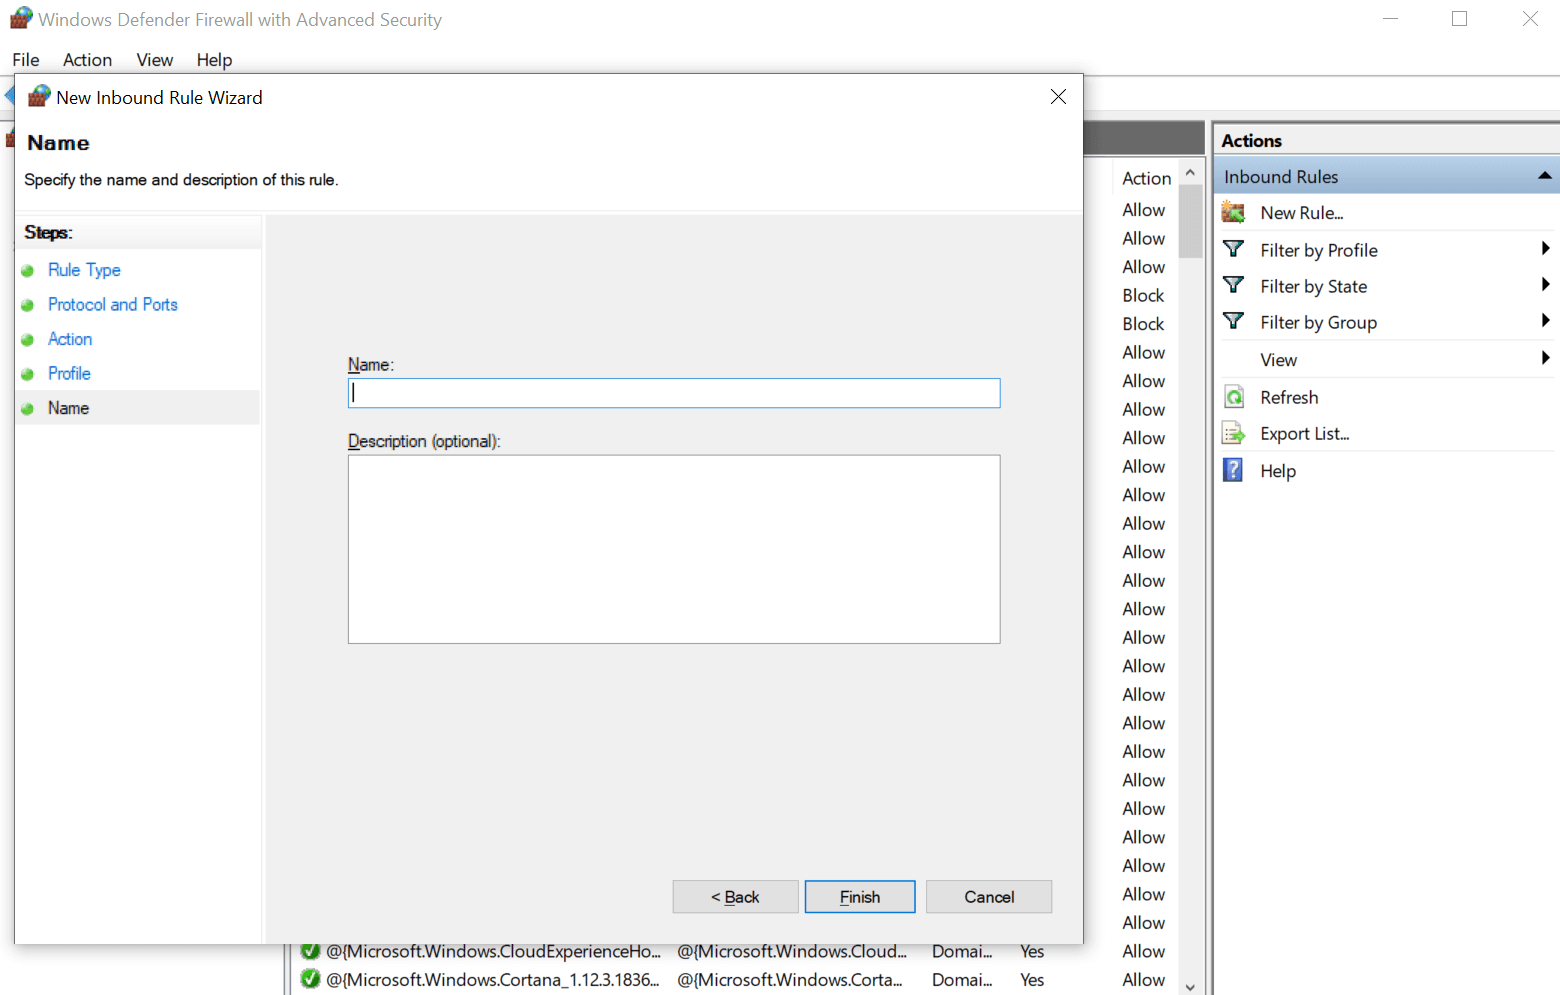
In case after a few hours, days, or months, you wish to make changes in the created rule, you have the liberty to make the necessary changes. From disabling the created rule to deleting it once & for all, anything is possible (according to your necessity).
Wrapping Up
Microsoft Defender itself is a very advanced & powerful security software for your Windows PC & you can totally rely on the same to boost PC security. However, there are a few settings that are disabled (by default) & if you enable them, they will add nothing but a security layer to your PC. Obviously, this will boost PC security but with that, it gives you the power to make changes in Microsoft Defender settings according to your suitability.
So you need to start exploring Microsoft Defender & check every setting to make sure if it’s useful for your PC. And if you think it’s useful, enable the same & experience the changes it brings to your PC like boosting PC security, protecting the system, & keeping it secure than ever.
Next Read
How To Disable Windows Defender


David Morrison
This is a well researched article. Never knew so much about what Microsoft defender can actually do. I will not renew my AVG subscription and stick with Microsoft Defender.