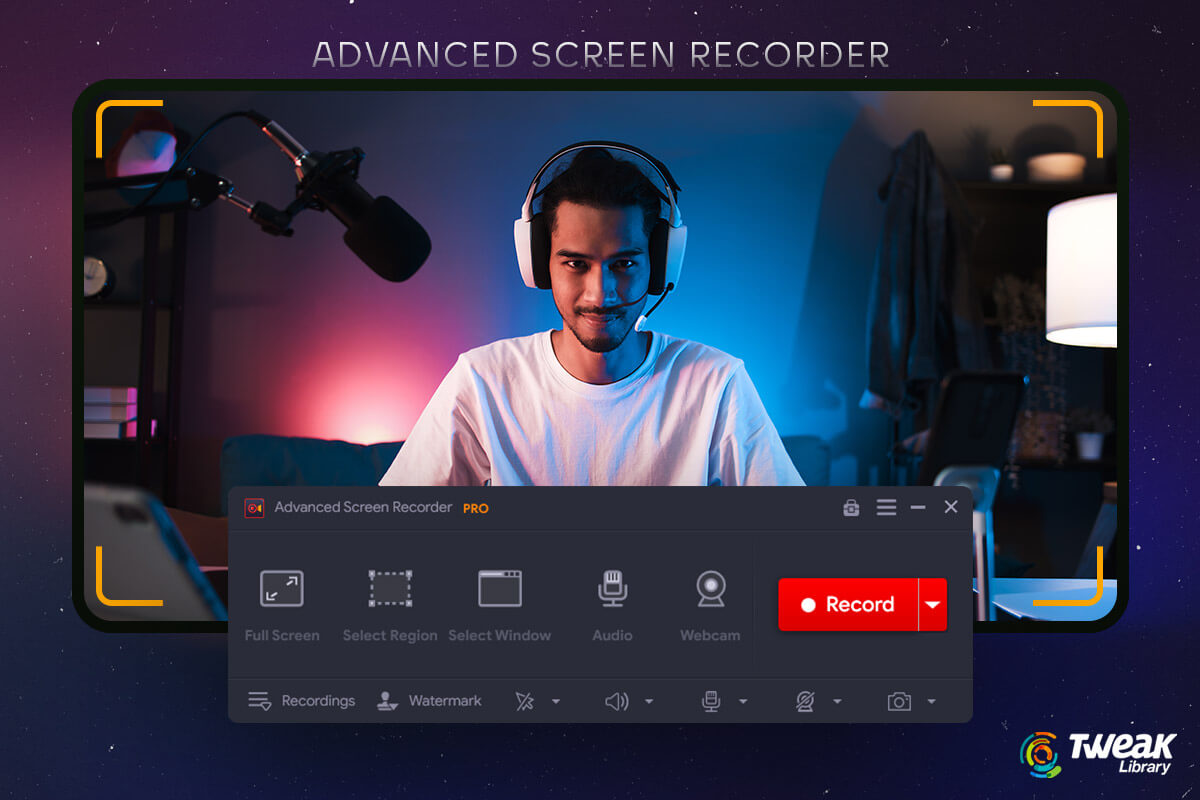
In a day and age where video presentations, online lectures, online meetings, and the like have become common, it is important to keep a track of notable instances. And, to do that you need a screen recording software. While there are many screen recording utilities, Advanced Screen Recorder is one of the best screen recorders for PC.
In this post, we are going to review Advanced Screen Recorder, a tool that comes loaded with everything that can help you capture on-screen activities with utmost ease.
System Requirements
Windows compatibility – Windows 11, 10, 8.1, 8, and 7 (32 and 64-bit)
File size – 28.1 MB
Disk space required – At least 150 MB
RAM – 1 GB minimum, 4 GB recommended
Where Can You Use Advanced Screen Recorder?
Let’s have a look at some real-life applications of this screen recorder for Windows –
- Record tutorials, webinars, meetings, lectures, etc.
- Record both video and audio.
- Screen record your gameplay to capture exceptional moments.
- Conduct live streams.
- Watermark your screen recordings.
How To Use Advanced Screen Recorder?
1. Download, run and install Advanced Screen Recorder

2. Select the region of the screen that you want to record.
3. Want to overlay your webcam, click on the hamburger icon at the top-right corner of the interface and click on Settings.
4. Click on Webcam from the left and tweak the settings according to your requirement.
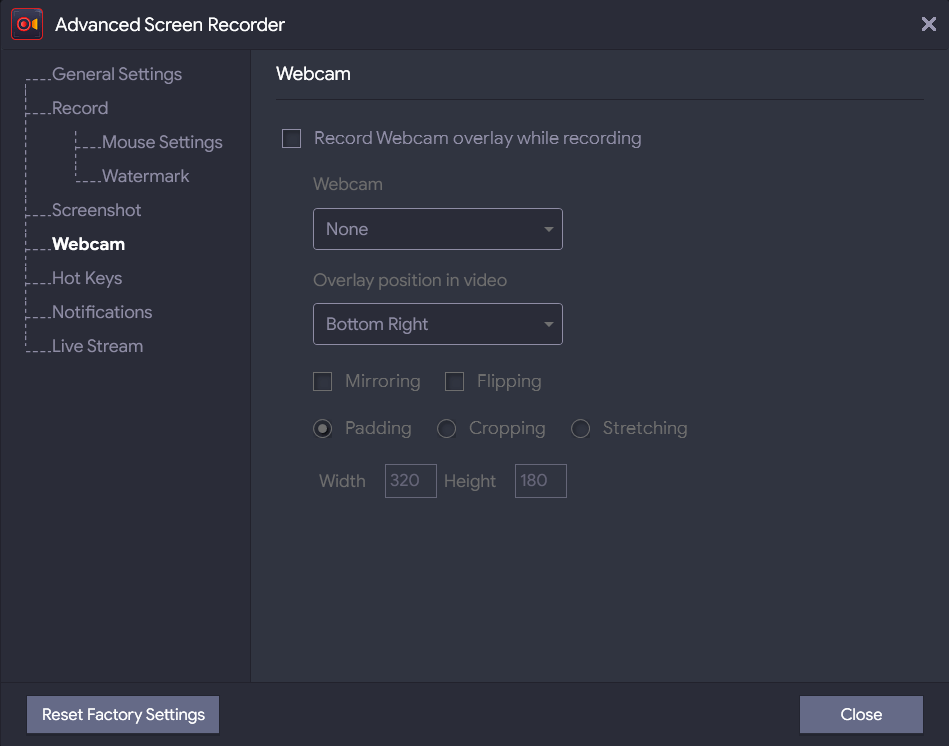
5. Once you are satisfied with the settings, click on Close.
6. On the main interface, click on the Record button. For live streaming, click on the down arrow next to Record and click on Live Stream.
7. Once you click on Live Stream, you can choose from various options. To know more you can refer to the features section below.
Advanced Screen Recorder Interface
Advanced Screen Recorder has a very simple interface. At the first glance, you know what each of the options is meant to do.
After you have run the installation file, this is what the home screen looks like. Here you have options to select the region of the screen you want to record, audio settings, and the option to capture your webcam. The moment you record your screen, you can directly access the recording by clicking on the down arrow key as shown in the screenshot below.
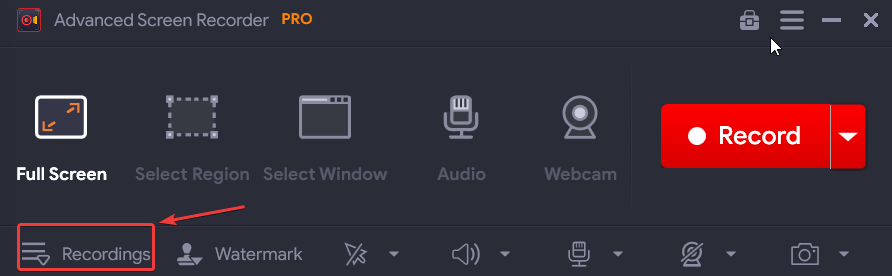
In the dashboard that opens up next, you can see all your video and audio recordings as well as screenshots (if you have taken any).
Features of Advanced Screen Recorder
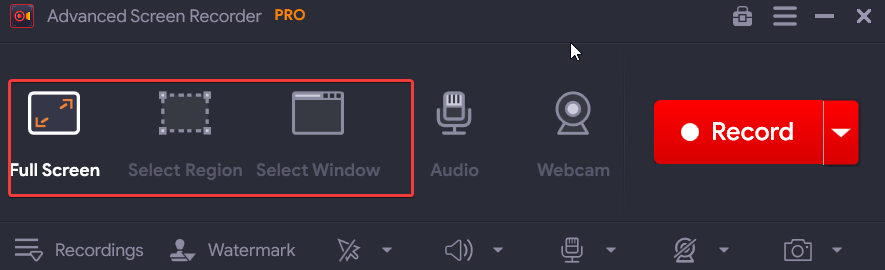
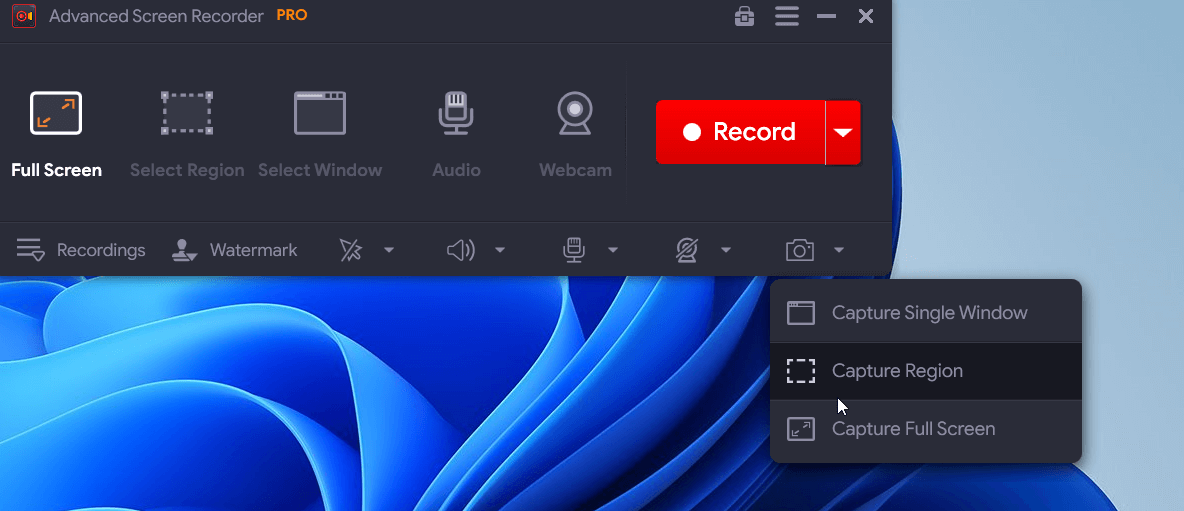
1. Record Any Region Of Your Desktop
As a Windows screen recorder, you can use this utility to capture any region of your desktop. To help you do that, Advanced Screen Recorder offers you three options – Full Screen, Select Region, and Select Window.
The “Full Screen” as the name suggests lets you capture everything that’s on your computer’s screen. With the “Select Region” option, you can capture the precise region on your screen. In fact, you can zero down to the very pixel thanks to the crosshairs that appear, the moment you choose this option. Last but not least, you can screen record a specific window on your screen with the help of the “Select Window” option.
2. Record Audio
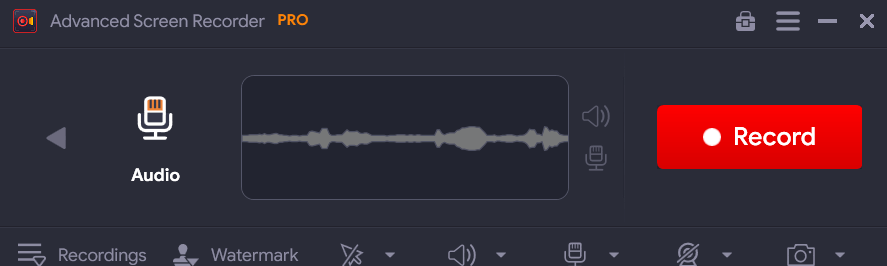
Apart from recording on-screen activities, you can also choose to (or not to) record sounds from your system such as audio from the video playing or other system sounds. You can also plug in your microphone and record a voice-over. One of the best aspects of Advanced Screen Recorder is that you can save an extra audio file while recording.
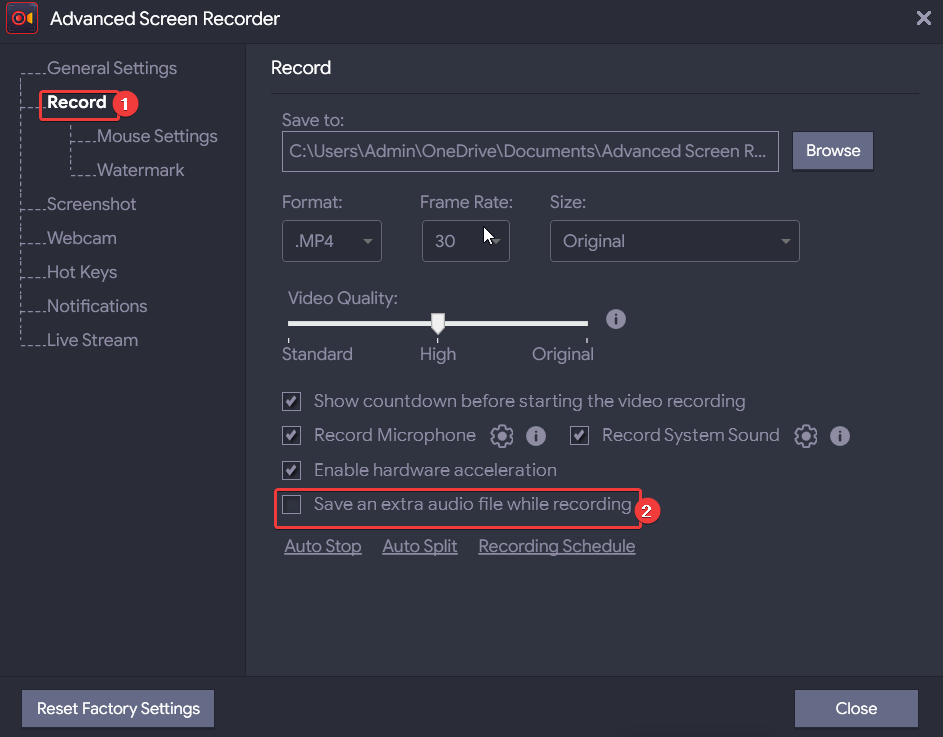
3. Auto Stop
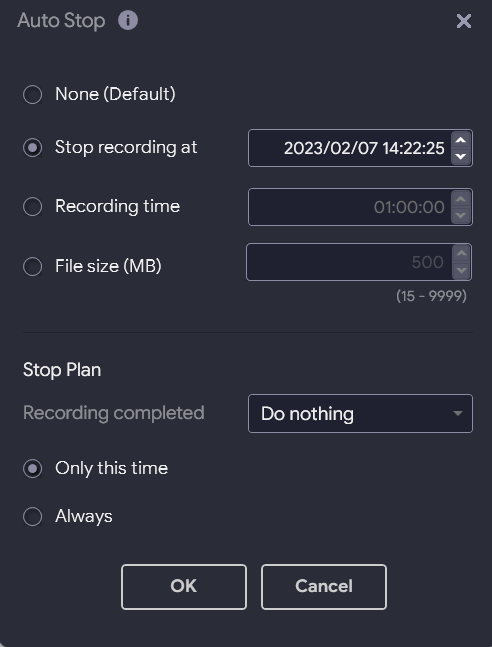
The Auto Stop feature lets you stop your recording session as per the parameters set by you. You can stop your screen recording as soon as it reaches a specific time, duration, or file size. Not just that, you can even choose the action that would happen once the recording stops. For instance, you can choose to exit after the recording stops.
4. Capture Screenshots
Want to take a screenshot of a memorable moment while recording your screen? You can do that by either pressing the F11 key on your keyboard or clicking on the camera icon at the bottom right corner of the interface. Just like in the case of recording the screen, you can capture any desired region.
5. Record Your Webcam
When recording a meeting, an online lecture, or when live streaming gameplay, you might also want to record your webcam as well. Advanced Screen Recorder gives you the option to do both. This means you can either record just the webcam footage or overlay the webcam while recording your screen. You can adjust the overlay position, width, height, and many other settings as per your needs.
6. Customize Watermark
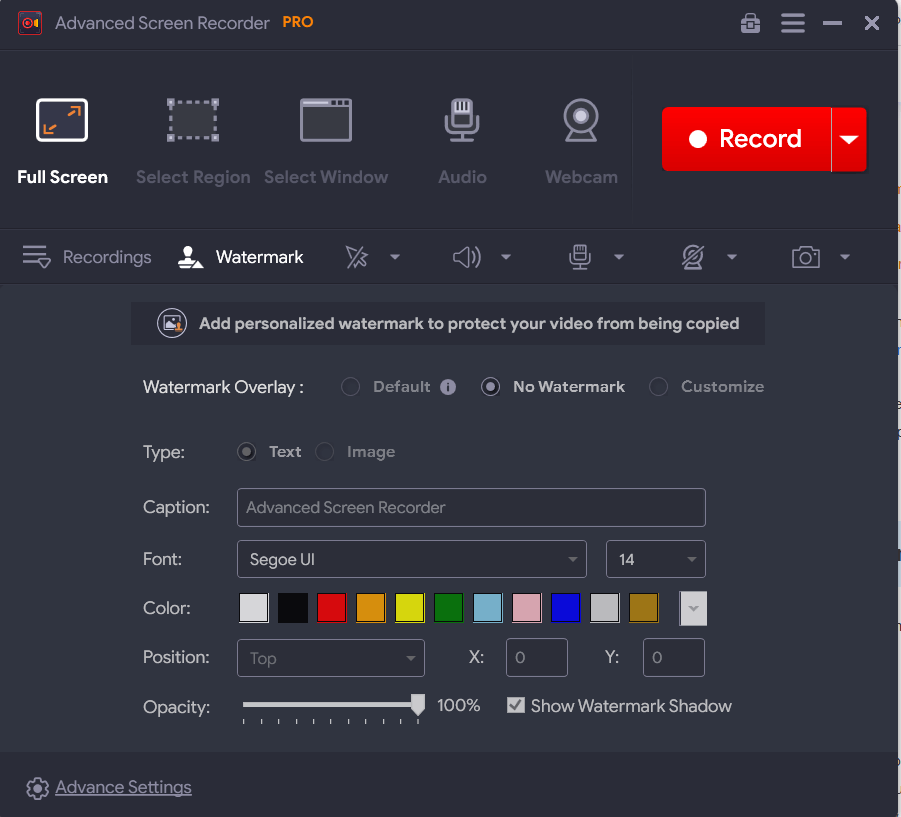
Before putting your screen recording out for later reference (by colleagues, students, clients, or other users) you might want to add a watermark to your recording to save it from being copied. With this screen recorder for Windows, you can customize your watermark exactly how you want it to be. You can choose a caption, change its font, color, and position, and even play with the “Opacity”
7. Auto Split
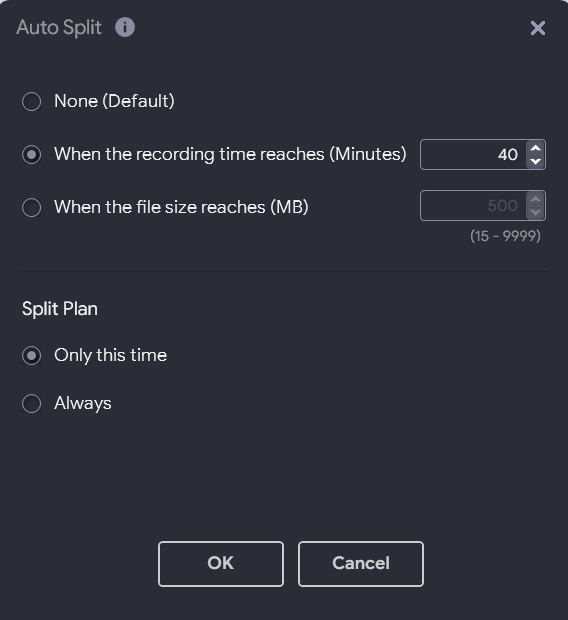
With the Auto Split feature, you can split your recording into separate files. Quite similar to the Auto Stop feature, here too, you can designate conditions after which the screen recording will split into files. You can specify a time or size after the split will take place. You can also choose the frequency of your “Split Plan”.
8. Live Stream
Let’s assume that you are conducting a webinar where you want a live audience to see your on-screen activities and your webcam. Advanced Screen Recorder lets you do just that.
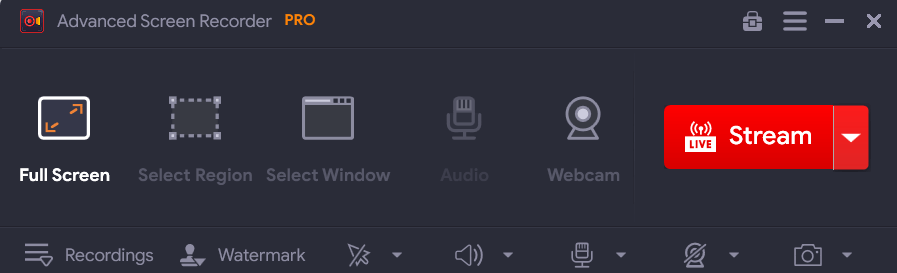
Under the “Live Stream” feature, you can select the streaming service, Bitrate, resolution, and stream key. You can even opt to save the recording of your Live Stream on your computer’s disk for later use.

9. Schedule Recording
Consider this example – You have 4 different meetings scheduled at different times of the day. Each of these online meetings has a different agenda. Also, in one of the meetings, you are also needed to record your webcam. Now, amidst a hectic day, where you are constantly on your toes, it would be tough to juggle other tasks while setting up a recording session, isn’t it?
How about scheduling all these meetings well in advance? As one of the best screen recorders for PC, Advanced Screen Recorder lets you schedule your recording sessions.
Here you can perform the following actions as shown in the screenshot below –
- Assign a separate name to your schedule.
- Choose the start and end time.
- Select the recording area, and choose whether or not to record system sounds.
- Select your microphone and webcam.
10. Denoiser
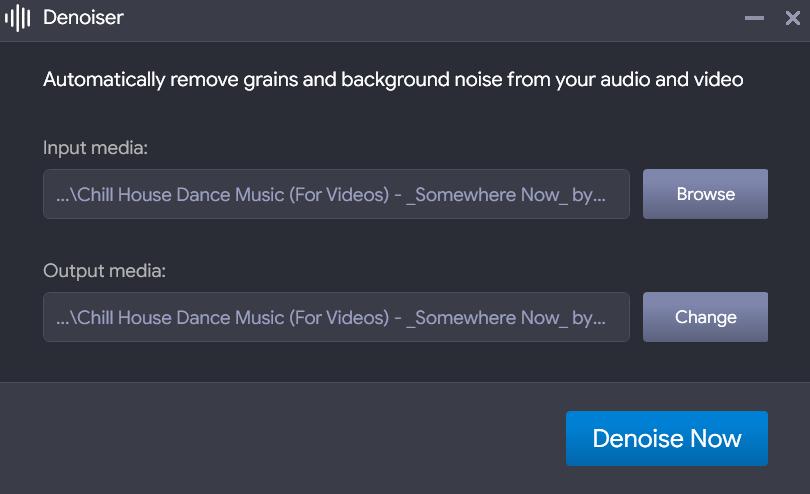
The Denoiser feature in Advanced Screen Recorder helps remove grains and background noise both from your audio and video. To support the denoise feature, you will be prompted to download a third-party component. Once you have downloaded this component, you can select the media from which you want to remove the background noise and click on the Denoise Now button.
11. Video Compressor
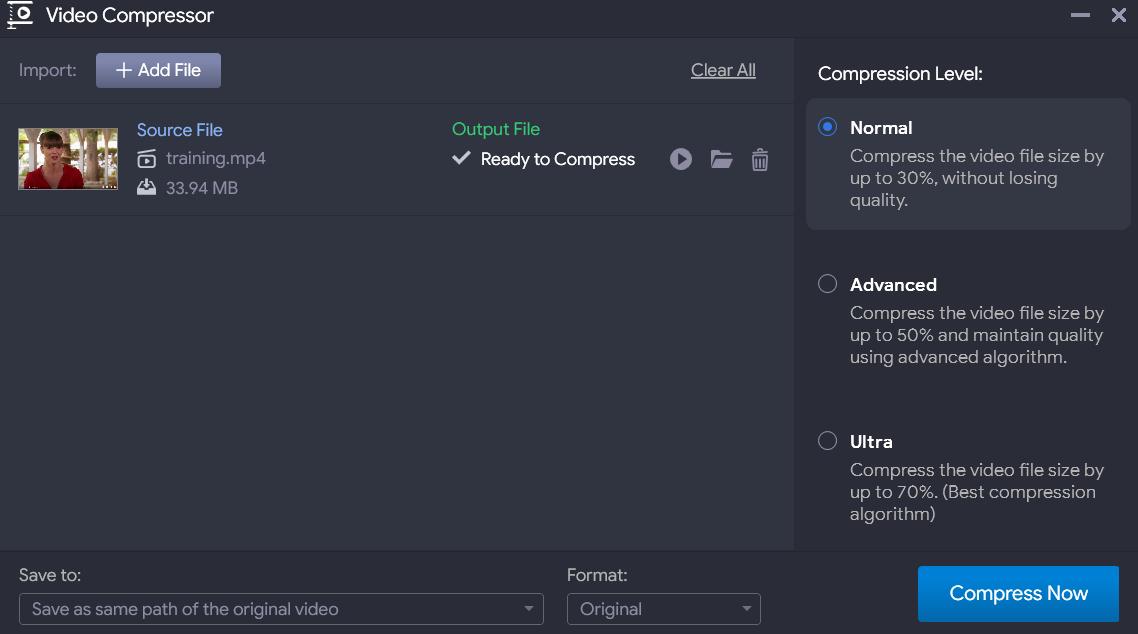
There are times when the need arises to compress large videos for sharing or uploading on various platforms. With the Video Compressor functionality that comes inbuilt in Advanced Screen Recorder, you won’t have to go elsewhere to reduce the size of your videos. You can drag and drop your video files, and choose the compression level. Moreover, you can even select the output format in which you want to save the video. Advanced Screen Recorder’s “Video Compressor” works for both screen-recorded videos as well as those that are already there on your computer.
Pricing – Free Vs Paid
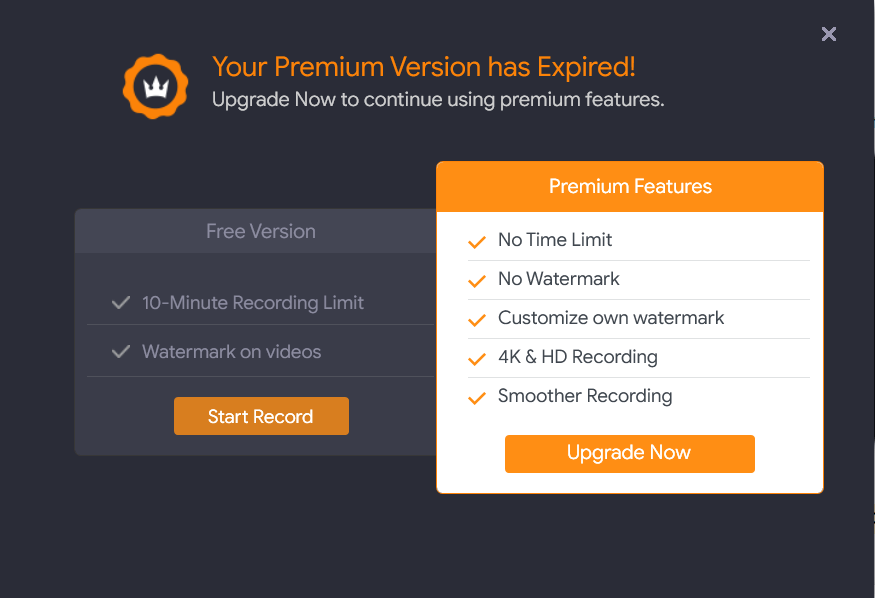
As a free screen recorder for PC, Advanced Screen Recorder lets you record the screen for 10 minutes and limits you to a few features. Also, the output video will bear a watermark. Whereas the premium variant removes any time and feature restrictions on the recording. For instance, features like Auto Split, Auto Stop, and Recording Schedule are available only in the Pro variant.
Moreover, with the premium or “Pro” variant, you can choose to put or remove watermarks on your screen recordings, and capture screens in 4K and HD. The premium variant is priced at US$39.95
Updates
Updates are regularly released in Advanced Screen Recorder in order to keep the application bug-free and to regularly release new features. Although a user is automatically notified of such updates, you can click on the hamburger icon and further click on Check for updates.
Customer Support
Should you get stuck with a feature or have issues regarding the license, there are multiple channels you can seek assistance. You can visit the help section and get an overview of how each of the options of Advanced Screen Recorder work. You can also visit the contact us page and elaborate on the product and issue you are facing.
Wrapping Up:
For many reasons Advanced Screen Recorder is undoubtedly one of the best screen recorders for Windows PC. It is simple to use, lets you record your on-screen activity in great resolution, and even lets you automate your screen recording session. Do give it a try and share your experience with us in the comments section below. For more such content, keep reading Tweak Library.


Leave a Reply