Windows 11 is a new OS that is self-sufficient in resolving minor issues by updates and troubleshooting processes. As the OS is new many users are not familiar with all the processes and therefore some minor issues like the camera not working become a big issue for them.
In this blog, we have covered all the troubleshooting steps which will resolve the issue of the camera not working on Windows 11. It is suggested to perform all the steps in the same order as mentioned in the blog so that if the issue gets resolved in an initial couple of steps then you can save your precious time.
Also read:- Best ways to fix Windows 10 camera not working.
Method to Fix Camera Not Working issue in Windows 11:-
1. Check if the camera has a privacy shutter
Before initiating the troubleshooting process for the camera issue on Windows 11 check whether the camera is covered with a privacy shutter or not. Some laptop brands offer a privacy shutter feature in the camera to avoid the instances of an accidental launch of the camera. Privacy shutter is a physical cap preset on the camera which is used over the camera lens. When the lens is covered with a privacy shutter nothing will be visible through the camera and users might get confused with the working of the feature.
Ensure that the privacy shutter is open before you start using the camera of the laptop.
Also Read:- Camera not working on Mac. Possible Fixes.
2. Check USB cable if you have an external webcam attached
Sometimes users use an external webcam that is attached to the laptop via USB cable. Ensure that USB cables are connected properly to the port. Also, try changing the USB port to check whether the port is working or not.
Also Read: How to Record Webcam on Windows PC
3. Ensure Windows 11 has detected the camera app correctly
Windows 11 is an advanced OS that is capable of detecting peripherals like cameras automatically but sometimes due to come corrupt files this feature may not work or sometimes sudden changes in some settings of OS may cause this issue.
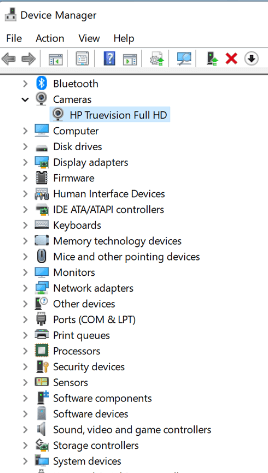
It is advised to check OS if it can detect the camera or not by following the process:-
- Open run by pressing Windows + R key
- Type command “msc” and press Enter to open Device Manager
- Navigate to the Camera device and expand the branch
- In case the Camera is not present in the Device Manager, then look for Imaging devices, Sound, Video, Game controllers branches.
- If Windows 11 can detect the camera, then it will appear in any of the above-mentioned branches
- If you do not find the camera in this section, then navigate to the top bar and click on the Action> Scan for hardware changes
- Restart the computer and you will see the Camera this time in the Device Manager
4. Check camera app privacy settings
Some apps like Zoom, Skype, Microsoft Teams seek app permissions that users deny to give and therefore the camera does not support these apps. It is advised to check app privacy settings if the camera is working with these apps.
Follow the steps to check app privacy settings:-
- Open Settings by pressing Windows + I key
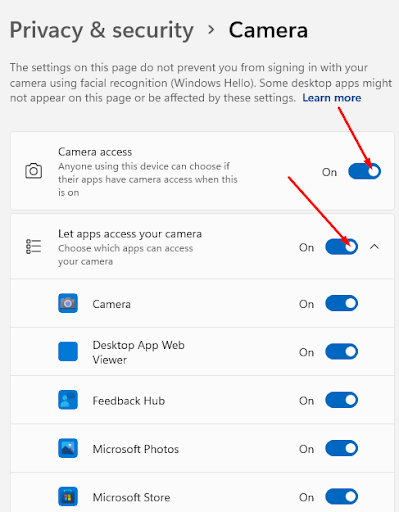
- Navigate to Privacy & Security> App Permissions> Camera
- Turn on camera access (Anyone using this device can choose if their apps have camera access when this is on)
- Turn on Let apps access your camera
- Restart computer
5. Check system updates
Whenever Windows roll out any updates, then it is recommended to download and install those updates because this update contains bugs fixes in them. By installing these updates you can resolve the small issue of the computer which can restrict the camera working process.
Follow the process to check for system updates:-
- Open Settings by pressing Windows + I key
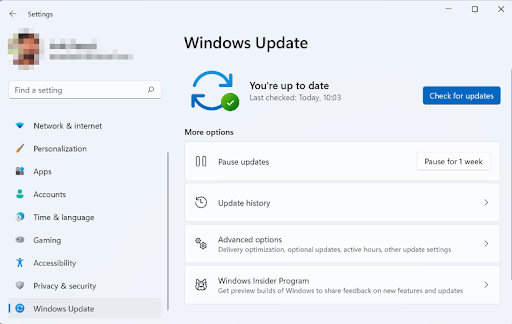
- Navigate to Windows Update> Check for updates
- Download and install if any updates are available
- The computer will restart automatically
- Check if the camera is working or not
6. Reset camera application
Sometimes resetting the camera app may cause unknown reasons for the camera not working in Windows 11.
Follow the steps to reset the camera app:-
- Open Settings by pressing Windows + I key
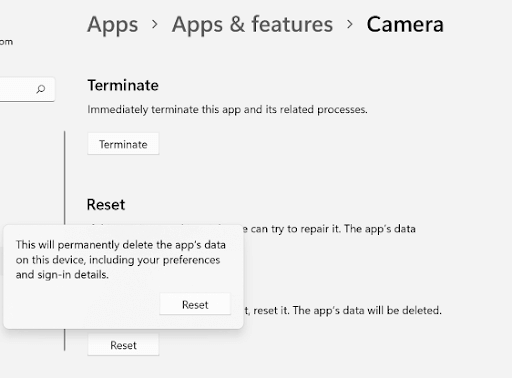
- Navigate to Apps & features> Camera
- Click on 3 dots menu> Advanced options
- Go to the next page and click on Reset
- Restart the computer
7. Run Hardware and Device Troubleshooter
Windows troubleshooter has the capability of removing these types of errors quickly and with a few clicks.
Steps to launch troubleshooter:-
- Open run by pressing Windows + R key
- Type the command exe -id DeviceDiagnostic and press Enter
- Click Next when Hardware and Devices troubleshooter prompts
- Select Camera in list of devices having issues by utility> Click Next
- If utility traces some problem, then click on Apply this fix
- Click on next one more time
- Restart computer
8. Update webcam driver
Sometimes faulty drivers cause the problem of the camera not working in Windows 11. Updating these drivers fix the issue and you can use the camera once the drivers are updated. To update drivers automatically, we recommend using Advanced Driver Updater. It is a great tool that helps in updating all corrupt and missing and therefore helps in enhancing the computer performance.
Advanced Driver Updater has a large database of drivers which is used to update outdated and missing drivers. You can also take backup and restore drivers for future use. Using Advanced Driver Updater is very easy as it scans the computer and gives a list of all the outdated drivers which can be updated manually in non-registered versions and automatically in the registered versions.
Download Advanced Driver Updater
Complete Review on Advanced Driver Updater
Features of Advanced Driver Updater:-
- Scans the computer and provides a list of all the outdated drivers.
- It has a comprehensive database of drivers
- Excellent customer support
- Easy to download and install drivers
- Backup and restore function available
- Scheduled update available
Steps to use Advanced Driver Updater:-
1. Download and install Advanced Driver Updater
2. Run the application and click on Start Scan Now
3. You will get a list of all the outdated drivers once the scan is complete.
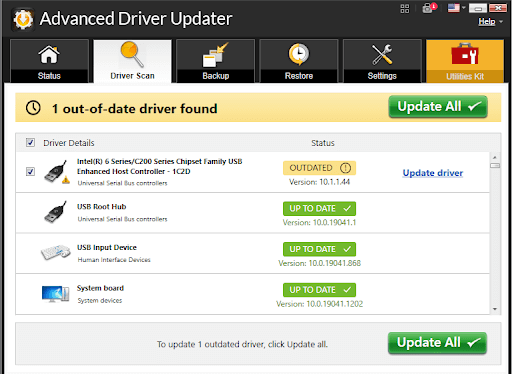
Note:- For demonstration, we have used the registered version of Advanced Driver Updater. It updates all the outdated drives in one click. If you use a non-registered version, then you will have to update each driver one by one.
4. Once all the drivers are updated, restart the computer.
Conclusion:-
Many users face camera not working issues on Windows 11. As it is a new OS therefore users do not know many troubleshooting steps. In this blog, we have discussed all the ways by which you can resolve these issues and you can get the camera app working for your personal and professional use.
Try these troubleshooting steps if the camera app is not working on your Windows 11 computer and let us know your experience in the comments section below.


Leave a Reply