If you are reading this article, it means you have forgotten your Wi-Fi Password and are looking for ways to retrieve it. Fortunately, Windows 10 has a workaround for this problem. Windows 10 remembers and saves every Wi-Fi password a user has ever used. Thereby making it easy to view Wi-Fi passwords on Windows 10.
Wi-Fi password on Windows 10 can be viewed either from Wireless Network Properties or using command prompt, an inbuilt Windows operating system tool.
For detailed instructions continue reading the article till the end.
How To View Wi-Fi Password In Windows 10
Generally, many Wi-Fi users don’t change the default Wi-Fi password and username provided by their service provider as they either forget about it or don’t feel comfortable. To remember it, they either jot it down somewhere or check the backside of the Router for a Wi-Fi username and password. But believe us guys, both these approaches are not a full proof solution as a password printed on the back of the router can be faded and the password is written on a piece of paper that can be misplaced.
Must Read: What To Know Before Connecting To A Public Wi-Fi Hotspot
So, guys no more checking the router or jotting down the Wi-Fi password, as you can anytime see the Wi-Fi password stored in Windows 10 from Wireless Network Properties by following the below-listed steps.
How To See Wi-Fi Password on Windows 10 From Windows Settings:
The steps listed below will help you to view your Wi-Fi password in case you no more remember it:
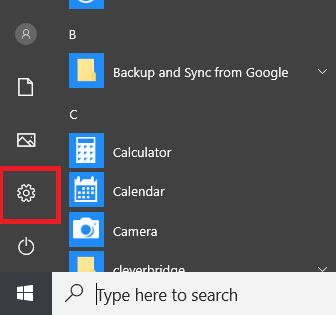
1. Click on the Windows button > Setting icon(gear icon) to open Windows Settings.
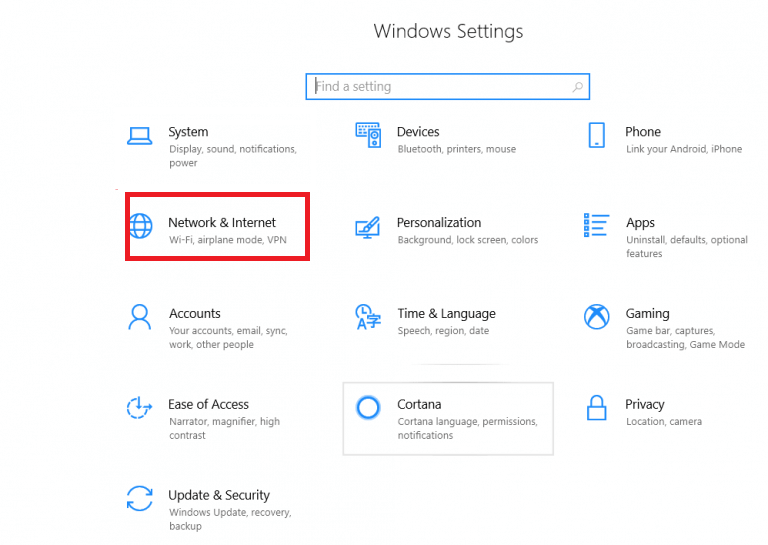
2. Now in the Windows Settings click on the Network & Internet Settings option.
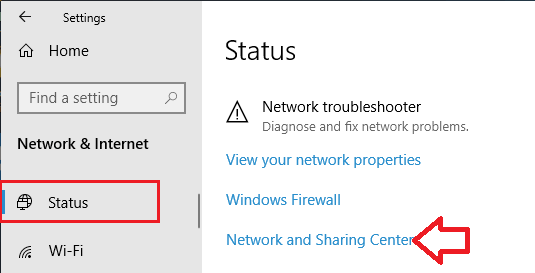
3. Now on the next screen, on the left pane click on Status and on the right pane click on Network and Sharing Center option.
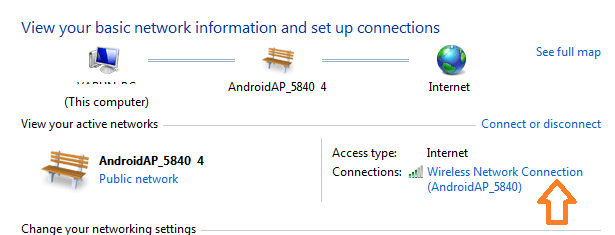
4. On the Network and Sharing Center screen, under View your active network click on the Wi-Fi Network your system is connected to.
5. On the Wireless Network Connection Status Screen click on the Wireless Properties button.
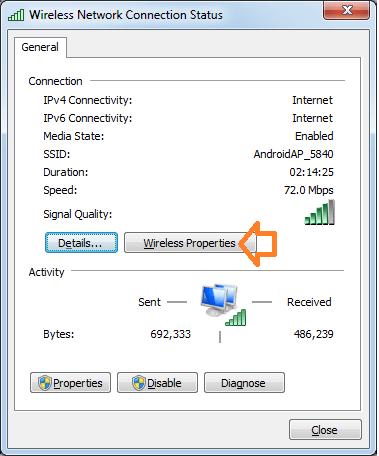
6. On the Wireless Network, Properties window clicks on the Security tab. Now checkmark the box that is next to Show Characters.
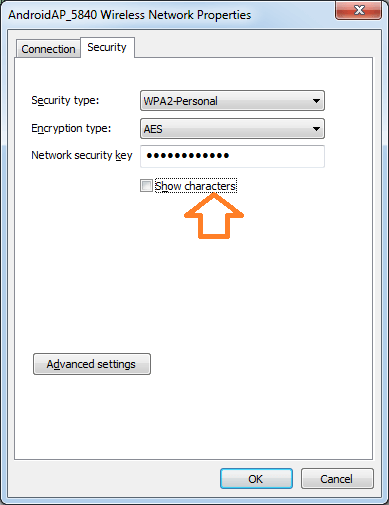
7. Clicking on the box next to Show characters box will reveal the Wi-Fi Password for the current Wi-Fi network that your system is connected with.
Please note that for security reasons it is highly recommended that you uncheck the box after copying your Wi-Fi password.
Also Read: Fix For Wi-Fi Icon Missing In Windows 10 Problem
How To View Wi-Fi Password on Windows 10 Using Command Prompt:
You can also get your saved Wi-Fi password by typing a simple command on the Command Prompt.
1. In the Windows search bar type in Command Prompt. From the results, right-click on the Command Prompt and select Run as administrator option.
2. Now in the Command Prompt window enter the following command:
netsh wlan show profiles
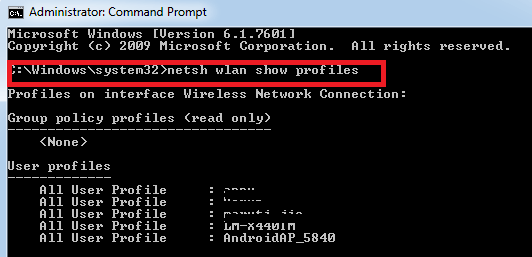
3. The following command will display a list of all Wi-Fi networks that your system is previously or currently connected with.
4. From all the displayed network profiles copy the profile for which you want to view the password.
5. Now to view the password type in the following command. You have to replace PROFILE_NAME with the profile name you got in the previous step.
netsh wlan show profile PROFILE_NAME key = clear
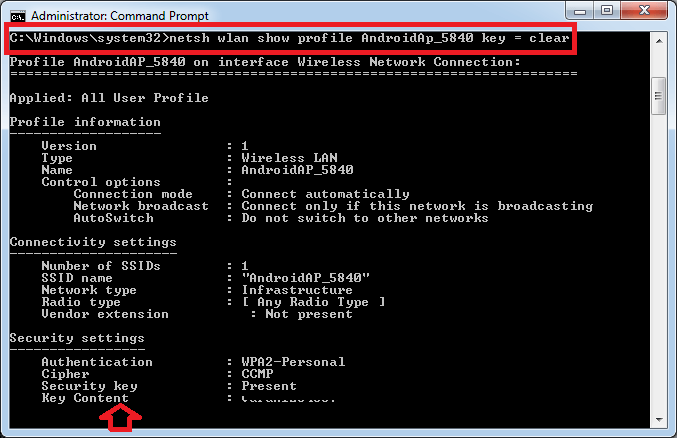
6. The command will now display the Wi-Fi password in front of Key Content along with other details.
So, guys, this is all from our side. I hope now you are able to see your Wi-Fi password in Windows 10 using the above steps. If you have any other comments or suggestions then do share them in the comment box below.
Read Next:
How to Share Wi-Fi Password from iPhone to Mac
How To Enable Wi-Fi Calling On Android And iOS


Leave a Reply