Skype is one of the best apps to send messages, make calls, and share files online across the globe. Microsoft owns this app and it is available for free to all users. You can also add credit and make international calls from most devices running different operating systems.
However, some users have been complaining about Skype’s high CPU usage in Windows 10/11. This blog will help Skype users to reduce CPU high usage and CPU load that is caused by the Skype app.
What Causes Skype’s High CPU Usage In Windows 10/11?
Just like any other app, Skype is designed not to consume a lot of system resources. However, if you observe that you have CPU high usage and CPU load then, this could be because of the following reasons.
Malware. One of the main reasons for high CPU usage in Windows 10/11 is malware infection. Threat actors can send disguised malware files to your PC that may attach to legitimate software and consume resources.
Malfunctioning Services. If the Skype-related Windows services are malfunctioning then this can result in Skype’s high CPU usage.
RAM issues. If you have less RAM or your RAM has developed errors then you can observe high CPU usage in Windows 10 related to all apps including Skype.
Outdated Version. It is important to update your Windows OS and all the apps including Skype. Older versions of any software lead to CPU high usage and increase the CPU load of your PC.
Corrupt System Files. As Skype is a Microsoft app, it relies on the Windows system files to function. If your Windows system files are corrupt then this can lead to high CPU usage in Windows 10/11.
Expert-Recommend Troubleshooting Methods From Microsoft And Reddit Forums
Method 1: Reboot PC

The first troubleshooting step for most major problems is to reboot your PC. A simple restart will fix many issues. Just restart your PC and check if Skype is still consuming more resources or not.
Method 2: Update Skype
One of the most prominent issues of high CPU usage in Windows 10/11 is outdated apps. It is recommended that you first update Windows OS which might include a Skype update and then update Skype individually. Here are the steps:
Update Windows:
Step 1: Press Win + I to open Windows Settings.
Step 2: Click on the last tab in the left panel named Windows Updates.

Step 3: Now click on the Check for Updates button in the right pane.

Step 4: Click on the Download and Install link under each update and let the process complete.

Step 5: Reboot the PC and check.
Update Skype:
Step 1: Click on the Windows key and type Microsoft Store.
Step 2: Click on the relevant result and the Microsoft Store will open.
Step 3: Click on the Library icon in the left bottom corner.
Step 4: Click on the Get updates button in the top right corner and let the update process continue.

Step 5: Restart your PC.
Method 3: Scan For Malware

The next method to fix Skype’s high CPU usage is to scan your PC for Malware. You can use either Microsoft Defender or any third-party application to check and remove any viruses and malware from your system. If you ask us, then we recommend T9 antivirus which is a real-time antivirus that prevents malware from entering your system in the first place.
Method 4: Check PC RAM
Skype requires at least 4 GB RAM to function. So if you have less than 4 GB then we recommend you upgrade your RAM.
If you have 4 GB of RAM and are still facing Skype for business high CPU usage issues then you can terminate other background apps. As they are consuming resources and closing them will free up RAM to help Skype run properly.
Also Read:How to Delete Undeletable Files & Folders in Windows 11/10/8/7?
Method 5: Alter The Visual Effects Settings.
To fix the “Skype using too much CPU” error, we need to adjust the settings of Visual Effects on your PC to Best Performance. Here are the steps to do that:
Step 1: Press Win + E to open File Explorer.
Step 2: Locate This PC and right-click on it to view the context menu. Click on Properties.
Step 3: A new About window will open.

Step 4: Click on Advanced System Settings.

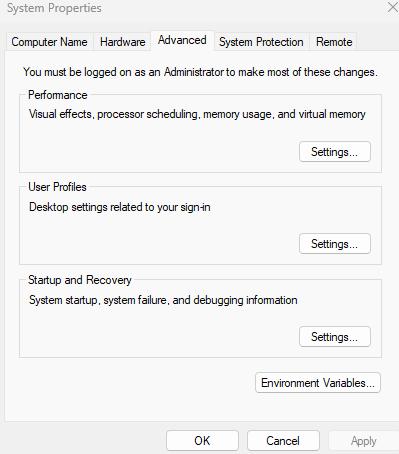
Step 5: Now click on the Advanced tab and then click on Settings under Performance.

Step 6: Further, in the new box that opens, click on the Visual Effects tab and then choose Adjust For Best Performance.

Method 6: Remove Skype Cache And Reset Skype
Every app stores some temporary files on your PC to run faster rather than downloading them from the server. Sometimes these stored files also known as cache get corrupted and can result in Skype using too much CPU. Therefore, it is necessary to clean temporary files from your PC. Here are the steps:
Step 1: Exit the Skype App.
Step 2: Press the Windows key and type Add or Remove Programs. Click on the relevant result.
Step 3: A list of installed apps will appear on your screen. Type Skype in the search box.

Step 4: Look for the Skype app and click on the three dots next to it to reveal the context menu.
Step 5: Choose Advanced options and scroll down to locate the Reset section.

Step 6: Click on the Reset button and follow the instructions.
Also Read: How To Fix The Downloads Folder Not Responding On Windows
Method 7: Make Changes To Skype’s Settings
Another method to fix Skype using too much CPU is to make a few changes in the Skype settings.
Step 1: Launch Skype, click on the three dots and choose Settings (Ctrl +,).
Step 2: Click on the Appearance tab in the left panel.
Step 3: Locate Enable compact list mode and turn the toggle button towards the right.
Step 4: Next click on the Notification tab in the left panel and disable all the notifications that you do not need to reduce the CPU load and CPU high usage.
Method 8: Reinstall Skype
Another method to fix Skype using too much CPU is to uninstall the app completely and reinstall it. Here are the steps:
Step 1: Press the Windows key type Add or Remove Programs and click on the relevant result.
Step 2: Type Skype in the search bar and locate it in the results that appear below.
Step 3: Click on the three dots next to it and choose Uninstall option.

Step 4: Follow the onscreen instructions to remove the app from your system.
Step 5: After the app has been uninstalled, reboot your PC.
Step 6: Now, press the Windows key and type Microsoft Store.
Step 7: Click on the relevant result to launch the Store App.
Step 8: Type Skype in the search bar and choose the relevant result.
Step 9: Install the app by clicking on the Install button.
Also Read: Troubleshooting 101: Fixing the ‘Your PC Did Not Start Correctly’ Error
Method 9: Skype Support

If none of the above techniques work then we advise you to connect with Skype support to help with Skype for business high CPU usage issues. You can also read the FAQs and access other online support articles to help with this issue. Do let us know how you fixed this issue in the comments section below.
Is Skype’s High CPU Usage Issue Fixed?
The above-mentioned troubleshooting methods have been compiled from various Microsoft and Reddit forums. This is a complete troubleshooting guide for CPU high usage and CPU load caused by the Skype app. Do write to us about how you solved this error in the comments section below.


Leave a Reply