Keep things distinct on Google Chrome and Firefox by using multiple profiles, here how to do it.
One of the most appreciated features of Google Chrome and Firefox is the capability to create multiple profile. This feature helps in synching your history, bookmarks, apps, and extensions across various devices. Plus, if you are using more than one account multiple profiles will help you in keeping things separate.
Must Read: 10 Best Google Chrome Security Extensions
Moreover, you can back up the profile and restore it when you make new installation of either Chrome or Firefox. This way you won’t lose any data.
In this guide we’ll show you how to create Google Chrome profile and Firefox profile on Windows 10.
Getting started
How to add a new profile in Google Chrome
To create a new profile or to add new user in Google Chrome on Windows 10 follow the steps below:
1. Open Google Chrome.
2. Click profile button present at the right corner.
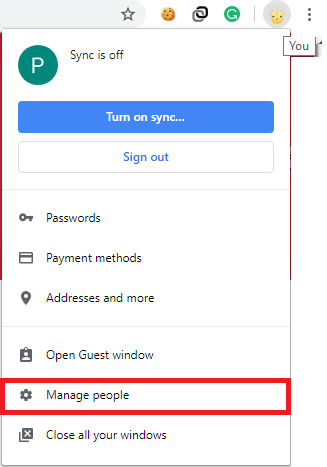
3. Next choose Manage people option from the menu.
4. Now click on Add person > type in the name for the new profile > select image for identifications > click Add button.
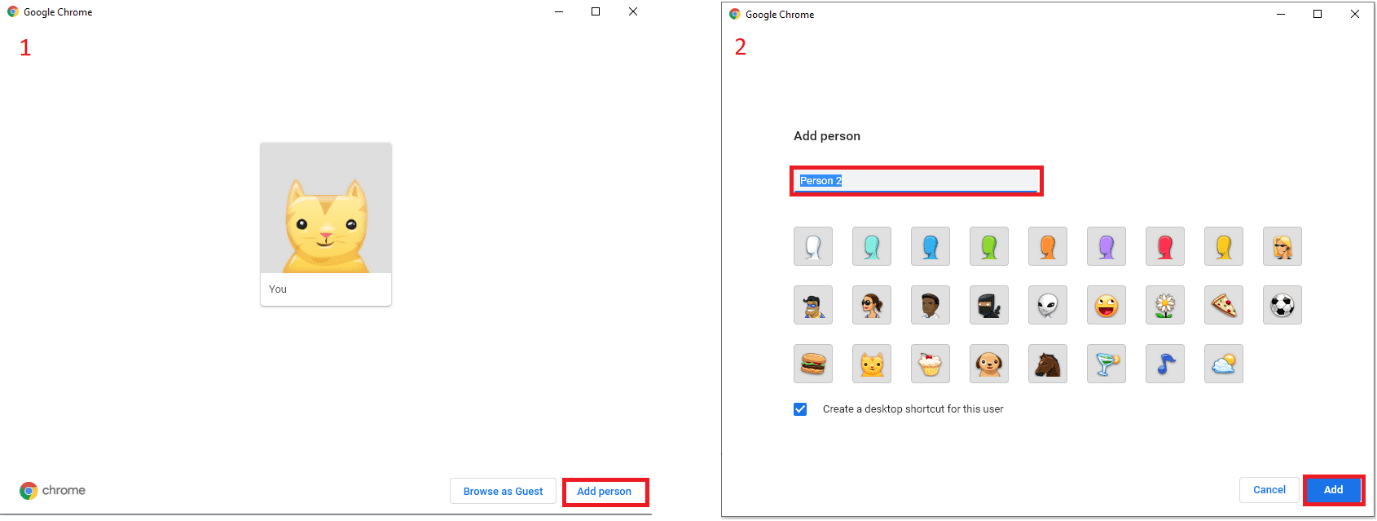
Using these steps, you’ll be able to create a new profile and use it separately. This means you’ll now have your own bookmarks, settings, cookies, passwords and other important things.
To create additional profiles on Google Chrome, use the same steps.
Using Profile Manager in Mozilla Firefox
Tip: Profile Manager in Firefox works when Firefox is open but certain options will only work when the browser is closed.
How To Launch Manage Profile When Firefox Is Open?
To manage profile when Firefox is in use follow the steps below:
1. Open profile about page by typing about:profiles in Firefox address bar.

2. Here, you’ll see the following options:
- Create a new profile: use this option and follow onscreen instructions to create new profile. Once done if you want Firefox to use it as default click on Set as default profile.
Now that you have created a profile, you can use following options to edit:
- Rename: use this option to change name. Remember: Folder containing files for the profile cannot be renamed.
- Remove: as the name says this option can be used to delete profile. Remember: Profile in use cannot be deleted.
- Set as default profile: Want to make a profile default use this option.
- Launch profile in new browser: use this option when you want to use profile in a new page.
Launching Managing profile when Firefox is closed
To manage profile when Firefox is running follow the steps below:
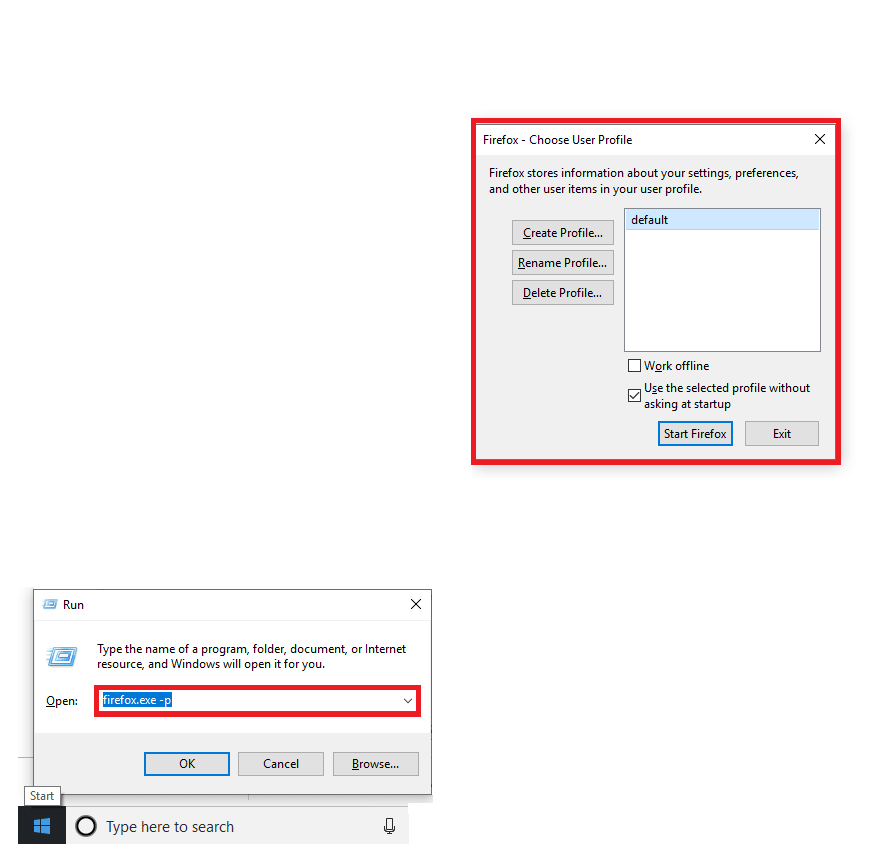
1. Open run window by pressing start + R key together.
2. Here type firefox.exe -P
Note: -P is used to open profile manager. Instead of this you can even type -p, or -ProfileManager
3. Click Ok. This will open the profile manager window.
Note: If Profile Manage does not open, it means Firefox is running in the background. However, if that is not the case and you still face the problem. Type in the following command in the Run window.
If you are using Firefox (32-bit) on 64-bit Windows:
“C:\Program Files (x86)\Mozilla Firefox\firefox.exe” -P
If you are using Firefox (64-bit) on 64-bit Windows:
“C:\Program Files\Mozilla Firefox\firefox.exe” -P
Now that you know different ways to open Profile Manager, it’s time to learn how to create new or additional profile.
How to create new profile in Firefox?
Once, you have profile manager window in front of you, follow steps below to create new profile:
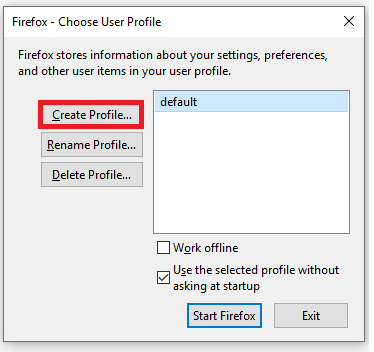
1. Click Create Profile in Profile Manager window.
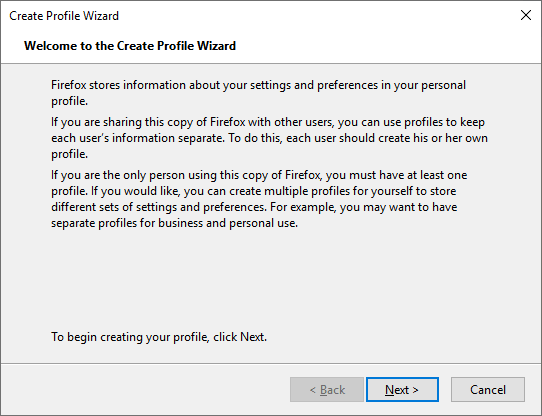
2. Now, click Next to begin creating profile.
3. Give name to your profile for identification. Note: This name is not visible on the Internet.
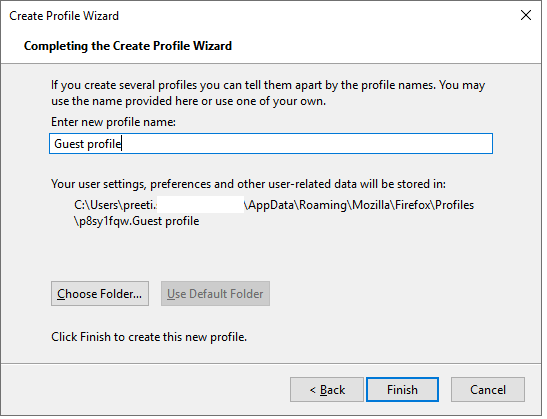
Note: If you don’t want to save profile on the PC disregard Choose Folder option.
- Next, click Finish. New profile will now be created.
Now that you have a new profile, you can sync your data.
If at any time after creating would want to delete the profile. You’d need to open profile manager > select the profile and click on Delete Profile option.
Remember: If you choose Delete Files all the data will be deleted, and this action can be undone. However, if you want to remove only the profile and retain data select Don’t Delete Files.
In addition to this if you want to use additional options you’ll need to start Profile Manager when Firefox is closed. As the options like Work offline and Use the selected profile without asking at Startup are only then available.
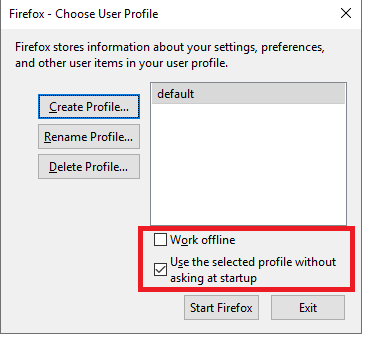
Work offline: This option loads chosen profile and starts Firefox when offline. This will help to view web page that you previously visited with the selected profile.
Use the selected profile without asking at startup: This option is beneficial when you want to tell Firefox what to do at startup.
Firefox will automatically load selected profile at startup. However, if this option is unmarked each time you start Firefox Profile Manager will ask you to select the profile you’d like to use.
Also Read: Enable Two-Step Authentication To Enhance Firefox Account Security
Using these simple steps, you can have easy access to all your data anywhere you want. By default, on Google Chrome the account you are logged in is your profile. But if you don’t want to sync all data in it. You can create a new profile. Same is with Firefox multiple profile gives you peace of mind. Moreover, you’ll be able to share your system and browser with other by keeping your privacy intact.
We hope you like knowing about Profile Manager and how to create and use Profile on Chrome and Firefox. Soon, we will be explaining you about how to recover important data from old Firefox profile. So, stay tuned to know about it.


Leave a Reply