Do you want to get to all websites on your Android? Do you want to keep your internet activities private? Setting up a proxy server on your Android can help!
A proxy server acts as an intermediary between your device and the internet. This acts in place of your real IP address while browsing. Hence, it becomes difficult for anyone to track or monitor your online activities. In addition, it can enable access to websites that may be restricted within certain regions. How amazing is that?
Don’t worry about setting up proxies, it’s quite simple. Go through these steps and start enjoying free surfing immediately!
Using a proxy server has a number of advantages. All the internet traffic originating from this device passes through this channel before being delivered to its final point. Therefore no one can tell where you are going or what you are doing online.
So after all that, let us move into knowing how can I set up a proxy server on my Android mobile phone.
Requirements: What You Need to Configure Proxy on Android
To get started with setting up a proxy on your Android mobile network, you’ll need a couple of things:
- A proxy service account. These range from free to paid services which can be found by searching online depending on what suits your needs.
- Proxy server details. Once signed up the service should provide you with its details such as address, port number, user name number username, and password for their servers but not all of them do so you might need to contact them about it.
- A proxy app for Android. This involves a proxy app specifically designed for Android devices. You may find that certain proxies offer their own software while others are accessible through third-party applications on the Google Play Store.
Having these handy will make the setup process a breeze. Once you have your account and proxy details ready, you’ll be just a few steps away from browsing the internet with more freedom and privacy!
Why Would I Need A Proxy Server On Android?
First, why would you ever need Android proxy settings? Even in this day and age, when you have robust mobile data service providers, why spend your precious data when you can use the Wi-Fi of your school, university, or even office? Now, say, you are trying to have access to your favorite site in your school or office, but thanks to IT admin preventions and restrictions, you can’t just get past it.
While Android proxy could be your savior that time, you can also consider opting for a VPN for Android. Maybe you wish to access geo blocked websites whose access is not permitted in your country.
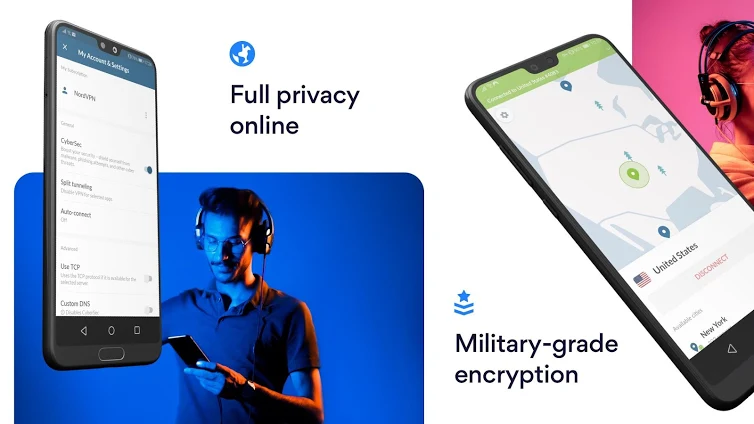
For instance, NordVPN is undoubtedly one of the best VPN options. It lets you enjoy private and secure internet access with just one tap.

Here are some of its key features –
1. Change your IP address and appear as if you are using the internet from a whole different region. It astonishingly has servers in over 60 countries
2. Immaterial of where you are using Wi-Fi, your data is safe as it is not exposed
3. You can rest assured of the speed, thanks to over 5700 servers worldwide
Also Read: The Difference Between VPN And Proxy
You see, while you already have a brilliant option in the form of a VPN, let’s quickly go over the steps on how you can set up Android proxy server. These steps are simple and easy to follow and will work just fine on all Android device running Android version 4.0 onwards –
Steps To Configure Proxy Settings For Chrome Android And Other Web Browsers –
| Quick Solution:
You can set up a proxy server on your Android device right from the phone’s settings menu. First, find the “Network & Internet” settings, then select the mobile network you’re connected to. Tap on the advanced options or manual setup, and look for “Proxy” settings. Here, you can enter the proxy server details like the hostname or IP address and port number provided by your proxy service. |
Note: The device used for the purpose of this blog is Samsung Galaxy M20. The settings and steps for operating proxy server settings may slightly differ on your Android device.
Follow these simple steps to configure proxy server on Android:
1. Open Android settings marked by the gear icon or tap and hold on the Wi-Fi icon
2. Now tap on the name of your Wi-Fi
3. Tap on Advanced
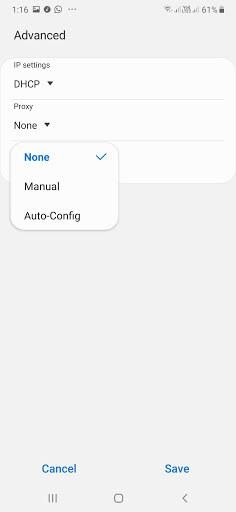
4. You will see a dropdown under the Proxy option. Now, it is important to understand each of the heads – None, Manual and Auto-Config
1. None:

As this name suggests, this is when you don’t want to have an Android proxy.
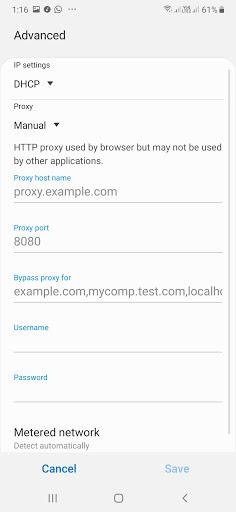
2. Manual:

Here you will be able to enter Android proxy server settings manually. You will now be able to enter your Proxy host name and the name of the website that you wish to enter or bypass.
Where would you use a Manual Proxy?
Android does not support WPAD (Web Proxy Auto-discovery protocol) which is sometimes used by organizational networks to distribute proxy settings. It is under this circumstance that you will have to mention a manual proxy host name as mentioned above.
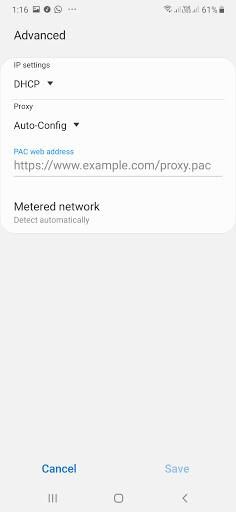
3. Auto-Config:

The Auto-Config or the Proxy Auto-Config is an option which might not be present in the older variants of Android. When you choose this option you will be required to enter the PAC web address which will have a .PAC file. Now, this is something that you will have to acquire from your network administrator.
In The End:
Though we have written the above steps for the majority of Android devices, if the steps are different in your Android device, we’d like you to mention the exact steps that you have taken to operate Android proxy settings on your device in the comments section below. Also mention the name of your Android device as well.
And, while you are browsing, do read our other tech related posts and stay updated of all our content by following us on all social media platforms, the links of which are mentioned below.
Read Next:
Google Backup Is Not Working On Android? Follow The Below Fixes!
How To Change Notification Sound on Android


JackgoesInternational
depends what kind of proxy you are using, but the hassle of setting it up yourself is not that worth it, because modern proxies and VPNs tend to do it for you. For example, as you've mention NordVPN, you really don't need to do any of that once you've installed their application. Automatically you can connect to a server and there you go. It is done, also with the times we are having and everyone working from home.
Sarang Bhargava
Hey Jack, Hope you are doing well. Thank you for your feedback. Really appreciate it.