
Gmail, being the first and forever choice when it comes to selecting an email client, should remain organized and easy to navigate through. But since the use of our Gmail IDs is not limited to professional use, it accounts for several Labels created, hence, cluttering the sidebar. Moreover, there are different sections for by tweaking up the Gmail Settings Inbox, Drafts, Sent Mail, etc. Plus, there are sections to navigate through Google Meet and Hangouts Chats.
Now we know there is a simple way not to get distracted by this cluttered sidebar on Gmail. And that is to click on the “Hamburger button on the top-left corner of the screen and hide it temporarily. But that doesn’t cut it and does not make any difference. But in this, we are discussing the ways you can take care of the real problem and clean up the Gmail Sidebar.
How to Clear Gmail Sidebar by Disabling Hangouts Chats and Google Meet
Step 1: Open up your Gmail account on the web browser on your computer.
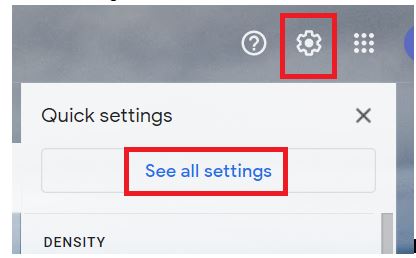
Step 2: Click on the Settings button, which is signified by the Gear Icon on the Gmail homepage on the web browser.
Step 3: This will lead you to a drop-down menu, where you have to select and click on See All Settings.

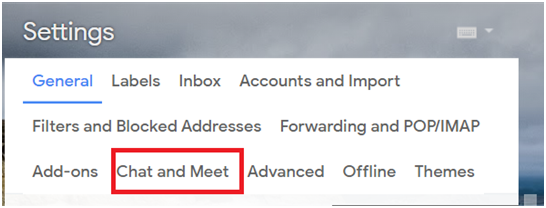
Step 4: In the Settings menu, head to the tab called Chat and Meet.
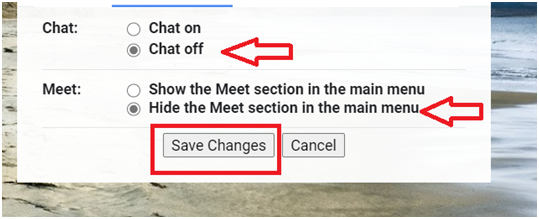
Step 5: Now, to disable Hangouts Chats, go to the Chat section and click on the button for Chat Off.
Step 6: To disable the Google Meet section, go to the Meet section and click on the button that says, Hide the Meet Section in the Main Menu.
Step 7: Refresh or Reload the Gmail webpage, and you’ll notice that both Hangouts Chats and Meet section has been removed from the Gmail sidebar. You can always reverse the changes using the same process and toggling both sections ON.
Read More: How To Create & Send A Group Email In Gmail
How to Clear Labels Section from the Gmail Sidebar
Labels is probably the most cluttered section on the Gmail sidebar. Most people assign multiple labels to different categories of emails, such as Office, Personal, etc. This accounts for a long Gmail sidebar with options dropping down to infinity. Now there are two types of labels created on the Gmail sidebar.
- System Labels
- Personally Created Labels
Here’s how you can get rid of the labels that aren’t necessary anymore and clear the Gmail sidebar:
1. Clearing System Labels from Gmail Sidebar
Step 1: Head back to the Settings menu via the Gear Icon.
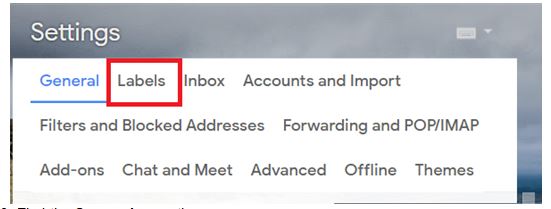
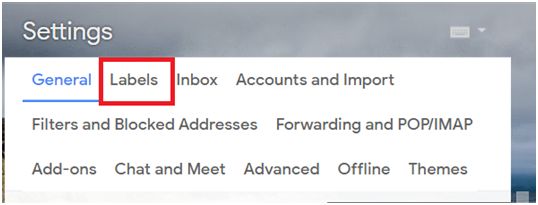
Step 2: The second section in the Settings menu is for Labels. Click on it.
Step 3: Under the System Labels section, you’ll see the system labels such an Inbox, Sent, Drafts, Scheduled, Spam, Trash.
Step 4: You get three options to choose from:
- Show, which will permanently keep the label on your sidebar.
- Hide, which hides the label from the sidebar
- Show if Unread, which will only show the label in the sidebar when an email is
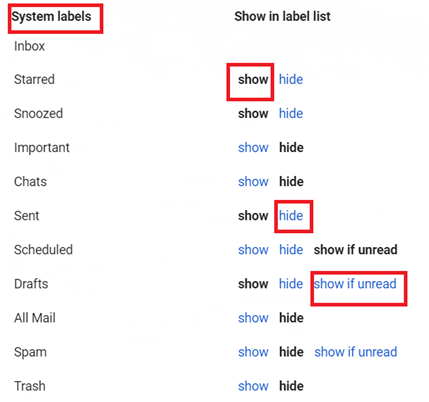
Step 5: Choose the option Hide or the irrelevant ones such as Spam and Trash. However, it’s recommended to use the Show if Unread option wherever possible.
Step 6: Review the sidebar after choosing the suitable options, and you’ll notice you’d have reduced the number of labels on the Gmail sidebar.
Note: The labels hidden are not permanently disabled. You can always click on the More button to expand the sidebar and view hidden labels. It compacts the length of the sidebar.
2. Clearing Personally Created Labels
There are labels that you create to mark the crucial emails consisting of highly significant conversations or documents. For example, I correctly labeled the emails I received at the time of my interview to quickly retrieve the related documents if I need them ever in the future. Here’s how to manage them and clear the sidebar:
Step 1: In the same Labels category in the Settings menu, you’ll also find a category named just Labels with a Create Label button below it.
Step 2: Here, you’ll find the personally created labels listed all together.
Step 3: Here again, you’ll be able to choose from different options:
- Show in Label List, which will list the labels under Labels
- Show in Message List, which will place/hide labels under the Inbox
- Remove/Edit, which will either Remove the label or will let you rename it.
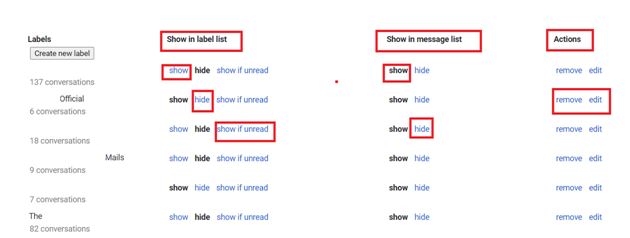
Step 4: Take the relevant actions for all the labels and then see the decluttered sidebar.
You can always see the hidden labels in the More section.
Read More: Easy Steps to Auto-Delete Emails in Gmail and Reclaim Lost Space
How to Edit the Categories
Categories section involves the pre-created categories that Gmail uses to filter the emails. This includes categories like Social, Updates, Forums, Promotions, etc.
Step 1: Head back to the Settings menu via the Gear Icon.
Step 2: The second section in the Settings menu is for Labels. Click on it.
Step 3: Find the Categories section.
Step 4: Here again, you’ll be able to choose from different options:
- Show in Label List, which will list the labels under Categories
- Show in Message List, which will place/hide labels under the Inbox.
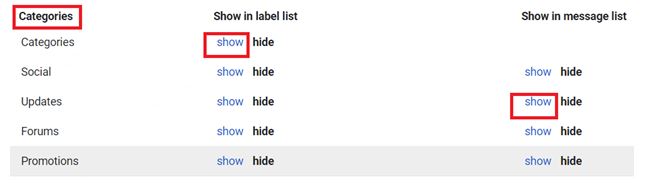
Step 5: Take the relevant actions for all the labels and then see the decluttered sidebar.
You can always see the hidden labels in the More section.
Now our long list of labels, sections, and categories have been removed and placed under the More section, thus helping us to clear the Gmail sidebar.
You May Also Like:
Send Emails To Multiple Recipients Using Mail Merge in Gmail


mariya jonsan
As i am not aware of this tricks but now i got it will try it once.