
Let’s face it, ads are everywhere these days. They bombard us on websites, lurk within apps, and can be downright disruptive. While some ads can be helpful, many are intrusive and annoying. If you’re an Android user who’s sick and tired of dealing with constant ads, then this guide is for you.
On your Android phone, these unwanted pop-ups and banners can disrupt your gaming, social media scrolling, and even your online homework. But what if there was a way to silence the ad clutter without complicated apps or messing with your phone’s settings too much? We’re going to explore the world of Private DNS and show you how to leverage it as a powerful DNS ad blocker.
This guide dives deep into how to leverage Private DNS to block ads on your Android device, offering a smoother, ad-free experience. No more interrupting pop-ups, no more data-guzzling video ads – just you and the content you crave.
What is Private DNS, and How Does it Block Ads?
Imagine your phone or tablet as a car navigating the internet. To find websites, it needs directions. This is where DNS (Domain Name System) comes in. It acts like a giant phonebook, translating website names (like TweakLibrary) into numerical addresses (like 8.8.8.8) that your device understands.
Private DNS takes this a step further. It allows you to choose a custom DNS provider, one that can filter out ad-laden domains before they even reach your device. Think of it as a smart detour that avoids traffic jams (ads) on the information highway.
How Does Private DNS Block Ads?
When you enable Private DNS, your Android device bypasses your ISP’s DNS servers and connects directly to the DNS server of your choice. Here’s how it works:
- DNS Resolution: When you visit a website or use an app, your device sends a DNS query to resolve the domain name. Instead of relying on your ISP’s DNS, Private DNS directs the query to a different server.
- Ad Blocking: Some DNS servers are configured to block known ad-serving domains. When your device queries these servers, they return null or invalid IP addresses for ad domains, effectively preventing ads from loading.
Read Also: What Does My ISP See When I Use A VPN
Benefits of Blocking Ads with Private DNS
- Say goodbye to intrusive ads that slow down your browsing and disrupt your flow.
- With fewer ads to load, websites will generally snap open quickly.
- Ads can guzzle your mobile data. Blocking them helps you conserve precious data for what matters.
- Many ad networks track your browsing habits. Blocking them can limit their ability to build a profile on you.
Here’s How to Use and Set Up Private DNS for Ad Blocking
Before we start setting up DNS you must know these important considerations
- Limited functionality on some apps: While Private DNS can block ads on most websites and apps, some apps might have built-in ad servers that they can’t reach. In such cases, you might still see ads within those specific apps.
- Potential for website breakage: In rare instances, using a custom DNS server might cause some websites to malfunction. You can always switch back to your default DNS provider if you encounter any issues.
The good news is that using Private DNS to block ads is a breeze. However, keep in mind this feature is only available on Android 9 Pie (or later). Here’s a step-by-step guide:
Choosing the Best DNS for Ad Blocking
Several reputable DNS providers offer ad-blocking functionality. Here are a few popular choices:
- AdGuard DNS (dns.adguard.com): A well-known ad blocker with a free tier that offers basic ad blocking. They also have a premium tier with additional security features.
- NextDNS (f62761.dns.nextdns.io): Another popular option with a free tier that provides good ad blocking. They also offer advanced features like parental controls (requires a paid subscription).
- Cloudflare DNS (1.1.1.1): While not specifically designed for ad blocking, Cloudflare DNS offers good privacy protection and can incidentally block some ads.
Now follow the steps below:
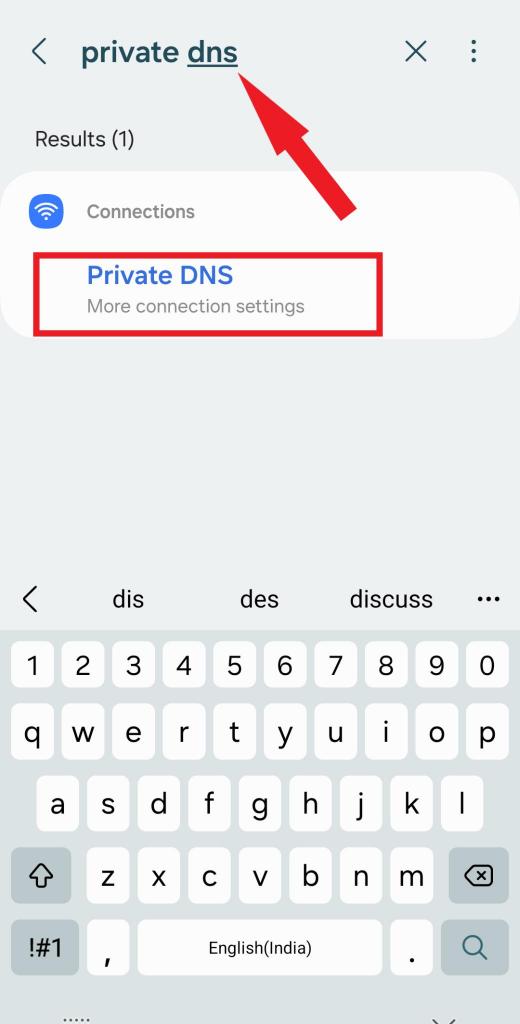
Step 1: Open Settings of your Android smartphone.
Step 2: Click on the Search icon from the top-left corner of the screen and type ‘private DNS’.
Step 3: Now click on the Private DNS option.
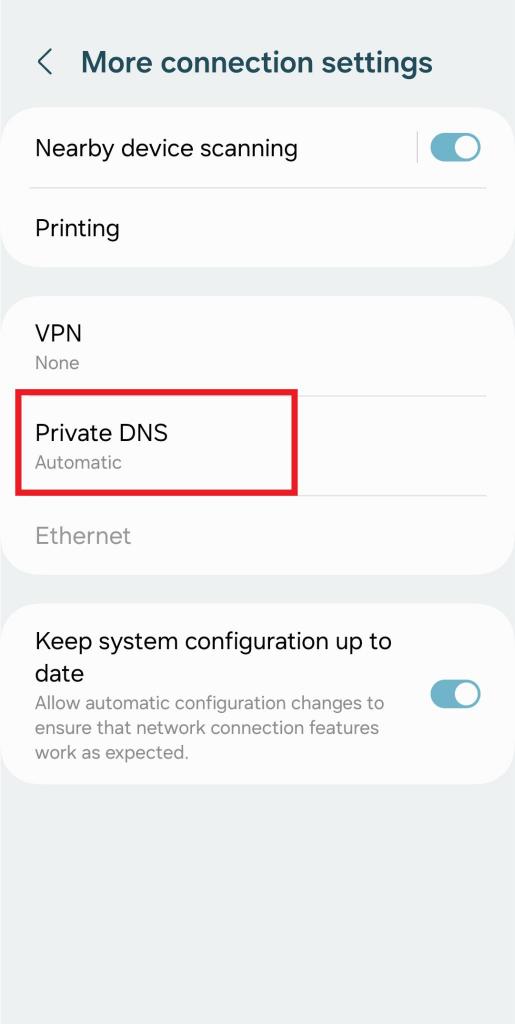
Step 4: Again here, click on Private DNS.
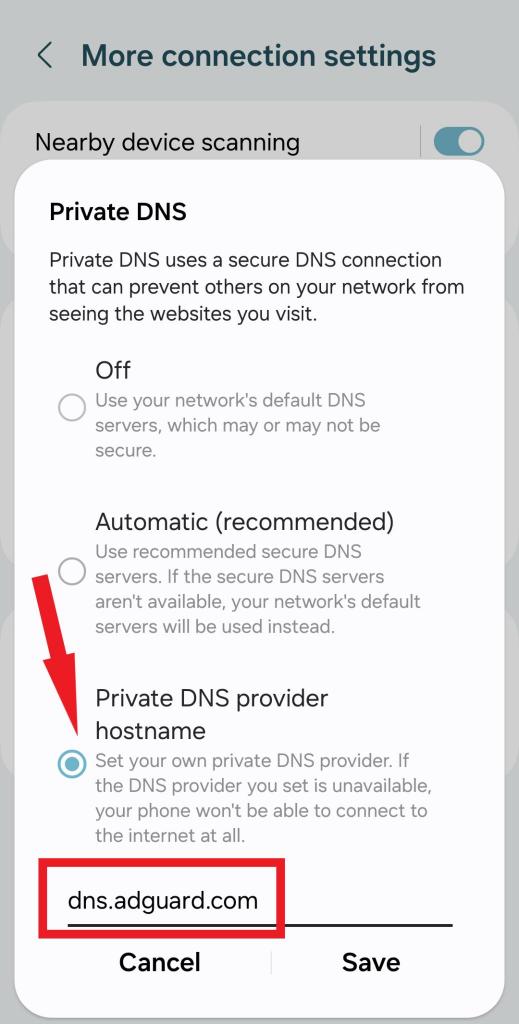
Step 5: Choose the Private DNS Provider hostname option.
Step 6: In the hostname field, enter the address of your chosen DNS ad blocker.
Step 7: Tap on Save.
Note: It’s important to understand that employing a private DNS primarily blocks ads originating from third-party hosts. However, it’s worth noting that certain websites host their ads, which may still appear despite using a private DNS. This includes platforms like YouTube, including YouTube ads.
Read Also: How to Clear DNS Cache on Android Devices
Final Thoughts on Blocking Ads on Android Using Private DNS Ad Blocker
Remember, while Private DNS might not be a silver bullet that vanquishes every single ad, it’s a powerful tool that significantly reduces those intrusive interruptions. Now you can focus on the content that truly matters, whether you’re crushing candy in your favorite game, scrolling through social media, or tackling online homework.
So go forth and conquer the ad-infested internet with your newfound Private DNS knowledge! If you have any questions or want to share your ad-blocking experiences, please comment below.


Leave a Reply