Every device be it a laptop or a computer comes with a serial number that can anytime be used to get support from the tech department. Model number is the first thing that is asked while you seek any technical support. This is why it is important to know what is the serial number of the laptop or computer you use. On Windows 10, you can check for the computer serial number using many ways.
Generally the serial number is there on the sticker at the back or bottom of your computer or laptop. But there are times when you cannot find the computer serial number or the sticker is torn off, you can check the serial number through Basic Input/Output System (BIOS) or Unified Extensible Firmware Interface (UEFI) on your motherboard. However, there are a few ways that can help you retrieve information and get a serial number using PowerShell and Command Prompt on Windows 10.
In this article, we would be telling you how to find the serial number of a laptop or desktop computer. The computer serial number can be retrieved using command lines.
Find A Computer’s Serial Number On Windows 10
Using commands is useful to automate the process and makes it easy to retrieve serial information from multiple devices. Here are two ways to find a serial number of your computer:
1. How to find computer serial number using PowerShell
2. How to find serial number of a PC using Command Prompt
How To Find Computer Serial Number Using PowerShell
Follow the steps below to get a serial number using PowerShell on your Windows 10 computer:
- On your computer, open the Start menu.
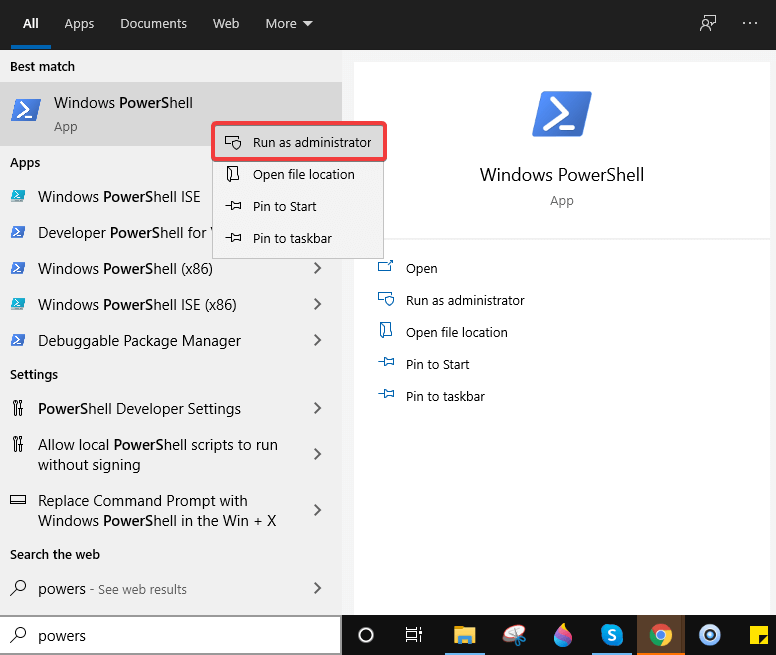
- Search for PowerShell and from the results displayed, right-click on the PowerShell app result and click on Run as administrator.

- Now type the command listed below to find a serial number of your computer. Type in:
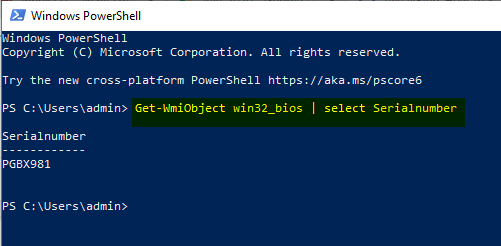
Get-WmiObject win32_bios | select Serialnumberand press Enter.

- Now confirm Serialnumber information.
- Once you get the serial number of your computer displayed, you can extract it out in a text file using the following command:
Get-WmiObject win32_bios | select Serialnumber > PATH\TO\EXPORT
Once you complete the steps, you will clearly get to know the serial number of laptop or computer.
How To Find Serial Number Of A PC Using Command Prompt
The other way to find the serial number of your computer is through Command Prompt settings. Follow the steps below to get the serial number of your PC.
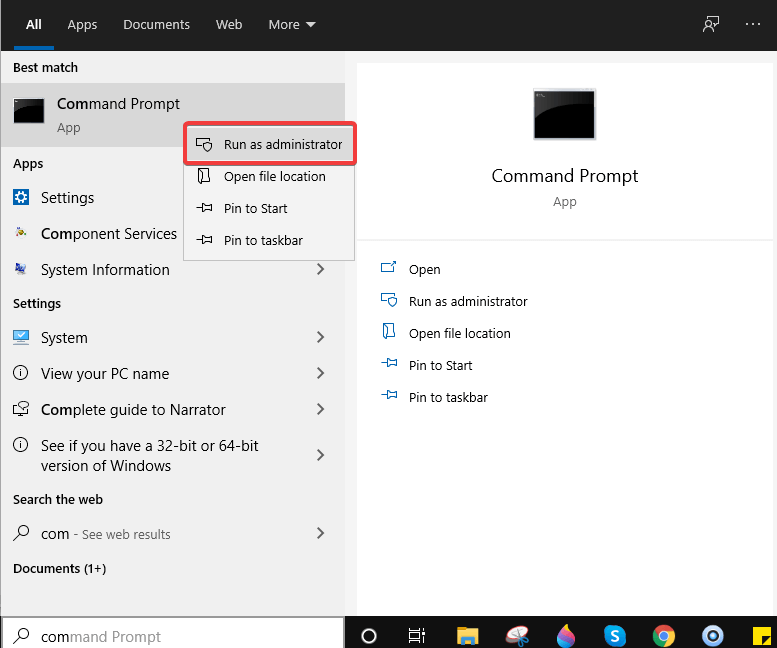
- In the search box, type Command Prompt.
- Right click on the result displayed and click Run as administrator.

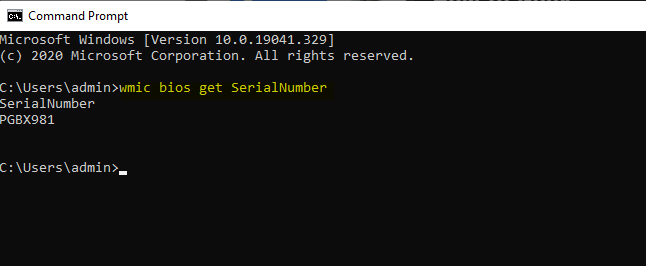
- Type the following command ‘wmic bios get SerialNumber’ and press Enter.

- Confirm the serial number and to export it on your PC, type in a command:
wmic bios get SerialNumber > PATH\TO|EXPORT.
Make sure you replace the ‘PATH\TO\EXPORT’ with the location on your PC you want to export the text file. This is it! You can now see your computer’s serial number as and when needed by opening the text file using Notepad or other apps.
Wrapping Up
That’s all folks! You can get your computer serial number using the ways above. If you couldn’t find the serial number of your computer for some reason, you can look out for your proof of purchase like buying a receipt. The process to determine computer serial number is quite quick and easy. Follow these steps and let us know if you were able to get your PC’s serial number or not.
Drop us a note with your suggestions and keep reading Tweak Library for more updates.
Recommended Readings:
Customize Command Prompt in Windows 10 And Make It A Bit More Personal
How to Fix The Frozen Windows 10 Taskbar
Use Command Prompt Like A Pro – All About Command Prompt


Leave a Reply