Now that mostly all Mac users are using macOS Mojave, it’s time to explore what latest macOS Mojave can do. Trust us, it can do a lot more than you can imagine without any third-party tools.
Mac and MacBooks with tons of inbuilt functions can do things that Windows 10 needs third party tools for. Mac machines allow users to perform different activities like photo editing, digitally signing PDF, taking screenshots, using iOS dark mode and performing other tasks.
Here in this guide, we will explain how to take screenshots on Mac, change the file format of screenshot, you can do all these things.
These Mac tips and tricks will not only increase productivity but will also save you precious time.
1. How to take a screenshot on Mac
For Windows 10 users, taking screenshots is tricky. To capture complete screen they need to press Print Screen keys. To take screenshots of the active window they need to press Alt + Print Screen. Moreover, to capture a specific region, scrolling windows and to edit screenshots they need to use tools like TweakShot. This is a hassle for Windows 10 users as sometimes keyboards aren’t compatible with the shortcut. Luckily, for Mac users, there’s nothing like this.
To screen capture on Mac you can use a powerful screenshot tool added by Apple to Mojave. To open it press Shift+ Command (⌘) +5 all keys together. Alternatively, you can head to Launchpad > Other > Screenshot.
Here, you will see different options to take a screenshot of active windows, entire screen, or a custom section of the screen.
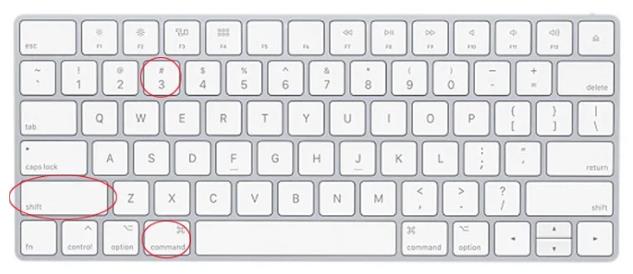
To screen capture the complete screen on Mac press Shift+ Command (⌘) +3.
To take a screenshot of a selected window on Mac press Shift+ Command (⌘) +4. This will change the pointer to a crosshair, select the area that you wish to capture. Press spacebar to change how selection moves while you drag it. When done release the spacebar.
To take a screenshot of a window on Mac press Shift+ Command (⌘) +4. You will see a pointer changed to a crosshair. Press spacebar to change it to the camera so that you can highlight the window. Once done click the mouse to take a screenshot.
Note: All screenshots are saved on the desktop in .png format.
Moreover, you will also get options to capture recorded video, including the entire screen or a custom section of the screen.
You can choose where you want to save screenshots and use other options to set up a timer and others. An options drop-down menu allows you to choose where to save screen capture mac, set up a timer, and other options.
To take a screenshot of Touch Bar, press Shift+Command+6.
Using these key combination you can take easily take screenshots on Mac.
2. Change the location to save screenshots on Mac
By default, screen capture mac on Mac is saved on the desktop. To change this you’ll need to create a folder. Once done head to Terminal here enter defaults write com.apple.screencapture location. Note there will be a space at the end of the command. Now drag the newly created folder into terminal and press Enter.
This way all the screenshots you take on Mac Mojave will now be saved into this folder.
Note: This folder cannot be deleted until a new location is given to save screenshots.
3. Enable Dark Mode in iOS
Want to give your eyes a break? Why not use iOS Dark Mode introduced in Mojave and make those bright screens dark? To use iOS dark mode head to System Preferences > General > Appearance: Dark. This will change Mac Mojave to iOS dark mode. This means every window, application, program including Safari, Finder will become dark.
4. Editing photos in Mac
With each new update, Apple changes the way you interact with saved files. In mac OS Mojave you can edit photos and videos without opening them. To do so click on a file and hit the spacebar. This will make you view a selected file in Quick view with a horizontal view. From here you can edit screenshots like crop, rotate photos, cut audio, create PDF by selecting multiple files and a lot more.

Changes made to the photos in Quick View can be overwritten, undo, saved in a separate document. Moreover, you can share a file using AirDrop and Mail. You can also edit metadata and do a lot more from Quick View.
5. Sign PDFs without printing
We are so advanced, yet we print important documents to sign and agree to the terms. When a PDF is received on email instead of printing it, you can sign it in the Mail straight away.
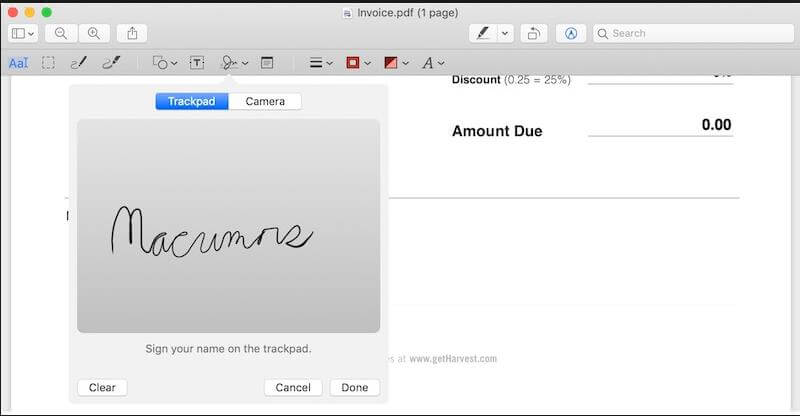
To do so, drag PDF into the email you wish to send. Hover over it to bring a little button to appear at the top right corner. Click on it, to get options including the one that allows you to sign documents in the mail. In addition to this, you can use a webcam to scan signatures or can use the trackpad to draw your signature.
6. Split Screen on Mac

Want to work with apps side-by-side and make things easy? Worry not you can get this done by simply clicking, holding and dragging green maximize button, on the left or right-hand side of the display. This will make space for the second window allowing you to snap another window onto the free space.
7. Find Wi-Fi password of other devices
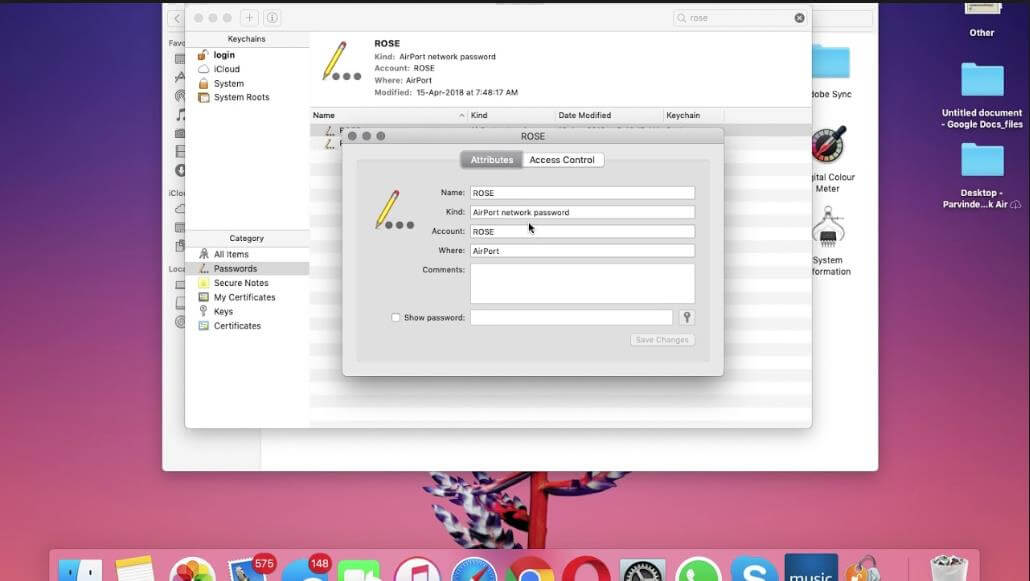
One unique thing Macs are capable of that Windows can’t is remembering all the passwords and recalling them. Keychain Access the in-built software keeps all your private details. This feature is helpful when you forget your own Wi-Fi password, To use Keychain on Mac head to Spotlight and type Keychain. Next, look for the connection you want to get the password for, double click the corresponding SSID > click ‘Show password’ > enter the Keychain password set earlier. This will show the Wi-Fi password of the selected connection.
8. Email huge files Right Backup
Emails aren’t meant for file transfer still we all do it. But the problem occurs when the email provider does not allow sending attachments over a particular size. This means sending large files over email is a no-no.
But when you have Right Backup – cloud backup tool around, this problem can be easily solved. Using this tool you can email big files. What happens is that the file is uploaded on the cloud and then the link of the uploaded file is sent to the recipient via email. In addition to this, since Right Backup is a web-based tool you can access it on any device from anywhere, anytime.
9. Paste text without keeping its formatting
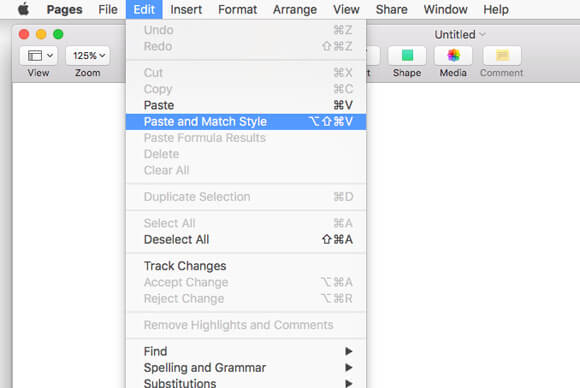
When a text is copied from an application especially from a web page, it’s formatting such as text size, font style, and others are copies. Due to this when this text is pasted its looks out of place and readability is affected. Therefore, to paste text without formatting instead of using Command+V, keys combination use Option+Shift+Command+V keys combination.
Windows 10 users can use the “Paste Special” option present in the context menu.
10. Partition external hard drives
Only a few mac users know that Mac uses a different file system than Windows computers. This means if you want to use the same external hard drive between both Microsoft and Apple systems, you have only a few options. If you format it to the exFAT file system to take advantage you will miss out on faster write times.
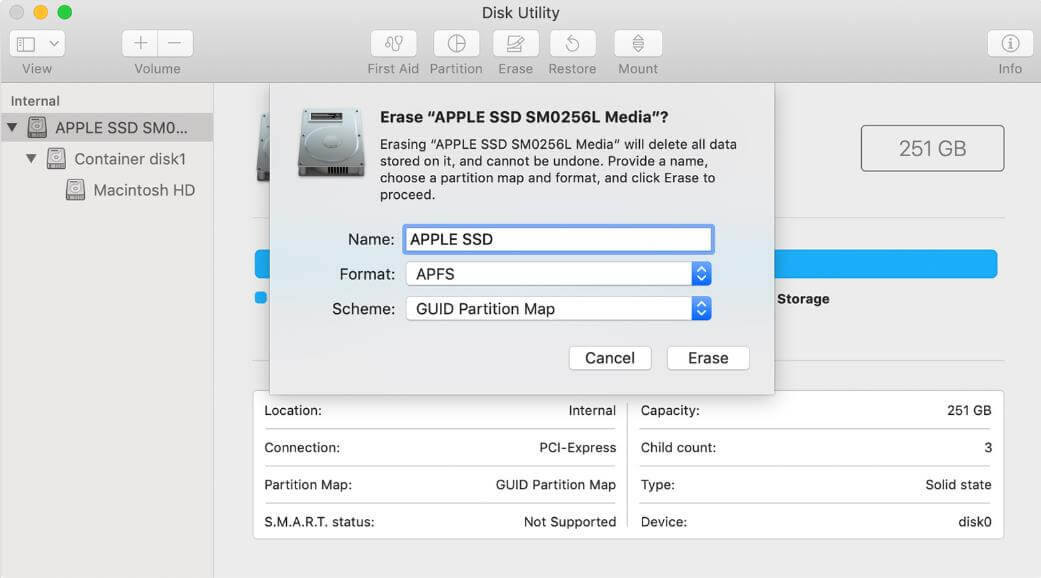
To overcome this problem you can use Disk Utility feature to partition the hard drive and make one volume compatible with macOS i.e. NTFS file system and others with Windows. This way you will be able to make it a perfect little hybrid device. To learn how to use NTFS drive on Mac click here.
With these quick tips, you can get the most out of your Mac machine without needing to install any third-party software. If we missed on any tips that you think will help other Mac users do share.
Related Reads:
5 Methods To Take Screenshots On Windows 10 PC
How To Take A Screenshot On A Chromebook?

Leave a Reply