Since split screen is an extremely helpful feature (irrespective of the device you are using), it brings nothing but an overall easiness in work. Additionally, the ways to enable split screen aren’t complicated as well so I think there are no barriers if you wish to use split screen on your device.
Today we would be talking about using split screen on Windows 10 PC in the easiest ways possible. Now that everyone is contributing towards tech development, you can find many ways to use split screen view on WIndows PC. You may find various third party services that can help you split screen on Windows 10 PC successfully. However, you must always go with the in-built features & then look outside if things aren’t going as planned.
Also Read: How to Use Split Screen on Android
How to Use Split Screen View on Windows 10 PC
In order to use the Windows split screen, first you need to identify those prerequisites so there wouldn’t be any barriers. So before using Windows split screen, let’s look out those initial criterias that need to be fulfilled:

Thankfully, there isn’t a list of prerequisites that need to be taken care of as all it takes is to enable Split Windows on your PC (as mentioned below):
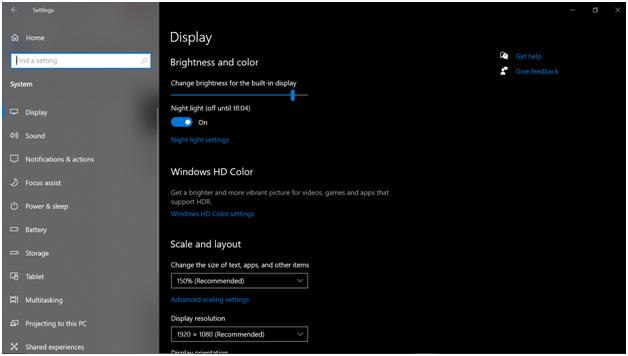
1. Navigate yourself to the Settings section on your Windows 10 PC (either by tapping on Windows icon or using Windows icon + I).
2. On the Settings page, you need to tap on the System category from the given list of options.
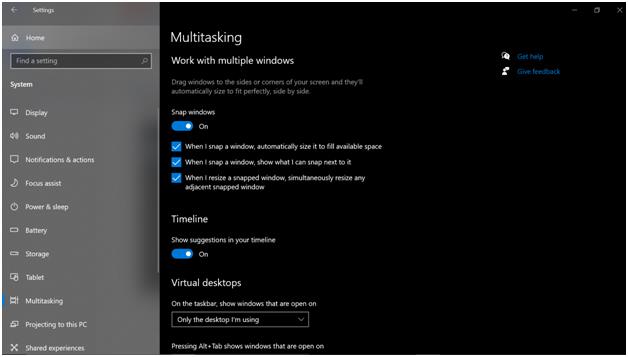
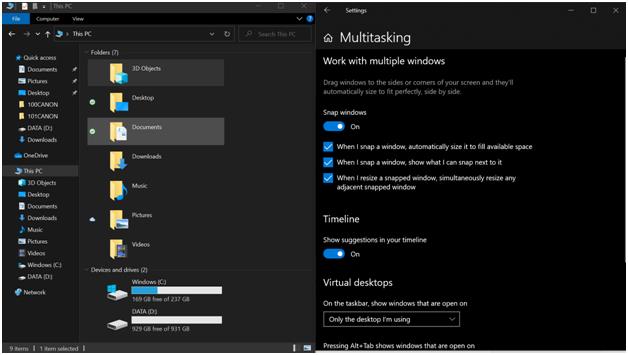
3. Here you need to select the Multitasking feature (left side of the screen).
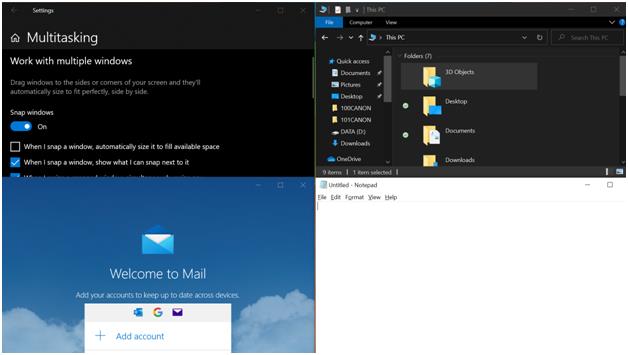
4. On the Multitasking page (under System category), you need to make sure that Snap Windows option is enabled. Also, all the options under Snap Windows must also be enabled (if not, do so).
How to Use Windows Split Screen on Windows 10 PC (2 screens)
Please know that not only one, you can split screen on Windows 10 in more than 2 sections. Yeah!! Normally, you can use split screen on different devices upto two screens, however, Windows allows to split it into more than 2 screens successfully. So let’s get to know how to use Windows Split Screen view (2 screens) on your PC:
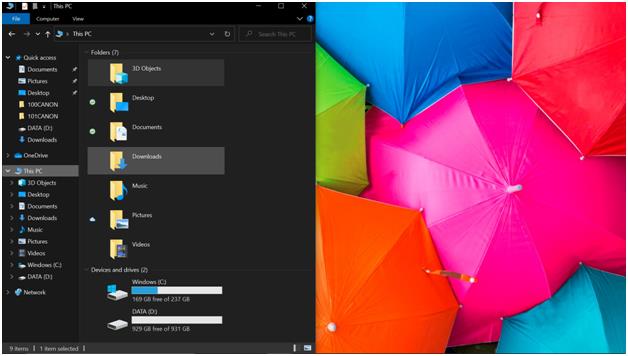
1. Considering that the Split Windows option has been enabled, launch any window that you wish to split on your Windows 10 PC screen.
2. As simple as you can imagine, all you need to do is press the Windows key on your keyboard; also, tap on the arrow key as well. You can choose arrow keys according to your preference (left or right).
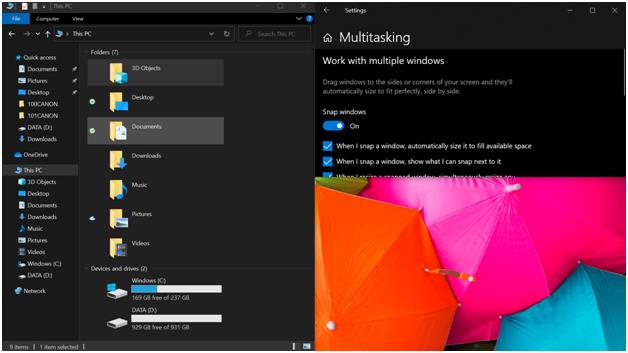
3. According to which side you prefer, your very first launched window will be put on that side. And whatever window you choose to put on the other side of the screen, launch that window & follow the above mentioned same process.
4. Doing so will split Windows screen into 2 sections where you can easily use both applications at the same time. Voila!! You have started using the Windows split screen successfully in no time.
Also Read: How to Use Split-Screen on iPhone or iPad
How to Use Windows Split Screen Mode on your PC For 3 screens
As we mentioned before, your Windows operating system allows you to use the split screen in more than 2 screens without any hassle. And to split Windows screen in 3 screens, let’s check out the steps as below:
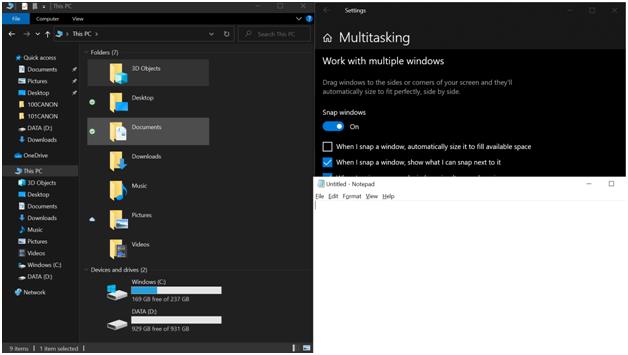
1. You need to keep the Windows split screen (2 screens) enabled and then tap on the right side of the window to select it.

2. Post that, tap on the Windows icon on your keyboard & press arrow (Up) key as well.
3. Doing so will split the right side of the already split screen into two and you will be able to fill that blank section with any of the open windows.
4. You can choose any of the opened windows (shown in a block format) and that will be your 3rd split screen on Windows 10 PC. Simple!!

How to Enable Windows Split Screen view on your PC (4 screens)
Yeah!! You can easily & successfully use 4 split screens on your Windows 10 PC. And to do so, you need to keep those 3 split screens open so that the 4th screen can be split successfully. To do so, you need to start with selecting the left side of the split window open.
1. After selecting the left side split screen, press Windows key as well as the arrow (Up) key so that the left side (bottom) becomes free.
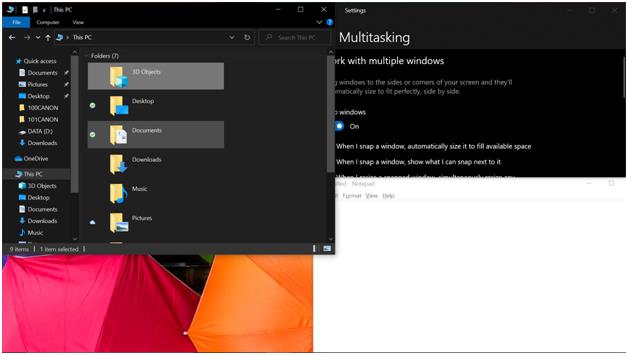
2. Same steps we used to split your system screen in 3 screens, you same steps need to be followed this time as well, but this time it will be on your PC at the left bottom side. Choose the application that you wish to keep as your system’s 4th split screen & it will pop up in the middle space.
3. Here you need to drag that same 4th split screen on your left side of the screen (bottom) and all your 4 split screens will be in front of you to be accessed. Easy peasy!!
Split Screen on Windows 10 PC & Make Work More Efficient:
If I’m working on a task where I need to look into one window for information to make something new onto the next window, a split screen can be useful. Working on MS excel, powerpoint, or data files, split screen becomes very handy so it’s important to know how to use this feature. Here we are talking about using Windows split screen & making your work more efficient. So explore all above mentioned ways to split screen on Windows 10 PC and make the most of it.
Recommended Readings:
Use two Mac Apps Side by Side in Split View: Multitasking Made Easy
How To Get Rid Of A Flashing Screen On Windows 10 After Upgrade


Leave a Reply