You might have come across the term hardware acceleration. As while troubleshooting various error messages on browser or browser dependent apps you have been advised to disable the hardware acceleration. So in this article we will learn in detail on how to disable hardware acceleration in Chrome and Firefox, two most used browsers.
What is Hardware Acceleration in Chrome?
Before learning the various ways to disable hardware acceleration, let’s discuss what actually hardware acceleration is. Your most preferred browser, Chrome comes with an inbuilt feature, known as hardware acceleration that helps it in accessing your system’s hardware (GPU), resulting in freeing your CPU.
Although it is an amazing feature using which Chrome can speed up the processes that are graphic intensive but on the other hand it can result in various issues like YouTube black screen.
Other than this enabling hardware acceleration in Chrome might also result in crashing and freezing.
So if you believe that hardware acceleration is the culprit for the browser related problems, then you can disable it easily by following the methods below.
Also Read: Resolution: A web page is slowing down your browser message in Firefox
Disable Hardware Acceleration In Chrome
Please note that hardware acceleration in Chrome is enabled by default. However disabling it in Chrome is a straightforward task.
To disable hardware acceleration in Chrome follows the steps below:
1. Double click on the Chrome icon to launch the browser.
2. Now click on the menu icon (three dots) at the top right corner of the browser window.
3. From the drop down menu select Settings option.
4. This will open the Chrome Setting tab. You can also open a new tab and type in chrome://settings/.
5. Scroll down to Advanced and click on it.
6. Now scroll a bit more to the System section. In the system section you will find the option, “Use hardware acceleration when available”.
7. To turn off hardware acceleration toggle off the button next to it.

8. Once to toggle off hardware acceleration you will find a new button, “Relaunch”.
Note: Before clicking on the Relaunch Tab, do make sure to save all the stuff you are currently e working on. As it will reload all the open tabs and you may lose some of your work after the relaunching of the browser.
9. Click on the Relaunch button to relaunch your Chrome browser and apply the settings.
Disable Hardware Acceleration In Chrome through Registry Editor.
We have discussed a lot many times how powerful a registry editor tool is. You can change almost any setting of Windows using Windows Registry Editor. This time we are trying to disable hardware acceleration in Chrome using Registry Editor.
1. Open Run command window by pressing Windows + R key.
2. In the Run command window type Regedit and hit Enter. This will open Windows Registry Editor.
3. In the Registry Editor navigate to the following key:
HKEY_LOCAL_MACHINE \ SOFTWARE \ Policies \ Google \ Chrome \
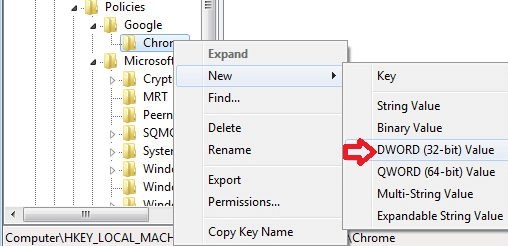
4. Now right-click on the Chrome and from the menu select New > DWORD 32-bit value

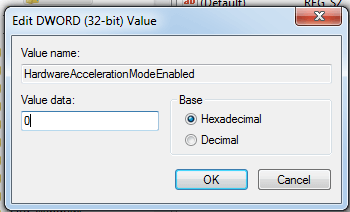
5. Assign this value a name as “HardwareAccelerationModeEnabled“.
6. To disable hardware acceleration double click the value and assign 0 in the value data field and click OK..

7. Now close the Registry Editor and restart the computer for the changes to take effect.
Disable Hardware Acceleration in Chrome on MacOS(Using Terminal)
If you are using Chrome on MacOS and wish to disable hardware acceleration then you can do it easily from Mac Terminal.
To disable hardware acceleration from terminal, follow the steps below:
1. For getting started close Chrome if already running.
2. Now from the Finder, select Go > Utilities.
3. In the Utilities folder that opens, double-click on Terminal to launch it
4. On the terminal type the following command:
defaults write com.google.chrome HardwareAccelerationModeEnabled -integer 0
5. Now press Enter.
6. To enable it back you can change the value next to -integer from 0 to 1
How to Confirm that Hardware Acceleration is Completely Disabled in Chrome
You might be thinking that how can you confirm that hardware acceleration is fully disabled in Chrome or not. So there is a quick way to confirm it.
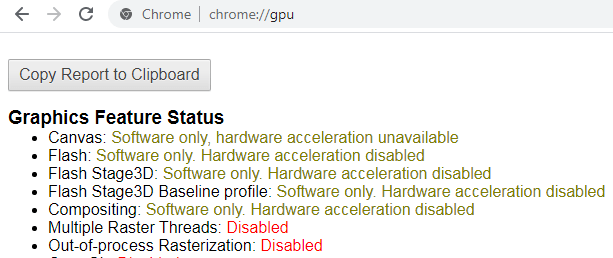
All you do is type chrome://gpu/ in the Chrome URL and hit enter.
Now, when hardware acceleration is disabled in Chrome, the items under Graphics Feature Status like Canvas, Flash etc will read as Software only, hardware acceleration disabled.

Disable Hardware Acceleration In FireFox
If you are using Mozilla Firefox as your preferred browser, then follow the steps below to disable hardware acceleration in Firefox.
1. Launch Firefox and click on the menu icon located at the top right corner of the screen.
2. Now from the drop down menu select Options to open the Preference tab.
3. In the Preference tab Select the General from the left pane and scroll down to Performance.
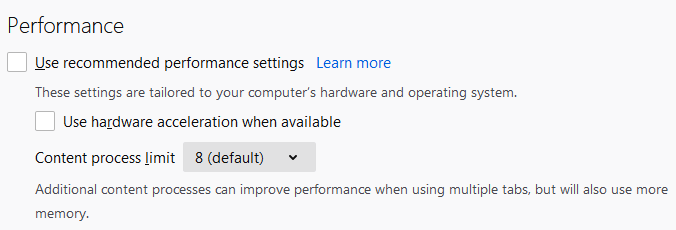
4. Now under Performance uncheck the setting“Use hardware acceleration when available”.

5. Restart your browser for the setting to take effect.
Also Read : The Best Tricks To Speed Up Firefox Browser
Wrapping Up:
It is not always when the browser related browsers are caused when hardware acceleration is enabled. As they can also be caused because of faulty extensions or an outdated version of the browser. But still we suggest you try disabling hardware acceleration in Chrome or Firefox to troubleshoot common problems related to these browsers.
So guys this all from our side. We hope that you enjoyed reading this article. Also do share your thoughts and suggestions about it in the comments box below.


Leave a Reply